Lesson 1
Overview
Did you complete the Course Orientation?
Before you begin this course, make sure you have completed the Course Orientation.
About Lesson 1
Most of us do not notice the daily and yearly changes in the sky because, frankly, we no longer have to bother! Clocks and watches have been around so long that they hardly seem to be advanced technology. Anyone can look at a calendar to tell you what the date is, and, if we are lost on an unfamiliar road, most phones have GPS functions that can help us find our way home. Even though calendars, clocks, and navigational tools have insulated us from the need to understand the motions of the sky, most of us do appreciate that our system of time and our location on the surface of the Earth can be tied directly to observations of the sky.
In this lesson, we will study the observable changes in the positions of objects in the sky and show how these data allow us to understand the relative positions and motions of the Sun, Moon, Earth, and the stars. My hope is that from this point forward, whenever you look at the sky you'll be aware of what it can tell you about time, date, and your location.
What will we learn in Lesson 1?
By the end of Lesson 1, you should be able to:
- identify the objects visible in the night sky to the unaided eye;
- describe the three dimensional geometry of the Earth / Moon / Sun system;
- describe the various motions in the sky that result from Earth’s rotation and orbit;
- explain the reason that the Earth experiences seasons;
- describe the process and appearance of eclipses and the phases of the Moon.
What is due for Lesson 1?
Lesson 1 will take us one week to complete. Please refer to the Calendar in Canvas for specific time frames and due dates.
There are a number of required activities in this lesson. The following table provides an overview of those activities that must be submitted for Lesson 1.
| Requirement | Submitting Your Work |
|---|---|
| Lesson 1 Quiz | Your score on this Canvas quiz will count towards your overall quiz average. |
| Discussion: Teaching and Learning about the Moon | Participate in the Canvas discussion forum "Teaching and Learning About the Moon." |
Questions?
If you have any questions, please post them to the General Questions and Discussion forum (not email). I will check that discussion forum daily to respond. While you are there, feel free to post your own responses if you, too, are able to help out a classmate.
Definitions
If you want to complete some additional reading beyond what is in our Lesson 1 pages, I recommend:
In this lesson, we will be using some vocabulary that may be either unfamiliar or may be used differently, in an astronomical context, from your usual usage. Normally, I advocate for discussing vocabulary in the context of a lesson, instead of presenting it like this to begin the lesson. In our case, though, I'm going to break my own rule so that we can start discussing the sky immediately and make sure that we agree on the meaning of these terms. The vocabulary you will encounter in this lesson includes:
- Altitude
- Azimuth
- Meridian (and transit of the meridian)
- Horizon
- Zenith
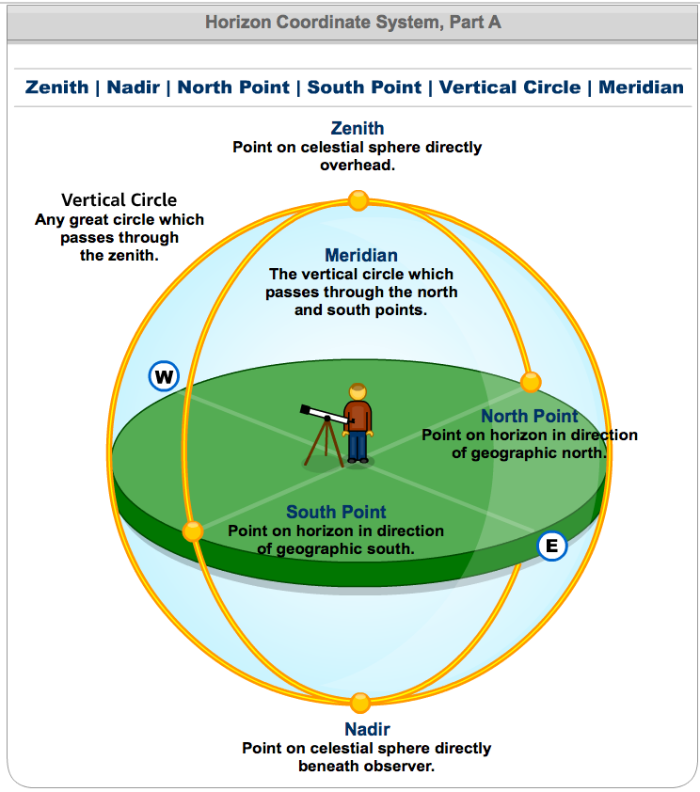
All of these terms are used to describe the location or behavior of objects in the sky. For example, you can refer to the altitude of the Sun. Or, when the Sun passes from one side of the meridian to the other, you can talk about the Sun "transiting the meridian." These terms and their meanings are illustrated using the following two diagrams. Read over the list of terms and definitions in the list and/or mouse over the terms in the image to view their definitions.
Horizon Coordinate System, Part A
- Zenith - Point on celestial sphere directly overhead.
- Nadir - Point on celestial sphere directly beneath observer.
- North Point - Point on horizon in direction of geographical north.
- South Point - Point on horizon in direction of geographical south.
- Vertical Circle - Any great circle which passes through the zenith.
- Meridian - The vertical circle which passes through the north and south points.
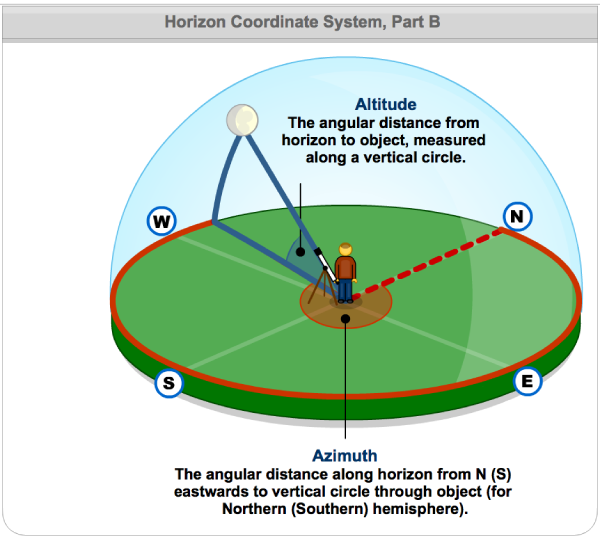
Horizon Coordinate System, Part B
- Altitude - The angular distance from horizon to object, measured along a vertical circle.
- Azimuth - The angular distance along horizon from N (S) eastwards to vertical circle through object (for Northern (Southern) hemisphere.
Day and Night
Additional Reading at www.astronomynotes.com:
The most obvious change in the sky is that for about half of the day the sky is brightly lit and, for the other half, it is dark. If the sky is clear, we can tell that the Sun is “up” during the day and “down” at night. Even though this is obvious to most observers, there is one question about day and night that took many centuries to solve:
Is the Earth stationary and is the Sun orbiting it, or vice versa?
In the three movies above, we first see the motion of the Sun from East to West that we are familiar with seeing over the course of the daylight hours on one day. In the second movie, we see a stationary observer on a stationary Earth watching a moving Sun. This would reproduce what we see of the Sun appearing to move from east to west across our sky. The last movie shows another alternative; the Sun is at a stationary location from our perspective, and the Earth is rotating, causing the Sun to appear to move.
We will discuss some of the history of this question (which is a very interesting discussion of the history of astronomy) in Lesson 2, but for now I will directly answer the question.
The Earth rotates around an imaginary line that goes through the North and South Poles, which is called the axis of rotation.
This movie shows the rotation of the Earth along the axis that goes through the North and South poles.
One can make a representation of how the rotation of the Earth makes the Sun appear to move across the sky kinesthetically: If an object is at a fixed location on a wall (for example, a clock) and I am facing it, then I can see the clock. If I rotate so that I'm facing away from the clock, I can no longer see it. While I am rotating, the clock will, from my point of view, appear to be moving. You can try this out wherever you are right now!
If the Sun is in a "fixed" location on the sky and the Earth is facing this location, then we can see it (daytime!). When the Earth has rotated by 180 degrees, we are no longer facing the Sun, so we can't see the Sun (nighttime!). From our point of view fixed to a specific location on the Earth, as the Earth rotates it is the Sun that appears to move, just like the clock in my example above. This is our modern understanding of day and night.
This has consequences beyond day and night. The Earth's rotation causes every object in the sky to appear to trace out a path on the sky from East to West. So if you pick out a star in the sky, it will appear to make an arc across the sky. This is because, for our purposes, we can consider the star to be fixed in space, and the Earth is rotating underneath it. This happens slowly, so from minute to minute you don't notice the star's motion. However, over the course of a few hours you will be able to tell that the stars have moved a substantial distance on the sky. Since, like the Sun, the stars will (for the most part) appear to rise in the east and set in the west, so the apparent motion of a star will depend on which direction you face. An example follows in a 3 second movie. In the top left panel, you see stars appear to rotate counterclockwise around the North Celestial Pole, which is what we would see if facing north. In the top right panel, you see stars rising in the east, moving along circular, clockwise paths, and setting in the west, which is the behavior we would see if facing south. The lower panel shows the stars rising diagonally from the east on the first part of this circular path, which is what we would see if facing east.
Reproducing the above animation with real observations of the stars is a popular type of astrophotography. An example is an image following of the apparent motion of the stars across the sky as seen from Mt. Kilimanjaro.

The picture was created by leaving the camera shutter open for more than three hours (Note: can you tell how long the exposure was? How might you figure this out?), so it shows the path the stars in the sky follow over a small fraction of the night. This image also illustrates another important point—the Sun and the stars all appear to rotate around one point, which is the point directly above the North Pole of the Earth for observers in the northern hemisphere (called the North Celestial Pole or NCP), or the point directly above the South Pole of the Earth (the South Celestial Pole or SCP) for observers in the southern hemisphere. There is a star that is positioned very close to the NCP, which is called Polaris, the Pole Star. It is NOT the brightest star in the sky; it isn't even in the top 25. The importance of Polaris is that it roughly marks the location of the NCP, so all stars visible to observers in the northern hemisphere appear to rotate around Polaris.
Test this with Starry Night!
- Open up Starry Night.
- Using the bar at the top, set the time to a time after Sunset, say 9:00 p.m.
- Set the time flow rate to 300x.
- Face South (if you aren't already, type "S").
- Press the play button, and watch the stars move on the sky from 9:00 p.m. - 11:00 p.m.
- Reset to 9:00 p.m. and then do the same, but facing East and then West. How did the motion of the stars differ?
We can prove to ourselves that the apparent motion of objects in the sky depends on your location on the Earth! For example, consider the following cases:
- If you are standing at the north pole, Polaris will be directly overhead. From your point of view, all stars will appear to make horizontal, circular paths around your zenith.
- If you were standing on the Earth’s equator (say near Mt. Kilimanjaro, as in the image linked above), you would have to look due North towards your horizon to find Polaris, so the stars would appear to rise almost vertically from the eastern horizon, and the point around which they appear to rotate is near or at the northern horizon.
- If you are in between the equator and the north or south poles (say in State College, PA), the point around which all the objects appear to rotate is about midway between your horizon and the zenith (at an altitude equal to your latitude, approximately 40 degrees).
Note that for observers at most locations above or below the equator, there are some stars that are near the NCP, and these trace out small circular paths that are never below the horizon. These stars that never rise or set are called circumpolar stars. The lower the altitude Polaris appears from your viewing location (that is, the closer your latitude is to that of the equator), the fewer the number of stars that are circumpolar from your point of view.
Test this with Starry Night!
- Open up Starry Night.
- Change your location to the North Pole. (Set the location to a latitude to 90 degrees North)
- Set the time to 9:00 p.m. If the sky appears to be light, you can momentarily turn off the Sun: Under the View menu or using the Display Optios you can select "Hide Daylight," which will allow you to see the stars even when the Sun is up.
- Set the time flow to 300x.
- Press the play button and watch the stars move on the sky. How many stars are circumpolar here?
- Do the same for the Equator (Latitude 0 degrees).
- Face North, South, East, and West and watch the stars move on the sky. How many stars are circumpolar here?
- How did the motion of the stars differ at the Equator compared to near the North Pole? Can you make a sketch to explain why the stars appear to move differently at these locations? It might be helpful to think about the how one's horizon at a particular location on the Earth, relative to Earth's rotation axis, limits their view of the sky.
The Path of the Sun
Additional Reading at www.astronomynotes.com:
During the day, we can see the Sun, but the bright daylight sky prevents us from seeing most other objects in the sky (on some days you can see the Moon during the day, and if you know where to look you can also sometimes see Venus).
As a thought experiment, think about what you might see if you were able to see the Sun and the stars in the sky during the daytime simultaneously.
- What stars would you see behind the Sun?
- Would you always see the same stars behind the Sun?
Test this with Starry Night!
- Open up Starry Night, set it for Sunrise, and set the time flow rate to 1 hour.
- Under the View menu or using the options tab, you can select "Hide Daylight," which will allow you to see the stars even when the Sun is up.
- If you want, to help guide your eye, you can also turn on the constellation stick figures using the View menu, the Options tab, or just by typing the letter "k" on the keyboard.
- Now, step through time one hour at a time by hitting the step forward button. Take note of the Sun's path and its position with respect to the stars.
Let's look at two movies made with Starry Night. The first illustrates the path of the Sun during one day (Sunrise to Sunset), following the instructions listed prior.
The second illustrates the position of the Sun at noon eastern on June 21, September 21, December 21, and March 21.
If you could see the Sun and the stars simultaneously, you would see that during the course of one day, the Sun would be inside one constellation (to be more specific, one of the constellations of the Zodiac). To be even more specific, realize that the constellations are made up of stars far in the background, so when we say the Sun is "inside" a constellation, we mean that we are seeing the Sun in projection in front of a specific group of distant stars.
In the first of the two movies, notice the Sun's position relative to the constellation Virgo at 7:00 AM, noon and 6:00 PM. As we discussed at the beginning of the lesson, it is the rotation of the Earth that causes the Sun and the stars to move across the sky, so we should expect that the Sun and the stars should both appear to move at the same rate. Thus, the Sun will be seen inside of the same constellation during the entire day. That is, if the Sun appears to be in the constellation of Gemini at dawn, then it will still be in Gemini at noon and at Sunset.
This is mostly correct, however, there is one effect that we are neglecting to take into consideration. The Earth isn’t just rotating in a fixed spot in space. The Earth is also orbiting around the Sun. In one year, the Earth will make a complete trip around the Sun. So, in December, the Earth will be on one side of the Sun, and six months later, in June, it will be on the opposite side of the Sun.
The second Starry Night movie shown above demonstrates that in December, when the Earth is facing the Sun, the constellation behind the Sun is Sagittarius. Twelve hours later, when the Earth has rotated so that it is night, the Earth is facing directly away from the Sun, towards the constellation of Gemini. In June, the situation is completely reversed because the Earth is on the opposite side of the Sun. The constellation behind the Sun at noon in June is Gemini, and twelve hours later, when the Earth is facing directly away from the Sun, it is pointed towards the constellation of Sagittarius.
This is reasonably easy to visualize when you think of the extreme case of the differences in the position of the Earth six months apart, but what happens on a day to day basis? The way to visualize it is as follows. The stars are so far away from the Earth that, again, for our purposes, we can consider them to be fixed. We know that the rotation of the Earth causes stars to appear to make circles or arcs on the sky that start in the east and move westward. A natural question to ask is, “How long does it take for star A to appear in the same spot in the sky one day later?” That is, let’s say that star A is “transiting your meridian” (this means that if you draw the imaginary line on the sky that connects due North to due South, the star is passing this line at this particular instant in time), how long will it be until star A transits your meridian the next time? You may be tempted to say 24 hours, but the correct answer is 23 hours and 56 minutes! If you do the same exercise for the Sun—that is, if you calculate the time between successive transits of the Sun—it is 24 hours (although it does vary over the course of the year, and some days are slightly longer and others are slightly shorter than 24 hours).
The length of time between transits for a star (any star) is called a Sidereal Day, and the length of time between transits for the Sun is called a Solar Day. The difference is caused by the slow drift of the Earth around the Sun. Because the Earth has moved 1/365th of the way around the Sun in a day, it has to rotate more than 360 degrees in order for the Sun to appear in the same part of the sky (e.g., transiting the meridian) as it did yesterday. However, since the stars are so far away, the Earth’s orbit around the Sun doesn’t affect their apparent position in the sky, so the Earth only needs to rotate 360 degrees in order for them to appear in the same part of the sky. Because of this effect, the Sun appears to slowly drift eastward compared to the background stars, and the cumulative effect of this drift is that the Sun will appear to be in Gemini in June and Sagittarius in December.
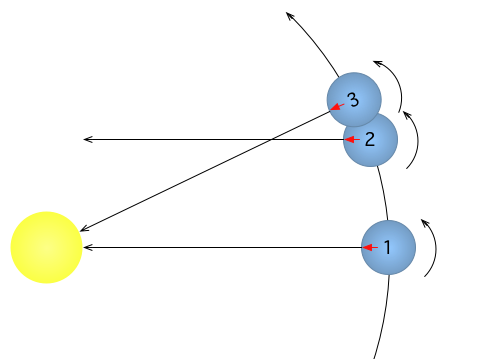
Note in the figure above that when the Earth rotates 360 degrees, it goes from position 1 to position 2, and a distant star will appear to be in the same position as seen from Earth. However, the Earth has to go from position 1 to position 3 for the Sun to appear in the same position.
Test this with Starry Night!
- Open up Starry Night, and set it for a time when it is completely dark, say 11:00 PM.
- Using the View menu turn on the Local Meridian line.
- Either adjust the time slightly or let time flow forward until a bright star is on the meridian.
- Now, from the time flow rate box, select "days" as the time step.
- If you click on the forward button, you should see that each day at the same time, your bright star that started on the meridian will get further and further from the meridian.
- Next, click the backward button so that the bright star is back on the meridian.
- Now, change the time step to be "sidereal days."
- Now, if you click the forward button, your star should remain on the meridian without moving each time you click.
The Height of the Sun
Additional Reading at www.astronomynotes.com:
We are still not done talking about the apparent changes of the Sun in the sky. You now know that the Sun appears to move from east to west because of the rotation of the Earth, and that if you could see the stars during the daytime it would appear to drift with respect to the stars by a small amount each day because of the orbit of the Earth around the Sun. The next question is:
Does the apparent path of the Sun across the sky change during the year?
Again, let’s consider two extreme cases—December and June. Think about the appearance of the Sun in winter and then in summer. If you live at roughly the same latitude as central Pennsylvania, you should remember that the Sun never gets very high above the horizon in December, but in June it passes almost (but not quite!) directly overhead. So, the apparent path of the Sun does change from season to season. You can also observe this effect if you re-run the animation on the previous page; in June, the Sun is high above the horizon, in September it is lower, and in December it is very low on the horizon.
The cause of this effect is that the axis of the Earth’s rotation (the imaginary line that passes from the North Pole through the Earth to the South Pole) is tilted with respect to the Sun by an angle of 23.5 degrees. If you go back and look at the animation of the rotating Earth on the day and night page in this lesson, you will see that the line indicating the axis of rotation is not vertical, but is offset by 23.5 degrees from the vertical. As the Earth orbits the Sun, the orientation of the Earth stays fixed, and as a result, in December, the northern hemisphere is tilted away from the Sun during the day, and in June the northern hemisphere is tilted towards the Sun during the day.
There are two consequences of the tilt of the Earth’s rotation axis:
- When the hemisphere you are located on is tilted towards the Sun, the path of the Sun across the sky will be longer than when the hemisphere you are on is tilted away from the Sun. That is, there are more hours of daylight during summer than there are during winter.
- When the hemisphere you are located on is tilted towards the Sun, the light from the Sun is hitting the Earth more directly where you are located than when the Earth is tilted away from the Sun. This means more energy is hitting each square meter of Earth during summer than winter, making summer days hotter than winter days.
Try This!
To help visualize this, you can do a simple demonstration if you have a desktop globe and a lamp with a bare bulb. Most globes are set with their axis of rotation set to 23.5 degrees from vertical. In a dark room, place the globe on a table so that the northern hemisphere is tilted towards the lit lamp, which represents the Sun. You should see that if you pick out a spot, say Pennsylvania, and then watch that spot as you spin the globe, Pennsylvania will get light from the lamp for about 2/3 of its path as it rotates on the globe. If you now move the globe to the other side of the lamp (that is, the northern hemisphere should now be pointing away from the lit lamp), this simulates Earth's position six months later. If you again pick out Pennsylvania on the globe and watch it as it spins, it will receive light from the lamp for only about 1/3 of its path as it rotates on the globe.
Note that the tilt of the Earth is neither towards nor away from the Sun during March and September (Spring and Autumn). Thus, the path of the Sun across the sky and the angle of the Sun’s rays is similar during these two seasons, which is why the length of the day and the daytime temperatures are similar.
There is a nice animated demo from PBS that helps illustrate this effect: Cycles in the Sky: Crash Course Astronomy #3.
Recall that the ecliptic is the path of the Sun across the sky; it can be represented by an imaginary circle in space. If we take the Earth’s equator (another imaginary circle) and project it on the sky, the angle between the ecliptic and the celestial equator would be 23.5 degrees because of the tilt of the Earth. Because the tilt of Earth's rotation axis gives rise to the angle between the ecliptic and the celestial equator, astronomers refer to the tilt of Earth's rotation axis as the "obliquity of the ecliptic". There are four special points on the ecliptic (and note that since the ecliptic is the same thing as the path of the Earth around the Sun, points on the ecliptic are the same things as dates on our calendar):
- Equinoxes - The equinoxes are the two points on the ecliptic where it crosses the celestial equator. On the vernal and autumnal equinoxes (around March 21 and September 21 respectively) the length of the day and night are roughly (but not exactly!) equal.
- Solstices - The points on the ecliptic when the Sun is highest above or lowest below the celestial equator are called the solstices. On the winter solstice (around December 21 in the Northern Hemisphere), the night is much longer than the day, and on the summer solstice (around June 21 in the Northern Hemisphere), the day is much longer than the night. See the three figures below for a comparison between the celestial equator (red line) and the ecliptic (green line):


So, why do we experience seasons?
This emphasizes one major point that is the most misunderstood fact in astronomy:
The Earth experiences seasons because of the tilt of its axis of rotation. The seasons have nothing to do with the distance of the Earth from the Sun.
There is one observation that should help you remember the cause for the seasons. The seasons are opposite in the northern and southern hemispheres on the Earth. That is, it is summer in Pennsylvania from June through September, but in South Africa, it is wintertime during these same months! This is easy to explain if you understand that the Earth’s tilt causes the seasons; when the northern hemisphere is tilted towards the Sun (summertime), the southern hemisphere is tilted away from the Sun. If the distance between the Earth and the Sun caused the seasons, then it would have to be summer in both the northern and southern hemispheres at the same time, because both would be the same distance from the Sun at the same time. Do you know when the Earth is closest to the Sun? In January!
Often, when confronted with the understanding that it is the tilt of the Earth's rotation axis that causes the seasons, students who feel strongly that the reason the seasons must be a difference in distance from the Earth to the Sun will point out that the hemisphere tilted towards the Sun is now closer to the Sun. However, the Earth is so far from the Sun that the difference in distance to the Sun between the hemisphere tilted towards the Sun and the one tilted away from the Sun is effectively zero.
The Phases of the Moon
Additional Reading at www.astronomynotes.com:
The changing Moon is a familiar sight to all of us, since it is the second brightest object in the sky after the Sun. The images of the Moon below were created by taking images of the Moon over approximately one month.
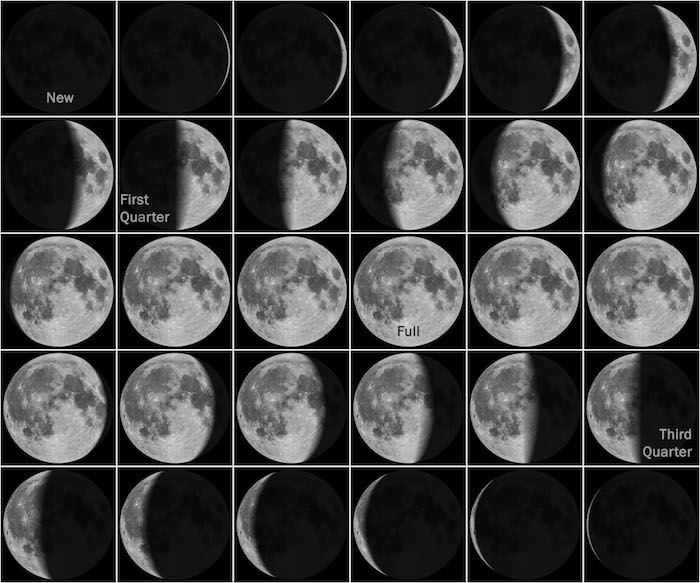
Looking more closely at these images, you can notice a few characteristics in the appearance of the Moon:
- It always keeps the same face pointed towards the Earth.
- It goes from completely dark to completely illuminated and back again.
Let’s start with the phases. First, we need to again talk about the layout of the Sun, Earth, and Moon system. We already have learned that the Earth is orbiting the Sun, and it is rotating on its tilted axis as it orbits. At the same time, the Moon is orbiting the Earth, and as it orbits around the Earth, it is rotating, too. Just like the Earth, the half of the Moon that is pointed towards the Sun is illuminated, and the half of the Moon that points away from the Sun is dark. So, the simple explanation for the phases of the Moon is that, at any one time, half of the Moon is light and half is dark, and the appearance of the half of the Moon that we see changes as it orbits the Earth. For a listing of the individual phases and a description of their appearance, see "Phases of the Moon and Percent of the Moon Illuminated."
Try This!
For this lesson, we begin by referring to the following animation. Note that the animation is 6 minutes, 4 seconds long, and that there is much to interpret.
Once the movie begins, you should see that the Earth begins to rotate and the Moon begins to orbit the Earth. The Moon is also rotating, but that is less obvious (we will discuss this more later). Please keep this animation in mind when we discuss the phases—remember that all of these phenomena happen simultaneously (Earth's rotation and orbit, Moon's rotation and orbit).
Next visit Lunar Phase Simulator developed by the University of Nebraska-Lincoln. This is an image that requires some interpretation, but if you can figure it out, you will have mastered an understanding of the phases of the Moon. The Sun is far off to the left on the diagram, so sunlight is illuminating the left side of both the Earth and the Moon. The point on the Earth immediately underneath the Sun experiences noon, and if you imagine the stationary Earth in the diagram rotating counterclockwise, that point will experience sunset when the Earth has rotated 1/4 of the way around, then midnight, then sunrise, then back to noon. Those times are labeled.
In the same diagram, the Moon is shown in eight different locations along its orbit around the Earth. For example, the full Moon occurs when the Sun, Earth, and Moon are in a line in that order (labeled as position 4). The sunlight that is hitting the Moon illuminates the half of the Moon that points towards the Earth. So, when the Moon is full, its entire illuminated half is pointed directly at the Earth.
The next question that you can answer from this diagram is: What time is the full Moon visible on Earth? To answer this question, we can integrate our knowledge about the rotation of the Earth. Picture yourself on the daylight part of the Earth pointing directly at the Sun. Remember, it is noon for you when you are on the part of the Earth pointing directly at the Sun, which is when the Sun is transiting your meridian. Six hours later, when the Earth has rotated one quarter of the way around, you would have to look to the western horizon to see the Sun, and to the eastern horizon to see the Full Moon. So, at sunset (about 6:00 PM), the full Moon is rising. Six hours later, the Earth has rotated an additional one quarter of the way around. Now, the Moon is directly in front of you (that is, this time it is transiting your meridian). So, the full Moon transits at midnight. Six hours later, at about 6:00 AM, the Moon will now be on your western horizon (setting), and the Sun will be on the eastern horizon (rising).
The New Moon phase occurs when the Sun, Moon, and Earth are in a line in that order (unlabeled, but it is position 8). In this case, the unilluminated side of the Moon faces the Earth. Thus, during New Moon, we do not see the Moon in our sky at all. Using the logic from the paragraph above, even though we can't directly see the New Moon, we know that the New Moon transits at 12 PM (noon), sets at sunset (about 6 PM), and rises at sunrise (6 AM).
The other phases fall in between these two extremes. For example, at First Quarter, the side of the Moon facing the Earth is half illuminated and half dark. It will rise at noon, transit at 6 PM, and set at midnight.
Let's end this discussion of the Moon by returning to its rotation. If the Moon rotates, why does it always show the same face to the Earth? Shouldn’t we see the face of the Moon slowly changing as it rotates? For example, think about observing the Earth from the point of view of the Sun; during the course of 24 hours, you will see North America rotate out of your view and then back again. We will discuss this in more detail in a later lesson, but the short answer is that the Moon’s rotation rate is matched to its orbital rate. That is, the Moon takes the same amount of time to rotate as it takes to orbit. Because of this, it keeps the same face pointed towards the Earth at all times.
The last point to make about the phases is the time it takes for the Moon to complete one complete cycle of phases. We know that the length of our day is tied to the rotation rate of the Earth and the length of our year is tied to the orbital period of the Earth around the Sun, so what about the Moon? Well, it takes approximately 29.5 days for the Moon to complete one set of phases, or roughly one month.
Eclipses
Unlike day and night, the phases of the Moon, and the seasons, this last phenomenon is a rare event that you may or may not have personally experienced or listed on your set of observations. This may have just changed as of August, 2017, as many of us got to experience the solar eclipse that passed through much of the US! Eclipses occur infrequently because they require a very specific alignment of the Sun, Earth, and Moon. If the Moon is lined up precisely with the Sun from the Earth’s point of view, the Moon will block Sunlight from reaching the Earth, causing a solar eclipse. If the Moon is on the other side of the Earth from the Sun, the Earth will block Sunlight from reaching the Moon, causing a lunar eclipse. According to the diagram of the Moon phases from the Lunar Cycles module, it appears that the Sun, Earth, and Moon are lined up for an eclipse twice a month!
Is there a solar eclipse every new Moon and a lunar eclipse every full Moon?
As it turns out, there is another effect that we need to account for. In order for there to be an eclipse during every full Moon and new Moon, the orbital plane of the Moon around the Earth would have to be identical to the orbital plane of the Earth around the Sun. That is, the three objects have to be precisely lined up as in the first diagram below. If, for example, the Moon is above or below the Earth’s shadow, there will not be a lunar eclipse. Similarly, if the Moon’s shadow does not hit the Earth because the Moon is above or below the plane of the Earth’s orbit around the Sun, there will not be a solar eclipse. The plane of the Moon’s orbit is inclined by 5 degrees compared to the plane of the Earth’s orbit, so at most times the Moon is above or below the position necessary to cause an eclipse.
If you think of the Earth’s orbit around the Sun as a disk and the Moon’s orbit around the Earth as another disk, there is a 5 degree angle between the two disks. However, any time you have two circles that intersect each other like the two disks do, there will be two points at which the intersection occurs (just like the two equinoxes we discussed above are the two points where the Celestial Equator and Ecliptic intersect). These two points on the Moon’s orbit (where the Moon lies in the same plane as the Earth’s orbit) are called nodes, and the line connecting these two points is called the line of nodes.
So, the recipe for having a solar or lunar eclipse requires two circumstances, not just one. They are:
- The phase of the Moon must be new for a solar eclipse or full for a lunar eclipse to occur (top figure).
and - The line of nodes must be closely aligned with the Sun and the Earth (bottom figure).


Watch This!
You can find a brief video clip about a solar eclipse at the Teachers' Domain website.
NOTE: "Teacher's Domain" is a free resource, but you must register with them in order to view more than 7 resources. Since we'll point to that resource throughout this course, you may want to take a moment to go ahead and register with them now.
The appearance of the Sun and Moon during eclipses
Finally, let’s conclude this lesson with a discussion of how the Sun and Moon appear during eclipses. There are three possibilities for a lunar eclipse, depending on how well the line of nodes is aligned with the Sun and Earth:
- Total Lunar Eclipse: Occurs when the Moon is entirely contained within the Earth’s umbra.
- Partial Lunar Eclipse: Occurs when the Moon is partly in the umbra of the Earth and partly in the penumbra.
- Penumbral Lunar Eclipse: Occurs when the Moon is entirely contained within the penumbra.
During a total lunar eclipse, the Moon will darken considerably and glow red as the Earth allows some of the red light from the Sun to reach the Moon. During a partial lunar eclipse, part of the Moon will appear darker and redder, while the rest will appear normal. Most of us don’t even notice penumbral lunar eclipses, because the Moon only dims.
Here are some examples:
- Astronomy Picture of the Day: 2003 November 21
- Astronomy Picture of the Day: 2001 January 18
- Astronomy Picture of the Day: 2003 May 22
One significant difference between solar and lunar eclipses that we must mention is that a solar eclipse is only visible to certain parts of the Earth. See these Astronomy Pictures of the Day to see why:
There are three types of solar eclipses, too:
- Total Solar Eclipse: Anyone on Earth who lives in an area where the Moon’s umbra passes will see the entire Sun obscured by the Moon. For example: Astronomy Picture of the Day: 2002 December 6. Many of you have probably heard this, but people who have experienced a total solar eclipse describe it as one of the most breathtaking phenomena in their lives. It is almost impossible to capture in images or videos the effects, but there are a number of very interesting aspects of total solar eclipses that awe the people who see them. For example, here is an image of the "Diamond Ring" effect just after totality during the August 21, 2017 eclipse. The next total solar eclipse that will be visible in the US is in April of 2024. Here is a Google map of the eclipse path. This course's author stayed in PA for the 2017 eclipse, but will be traveling to the path of totality for the 2024 eclipse and encourages all of you to do the same!
- Partial Solar Eclipse: If you live just outside the path of the Moon’s umbra, but within the path of the Moon’s penumbra, you will see part of the Sun obscured by the Moon. Here is a good example: Astronomy Picture of the Day: September 3, 1997. There are many images like this from the August 2017 eclipse.
- Annular Solar Eclipse: Recall from the movie of the lunation above that the Moon appears to be a little bit bigger sometimes and a little bit smaller other times. This is caused by the Moon’s elliptical orbit. Sometimes it is closer to the Earth than other times. Well, if the Moon just happens to be in a position that is slightly farther from Earth, it won’t completely cover the Sun even during a total solar eclipse. In this case, you see a ring of the Sun still visible, such as in this example: Astronomy Picture of the Day: 2003 June 5.
Additional Resources
On these pages, I will try to include links to resources specific to the content in the current lesson. However, since this is the first lesson, I'm going to put some general resources here that will be useful throughout the course.
- Perhaps my favorite astronomy website is Astronomy Picture of the Day (APOD). I recommend visiting this site daily (or at least weekly) to see what the new image is and to read the caption that explains the image. Almost every image you see featured at APOD will be relevant to material you will learn at some point this semester. Here are a few of the APOD images I already linked to or that are related to the Lesson 1 material:
- An image of the star trails seen by an observer near the equator
- An animation of a Lunation
- An image of the Moon during a 2003 lunar eclipse
- An image of the Sun's shadow on the Earth during a solar eclipse
- An image of a 2008 solar eclipse
Note that APOD has been in existence since June of 1995, so there are more than 8,000 images in their archive. If you are ever looking for an astronomical image of a specific object (e.g., M13 star cluster) or phenomenon (e.g., Sundog), their search feature is an excellent place to start. - For more imagery specifically from the Hubble Space Telescope, you can go to Hubblesite, which also has much more to explore beyond static images.
- My favorite group activity for teaching the 3D relationship between the Sun, Earth, and Moon is called "kinesthetic astronomy." Download the activity, with all of the necessary supporting materials, from its author.
- If you would like to print out and make a planisphere to teach yourself the constellations, the PDF file templates for "Uncle Al's Sky Wheels" are available and can be printed on cardstock with most printers.
- While not as fully featured as Starry Night, if you want free planetarium software for your classroom, you can also try out the open source alternative called Stellarium.
- For more on eclipses, visit Mr. Eclipse's Solar Eclipses for beginners or Mr. Eclipse's Lunar Eclipses for beginners.
- An excellent tool for visualizing celestial sphere concepts (e.g., the ecliptic path, the height of the Sun in different seasons, etc.) is a physical model of a celestial sphere. You can purchase one online; however, they are unfortunately quite expensive.
- Throughout this lesson, I have linked to an excellent, free, on-line textbook for astronomy at www.astronomynotes.com. There is another free on-line textbook resource that is found at www.teachastronomy.com. Although this last resource is not free and is not on-line, an excellent resource to engage your students directly in short, group activities related to the concepts in this lesson and in future lessons is the workbook "Lecture Tutorials for Introductory Astronomy".
Tell us about it!
Have another website on this topic that you have found useful? Share it in the Comment area!
Summary & Final Tasks
In this lesson, we covered many of the astronomy content topics that are found in the K-12 educational standards -- the phases of the Moon, eclipses, and the seasons. Studies have shown, and my own experience has shown, that the three dimensional geometry of the Sun, Earth, Moon system is a difficult concept to teach. I hope you now understand it well and feel better equipped to teach the topic. In particular, I hope you are able to picture for yourself the distribution of these objects and their relative locations at a given time of day, on a given day of the year, and at a given phase of the Moon. If you have any remaining questions, please do not hesitate to ask!
Activity 1
Directions
I want you to reflect on what was covered in this lesson, in particular about the changing appearance of the Moon. Consider how you might adapt these materials (or the materials from the additional resources page) for your own classroom. Since this is a discussion activity, you will need to enter the discussion forum more than once in order to read and respond to others' postings.
Submitting your work
- Go to Canvas.
- Go to the "Lesson 1: Teaching and Learning About The Moon" discussion forum.
- Post your ideas for how the materials we covered in this lesson might be adapted for your own classroom.
- Read postings by other ASTRO 801 students.
- Respond to at least one other posting by asking for clarification, asking a follow-up question, expanding on what has already been said, etc.
Grading criteria
You will be graded on the quality of your participation. See the grading rubric (identical to the one from Earth 530) for specifics on how this assignment will be graded.
Activity 2
Directions
Finally, to complete this lesson, you need to take the Web-based Lesson 1 quiz.
- Go to Canvas.
- Go to the "Lesson 1 Quiz" and complete the quiz.
Good luck!
Reminder - Complete all of the lesson tasks!
You have finished the reading for Lesson 1. Double-check the list of requirements on the Lesson 1 Overview page to make sure you have completed all of the activities listed there before beginning the next lesson.