Background Information
Spatial Problem Solving
-
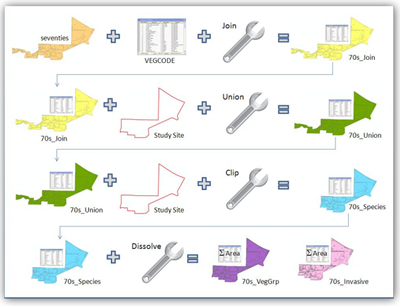
Seventies + VEGCODE + join = 70s_Join
-
70s_Join + Study Site + union = 70s_union
-
70s_union + Study Site + clip = 70s_species
-
70s_species + dissolve = 70s_VegGrp + 70s_Invasive
You have been applying spatial problem-solving skills throughout this course. In previous lessons, I provided step-by-step workflows illustrating how to use GIS to explore specific environmental scenarios.
Now, it is your turn to apply your spatial skills by designing a workflow from scratch. Workflow planning is not a linear process. It involves loops and iterations, and some dead ends along the way.
There are also multiple correct paths in GIS that will lead to the same end product, so you may need to think through a few different options. I find it easier to design a GIS workflow if I create a visual map of the process like the example shown here, from Lesson 3.
Designing a Visual Plan
Prezi.com is a great tool for planning complex processes. The program makes it is very easy to compile several ideas in one workspace, rearrange them into groups, and add more details later on as your plans solidify. Unlike Microsoft Word and PowerPoint, Prezi does not impose a linear order on your information. Another helpful feature of Prezi is the ability to include relative scale in your brainstorming map, so main ideas are larger than minor details. This approach makes it easier to break your analysis into several pieces, then focus on one piece at a time. With Prezi, you can also embed screenshots, videos, and other media to keep track of your ideas in a visual manner.
You may make a copy of a Prezi blue circles template and then edit it for your own project. If you are not a Prezi fan, I also recommend Canva.com or ArcGIS StoryMaps. Canva is a cloud-based program that also allows you to map out your own ideas or use built-in templates. And, you will read more about ArcGIS StoryMaps in the required readings and videos section.
Video: How to Use Prezi (5:32)
Hello everybody. Welcome to a brand new tutorial. In this video, I will be showing you how to use a website called Prezi. And if you haven't heard of it, what it is is a zooming PowerPoint presentation type deal. So this is my personal account of Prezis I have made. So I just want to show you what all it can do and this is a good little example. I'm just going to click through it really fast. This is a project I did for a worldview class on Lord of the Rings with a couple of friends. So what it allows you to do is zoom around a background picture or a color, and move around. And this is basically what Prezi can do and zoom around to help get your point across and all that. It's often used in a lot of classes anymore as well as professional presentation situations. And it also allows you to add multiple photo layers. So when you zoom in further, you then enter a new photo layer of your background.
So without further ado, let's go ahead and get started. So, first things first, you will need to go to Prezi.com, you'll click the get started button, come over to the free account. When you have a free account then all your Prezis are publicly visible, you have no control over if it's private or not. I'm going to just fill this out. Once I am done, I will click "create your free public account". Once you have created an account, Prezi will show you the basics and you can continue editing the one they give you just for further playing around with Prezi. But to show you everything, I am going to create my own new Prezi and then a page like this will load and you can scroll through the ones they give you immediately. You can also look up more. I'm going to use this one. If you don't like any of the templates, you can start a blank Prezi. What they have here is a preset of where all your slides will go. You can also choose to move them elsewhere. Let's say you need more slides than what they give you, then you can add a frame just by clicking up here and it adds it right after whichever one you were just on, I think. But you can also rearrange the path. So if I want it to happen after it zooms out, then I can do that. I can edit the path. You can also have some form of animation happen just by clicking the edit path and then click on the star. You can apply a fade in effect but that is the only effect they give you, unfortunately. You're kind of limited effects-wise because most of the effects are from the zooming in and around and out and whatnot. So I'm going to be done editing the path. You can add text. This type of online presentation stuff is pretty easy to use. You can insert an image, you can insert symbols and shapes, you can even insert YouTube videos. You can add layouts, and they have single-frame, as well as multi-frame layouts to help you get the point that you want across. You can also highlight things, you can also add background music, and you can even insert slides from a PowerPoint. So if you want to upgrade a PowerPoint you just made and be able to zoom around and add a few more things, you can do that in Prezi. You can even customize the theme by clicking up here. You can also make your background a picture, you can add multiple photo layers in your Prezi. So to do that, you will come down to the advanced button, you'll come over to the 3D background and click Edit, then you can upload up to three photo layers. So this time I actually will use a weird picture of me. I'd rather embarrass myself. Then I will click done in the advanced area. You can adjust the theme colors and whatnot. Once you are done, then you click Done. If you zoom in far enough, then the picture changes, except I have awkwardly zoomed in on my own shirt. I zoom out and then we get the original picture that I started with. Otherwise, it is pretty simple to use and understand and it's not overly complex. So we're going to exit a presentation. It will exit and save automatically.
Let's get into the account settings. Let me go over to the profile page. If you want to add a picture, I believe it pulls your a picture. You can insert a profile picture via a site called Gravatar and I'll put a link to that down below.
So that was a brief overview of how to use Prezi. If you have any further questions about how to use it, you can leave me comments down below and I will do my best to answer your questions. So anyway, thank you guys so much for watching. If you enjoyed this video, give it a big thumbs up and don't forget to click on the red subscribe button to subscribe to the respective channels and as always I will see you guys in the next tutorial. Bye-bye.
Translating "GeoJargon"
GIS professionals who communicate well are the ones who get ahead. Effective communication in the GIS field involves researching your audience, choosing language that appeals to them, and communicating how you add value. Most clients and end-users are not interested in the nuts and bolts of GIS. They want to know how they can make better decisions, save money or time, more easily share information, or better reach their organization's goals. A general rule to follow is "simpler is better." The more you can make your products self-explanatory and appealing to your target audience, the more likely your audience is to use them and value your work.
My first boss told me a story that has stuck with me for many years. He said:
"When you take your car to the auto shop, do you want to receive a lengthy report about the model number of the tools the mechanic used, how high they had to raise your car on the lift or the particular order of steps they followed to change your oil or rotate your tires? Probably not. You likely just want to know when you can get your car back, how much it costs, any serious issues you need to address and what will happen if you wait too long to fix them. It's the same with GIS. Your client hired you to handle the technical details because it is not something they are particularly interested in, have time for, or are good at themselves. It's your job to apply your skills to their problem, then translate the results into terms that they care about."
I frequently experience GIS students and professionals tossing around data formats and Esri command names as though they were common verbs and nouns. To most prospective clients and proposal review teams, these are unknown terms. and they will quickly lose interest. My advice here is to avoid them, but when you feel they are necessary, you must remember to provide a definition.
You will need to apply these skills often - for example: when pitching a new project to a client, convincing your boss that your GIS department or team should receive funding, writing grant applications, responding to Request for Proposals (RFPs), presenting your work at technical conferences, or marketing your own portfolio and skills to potential new employers. Creating a communication plan is also an iterative process. Rarely is a first draft a final product.