Upon completion of module 5/6, you will be able to describe common data formats, diagnose the characteristics of unfamiliar data types, determine appropriate data formats given intended data use, incorporate various types of GIS data (e.g., tabular data in printed form, National Map data, GPS data, CAD data, LIDAR or other remotely-sensed data) into a GIS database, transform data from one format to another, understand GIS software functionality related to data conversion, import and export, editing, updating, and revising, and explain interoperability and the initiatives that are under way to accomplish that goal.
Now that you've done an assessment of data for your area and started the acquisition process, chances are good that you've come across data that are in different formats. Whether they are data in another software format, tabular data, in an interchange format (e.g., .e00 files), or simply in different coordinate spaces, you probably have to do some kind of manipulation to make the data work together. In this lesson we will begin to get familiar with how to bring data from different sources together. With more and more organizations becoming familiar with the importance of interoperability, this task should get easier with time, as data will be made available in formats that are more easily integrated.
This module is two weeks in length. Please refer to the course Calendar tab, in ANGEL, for the due date.
Please see the Deliverables section at the end of Part II for this week's readings and action items.
Lesson 5, 6 is two weeks in length. Please refer to the Calendar in ANGEL for specific time frames and due dates. To finish this lesson, you must complete the actvities listed below. You may find it useful to print this page out first so that you can follow along with the directions.
| Step | Activity | Access/Directions |
|---|---|---|
| 1 | Work through Lesson 5, 6 | You are in the Lesson 5, 6 online content now. The overview page is previous to this page, and you are on the Checklist page right now. |
| 2 | Complete the deliverables for Lesson 5, 6 | Page 4 has this week's deliverables. |
My story:
As I acquired data for my project, I encountered quite a few manipulations that I had to do in order to make all the data work together. I found some data in different software formats. I found some data in different projections (undefined with no metadata to tell me what the projection was). I downloaded data in interchange formats that needed to be imported. We'll go through the process I used to bring some of the data together.
Registered Students download from ANGEL the Lesson 5/6 data (lesson5_6files.zip) to a new folder (e.g., C:\MGIS\GEOG488\Lesson5_6).
The data in this exercise are used by permission of the State College Borough Water Authority, Centre County GIS, and Meridian GeoSystems Inc.
We will be adding data from many different sources (e00 file, xy data from a GPS, Mapinfo Data by import), and first we will be transforming CAD data to the coordinate space of the Centre County basemap data.
The CAD feature dataset is not in the same coordinate space as the Centre County basemap data layers. It needs to be transformed into geographic space. In ArcMap at 9.2 there are a number of ways to do this. One method is to use the georeferencing toolbar and move and manipulate the cad drawing as if it were a raster or orthophoto image file. There are a number of tools on the bar to fit the drawing to the display and rotate and move it. The final step is to click the Update Georeferencing; This will lock the CAD drawing to the geo-coordinate system and generate a Worldfile. Another method is to look at the drawings properties by right clicking in the TOC. Under the property Transformations you can set up a worldfile directly. To see all the range of ways of working with CAD Drawing transformations I suggest that you look at Esri Help File for CAD Transformations or look at it online here [3].
We are going to use a Worldfile, as this method is permanent, and suitable for ArcGIS 9.1 and earlier. The accuracy of the transformation in all methods depends upon the accuracy and precision of locating common points between the Cad Drawing and the feature set used as a coordinate source. Sometimes, doing this manually is more accurate than the interactive method in the georeferencing tool set.
By using a world file, the SCBWA data can be positioned in the same coordinate space as the Centre County basemap data. In the next few steps, you will create a CAD world file to apply a coordinate transformation to the CAD layer to make sure it overlays with your other data. The CAD world file is a simple text file that contains four coordinate pairs.
You will identify a pair of common control points that are easy to identify in both the CAD feature dataset and the reference dataset. It's always a good idea to use fixed features such as road intersections or corners of buildings as control points because they are unlikely to move with time. You can document this in the Metadata, too, so that people know how you derived the coordinate system.
Tip: You can use snapping to assist with the accurate creation of the control points. Snapping requires an active session, so you will need to have an editable vector layer in the map (preferably the editable layer will serve as the snapping layer).
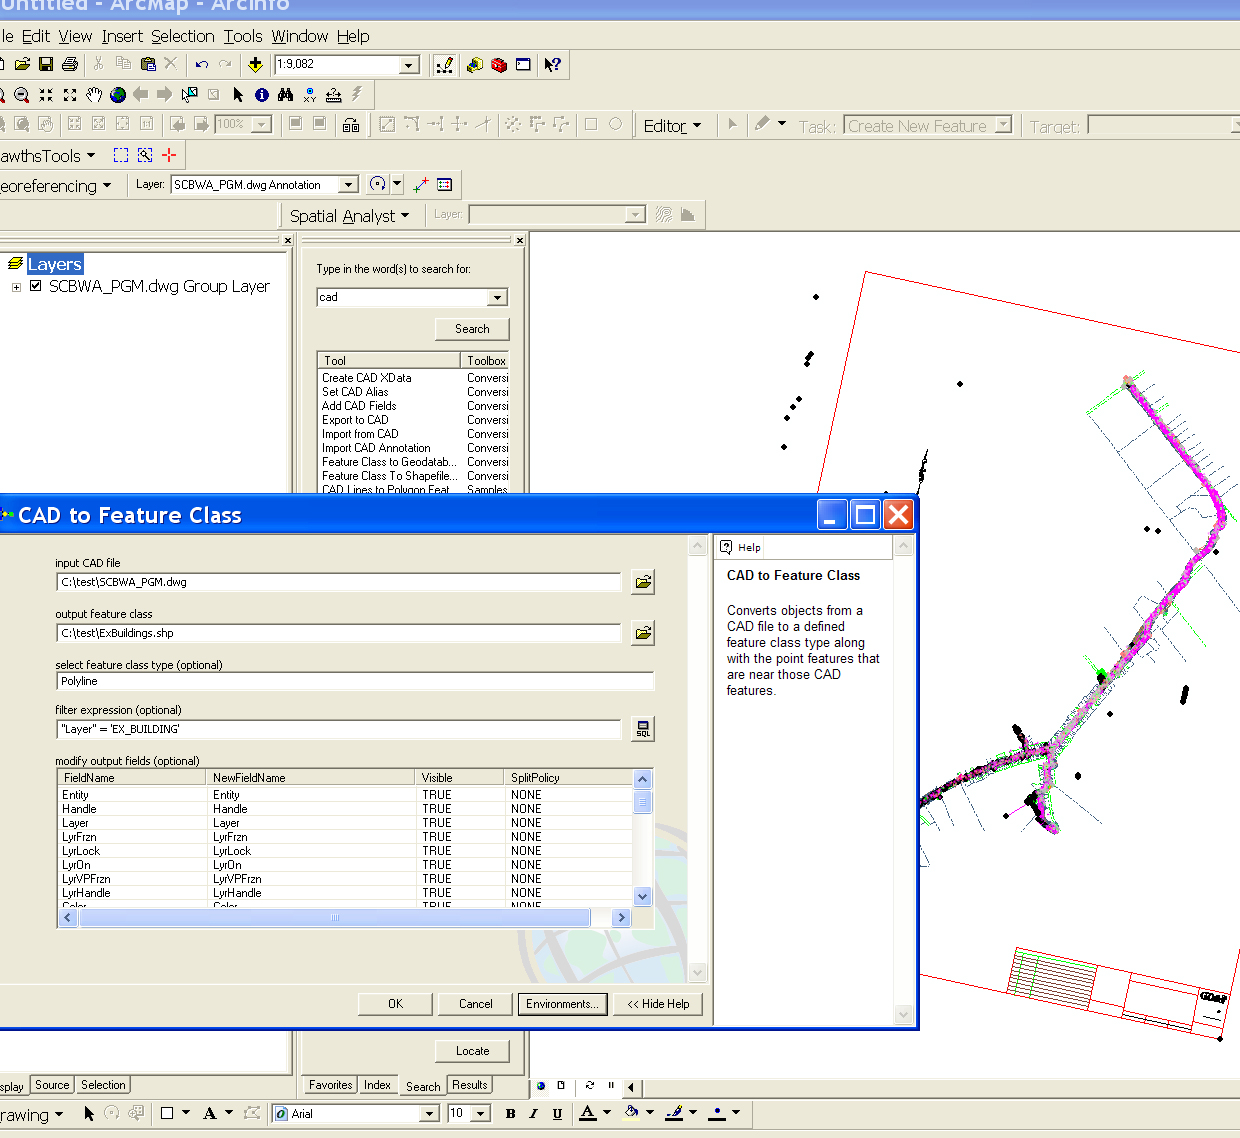
The easiest way to convert CAD files into ArcGIS shape or geodatabase is to use the CAD tool (example [9]). Make sure to export using the data frame coordinate system, not the source, or they will revert to CAD space instead of geographic space. You will need to set the projection for the files after as the Esri tool does not support this function. With this tool you can run a selection SQL statement to choose just the features you require. If you do not do this, all the lines will end up in the same shape file. You have to repeat this action for each geometry type, point, line, polygon, annotation.
These are a few points of interest on the Penn State Campus.
These are school district data for Pennsylvania. Again you will see that there is no metadata and no coordinate system defined.
This is forest data for Pennsylvania. Again, devoid of the information, you need to be able to easily utilize the data. (I personally recommend noting when data is received without metadata and the assumptions you made to utilize the data in your own metadata you create. This will partly cover you if your guess turns out to be wrong.)
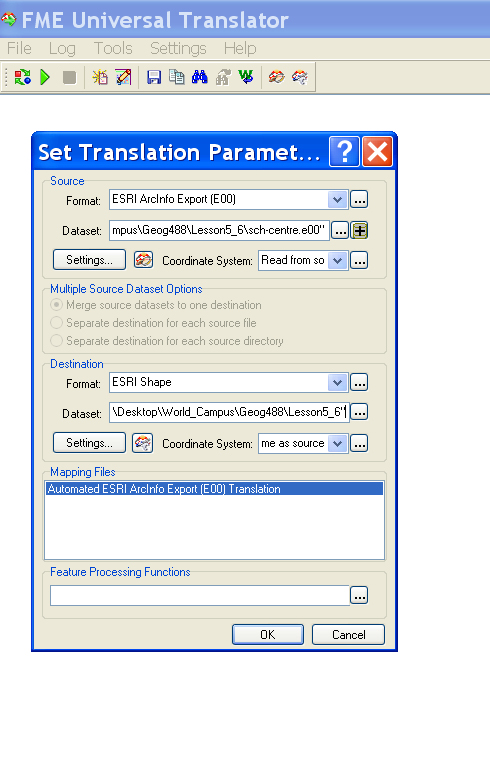
Take time to look around in the many features and help files in FME Universal Translator. In particular go through the supported feature types and look at their attributes.
CAD users who need to move data constantly between GIS and CAD programs must follow naming conventions as outlined in the guidelines of United States National CAD Standard. The documentation of the standard is costly to buy but they are based on those of the Department of Homeland Security Geospatial Data Model that can be viewed here DHS CAD Standard [11]. If you have time look at the standard to get an idea of the requirements.
You have just completed Part I of this module, which involved integrating ArcView shapefiles, an ArcInfo coverage (.e00), a MapInfo layer (.mif), and CAD data. In Part II, you will explore additional data formats.
Your story:
As part of your data search, you may have come across data in different formats. Most organizations pick one software and stick with it. Many clearinghouses pick one data format, but provide data translators in case you are using a different software. In Part I, we worked with data in just a few formats. What other formats are out there? Take time to look at the FME Format Gallery. What data formats are the organizations you've come in contact with using?
Take a look at the data types supported in ArcGIS in the ArcGIS Desktop Help. From the Help menu, select ArcGIS Desktop Help. Click the Index tab, type data and double-click types supported in ArcGIS in the list that appears in the Help window.
Do you subscribe to any GIS newsletters? If not, now is a good time to do so. There is a lot of information relevant to this class. Find an article related to data integration or interoperability. A few examples of online newsletters are:
This module is two weeks in length. Please refer to the course Calendar tab in ANGEL for the due date.
1. Readings:
Required:
Recommended:
2. Post a project write-up including:
3. Write a brief essay on how you would explain to your boss that the data sets you have just acquired cannot be lined up and have discrepancies between them. Put in the Week 6 Drop Box. This should be business formal standard communication, not an informal note.
4. Discuss the weekly topics on the discussion forum.
5. Complete Quiz 2
6. Make sure you have posted the completed Course Paper in Week 5 in the Lesson 5 Drop Box.
You have just completed module 5/6.
Don't forget...if you have any questions, feel free to post them to the Lesson 5/6 Discussion Forum.
Links
[1] http://support.esri.com/index.cfm?fa=knowledgebase.techarticles.articleShow&d=29039
[2] http://support.esri.com/index.cfm?fa=knowledgebase.techArticles.articleShow&d=29035
[3] http://webhelp.esri.com/arcgisdesktop/9.2/index.cfm?id=2581&pid=2578&topicname=Transforming_CAD_datasets
[4] https://www.e-education.psu.edu/geog488/sites/www.e-education.psu.edu.geog488/files/image/L05_1fig01.gif
[5] https://www.e-education.psu.edu/geog488/sites/www.e-education.psu.edu.geog488/files/image/L05_1fig02.gif
[6] https://www.e-education.psu.edu/geog488/sites/www.e-education.psu.edu.geog488/files/image/L05_1fig03.gif
[7] https://www.e-education.psu.edu/geog488/sites/www.e-education.psu.edu.geog488/files/image/L05_1fig04.gif
[8] https://www.e-education.psu.edu/geog488/sites/www.e-education.psu.edu.geog488/files/image/L05_1fig05.gif
[9] https://www.e-education.psu.edu/geog488/sites/www.e-education.psu.edu.geog488/files/image/CAD2Shp.jpg
[10] https://www.e-education.psu.edu/geog488/sites/www.e-education.psu.edu.geog488/files/image/UniversalTrslt1.jpg
[11] http://www.fgdc.gov/standards/projects/FGDC-standards-projects/SDTS/sdts_cadd/caddprof.pdf
[12] http://www.directionsmag.com/
[13] http://www.opengeospatial.org/press/?page=newsletter
[14] http://www.vector1media.com/
[15] http://www.esri.com/news/arcnews/summer04articles/esri-expands.html
[16] http://www.opengeospatial.org/pressroom/papers
[17] http://www.directionsmag.com/article.php?article_id=687&trv=1
[18] http://xml.coverpages.org/ni2004-03-26-a.html
[19] http://mcmcweb.er.usgs.gov/sdts/index.html