There is a wealth of geographic (and other) information available out there on the web in the form of web pages and web services, and sometimes we may want to make use of this information in our Python programs. In the first walkthrough of this lesson, we will access two web services from our Python code that allow us to retrieve information about places based on the places’ names. Another common web-based programming task is scraping the content of web pages with the goal of extracting certain pieces of information from them, for instance links leading to other pages. In this section, we are laying the foundation to perform such tasks in Python by showing some examples of working with URLs and web requests using the urllib and requests packages from the standard Python library, and the BeautifulSoup4 (bs4) package, which is a 3rd party package that you will have to install.
Urllib in Python 3 consists of the three main modules urllib.requests for opening and reading URLs, urllib.error defining the exceptions that can be raised, and urllib.parse for parsing URLs. It is quite comprehensive and includes many useful auxiliary functions for working with URLs and communicating with web servers, mainly via the HTTP protocol. Nevertheless, we will only use it to access a web page in this first example here, and then we will switch over to using the requests package instead, which is more convenient to use for the high-level tasks we are going to perform.
In the following example, we use urllib to download the start page from Lesson 1 of this course:
import urllib.request

url = "https://www.e-education.psu.edu/geog489/l1.html"
response = urllib.request.urlopen(url)
htmlCode = response.read()
print(htmlCode)
After importing the urllib.request module, we define the URL of the page we want to access in a string variable. Then in line 4, we use function urlopen(…) of urllib to send out an HTTP request over the internet to get the page whose URL we provide as a parameter. After a successful request, the response object returned by the function will contain the html code of the page and we can access it via the read() method (line 5). If you run this example, you will see that the print statement in the last line prints out the raw html code of the Lesson 1 start page.
Here is how the same example looks using the requests package rather than urllib:
import requests

url = "https://www.e-education.psu.edu/geog489/l1.html"
response = requests.get(url)
htmlCode = response.text
print(htmlCode)
As you can see, for this simple example there really isn’t a big difference in the code. The function used to request the page in line 4 is called get(…) in requests and the raw html code can be accessed by using a property called text of the response object in line 5 not a method, that’s why there are no parentheses after text.
The most common things returned by a single web request, at least in our domain, are:
- html code
- plain text
- an image (e.g. JPEG or PNG)
- XML code
- JSON code
Most likely you are at least somewhat familiar with html code and how it uses tags to hierarchically organize the content of a page including semantic and meta information about the content as well as formatting instructions. Most common browsers like Chrome, Firefox, and Edge have some tools to inspect the html code of a page in the browser. Open the first lesson page in a new browser window and then do a right-click -> Inspect (element) on the first bullet point for “1.1 Overview and Checklist” in the middle of the window. That should open up a window in your browser showing the html code with the part that produces this line with the link to the Section 1.1 web page highlighted as in the figure below.
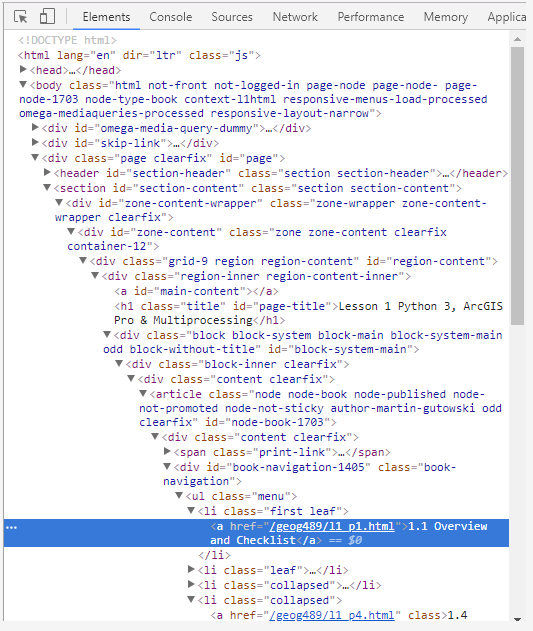
The arrows indicate the hierarchical organization of the html code, the so-called Document Object Model (DOM), and can be used to unfold/fold in part of the code. Also note how most html tags (‘body’,‘div’, ‘a’, ‘span’, etc.) have an attribute “id” that defines a unique ID for that element in the document as well as an attribute “class” which declares the element to be of one or several classes (separated by spaces) that, for instance, affect how the element will be formatted. We cannot provide an introduction to html and DOM here but this should be enough background information to understand the following examples. (These topics are addressed in more detail in our GEOG 863 class.)
Unless our program contains a browser component for displaying web pages, we are typically downloading the html code of a web page because we are looking for very specific information in that code. For this, it is helpful to first parse the entire html code and create a hierarchical data structure from it that reflects the DOM structure of the html code and can be used to query for specific html elements in the structure to then access their attributes or content. This is exactly what BeautifulSoup does.
Go ahead and install the beautifulsoup4 package in the Python Package Manager of ArcGIS Pro as you did with Spyder in Section 1.5. Once installed, BeautifulSoup will be available under the module name bs4. The following example shows how we can use it to access the <title> element of the html document:
import requests
from bs4 import BeautifulSoup

url = "https://www.e-education.psu.edu/geog489/l1.html"
response = requests.get(url)
soup = BeautifulSoup(response.text, 'html.parser')

print(soup.find('title'))
Output:
<title>Lesson 1 Python 3, ArcGIS Pro & Multiprocessing | GEOG 489: GIS Application Development</title>
In line 6, we are taking the raw html code from response.text and create a BeautifulSoup object from it using an html parser and store it in variable soup. Parsing the html code and creating the hierarchical data structure can take a few seconds. We then call the find(…) method to get the element demarcated by the title tags <title>…</title> in the document. This works fine here for <title> because an html document only contains a single <title> tag. If used with other tags, find(…) will always return only the first element, which may not be the one we are looking for.
However, we can provide additional attributes like a class or id for the element we are looking for. For instance, the following command can be used to get the link element (= html tag <a>) that is of the class “print-page”:
print(soup.find('a', attrs = {'class': 'print-page'}))
The output will start with <a class=”print-page” href…” and include the html code for all child elements of this <a> element. The “attrs” keyword argument takes a dictionary that maps attribute names to expected values. If we don’t want to print out all this html code but just a particular attribute of the found element, we can use the get(…) method of the object returned by find(…), for instance with ‘href’ for the attribute that contains the actual link URL:
element = soup.find('a', attrs = {'class': 'print-page'})
print(element.get('href'))
Output:
https://www.e-education.psu.edu/geog489/print/book/export/html/1703
You can also get a list of all elements that match the given criteria, not only the first element, by using the method find_all(…) instead of find(…). But let’s instead look at another method that is even more powerful, the method called select(…). Let’s say what we really want to achieve with our code is extract the link URLs for all the pages linked to from the content list on the page. If you look at the highlighted part in the image above again, you will see that the <a> tags for these links do not have an id or class attribute to distinguish them from other <a> tags appearing in the document. How can we unambiguously characterize these links?
What we can say is that these are the links that are formed by a <a> tag within a <li> element within a <ul> element within a <div> element that has the class “book-navigation”. This condition is only satisfied by the links we are interested in. With select(…) we can perform such queries by providing a string that describes these parent-child relationships:
elementList = soup.select('div.book-navigation > ul > li > a')
for e in elementList:
	print(e.get('href'))
Output:
/geog/489/l1_p1.html
/geog/489/l1_p2.html
/geog/489/l1_p3.html
…
The list produced by the code should consist of ten URLs in total. Note how in the string given to select(…) the required class for the <div> element is appended with a dot and how the > symbol is used to describe the parent-child relationships along the chain of elements down to the <a> elements we are interested in. The result is a list of elements that match this condition and we loop through that list in line 2 and print out the “href” attribute of each element to display the URLs.
One final example showing the power of BeautifulSoup: The web page www.timeanddate.com, among other things, allows you to look up the current time for a given place name by directly incorporating country and place name into the URL, e.g.
http://www.timeanddate.com/worldclock/usa/state-college
… to get a web page showing the current time in State College, PA. Check out the web page returned by this request and use right-click -> Inspect (element) again to check how the digital clock with the current time for State College is produced in the html code. The highlighted line contains a <span> tag with the id “ct”. That makes it easy to extract this information with the help of BeautifulSoup. Here is the full code for this:
import requests
from bs4 import BeautifulSoup

url = "http://www.timeanddate.com/worldclock/usa/state-college"

response = requests.get(url)
soup = BeautifulSoup(response.text, 'html.parser')
time = soup.find('span', attrs= { 'id': 'ct'})

print('Current time in State College: ' + time.text)
Output:
Current time in State College: 13:32:28
Obviously, the exact output depends on the time of day you run the code. Please note that in the last line we use time.text to get the content of the <span> tag found, which is what appears between the <span> and </span> tags in the html.
We are intentionally only doing this for a single place here because if you ever do this kind of scraping of web pages on a larger scale, you should make sure that this form of usage is not against the web site’s terms of use. In addition, some things can be done to keep the load on the server produced by web scraping as low as possible, e.g. by making sure the results are stored/cached when the program is running and not constantly being queried again unless the result may have changed. In this example, while the time changes constantly, one could still only run the query once, calculate the offset to the local computer’s current time once, and then always recalculate the current time for State College based on this information and the current local time.
The examples we have seen so far all used simple URLs, although this last example was already an example where parameters of the query are encoded in the URL (country and place name), and the response was always an html page intended to be displayed in a browser. In addition, there exist web APIs that realize a form of programming interface that can be used via URLs and HTTP requests. Such web APIs are, for instance, available by Twitter to search within recent tweets, by Google Maps, and by Esri. Often there is a business model behind these APIs that requires license fees and some form of authorization.
Web APIs often allow for providing additional parameters for a particular request that have to be included in the URL. This works very similar to a function call, just the syntax is a bit different with the special symbol ? used to separate the base URL of a particular web API call from its parameters and the special symbol & used to separate different parameters. Here is an example of using a URL for querying the Google Books API for the query parameter “Zandbergen Python”:
https://www.googleapis.com/books/v1/volumes?q=Zandbergen%20Python
www.googleapis.com/books/v1/volumes is the base URL for using the web API to perform this kind of query and q=Zandbergen%20Python is the query parameter specifying what terms we want to search for. The %20 encodes a single space in a URL. If there would be more parameters, they would be separated by & symbols like this:
<parameter 1>=<value 1>&<parameter 2>=<value 2>&…
We also mentioned above that one common response format is JSON (JavaScript Object Notation) code. If you actually click the link above, you will see that Google sends back the response as JSON code. JSON is intended to be easily readable by computers not humans, but the good thing is that we as Python programmers are already used to reading it because it is based on notations for arrays (=lists) and objects (=dictionaries) that use the same syntax as Python.
Study the JSON response to our Zandbergen query from above for a moment. At the top level we have a dictionary that describes the response. One entry “totalItems” in the dictionary says that the response contains 16 results. The entry “items” contains these results as a list of dictionaries/objects. The first dictionary from the list is the one for our course textbook. One attribute of this dictionary is “volumeInfo”, which is again a dictionary/object whose attributes include the title of the book and name of the author. Please note that the “authors” attribute is again a list because books can have multiple authors. If you scroll down a bit, you will see that at some point the dictionary for the Zandbergen book is closed with a “}” and then a new dictionary for another book starts which is the second item from the “items” list, and so on.
After this explanation of web APIs and JSON, here is the Python code to run this query and process the returned JSON code:
import requests, urllib.parse

url = "https://www.googleapis.com/books/v1/volumes"
query = "Zandbergen Python"

parameterString = "?q=" + urllib.parse.quote(query)

response = requests.get(url + parameterString)
jsonCode = response.json()

print(jsonCode['items'][0]['volumeInfo']['title'])
Output:
Python Scripting for Arcgis
We here define the base URL for this web API call and the query term string in different variables (lines 3 and 4). You saw above that certain characters like spaces appearing in URLs need to be encoded in certain ways. When we enter such URLs into a browser, the browser will take care of this but if we construct the URL for a request in our code we have to take care of this ourselves. Fortunately, the urllib.parse module provides the function quote(…) for this, which we use in line 6 to construct the correctly encoded parameter list which is then combined with the base url in the call of requests.get(…) in line 8.
By using the json() method of the response object in line 9, we get a Python data structure that will represent the JSON response and store it in variable jsonCode. In this case, it is a dictionary that under the key “items” contains a Python list with dictionaries for the individual book items returned. In line 11, we use this data structure to access the 'title' attribute of the first book item in the list: With ['items'] we first get the “items” list, then we take the first element from that list with [0], then we access the 'volumeInfo' property of the resulting dictionary, and finally with ['title'] we get the 'title' attribute from the volume info dictionary.
The code from above was supposed to show you how you to explicitly encode parameters for web API requests (with the help of urllib.parse.quote(...)) and build the final URL. The great thing about the requests module is that it can take care of all these things for you: You can simply provide an additional parameter for get(…) that contains a dictionary of parameter names for the web request and what values should be assigned to these parameters. Requests then automatically encodes these values and builds the final URL. Here is the version of the previous example that uses this approach.
import requests

url = "https://www.googleapis.com/books/v1/volumes"
query = "Zandbergen Python"

response = requests.get(url, {'q': query})
jsonCode = response.json()

print(jsonCode['items'][0]['volumeInfo']['title'])
The dictionary with parameters for the web request that we use in line 6 says that the value assigned to parameter 'q' should be the string contained in variable query. As said, requests will automatically take care of encoding special characters like spaces in the parameter values and of producing the final URL from them.
You will see more examples of using web APIs and processing the JSON code returned in the first walkthrough of this lesson. These examples will actually return GeoJSON code which is a standardized approach for encoding spatial features in JSON including their geometry data. However, there is a rather large but also very interesting topic that we have to cover first.