1.8 Version control systems, Git, and GitHub
Version control systems
Software projects can often grow in complexity and expand to include multiple developers. Version control systems (VCS) are designed to record changes to data and encourage team collaboration. Data, often software code, can be backed up to prevent data loss and track changes made. VCS are tools to facilitate teamwork and merging of different contributor’s changes. Version control [1] [1] is also known as “revision control.” Version control tools like Git can help development teams or individuals manage their projects in a logical, procedural way without needing to email copies of files around and worry about who made what changes in which version.
Differences between centralized VCS and distributed VCS
Centralized VCS, like Subversion (SVN), Microsoft Team Foundation Server (TFS) and IBM ClearCase, all use a centralized, client-server model for data storage and to varying degrees discourage “branching” of code (discussed in more detail below). These systems instead encourage a file check-out, check-in process and often have longer “commit cycles” where developers work locally with their code for longer periods before committing their changes to the central repository for back-up and collaboration with others. Centralized VCS have a longer history in the software development world than DVCS, which are comparatively newer. Some of these tools are difficult to compare solely on their VCS merits because they perform more operations than just version control. For example, TFS and ClearCase are not just VCS software, but integrate bug tracking and release deployment as well.
Distributed VCS (DVCS) like Git (what we’re focusing on) or Mercurial (hg), all use a decentralized, peer-to-peer model where each developer can check out an entire repository to their local environment. This creates a system of distributed backup where if any one system becomes unavailable, the code can be reconstructed from a different developer’s copy of the repository. This also allows off-line editing of the repository code when a network connection to a central repository is unavailable. As well, DVCS software encourages branching to allow developers to experiment with new functionality without “breaking” the main “trunk” of the code base.
A hybrid VCS might use the concept of a central main repository that can be branched by multiple developers using DVCS software, but where all changes are eventually merged back to the main trunk code repository. This is generally the model used by online code repositories like GitHub or Bitbucket.
Basics of Git
Git is a VCS that stores and tracks source code in a repository. A variety of data about code projects is tracked such as what changes were made, who made them, and comments about the changes [3] [2]. Past versions of a project can be accessed and reinstated if necessary. Git uses permissions to control what changes get incorporated in the master repository. In projects with multiple people, one user will be designated as the project owner and will approve or reject changes as necessary.
Changes to the source code are handled by branches, merges, and commits. Branching, sometimes called forking, lets a developer copy a code repository (or part of a repository) for development in parallel with the main trunk of the code base. This is typically done to allow multiple developers to work separately and then merge their changes back into a main trunk code repository.
Although Git is commonly used on code projects with multiple developers, the technology can be applied to any number of users (including one) working on any types of digital files. More recently, Git has gained in popularity since it is used as the back end for GitHub among other platforms. Although other VCS exist, Git is frequently chosen since it is free, open source, and easily implemented.
Dictionary
Git has a few key terms to know moving forward [2] [3]:
- Repository (n.)- place where the history of work is stored
- Clone (n.)- a copy you make of someone else’s repository which you may or may not intend to edit
- Fork (v.)- the act of copying someone else’s repository, usually with the intent of making your own edits
- Branch (n.)- similar to a clone, but a branch is a copy of a repository created by forking a project. The intent with a branch is to make edits that result in either reconciling the branch to the parent repository or having the branch become a new separate repository.
- Merge (v.)- integrating changes from one branch into another branch
- Commit (n.)- an individual change to a file or set of files. It’s somewhat similar to hitting the “save” button.
- Pull (v.)- integrating others’ changes into your local copy of files
- Pull request (n.)- a request from another developer to integrate their changes into the repository
- Push (v.)- sending your committed changes to a remote repository
Basic Git progression
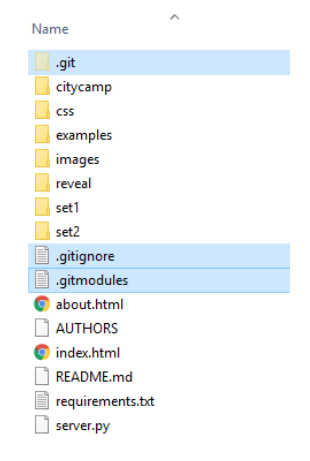
A Git repository begins as a folder, either one that already exists or one that is created specifically to house the repository. For the cleanest approach, this folder will only contain folders and files that contribute to one particular project. When a folder is designated as a repository, Git adds one additional hidden subfolder called .git that houses several folders and files and two text files called .gitignore and .gitmodule as highlighted in Figure 1.29
These file components handle all of the version control and tracking as the user commits changes to Git. If the user does not commit their changes to Git, the changes are not “saved” in the version control system. Because of this, it’s best to commit changes at fairly frequent intervals. The committed changes are only active on one particular user’s computer at this point. If the user is working on a branch of another repository, they will want to pull changes from the master repository fairly often to make sure they’re working on the most recent version of the code. If a conflict arises when the branch and the master have both changed in the same place in different ways, the user can work through how to resolve the conflict. When the user wants to integrate their changes with the master repository, the user will create a pull request to the owner of the repository. The owner will then review the changes made and any conflicts that exist, and either choose to accept the pull request to merge the edits into the master repository or send the changes back for additional work. These workflow steps may happen hundreds or thousands of times throughout the lifetime of a code project.
On its own, Git operates off a command line interface; users perform all actions by typing commands. Although this method is perfectly fine, visualizing what’s going on with the project can be a bit hard. To help with that, multiple GUI interfaces have been created to visualize and thus simplify the version control process, and some IDEs include built-in version control hooks. Currently, GitHub is the most popular front-end for Git and offers a free version for basic users.
Resources:
[1] https://en.wikipedia.org/wiki/Version_control
[2] https://github.com/kansasgis/GithubWebinar_2015
[3] https://en.wikipedia.org/wiki/Git
1.8.1 Introduction to Online VCS and GitHub
Introduction to Online VCS
Some popular online hosting solutions for VCS and DVCS code repositories include: GitHub, Bitbucket, Google Code and Microsoft CodePlex. These online repositories are often used as the main trunk repositories for open-source projects with many developers who may be geographically dispersed. For the purposes of this class, we will focus on GitHub.
Introduction to GitHub
GitHub takes all of Git’s version control components, adds a graphical user interface to repositories, change history, and branch documentation, and adds several social components. Users can add comments, submit issues, and get involved in the bug tracking process. Users can follow other GitHub users or specific projects to be notified of project updates. GitHub can either be used entirely online or with an application download for easily managing and syncing local and online repositories. Optional (not required for class): Click here for the desktop application download [4].
The following exercise will cover the basics of Git and how they’re used in the GitHub website.
Git Exercise in GitHub
- Go to GitHub's website [5] and sign up for an account using any email and password you like. If you already have a GitHub account, feel free to use that.
- Follow the instructions posted at the GitHub Guides Hello World page [6].
GitHub's change log
GitHub has the ability to display everything that changed with every commit. Take a look at GitHub's Kansasgis/NG911 page [7]. If you click on one of the titles of one of the commits, it displays whatever basic description the developer included of the changes and then as you scroll down, you can see every code change that occurred - red highlighting what was removed and green highlighting what was added. If you mouse over the code, a plus sign graphic shows up, and users can leave comments and such.
Resolving conflicts on GitHub
Conflicts occur if two branches being merged have had different changes in the same places. Git automatically flags conflicts and will not complete the merge like normal; instead, the user will be notified that the conflicts must be resolved. Some conflicts can be resolved inside GitHub, and other types of conflicts have to be resolved in the Git command line [4] [8]. Due to the complexity of resolving conflicts in the command line, it’s best to plan ahead and silo projects as much as possible to avoid conflicts.
Git adds three different markers to the code to flag conflicts:
<<<<<<<HEAD – This marker indicates the beginning of the conflict in the base branch. The code from the base branch is located directly under this marker.
======= – This marker divides the base branch code from the other branch.
>>>>>>> BRANCH-NAME – This marker will have the name of the other branch next to it and indicates the end of the conflict.
Here’s a full example of how Git flags a conflict between branches:
<<<<<<<HEAD
myString = “Monty Python and the Holy Grail is the best. ”
=======
myString = “John Cleese is hilarious.”
>>>>>>> cleese-branch
To resolve the conflict, the user needs to pick what myString will equal. Possible resolution options-
Keeping the base branch -
myString = “Monty Python and the Holy Grail is the best.”
Using the other branch -
myString = “John Cleese is hilarious.”
Combining branches, in this case combining the options -
myString = “Monty Python and the Holy Grail is the best. John Cleese is hilarious.”
GitHub has an interface that can be activated for resolving basic conflicts by clicking on the “Resolve Conflicts” button under the “Pull Requests” tab. This interface steps through each conflict and the user must decide which version to take, keep their changes, use the other changes, or work out a way to integrate both sets of changes. Inside the GitHub interface, the user must also remove the Git symbols for the conflict. The user steps through every conflict in that particular file to decide how to resolve the conflict and then will eventually click on the “Mark as resolved” button. The next file in the project with conflicts will show up and the user will repeat all of the steps until the conflicts are resolved. At this point, the user will click “Commit merge” and then “Merge pull request.”
For more complex types of conflicts like one branch deleting a file that the other keeps, the resolution has to take place in the Git command line. This process can hopefully be avoided, but basic instructions are available at GitHub Help: Resolving a merge conflict using the command line [9].
Resources:
[4] https://help.github.com/articles/resolving-a-merge-conflict-on-github/ [8]
1.8.2 Open source and large companies
GitHub is a great fit for managing open source code projects since, with a free account, all repositories are available on the internet at large. For example, the open source GIS software QGIS (see Lesson 4) is housed on GitHub at GitHub's qgis/QGIS page [10]. Take a look at the repository.
On the front page, you can see in the dashboard statistics that (at the time of this writing) there have been over 40,000 commits, 50 branches, 100 releases, and 250 contributors to the QGIS project. Users worldwide can now contribute their ideas, bugs, and code improvements to a central location that can be managed with standard version control workflows.
Some software companies that have traditionally been protective about their code have adopted GitHub to open certain projects. Esri is rather active on GitHub at GitHub's Esri page [11] including the documentation and samples for the ArcGIS API for Python (see Lesson 3). Microsoft also is present at the GitHub Microsoft page [12] with the tagline “Open source, from Microsoft with love.”
1.8.3 GitHub and Python
While GitHub is open to all digital files and any programming languages, Python is a great fit for use in GitHub for multiple reasons. Unlike other, heavier programming languages, Python doesn’t require extensive libraries with complex dlls and installation structures to get the job done.
Creating Python repositories is as simple as adding the .py files, and then the project can be shared, documented, and updated as needed. GitHub is also a great place to find both Python snippets and entire modules to use. For basic purposes, users can copy/paste just the portions of code off another project they want to try. Otherwise, users can fork an entire repository and tweak it as necessary to fit their purposes.
1.8.4 GitHub's README file
GitHub strongly recommends that every repository contain a README.txt or README.md file. This file will act as the “home page” for the project and is displayed on the repository page after files and folders are listed. This document should contain specific information about the project, how to use it, licensing, and support.
Text files will show up without formatting, so many users choose to use an .md (markdown) file instead. Markdown notation will be interpreted to show various formatting components like font size, bold, italics, imbedded links, numbered lists, and bullet points.
For more information on markdown formatting, visit GitHub Guide's Mastering Markdown page [13]. We will also use Markdown in Lesson 3, in the context of Jupyter notebooks, and provide a brief introduction there.
1.8.5 Gists and GeoJson
Gists
While all free GitHub accounts are required to publish public repositories, all accounts have the ability to create Gists. Gists are single page repositories in GitHub, so they don't support projects with folder structures or multiple files. Since Gists are a single page repository, they are good for storing code snippets or one page projects. Gists can be public or private, even with a free account.
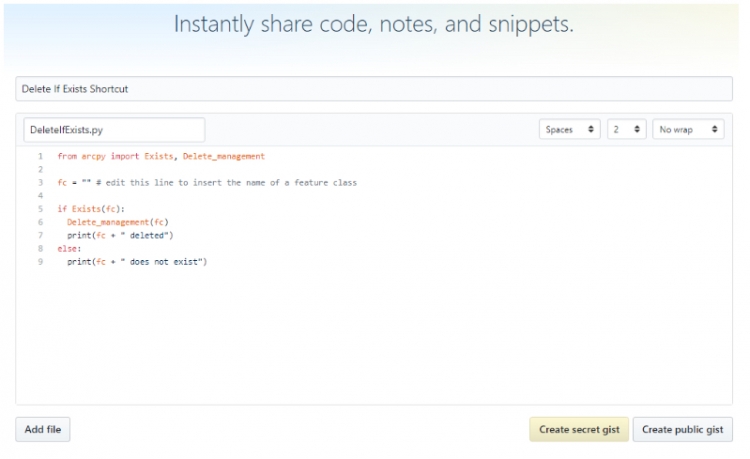
To create a Gist in GitHub, log into GitHub and then click on the plus sign in the upper right hand corner. In the options presented, choose "New gist." Enter a description of the Gist (in figure 1.30 "Delete if Exists Shortcut" is the description) as well as the filename with extension (in figure 1.30 this is DeleteIfExists.py). Enter code or notes in the large portion of the screen or import the code by using the "Add File" button. You have two options for saving your Gist- either "Create secret gist" or "Create public gist."
"Secret" Gists are only mostly secret since they use the internet philosophy of difficult-to-guess urls. If you create a secret Gist, you can still share the Gist with anyone by sending them the url, but there are no logins required to view the Gist. Along this same philosophy, if someone stumbles across the url, they will be able to see the Gist.
For more information about Gists, see the official GitHub documentation at "About Gists" page on Github's website [14].
GeoJson
For GIS professionals, Gists are additionally useful since a Gist can be a single GeoJson file. GeoJson files are essentially a text version of geographic data in json formatting. Other developers can instantly access your GeoJson data and incorporate it from GitHub into their online mapping applications without needing to get a hard copy of the shapefile or geodatabase feature class or rely on some kind of map server. GitHub will automatically display GeoJson files as a map whether the file is a Gist or a part of a larger repository. For example, take a look at GitHub's lyzidiamond/learn-geojson page [15]. At first, you’ll see the GeoJson file interpreted as a map. If you click the “Raw” button located on the upper right-ish side of the map, you will see what the GeoJson file looks like in text form. GeoJson can be easily used in Python since after reading in the file, Python can work with the text as if it is one giant dictionary.
1.8.6 GitHub Conclusion
Using GitHub in This Course
In GEOG 489, using GitHub to store the sample code and exercise code from the lessons can be a great way to practice and gain experience with a new software tool. Using GitHub is not required and we don't recommend that you store your completed projects on there. GitHub is an encouraged platform for students to learn since many organizations use GitHub or other VCS.
Conclusion
Git and GitHub provide fast and convenient ways to track projects, whether the project is by one individual or a team of software developers. Although GitHub has many complex features available, it’s easily accessible for individual and small projects that need some kind of tracking mechanism. In addition to version control, GitHub provides users with a social platform for project management as well as the ability for users to create Gists and store GeoJson.