4.9 Inheritance in GUI Programming
Inheritance also plays an important role in GUI programming. For instance, the widget classes of a GUI library are typically organized in a class hierarchy with some basic class like QWidget towards the top and more specialized widgets like buttons and dialog boxes derived from it. Other parts of the GUI library like the event system are also typically organized hierarchically. Have a quick look at this QT class chart [1] and see how, for instance, the QPushButton is a subclass of QWidget with an intermediate class QButton in between from which also other types of buttons like QCheckbox and QRadioButton are derived. This chart is for version 3 of QT; the chart for version 5 has unfortunately somehow disappeared but the relation between these classes is still the same in QT5.
Let’s think back to the GUI programming sections from Lesson 2: there, we often created widgets, stored them in a variable, and then made changes to the widgets like changing their properties and adding child widgets from the main part of the code. For instance, in the miles-to-kilometers conversion tool from Section 2.5.2.3, we created a QWidget for the main window and then changed its properties and added the child widgets for the other GUI elements like this:
rootWindow = QWidget()
rootWindow.setWindowTitle("Miles to kilometers")
rootWindow.resize(500, 200)

gridLayout = QGridLayout(rootWindow)

labelMiles = QLabel('Distance in miles:')
gridLayout.addWidget(labelMiles, 0, 0)
… and so on. We mainly took this approach because at that point we hadn’t covered the fundamentals of object-oriented programming and inheritance yet and our examples were still rather simple. Typically, what one would rather do is use inheritance to create a new widget class derived from an existing widget class. This new class then implements some specialized behavior compared to its base class and encapsulates everything related to this kind of widget in a single class definition. For instance, for the conversion tool, it makes sense to define a new class that is derived from QWidget like this:
from PyQt5.QtWidgets import QApplication, QWidget, QLabel, QGridLayout, QLineEdit, QPushButton

class ConverterWidget(QWidget):

	def __init__(self):
		super(ConverterWidget,self).__init__()

 		self.setWindowTitle("Miles to kilometers")
		self.resize(500, 200)

		self.gridLayout = QGridLayout(self)

		self.labelMiles = QLabel('Distance in miles:')
		self.gridLayout.addWidget(self.labelMiles, 0, 0)

		self.labelKm = QLabel('Distance in kilometers:')
		self.gridLayout.addWidget(self.labelKm, 2, 0)

		self.entryMiles = QLineEdit()
		self.gridLayout.addWidget(self.entryMiles, 0, 1)

		self.entryKm = QLineEdit()
		self.gridLayout.addWidget(self.entryKm, 2, 1)

		self.convertButton = QPushButton('Convert')
		self.gridLayout.addWidget(self.convertButton, 1, 1)

		self.convertButton.clicked.connect(self.convert)

	def convert(self):
         miles = float(self.entryMiles.text())
         self.entryKm.setText(str(miles * 1.60934))

app = QApplication([])
converter = ConverterWidget()

converter.show()
app.exec_()
In line 3, we say that our new class ConverterWidget should be derived from the PyQT5 class QWidget, meaning it will inherit all instance variables and methods (like setWindowTitle(…) and resize(…)) from QWidget. In the constructor of our class, we first call the constructor of the base class (line 6) and then set up the GUI of our widget similar to how we did this before from the main part of the code. However, now we store the different child widgets in instance variables (e.g., self.gridLayout) and invoke methods as self.setWindowTitle(…), for instance, because these are now inherited methods of this new class. The convert() event handler function has become a method of our new class and we connect it to the “clicked” signal of the button in line 28 using the prefix “self.” because it is a method of the class we are defining here. The main code of the program following the class definition has become very simple now: we just create an instance of our new class ConverterWidget in variable converter in line 35 and then call its show() method (inherited from QWidget) to make the widget show up on the screen.
As a result of defining a new widget class via inheritance, we now have everything related to our conversion widget nicely encapsulated in the class definition, which also helps in keeping the main code of our script as simple and clean as possible. If we need a conversion widget as part of another project, all we would need to move over to this project is the class definition of ConverterWidget. Another advantage that is not immediately obvious in this toy example is the following: think of situations in which you might need several instances of the widget. In the original version you would have to repeat the code for producing the converter widget. Here you can simply create another instance of the ConverterWidget class by repeating the command from line 35 and store the created widget in a different variable.
4.9.1 Another example involving painting on PyQ5 widgets
Understanding this idea of building reusable GUI components via inheritance is so important that we should look at another example. While doing so, we will also learn how you can actually programmatically draw on a widget to display your own content. What we are going to do is take the classes from our Geometry hierarchy from the previous section and create a widget that actually draws the instances of the classes we have stored in a list to the screen. To make this a bit more interesting, we also want all the objects of the different geometry types to have a “color” attribute that determines in which color the object should be drawn. Before we look at what changes need to be made to the different geometry classes, here is a quick introduction to drawing with PyQt5.
Every widget in QT5 has a method called paintEvent(…) that is called when the widget needs to be drawn (for instance, when its drawn for the first time or when the size of the widget has changed). The only parameter passed to this method is an event object that can be used to get the current dimensions of the content area that we can draw on by calling its rect() method. That means when we want to use a widget for drawing something on it, we derive a new class from the respective widget class and override the paintEvent(…) method with our own implementation that takes care of the drawing. To do the actual drawing, we need to create an object of the class QPainter and then use the drawing methods it provides. Here is a simple example; the details will be explained below:
import sys
from PyQt5 import QtGui, QtWidgets
from PyQt5.QtCore import Qt, QPoint

class MyWidget(QtWidgets.QWidget):

    def paintEvent(self, event):
        qp = QtGui.QPainter()
        qp.begin(self)

        qp.setPen(QtGui.QColor(200,0,0))
        qp.drawText(20,20, "Text at fixed coordinates")
        qp.drawText(event.rect(), Qt.AlignCenter, "Text centered in the drawing area")
        qp.setPen(QtGui.QPen(Qt.darkGreen, 4))
        qp.drawEllipse(QPoint(50,60),30,30)
        qp.setPen(QtGui.QPen(Qt.blue, 2, join = Qt.MiterJoin))
        qp.drawRect(20,60,50,80)

        qp.end()

app = QtWidgets.QApplication(sys.argv)

window = MyWidget()
window.show()

sys.exit(app.exec_())
When you run this small script, you should see the following window on your screen:

Let’s look at the coarse structure first: we are defining a new class derived from QWidget and only overriding the paintEvent(…) method, meaning in all other aspects this widget will behave like an instance of QWidget. In the main code, we simply create an instance of our new widget class and make it show up on the screen. Now, let’s look at the body of method paintEvent(…): The first thing to note here is that all drawing needs to be preceded by the creation of the QPainter object (line 8) and the call of its begin(…) method using “self” as the parameter standing for the widget object itself because that is what we want to draw on (line 9). To conclude the drawing, we need to call the end() method of the QPainter object (line 19).
Next, let us look at the methods of the QPainter object we are invoking that all start with “draw…”. These are the methods provided by QPainter to draw different kinds of entities like text, circles or ellipses, rectangles, images, etc. We here use the method drawText(…) twice to produce the two different lines of text (lines 12 and 13). The difference between the two calls is that in the first one we use absolute coordinates, so the text will be drawn at pixel coordinates 20, 20 counting from the top left corner of the widget’s content area. The second call takes a rectangle (class QRectF) as the first parameter and then draws the text within this rectangle based on the additional text options given as the second parameter which here says that the text should be centered within the rectangle. This is an example where a class provides several methods with the same name but different parameters, something that is called overloading. If you check out the documentation of QPainter [2], you will see that most methods come in different versions. Now go ahead and resize the window a bit and see how the text produced by the first call always remains at the same absolute position, while that from the second call always stays centered within the available area.
In line 15, we use the method drawEllipse(…) to produce the circle. There is no special circle drawing method, so we use this one and then provide the same number for the two radii. To draw the rectangle, we use the method drawRect(…) in the version that takes the coordinates of the corner plus width and height values as parameters.
The remaining calls of methods of the QPainter object are there to affect the way the objects are drawn, e.g. their color. Colors inPyQt5 are represented by instances of the class QColor. In line 11, we create a new QColor object by providing values between 0 and 255 for the color’s red, green, and blue values. Since the red value is 200 and both green and blue are zero, the overall color will be the kind of red that the text appears in. QT5 also has a number of predefined colors that we are using in lines 14 (Qt.darkGreen) and 16 (Qt.blue).
QPainter uses objects of class QPen [3] and QBrush [4] to draw the boundary and inside of a shape. In line 11, it is stated that a pen with red color should be used for the following drawing operations. As a result, both text lines appear in red. In line 14, we create a new QPen object to be used by the QPainter and specify that the color should be dark green, and the line width should be 4. This is used for drawing the circle. In line 16, we do the same with color blue and line width 2, and, in addition, we say that sharp corners should be used for the connection between to adjacent line segments of the shape’s border. This is used for drawing the rectangle. We won’t go further into the details of the different pen and brush properties here but the documentation of the QPen and QBrush classes provides some more examples and explanations. In addition, you will see more use cases in the walkthrough in the next section.
4.9.2 Adapting the geometry example
We are now going to revist the geometry example we saved in Section 4.8.
To prepare our geometry classes to be drawn on the screen, we first need to modify their definitions by
- introducing the new “color” instance variable for storing a QColor object,
- defining a method called “paint” for drawing the respective object on a screen. This method will have one parameter called “painter” for passing an object of the QPainter class that can be used for drawing onto the widget.
As an exercise, think about where in the class hierarchy you would need to make changes to address points (1) and (2). Once you have thought about this for a bit, read on.
The new attribute “color” is something that all our geometry classes have in common. Therefore, the best place to introduce it is in the root class Geometry. In all subclasses (Circle, Rectangle, Square), you then only have to adapt the constructor to include an additional keyword parameter for the color. Regarding point (2): As we saw above, drawing a circle or a rectangle requires different methods of the QPainter object to be called with different kinds of parameters specific to the particular geometry type. Therefore, we define the method paint(…) in class Geometry but then override it in the subclasses Circle and Rectangle. For class Square, the way it is based on class Rectangle allows us to directly use the implementation of paint(…) from the Rectangle class, so we do not have to override the method in the definition of Square. Here are the changes made to the four classes.
Class Geometry: as discussed, in class Geometry we introduce the “color” variable, so we need to change the constructor a bit. In addition, we add the method paint(…) but without an implementation. The rest of the definition remains unchanged:
class Geometry:

	def __init__(self, x = 0.0, y = 0.0, color = Qt.black):
       	 self.x = x
         self.y = y
         self.color = color

    ...

    def paint(self, painter):
         pass
Classes Circle and Rectangle: for the classes Circle and Rectangle, we adapt the constructors to also include a keyword argument for “color”. The color is directly passed on to the constructor of the base class, while the rest of the constructor remains unchanged. We then provide a definition for method paint(…) that sets up the Pen object to use the right color and then uses the corresponding QPainter method for drawing the object (drawEllipse(…) for class Circle and drawRect(…) for class Rectangle) providing the different instance variables as parameters. The rest of the respective class definitions stay the same:
class Circle (Geometry):

    def __init__(self, x = 0.0, y = 0.0, radius = 1.0, color = Qt.black):
         super(Circle,self).__init__(x,y,color)
         self.radius = radius

    ...

    def paint(self, painter):
         painter.setPen(QtGui.QPen(self.color, 2))
         painter.drawEllipse(QPoint(self.x, self.y), self.radius, self.radius)


class Rectangle(Geometry):

    def __init__(self, x = 0.0, y = 0.0, width = 1.0, height = 1.0, color = Qt.black):
         super(Rectangle,self).__init__(x,y, color)
         self.width = width
         self.height = height

    ...

    def paint(self, painter):
         painter.setPen(QtGui.QPen(self.color, 2,  join = Qt.MiterJoin))
         painter.drawRect(self.x, self.y, self.width, self.height)
Class Square: sor the Square class, we just adapt the constructor to include the color, the rest remains unchanged:
class Square(Rectangle):

    def __init__(self, x = 0.0, y = 0.0, sideLength = 1.0, color = Qt.black):
         super(Square,self).__init__(x, y, sideLength, sideLength, color)
Now that we have the geometry classes prepared, let us again derive a specialized class GeometryDrawingWidget from QWidget that stores a list of geometry objects and in the paintEvent(…) method sets up a QPainter object for drawing on its content area and then invokes the paint(…) methods for all objects from the list. This is bascially the same thing we did towards the end of Section 4.7.2 but now happens inside the new widget class. The list of objects is supposed to be given as a parameter to the constructor of GeometryDrawingWidget:
import math, sys
from PyQt5 import QtGui, QtWidgets
from PyQt5.QtCore import Qt, QPoint

class GeometryDrawingWidget(QtWidgets.QWidget):

     def __init__(self, objects):
         super(GeometryDrawingWidget,self).__init__()
         self.objectsToDraw = objects

     def paintEvent(self, event):
         qp = QtGui.QPainter()
         qp.begin(self)
         for obj in self.objectsToDraw:
             obj.paint(qp)
         qp.end()
Finally, we create another new class called MyMainWindow that is derived from QMainWindow for the main window containing the drawing widget. The constructor takes the list of objects to be drawn and then creates a new instance of GeometryDrawingWidget passing the object list as a parameter and makes it its central widget in line 6:
class MyMainWindow(QtWidgets.QMainWindow):

    def __init__(self, objects):
	    super(MyMainWindow, self).__init__()
	    self.resize(300,300)
	    self.setCentralWidget(GeometryDrawingWidget(objects))
In the main code of the script, we then simply create an instance of MyMainWindow with a predefined list of geometry objects and then call its show() method to make the window appear on the screen:
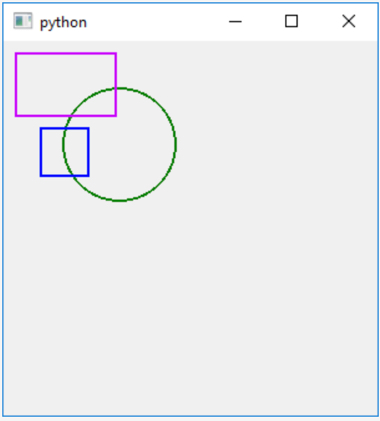
app = QtWidgets.QApplication(sys.argv)

objects = [ Circle(93,83,45, Qt.darkGreen), Rectangle(10,10,80,50, QtGui.QColor(200, 0, 250)), Square(30,70,38, Qt.blue)]

mainWindow = MyMainWindow (objects)
mainWindow.show()

sys.exit(app.exec_())
When you run the program, the produced window should look like in the figure below. While this is not really visible, every time you resize the window, the paintEvent(…) method of GeometryDrawingWidget will be called and the content consisting of the three geometric objects will be redrawn. While in this simple widget, we only use fixed absolute coordinates so that the drawn content is independent of the size of the widget, one could easily implement some logic that would scale the drawing based on the available space.