2.8.2 Python Package Management
There are many Python packages available for use, and there are a couple of different ways to effectively manage (install, uninstall, update) packages. The two package managers that are commonly used are pip and conda. In the following sections, we will discuss each of them in more detail. At the end of the section, we will discuss the merits of the two tools and make recommendations for their use.
We will be doing some more complicated technical "stuff" here so the steps might not work as planned because everyone’s PC is configured a little differently. If you get stuck please check in with the instructor sooner rather than later. A quick troubleshooting / debugging process can involve testing to see if running the command or Command Prompt as Administrator resolves the issue, trying the Windows Command prompt instead of the Python Command prompt (or vice versa), and, if none of that has helped, trying the tech support staple of restarting your PC.
2.8.2.1 Pip
As already mentioned, pip is a Python package manager. It allows for an easier install, uninstall and update of packages. Pip comes installed with Python, and if you have multiple versions of Python you will have a different version of pip for each. To make sure we are using the version of pip that comes installed with ArcGIS Pro, we will go to the directory where pip is installed. Go to the Windows Start Menu and open the Python Command Prompt as before.
In the command window that now opens, you will again be located in the default Python environment folder of your ArcGIS Pro installation. For newer versions of Pro this will be C:\Users\<username>\AppData\Local\ESRI\conda\envs\arcgispro-py3-clone\. Pip is installed in the Scripts subfolder of that location, so type in:
cd Scripts
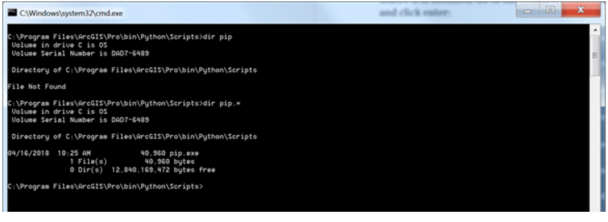
Now you can run a command to check that pip is in the directory – type in:
dir pip.*
The resulting output will show you all occurrences of files that start with pip. in the current folder, in this case, there is only one file found – pip.exe.
Next, let’s run our first pip command, type in:
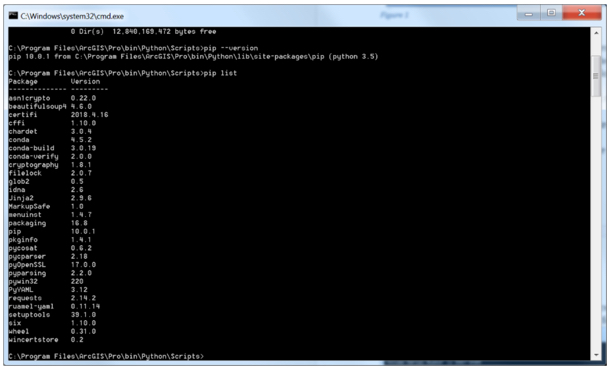
pip --version
The output shows you the current version of pip. Pip allows you to see what packages have been installed. To look at the list type in:
pip list
The output will show (Figure 31) the list of packages and their respective versions.
To install a package, you run the pip command with the install option and provide the name of the package, for example, try:
pip install numpy
Pip will run for a few seconds and show you a progress bar as it is searching for the numpy package online and installing it. When you run pip install, the packages are loaded from an online repository named PyPI, short for Python Package Index. You can browse available packages at Python's Package Index page [1]. If the installation has been successful you will see a message stating the same, which you can confirm by running pip list again.
In order to find out if any packages are outdated you can run the pip list with the outdated option:
pip list –-outdated
If you find that there are packages you want to update, you run the install with the upgrade option, for example:
pip install numpy –-upgrade
This last command will either install a newer version of numpy or inform you that you already have the latest version installed.
If you wanted to uninstall a package you would run pip with the uninstall option, for example:
pip uninstall numpy
You will be asked to confirm that you want the package uninstalled, and, if you do (better not to do this or you will have to install the package again!), the package will be removed.
The packages installed with pip are placed in the Lib\site-packages folder of the Python environment you are using. You will recall that that was one of the search locations Python uses in order to find the packages you import.
2.8.2.2 Optional complementary materials: Building a pip package
Important note: While knowing how to create packages from your Python code to disseminate it is an important skill for a Python programmer, the procedure described in this section is a bit complex and error-prone due to system and installation differences. It is also not required to have performed these steps successfully yourself to finish the lesson and the rest of the course. Therefore, this section is provided for interest only. We recommend that you just read through it or skip over it completely and you can then loop back to it at the end of the lesson if you have free time or after the end of the class. If you decide to go through the steps yourself and find yourself stuck with some errors, please feel free to ask about them on the course forums but don't let such issues keep you from reading through the rest of the section and finishing the lesson.
Now that we covered the basic operation of pip, we will create a pip package for the Locations From Web Services you developed in this lesson. Creating the pip package will involve the following steps:
- Creating a __init__.py file
- Creating a setup.py file
- Installing the package
- Creating a source distribution
- Creating an account on PyPI (you need to set up an account only once)
- Publishing the package and the source to PyPI
We will walk through all these steps and create the necessary files and folders. For reference, as you are reading on, your final package folder and file structure should look like this for pip:
<yourinitialsdate>locationsfromwebservices
├── setup.py
└── <yourinitialsdate>locationsfromwebservices
   ├── __init__.py
   ├── core_function.py
   ├── gui_main.py
   ├── gui_main.ui
   ├── gui_newshapefile.py
   ├── gui_newshapefile.ui
   └── main.py
Let’s start by creating a separate folder and copying the existing code files into it. Create a pip directory in a location of your choice. Then create a folder named <yourinitialsdate>locationsfromwebservices within it. Replace the <yourinitialsdate> part of the folder name with the combination of your initials and current date and leave out the <>. From now on in the lesson wherever you see that string, replace it with your own combination. Pip packages have to have unique names, otherwise you will not be able to upload them to the repository. Within that folder create another <yourinitialsdate>locationsfromwebservices folder. Copy all the code files you created (or downloaded) for the GUI walkthrough for the Locations from Web Services example in the previous section into this latest (inner) <yourinitialsdate>locationsfromwebservices folder.
Once the folder is set up use your Python editor or other text editor of choice to create the __init__.py file and place it in the same directory. The file is used by Python to indicate folders that are Python packages. We will leave the file blank – only its presence in the folder is required. The file need not be blank, however. It is a special file that gets executed once the package is imported into another package. It is written in standard Python, so it can contain regular code, and is often used to import other packages, so other modules in the package can import it from the package instead.
Let’s proceed to the second step – creating the setup.py file. The file needs to be located in the folder above the code, in the top level <yourinitialsdate>locationsfromwebservices folder. If that is confusing refer back to the folder tree diagram above. Type in the following content into the file:
from setuptools import setup, find_packages

setup(name='<yourinitialsdate>locationsfromwebservices',
      version='1.0',

description='<yourinitialsdate>locationsfromwebservices',
      url='http://drupal.psu.edu/geog489/',
      author='GEOG489',
      author_email='GEOG489@psu.edu',
      license='BSD',
      packages=find_packages(),
      install_requires=['pyqt5'],
      zip_safe=False)
Now we are ready to install the package. Please make sure that there are no other Python processes running; this includes quitting ArcGIS and/or spyder if they are currently running. In the Python Command Prompt window navigate to the location of your project, specifically the folder containing the setup.py file. Once there, type in and run this command (note the '.' at the end of the command which is important):
pip install .
You will receive some status update messages ending with the notification that the package has been successfully installed. You may get a notification you are using an outdated version of pip. Please do not update pip or any other package, as then your set up would be out of sync with the class material.
In order to upload the source to PyPI, the Python Package Index, we need to create a source distribution. To do so type in and run this command:
python setup.py sdist
The sdist option creates a new folder in your project named dist and packages all the necessary files for upload into a tar.gz file, which is a compressed file type.
Now that we have everything ready for upload, go to the Python Package Index page [1] and click on Register (top right corner), and proceed to create an account. You will need to log into your e-mail account and click the link to verify the account before you can make any uploads. Once you have an account enter the following in the Command Prompt window:
python setup.py sdist upload
You will be asked for your user credentials (or at least your password). Please enter them and the upload will start.
It is very likely you will get an error "error: Upload failed (403): Invalid or non-existent authentication information" that means your username wasn't specified.
The solution to this issue is twofold: First you need to create a file called .pypirc in your home directory (that is c:\Users\<your user name>). You can download this sample configuration file [2], place it in your home directory, and then edit it to put in your user credentials. Second, you need to install another package called twine:
pip install twine
Once twine is installed:
twine upload dist\*
will use twine to upload the zipped package in the dist folder to your repository (assuming you modified your username and password in the .pypirc file).
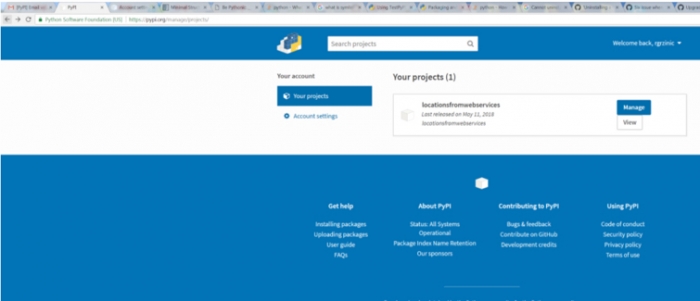
Once complete go back to your PyPI account and check the list of your projects to confirm the upload was successful. Please delete the project, as projects need to have unique names and another student attempting this process will get an error if your project remains in PyPI (although our attempt at generating a unique name with the date and our initials should minimize that chance). You need to click on Manage, then Settings and then Delete next to the project name (and type in the project name to confirm).
The package we created is a barebones package, it has absolute minimum elements to be uploaded. Two other elements you should definitely consider adding to your packages are a README and a LICENSE file. The README file would contain some information about the project – who created it, what it does, and any other notes you would like to leave for the users. The LICENSE file should spell out the license agreement for using your package. We will leave the pip package as is but will be adding a LICENSE file to our conda package.