Lesson 7: Drawing vector layers on the client side
The links below provide an outline of the material for this lesson. Be sure to carefully read through the entire lesson before returning to Canvas to submit your assignments.
Note: You can print the entire lesson by clicking on the "Print" link above.
Overview
Note: Currently, this lesson teaches the Leaflet API. If you are looking for the previous materials on OpenLayers, see the Lesson 7 archive page [1].
Last week, you used a server-drawn image from a WMS to display your business layer (the farmers markets). This week, you'll learn about an alternative way to display your business layers on the map; namely, sending the raw data to the client (such as a web browser) to be drawn. This is a common technique in many web maps that can provide for much interactivity and potentially faster performance if used appropriately. You may have even been exposed to this practice when you reviewed a web map for your assignment last week.
This lesson describes two common formats used for sending vector GIS data to the browser (KML and GeoJSON) and shows how you can add these types of layers in Leaflet.
Objectives
- Describe benefits and challenges of drawing thematic vector map layers on the client.
- Choose between KML, GeoJSON, and other formats for drawing vector data on the client.
- Understand how vector layers can be symbolized on the fly to provide a more interactive web map experience.
- Draw thematic vector layers in a web map using Leaflet and change the symbolization in response to map events.
Checklist
- Read the Lesson 7 materials on this page.
- Complete the walkthrough.
- Complete the Lesson 7 assignment.
Benefits and challenges of drawing vector layers on the client side
Up to this point, your web maps have displayed images obtained from the server: either through pre-drawn tiles or dynamically-drawn WMS maps. An alternative approach is to send some text to the client containing the coordinates and attributes of features, then allow the client to draw the layer. This approach can improve the speed and interactivity of your web map when used wisely.
You may be asking, "How does a client like a web browser know how to draw GIS data?" Although web browsers don't "know" anything about GIS, they indeed have the ability to draw vector graphics, which is just the simple process of connecting screen coordinates with a symbol. Web mapping APIs can read a series of coordinates provided in a GeoJSON file, or a KML file, to give a few examples, and convert these into screen coordinates to be drawn by the browser.
Advantages of drawing vectors on the client
Speed and interactivity are two principal advantages of drawing vector features on the client rather than the server. Once your web browser has read the vector data from the server, users of the web map can interact with the data in a lightning fast manner. Let's suppose I have a web map of the United States with all the NFL football teams displayed on it. The basemap is coming from an OpenStreetMap tiled layer. The football teams are coming from a GeoJSON file. When the map loads, all the GeoJSON for the teams is read by my web browser. This includes all geographic coordinates and the attribute information for each team. Now I can click on any team and see its information without making another request to the server. Contrast this with the farmers markets mashup from the previous lesson, which required a WMS GetFeatureInfo query to the server (and the associated wait time) any time you clicked a market.
Let's suppose I want to highlight a map symbol whenever a user hovers over it, thereby providing a visual cue that someone can click the symbol. A web browser can change the symbol styling quickly enough that this effect works. In contrast, if a round trip to the server were required on every hover event, my app (and possibly my server) could easily grind to a standstill.
Challenges with drawing vectors on the client
Not all use cases are appropriate for drawing vectors on the client side. If you're displaying hundreds of features at a time, or some complex polygons with many vertices, you're probably better off asking the server to draw the map and send it to you. Browsers can get weighed down to a crawl if handed too many vector graphics to draw at once. Sending a lot of complex graphics also results in more network traffic, as all the coordinates must be downloaded by the client.
To keep performance crisp, it's a good idea to generalize the layers that you draw on the client as much as possible, at least at the smallest map scales. For example, when displaying the United States at the nationwide level, you should not be using a file that contains every tiny coastal island in the state of Maine. You might switch to loading a more detailed file when the user zooms in past a particular scale.
Labeling can also be a challenge with browser-drawn graphics. Although web browsers can draw text on the screen at a given coordinate, they have no label placement algorithms like the ones employed by GeoServer, QGIS or TileMill. Your labels will likely overlap each other. You are better off allowing the user to discover the label through interactivity, displaying the label in a popup or HTML DIV when someone clicks a feature.
Finally, the symbol choices offered by web browsers are relatively elementary. You can always instruct the browser to draw a graphic, such as an SVG file, but you won't be able to get some of the complex lines and fills available in programs like QGIS or ArcGIS. Of course, if your client happens to be a desktop application such as QGIS, you don't have to worry as much about available symbol choices.
How to draw vectors on the client
Web mapping APIs typically provide classes for drawing vector layers with the browser; however, these go by different names with each API. For a few simple standalone vectors, you will often see a "marker" class. For more complex layers, you may see something like FeatureGroup (Leaflet) or FeatureLayer (Esri). OpenLayers has a Layer.Markers class and a Layer.Vector class for these respective purposes.
Desktop programs such as QGIS can view KML, GeoJSON, GML (described in Lesson 8), and various other text-based vector data formats.
Approaches for retrieving data from the server
When you define a vector layer, you need to specify the approach that your client will take for retrieving the data from the server. Remember that your client is not requesting map images from the server, but it does need to retrieve the coordinates of the vectors and any associated attribute information. Some popular approaches include:
- Retrieve all the data at the time the layer is loaded. In Leaflet, this is the default behavior. It requires an initial performance hit, but it makes your application responsive by ensuring that it never has to go back to the server to make another request. This approach is inappropriate for very large amounts of data.
- Retrieve only the data within the current map view. When the map view changes, make a new request. Although OpenLayers offers this approach through its "bbox" loading strategy [2], I am not aware of this functionality being available in Leaflet out of the box (please correct me if you know otherwise). It works well when there's too much data in the dataset to download at once, but it can make your map seem clunky if people zoom and pan very quickly. Sometimes, logic is incorporated to retain features already requested (for example, in the case of a small map pan where the new map view includes some features that were previously downloaded).
- Retrieve only some of the vector features from the dataset based on a filter or query condition. Leaflet offers a filter option when you create a GeoJSON layer. This can narrow down the data requested, allowing you to get the effect of the first approach (retrieve all data) without downloading the entire dataset.
- Retrieve vectors in uniformly sized chunks, or "vector tiles" as you learned about in Lesson 5. This is only possible if the server administrator has pregenerated a set of tiles. Various plugins [3]are available for consuming vector tiles via Leaflet. OpenLayers versions 3 and above have a VectorTile [4] layer class designed for this.
You may see other variations on the above approaches, including the re-loading of layers at fixed intervals to represent an ever-changing phenomenon, such as the position of a fleet of ships.
Working with vector KML
KML (Keyhole Markup Language) is a popular format for vector GIS features due to its association with Google Earth and Google Maps. KML is just XML formatted according to an open specification, previously maintained by Google, but now enshrined in an OGC standard. Although KML can define the placement of raster layers, we will focus on vector KML in this lesson.
The key XML tag behind KML is the placemark. This defines a geographic feature, a symbol, and extra information that can appear in a popup. You can see some placemarks if you save the example KML file [5] and open it in a text editor. This isn't the cleanest file, but it will do for the purposes of seeing a placemark:
<Placemark>
	   <name>Sundial, Plymouth, Devon, UK</name>
               <description><![CDATA[The gnonom is 27 feet high, the pool has 21 feet diameter.  It was designed by architect Carole Vincent from Boscastle in Cornwall and was unveiled by Her Majesty the Queen on Friday, July 22nd, 1988 at a cost of cost £70,000. The sundial runs one hour and seventeen minutes behind local clocks.
	<img src="http://www.photoready.co.uk/people-life/images/sundial-fountain.jpg">
	Image source:<a href="www.photoready.co.uk</a>]]>
           </description>
	   <LookAt>
	      <longitude>-4.142398271107962</longitude>
	      <latitude>50.37145390235462</latitude>
	      <altitude>0</altitude>
	      <range>63.33410419881957</range>
	      <tilt>0</tilt>
	      <heading>-0.0001034131369701296</heading>
	   </LookAt>
	   <styleUrl>#msn_sunny_copy69</styleUrl>
	   <Point>
	      <coordinates>-4.142446411782089,50.37160252809223,0</coordinates>
	   </Point>
	</Placemark>
This particular placemark has a single coordinate, contained in the Point tag. For polylines and polygons, the LineString and Polygon tags are used, respectively, although these do not appear in the above example.
Notice that the Description tag can contain HTML, which gives you more control over formatting popups. The full KML file is much longer than the snippet above, as it contains many points and descriptions.
Leaflet doesn't offer a way to read KML directly. This is an area where OpenLayers holds an advantage. However, Mapbox has produced a free Leaflet plugin called Omnivore that makes it fairly simple to read in vector file types, including KML. First, you need to put a reference to Omnivore in a script tag at the top of your page. You could reference it from a CDN like this:
<script src="https://cdnjs.cloudflare.com/ajax/libs/leaflet-omnivore/0.3.4/leaflet-omnivore.js"></script>
Then you can reference the KML in a layer, like this:
var runLayer = omnivore.kml('sundials.kml')
  .on('ready', function() {
    map.fitBounds(runLayer.getBounds());

    runLayer.eachLayer(function(layer) {
      layer.bindPopup(layer.feature.properties.description);
    });
  })
  .addTo(map);
One thing to be aware of is that Omnivore converts the KML to the GeoJSON format before displaying it; (see the next section of the lesson for more info on GeoJSON). Thus, your map may not be able to show all the styling that was originally defined in the KML. If your KML contains some kind of custom picture symbol for the points, you'll need to write Leaflet code to apply that picture to the markers. Notice, however, that the above code does bring in the KML description and applies that text in a popup. This is accomplished using the bindPopup method on the layer.
Again, don't worry about memorizing all the syntax. In most scenarios, you should just be able to tweak the above example to connect to your own KML.
Working with GeoJSON
GeoJSON is a widely-used data format for displaying vectors in web maps. It is based on JavaScript object notation, a simple and minimalist format for expressing data structures using syntax from JavaScript. In GeoJSON, a vector feature and its attributes are represented as a JavaScript object, allowing for easy parsing of the geometry and fields.
GeoJSON is less bulky than XML-based structures such as KML; however, GeoJSON does not always contain styling information like KML does. You must define the styling on the client, which in your case means writing JavaScript code or taking the Leaflet's default styling. This is covered in the next section of the lesson.
GeoJSON's simplicity and loading speed have made it popular, perhaps even trendy, among developers in the FOSS world. For example, in a tongue-in-cheek Internet poll, GIS practitioners recently voted "The answer is always GeoJSON" as the most likely attribute to define a 'GeoHipster' [6].
Here's what a piece of GeoJSON looks like. GeoJSON vectors are commonly bundled into a unit called a FeatureCollection. The FeatureCollection below holds just one feature (the state of Montana) but could hold other features. The bulk of the GeoJSON below contains the vertices that define the state outline, but you should also notice a few attributes, such as "fips" and "name":
{"type":"FeatureCollection","features":[{"type":"Feature","id":"USA-MT","properties":{"fips":"30","name":"Montana"},"geometry":{"type":"Polygon","coordinates":[[[-104.047534,49.000239],[-104.042057,47.861036],[-104.047534,45.944106],[-104.042057,44.996596],[-104.058488,44.996596],[-105.91517,45.002073],[-109.080842,45.002073],[-111.05254,45.002073],[-111.047063,44.476286],[-111.227803,44.580348],[-111.386634,44.75561],[-111.616665,44.547487],[-111.819312,44.509148],[-111.868605,44.563917],[-112.104113,44.520102],[-112.241036,44.569394],[-112.471068,44.481763],[-112.783254,44.48724],[-112.887315,44.394132],[-113.002331,44.448902],[-113.133778,44.772041],[-113.341901,44.782995],[-113.456917,44.865149],[-113.45144,45.056842],[-113.571933,45.128042],[-113.736241,45.330689],[-113.834826,45.522382],[-113.807441,45.604536],[-113.98818,45.703121],[-114.086765,45.593582],[-114.333228,45.456659],[-114.546828,45.560721],[-114.497536,45.670259],[-114.568736,45.774321],[-114.387997,45.88386],[-114.492059,46.037214],[-114.464674,46.272723],[-114.322274,46.645155],[-114.612552,46.639678],[-114.623506,46.705401],[-114.886399,46.809463],[-114.930214,46.919002],[-115.302646,47.187372],[-115.324554,47.258572],[-115.527201,47.302388],[-115.718894,47.42288],[-115.724371,47.696727],[-116.04751,47.976051],[-116.04751,49.000239],[-111.50165,48.994762],[-109.453274,49.000239],[-104.047534,49.000239]]]}}]}
In the GeoJSON above, notice the use of several JavaScript objects embedded within one another. At the lowest level, you have a Polygon object. The Polygon object is contained within a Feature object. The feature is part of a FeatureCollection object. The GeoJSON specification [7] (originally published in 2008 but replaced by a new specification in 2016) gives precise details about how these objects are to be structured. It's important to be familiar with these structures, although you will rarely have to read or write them directly. You will typically use convenience classes or converter programs that have been developed to simplify the experience of working with GeoJSON.
You can use GeoJSON within your main JavaScript code file, but, to keep your things looking simple, it's most common to maintain the GeoJSON in its own separate file. You then reference this file from the appropriate place in your code. With Leaflet you have to define the GeoJSON as a JavaScript variable (seen here) [8] using syntax such as
var <yourVariableName> = <yourGeoJSON>;
You would save this text in a file with a .js extension. For example, I could create a file titled myfeatures.js containing something like the following:
var myGardenJson = {"type":"FeatureCollection","features":[{"type":"Feature","id":"USA-MT","properties":{"fips":"30","name":"Montana"},"geometry":{"type":"Polygon","coordinates":[[[-104.047534,49.000239], . . . ]]}}]};
Then at the top of my HTML page, I need to put a reference to this file:
<script src="myfeatures.js"></script>
This allows me to reference the variable myGardenJson within my JavaScript code. Making a GeoJSON layer in Leaflet then becomes very simple:
var geojsonLayer = L.geoJSON(myGardenJson);
geojsonLayer.addTo(map);
It is important to note that L.geoJSON(…) expects all coordinates in the GeoJSON file to be WGS84 coordinates. That is why all GeoJSON files used in this lesson and Lesson 8 will use EPSG:4326. If instead you want to directly work with a GeoJSON file that uses a different projection (so without first reprojecting it to EPSG:4326), you can use the Proj4js [9] Javascript library together with the Proj4Leaflet [10] extension to enable support for coordinate reference systems not built into Leaflet. To do so, you would first have to add the lines to load the respective Javascript libraries at the beginning of the html file
<script src="https://cdnjs.cloudflare.com/ajax/libs/proj4js/2.4.3/proj4.js"></script>
<script src="https://cdnjs.cloudflare.com/ajax/libs/proj4leaflet/1.0.1/proj4leaflet.min.js"></script>
and then create the layer with
var geojsonLayer = L.Proj.geoJson(myGardenJson);
to have the code read what projection the GeoJSON file is in and then reproject the data accordingly on the fly. Leaflet, by the way, internally uses pixel coordinates for all data, so it understands locations with respect to the coordinate system of the map pane. That means that there is always a transformation process involved when loading vector data, independent of what projection the data comes in.
You can save any vector layer in QGIS as GeoJSON, and most web mapping APIs offer easy-to-use classes for GeoJSON as a vector display format. In the proprietary software realm, Esri has dragged its feet on GeoJSON support, offering its own JSON-based geometry formats [11] as part of the GeoServices REST Specification and the ArcGIS REST API; however, Esri has informally shared an open source JavaScript library [12]to convert between the two formats, which is now deprecated and replaced by their Terraformer tool [13].
The GeoJSON specification is not an OGC specification. At the time of this writing, OGC conspicuously lacks a JSON-based specification for defining vector GIS objects (OGC publishes the XML-based GML specification for vectors). This lack of an OGC-endorsed JSON specification played a role in the FOSS community's 2013 debate about whether the OGC should adopt the Esri-generated GeoServices REST Specification. The specification would have given OGC a JSON-based GIS data format, but some were wary of the format's association with a proprietary software company. The geoMusings "OGC Abandons the Web" [14] blog post gives one FOSS geo-developer's opinion on the episode (read the comments, too).
Symbolizing vector layers in Leaflet
When you bring in vector datasets to be drawn by the browser, you may need to do some work to define the symbol that will draw the feature. With data formats like GeoJSON that don't contain any styling information, you don't get ready-made styling like you would get if you just requested an image from the server. If you don't define a symbol for your graphics, you'll probably see your API's default symbol.
In Leaflet, it's common to define styles within functions. This makes them easy to re-use. Here's an example of how you could set up a style and apply it to a GeoJSON layer. This example shows urban gardens as polygons:
// Set up style for garden polygons
function gardenStyle(feature) {
  return {
    fillColor: "#FF00FF",
    fillOpacity: 1,
    color: '#B04173',
    weight: 4,
  };
}

// Create layer and add it to the map
var gardenLayer = L.geoJSON(myGardenJson,{
  style:gardenStyle
});

gardenLayer.addTo(map);
Notice that the properties include fill color, fill opacity (which controls transparency), stroke color, and stroke weight. The colors are defined using hex notation [15]. In this case, the symbol is a magenta fill with a purple outline (Sorry! I wanted it to stand out...). When writing your own code, use an online color picker [16] to get the hex values of the colors you want.

You can see a list of Leaflet's vector styling properties by reading the Path options [17] documentation. You should be able to accomplish most of what you want to do using working examples and a little bit of experimentation.
The advantage of drawing vector layers in the browser is that you can quickly change the styling in response to certain events. For example, you can change the color of a single symbol when a user clicks it. Using Leaflet, you can define various styles and connect them to map events.
The code below demonstrates how a style map could be used to "highlight" a garden feature when it's clicked. The selected garden would change to a blue fill:
Don't worry about running this code right now, because you'll use some nearly identical code in the lesson walkthrough in a working example. Just pay attention to the code patterns and what is happening in each line.
First, create functions to define the unselected and selected styles:
// Set up styles for garden polygons
// Magenta symbol for gardens
function gardenStyle(feature) {
  return {
    fillColor: "#FF00FF",
    fillOpacity: 1,
    color: '#B04173',
    weight: 4,
  };
}

// Blue symbol for selected gardens
function gardenSelectedStyle(feature) {
  return {
    fillColor: "#00FFFB",
    fillOpacity: 1,
    color: '#0000FF',
    weight: 4
  };
}
Then create the GeoJSON layer and add functions to listen for click events on the GeoJSON features and the map itself. The code below contains a variable named selection, which holds the currently selected feature. The expression if (selection) checks to see if there is any selected feature. The expression e.target means "the feature that just got clicked". Notice how the resetStyle method can set a layer's style back to its original form, and the setStyle method can change a feature's style to something new.
var selection;

// define function to handle click events on garden features
function gardenOnEachFeature(feature, layer){
  layer.on({
    click: function(e) {
      if (selection) {
        gardenLayer.resetStyle(selection);
      }

      e.target.setStyle(gardenSelectedStyle());
      selection = e.target;

      L.DomEvent.stopPropagation(e); // stop click event from being propagated down to other elements
    }
  });
}


// Create layer and add it to the map
var gardenLayer = L.geoJSON(myGardenJson,{
  style:gardenStyle,
  onEachFeature: gardenOnEachFeature
});

gardenLayer.addTo(map);


// define and register event handler for click events to unselect features when clicked anywhere else on the map
map.addEventListener('click', function(e) {
  if (selection) {
     gardenLayer.resetStyle(selection);

     selection = null;
  }
});
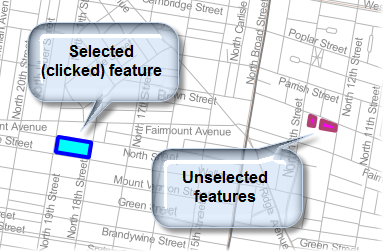
A map user should now be able to click any garden and see it highlighted in blue. When the user clicks off the garden, it goes back to its original magenta symbol.
To summarize this part of the lesson, vector layers drawn by the browser require a little more work on the developer's part, because the developer must define the symbols. However, with that work comes a variety of options for interactivity that would not be possible with rasterized image tiles or layers drawn by the server. Although the resymbolize-on-click functionality seems rudimentary, think about the difficulty (if not outright futility) of getting this type of effect with a WMS or rasterized tile layer.
This section of the lesson has discussed uniform symbols for each feature in the layer (except for the occasional selected feature); however, Leaflet allows you to go further by defining style classifications based on attribute values. This opens the door for choropleth maps, proportional symbols, and so forth. Some of these techniques will be covered in Lesson 8.
Allowing developers untrained in cartographic principles to select map symbols may present some challenges of its own. It may be a good idea to have the developer consult with a cartographer in order to determine the most appropriate widths, colors, and fills for the vector symbols.
Walkthrough: Adding interactive GeoJSON layers in Leaflet
This walkthrough builds on some of the previous sections of the lesson to show how you can add interactive GeoJSON layers to your web map using Leaflet. You will build a map containing your Philadelphia basemap tiles and two GeoJSON layers on top representing urban gardens and food pantries (i.e., food banks). A user can click one of the gardens or food pantries to see the name of the feature below the map (as an alternative to using popups). The clicked feature changes color while it is selected. Hopefully, you can think of many ways to apply these pieces of functionality to the web map you're building for your term project.
Note that this is a sample dataset culled from OpenStreetMap and is not a comprehensive list of these features in Philadelphia. If you know of any other gardens or food pantries, please add them in OpenStreetMap (more about this in Chapter 9)!
Downloading the data
Before continuing, download and unzip the data for this project [18]. Copy its contents into your Jetty home folder, which should have a path such as
c:\Users\{username}\GeoServer 2.x.x\webapps\geog585\
This is the same folder where you saved your Lesson 6 walkthrough and where your local stylesheet style.css (required for this exercise) is located.
This folder contains two JavaScript files containing GeoJSON data. gardens.js holds a gardensData variable with polygon GeoJSON and pantries.js holds a pantriesData variable with point GeoJSON.
There are also two SVG (scalable vector graphics) files that will be used for symbolizing the food pantries. The yellow symbol will be for the unselected features and the blue symbol for the selected features.
There are a couple of ways that you could get this kind of data for your own applications.
- QGIS can save any vector layer as GeoJSON format.
- ogr2ogr in the GDAL library can convert shapefiles and other types to GeoJSON
In both cases you would need to either save the data as a JS file and define the GeoJSON as a variable (the approach we took here), or use an extension like Leaflet AJAX to read the data directly out of the file (beyond the scope of this course).
To get icons, all the icons available in QGIS are available on your machine in a folder named something like:
C:\Program Files\QGIS <name of your version>\apps\qgis\svg
I used the open source program Inkscape to change the color of the icon.
Setting up the HTML file
Before diving into the JavaScript code, create an empty text file and insert the following code. Then save it as lesson7.html next to all the other files you just downloaded and copied into your home folder.
<!DOCTYPE html>
  <html>
    <head>
      <meta http-equiv="Content-Type" content="text/html; charset=utf-8">
      <title>Food resources: Community gardens and food pantries</title>
      <link rel="stylesheet" href="https://cdnjs.cloudflare.com/ajax/libs/leaflet/1.2.0/leaflet.css" type="text/css" crossorigin="">
      <script src="https://cdnjs.cloudflare.com/ajax/libs/leaflet/1.2.0/leaflet.js" crossorigin=""></script>
      <script src="gardens.js"></script>
      <script src="pantries.js"></script>
      <link rel="stylesheet" href="style.css" type="text/css">

        <script type="text/javascript">

        . . .

        </script>
    </head>
      <body onload="init()">
        <h1 id="title">Food resources: Community gardens and food pantries</h1>

        <div id="mapid"></div>
        <div id="summaryLabel">
            <p>Click a garden or food pantry on the map to get more information.</p>
        </div>
      </body>
  </html>
If you open this, you should see a blank map frame surrounded by an HTML title and descriptive text. In the script and link tags, notice that we are loading in Leaflet code and stylesheets, as well as the gardens and pantries.js files.
Now let's add the Leaflet JavaScript code that creates the map and layers.
Writing the JavaScript
- Find the script tag for your JavaScript code and replace the . . . with the following lines so that you have:
var map;

function init() {
  // create map and set center and zoom level
  map = new L.map('mapid');
  map.setView([39.960,-75.210],14);

  // create and add the tile layer
  var tiles = L.tileLayer('https://<URL of your S3 bucket>/PhillyBasemap/{z}/{x}/{y}.png');
  tiles.addTo(map);

 . . .

}
The above code creates a global variable for the map and then defines the initialization function that will run when the page loads. This init() function will contain most of our JavaScript code.
The map view is set zoomed in to West Philadelphia so we can get a detailed look at food resources at a neighborhood level.
The Philadelphia basemap tiles are also added here. You must modify the URL in the code above to point at your own tiles as you had to do in the Lesson 6 walkthrough. Again the URL should look similar to this with the first part being the URL of your S3 bucket:https://geog585-somestring.s3.someregion.amazonaws.com/PhillyBasemap/{z}/{x}/{y}.png - Now we'll set up some variables for use in this init() function. Replace the . . . in the code above with the following:
var gardenLayer;
var pantryLayer;

var selection;
var selectedLayer;

. . .
Nothing is happening with these yet, but it's important that you understand their future purpose in the code:
- gardenLayer and pantryLayer will eventually be Leaflet layers that reference the GeoJSON.
- selection will reference the currently selected feature. If no feature is selected, the value of this variable will be set to null.
- selectedLayer will reference the layer that was most recently selected.
- Now we'll set up the style we'll eventually use on the garden layer. Replace the . . . in the code above with the following:
// define the styles for the garden layer (unselected and selected)
function gardenStyle(feature) {
  return {
    fillColor: "#FF00FF",
    fillOpacity: 1,
    color: '#B04173',
  };
}

function gardenSelectedStyle(feature) {
  return {
    fillColor: "#00FFFB",
    color: '#0000FF',
    fillOpacity: 1
  };
}

. . .
This is nearly identical to the code in the previous section of the lesson, so I won't explain it in detail. It just defines two different symbols for the gardens layer (a default symbol and a selected symbol).
- Now let's add a function that will tell each garden feature how to behave when it is clicked. Replace the . . . in the code above with the following:
// handle click events on garden features
function gardenOnEachFeature(feature, layer){
  layer.on({
    click: function(e) {
      if (selection) {
        resetStyles();
      }

      e.target.setStyle(gardenSelectedStyle());
      selection = e.target;
      selectedLayer = gardenLayer;

      // Insert some HTML with the feature name
      buildSummaryLabel(feature);

      L.DomEvent.stopPropagation(e); // stop click event from being propagated further
    }
  });
}

. . .
There's a lot going on here, so we'll take this a piece at a time. One of the most useful things about Leaflet is its ability to define a function for each feature stating how that feature should behave in response to certain events. In the function above, we're telling each garden feature to listen for a click event. If a garden gets clicked, a function will run with an event argument (represented by the variable e) that will help us work with the clicked feature. This code is called event handler code, because it handles the situation where a click event occurs.
In the case above, if a feature gets clicked, we take any existing feature that might be highlighted and set its style back to the default. This is accomplished in the function resetStyles() whose code we are going to add later on.
Then we take the clicked feature (e.target) and style it with the special style we set up for selected features. We also update the selection and selectedLayer variables to reference our newly clicked feature.
Finally, we build some HTML to put in the descriptive layer below the map. This code will be found in a function called buildSummaryLabel(), which we will add a little later on.
Note that a call to L.DomEvent.stopPropogation() is needed so that if someone clicks a feature, only the feature click event handler code runs, and not the map click event handler code.
- Now we've got everything we need to add the garden layer to the map. Replace the . . . in the code above with the following:
// add the gardens GeoJSON layer using the gardensData variable from gardens.js
var gardenLayer = new L.geoJSON(gardensData,{
  style: gardenStyle,
  onEachFeature: gardenOnEachFeature
});

gardenLayer.addTo(map);

. . .
Note how the above code references the gardensData variable contained in gardens.js. If we didn't have a script tag referencing gardens.js at the top of our page, the variable gardensData would be unrecognized. By using gardenStyle for the style property, we are making sure that the layer will be styled according to our previous definition. Similarly, by using the gardenOnEachFeature function defined above for the onEachFeature property, we achieve that each feature from the layer will have the click event handler function defined in gardenOnEachFeature attached.
- Now we're going to repeat the whole process with the pantries layer. Replace the . . . in the code above with the following:
// create icons for pantries (selected and unselected)
var pantriesIcon = L.icon({
  iconUrl: 'pantries.svg',
  iconSize: [20,20]
});

var selectedPantriesIcon = L.icon({
  iconUrl: 'pantries_selected.svg',
  iconSize: [20,20]
});

// handle click events on pantry features
function pantriesOnEachFeature(feature, layer){
  layer.on({
    click: function(e) {
      if (selection) {
        resetStyles();
      }

      e.target.setIcon(selectedPantriesIcon);
      selection = e.target;
      selectedLayer = pantryLayer;

      // Insert some HTML with the feature name
      buildSummaryLabel(feature);

      L.DomEvent.stopPropagation(e); // stop click event from being propagated further
    }
  });
}


// add the pantries GeoJSON layer using the pantriesData variable from pantries.js
pantryLayer = new L.geoJSON(pantriesData,{
  pointToLayer: function (feature, latlng) {
    return L.marker(latlng, {icon: pantriesIcon});
  },
  onEachFeature: pantriesOnEachFeature
  }
);

pantryLayer.addTo(map);

. . .
The only fundamental difference between this and the gardens code is the way that the style is defined for a point using an SVG icon. Notice how when the Leaflet layer is created, the pointToLayer function must be defined stating where and how to place each Leaflet marker.
- Now that all the layers are added, let's switch our focus to the map. We have to handle the case where someone clicks on the map but doesn't click on a feature. In that situation, everything should become unselected. Replace the . . . in the code above with the following:
// handle clicks on the map that didn't hit a feature
map.addEventListener('click', function(e) {
  if (selection) {
    resetStyles();
    selection = null;
    document.getElementById('summaryLabel').innerHTML = '<p>Click a garden or food pantry on the map to get more information.</p>';
  }
});

. . .
There are several ways that event handlers can be added in Leaflet. The code above uses the addEventListener method. Notice how in the above code the label below the map is also reset with the message "Click a garden or food pantry on the map to get more information."
- Now we'll add some of the functions that were used in the layer event handler code above. The first one looks to see which layer was previously selected and sets the selected feature's symbol back to the default. Replace the . . . in the code above with the following:
// function to set the old selected feature back to its original symbol. Used when the map or a feature is clicked.
function resetStyles(){
  if (selectedLayer === pantryLayer) selection.setIcon(pantriesIcon);
  else if (selectedLayer === gardenLayer) selectedLayer.resetStyle(selection);
}

. . .
Separate lines of code are needed above for the pantries and gardens layers because points represented by icons and polygons have different styling syntaxes in Leaflet.
- Finally we need the function to build the HTML string for the summary label that goes below the map. Replace the . . . in the code above with the following:
// function to build the HTML for the summary label using the selected feature's "name" property
function buildSummaryLabel(currentFeature){
  var featureName = currentFeature.properties.name || "Unnamed feature";
  document.getElementById('summaryLabel').innerHTML = '<p style="font-size:18px"><b>' + featureName + '</b></p>';
}
The above function brings in the currently selected feature and reads its "name" attribute. It then gets the HTML element with the ID of "summaryLabel" and sets its innerHTML to a carefully constructed string of HTML into which the name (represented by the variable featureName) is inserted. Note that if our gardens and pantries layers had different attribute field names (such as "PANTRYNAME" and "GARDENNAME" then we would need to add more code above to handle those cases.
- Run your page, and click some of the garden and pantry features. When you click a feature, it should turn blue, and the feature name should display below the map. When you click away from a feature (or click a different feature), the feature should return to its original color, and the feature name should be removed (or updated if you clicked a different feature).
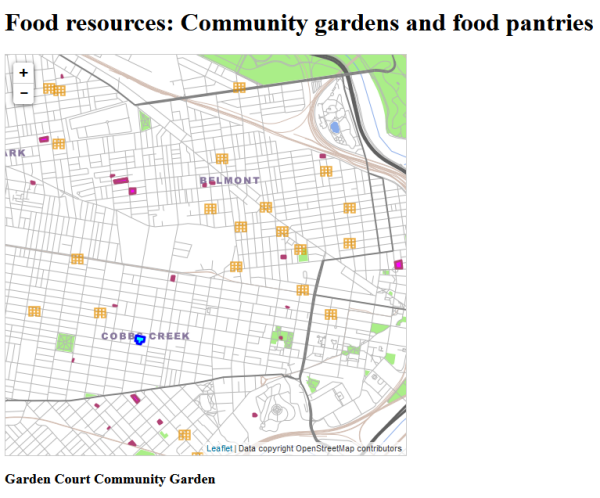 Figure 7.4
Final code for the walkthrough
If your page does not work, carefully compare your code to the full code below to make sure you have inserted everything in the right place. Also:
- Verify that you are connected to the Internet when you run the page, so that you can retrieve the Leaflet code from the CDN.
- Make sure that you have inserted the URL for your S3 bucket where the code refers to the basemap tile layer.
- Make sure that GeoServer is started (because you are running the page through its Jetty web servlet) and that you are referencing the page through a URL similar to the following: http://localhost:8080/geog585/lesson7.html [19].
An OpenLayers 3 version of the walkthrough code [20] is available for the curious. Note that the GeoJSON files must be adjusted for this version of the walkthrough to function. It must be pure GeoJSON and not contain any declared variables or JavaScript code.
<!DOCTYPE html>
  <html>
    <head>
      <meta http-equiv="Content-Type" content="text/html; charset=utf-8">
      <title>Food resources: Community gardens and food pantries</title>
      <link rel="stylesheet" href="https://cdnjs.cloudflare.com/ajax/libs/leaflet/1.2.0/leaflet.css" type="text/css" crossorigin="">
      <script src="https://cdnjs.cloudflare.com/ajax/libs/leaflet/1.2.0/leaflet.js" crossorigin=""></script>
      <script src="gardens.js"></script>
      <script src="pantries.js"></script>
      <link rel="stylesheet" href="style.css" type="text/css">

        <script type="text/javascript">
          var map;

          function init() {
          // create map and set center and zoom level
          map = new L.map('mapid');
          map.setView([39.960,-75.210],14);

          // create and add the tile layer
          var tiles = L.tileLayer('https://<URL of your S3 bucket>/PhillyBasemap/{z}/{x}/{y}.png');
          tiles.addTo(map);

          var gardenLayer;
          var pantryLayer;

          var selection;
          var selectedLayer;

          // define the styles for the garden layer (unselected and selected)
          function gardenStyle(feature) {
            return {
               fillColor: "#FF00FF",
               fillOpacity: 1,
               color: '#B04173',
            };
          }

          function gardenSelectedStyle(feature) {
             return {
               fillColor: "#00FFFB",
               color: '#0000FF',
               fillOpacity: 1
            };
          }

          // handle click events on garden features
          function gardenOnEachFeature(feature, layer){
            layer.on({
              click: function(e) {
                  if (selection) {
                    resetStyles();
                  }

                  e.target.setStyle(gardenSelectedStyle());
                  selection = e.target;
                  selectedLayer = gardenLayer;

                  // Insert some HTML with the feature name
                  buildSummaryLabel(feature);

                  L.DomEvent.stopPropagation(e); // stop click event from being propagated further
                }
            });
          }

                // add the gardens GeoJSON layer using the gardensData variable from gardens.js
                var gardenLayer = new L.geoJSON(gardensData,{
                  style: gardenStyle,
                  onEachFeature: gardenOnEachFeature
                });

                gardenLayer.addTo(map);


          // create icons for pantries (selected and unselected)
          var pantriesIcon = L.icon({
            iconUrl: 'pantries.svg',
            iconSize: [20,20]
          });

          var selectedPantriesIcon = L.icon({
            iconUrl: 'pantries_selected.svg',
            iconSize: [20,20]
          });

          // handle click events on pantry features
          function pantriesOnEachFeature(feature, layer){
            layer.on({
              click: function(e) {
                  if (selection) {
                    resetStyles();
                  }
                  e.target.setIcon(selectedPantriesIcon);
                  selection = e.target;
                  selectedLayer = pantryLayer;

                  // Insert some HTML with the feature name
                  buildSummaryLabel(feature);

                  L.DomEvent.stopPropagation(e); // stop click event from being propagated further
                }
            });
          }


          // add the pantries GeoJSON layer using the pantriesData variable from pantries.js
                pantryLayer = new L.geoJSON(pantriesData,{
                     pointToLayer: function (feature, latlng) {
                      return L.marker(latlng, {icon: pantriesIcon});
                     },
                     onEachFeature: pantriesOnEachFeature
                   }
                );

               pantryLayer.addTo(map);


          // handle clicks on the map that didn't hit a feature
          map.addEventListener('click', function(e) {
            if (selection) {
              resetStyles();
              selection = null;
              document.getElementById('summaryLabel').innerHTML = '<p>Click a garden or food pantry on the map to get more information.</p>';
            }
          });

          // function to set the old selected feature back to its original symbol. Used when the map or a feature is clicked.
          function resetStyles(){
            if (selectedLayer === pantryLayer) selection.setIcon(pantriesIcon);
            else if (selectedLayer === gardenLayer) selectedLayer.resetStyle(selection);
          }

          // function to build the HTML for the summary label using the selected feature's "name" property
          function buildSummaryLabel(currentFeature){
            var featureName = currentFeature.properties.name || "Unnamed feature";
            document.getElementById('summaryLabel').innerHTML = '<p style="font-size:18px"><b>' + featureName + '</b></p>';
          }

        }

        </script>
      </head>
      <body onload="init()">
        <h1 id="title">Food resources: Community gardens and food pantries</h1>

        <div id="mapid"></div>
        <div id="summaryLabel">
            <p>Click a garden or food pantry on the map to get more information.</p>
        </div>
      </body>
    </html>
Lesson 7 assignment: Make your own mashup with a vector layer drawn in the browser
In this week's assignment, you'll make a mashup consisting of a vector layer drawn by the browser on top of your own tiled basemap. To achieve this, you need to adapt the walkthrough techniques and code to your own data. Follow the instructions below to prepare this assignment:
- Examine your term project's tiled basemap. This could either be the one you created in the Lesson 5 assignment or a tiled map from OpenStreetMap that you want to use.
- Choose or create a vector dataset to overlay on top. This should result in a KML, GeoJSON, or other (with instructor approval) vector data file suitable for direct use on the web. Shapefiles are not to be used in this assignment.
You can create KML using Google Earth or Google Maps. You can create GeoJSON using QGIS or GDAL (via ogr2ogr).
Although you are overlaying this data on your term project basemap, you don't have to commit to using this vector layer in your term project (although it will give you a head start if you do).
- Use the patterns in this lesson to create a Leaflet map with your tiled layer as a basemap and your vector layer on top. Clicking any vector feature should A) highlight the feature in a different color and B) display some HTML of the feature attributes somewhere in the page, as was accomplished in the Lesson 7 walkthrough. Clicking off the feature should unhighlight it.
- Host the HTML page and all the other project files online in your AWS S3 bucket so that I can evaluate the functionality. Since the project will just consist of a couple of files, you can directly upload your project folder to S3 by using the Upload option on the S3 bucket web page. Or you can use CLI as in the L5 walkthrough. Hosting the entire web map application in your S3 space is possible because we are just using static files; there is no GeoServer involved this week.
- Create a text document with the URL to the page and a brief (less than 300 word) write up summarizing how things went for you with preparing the assignment, and what you learned. If you failed to achieve the needed functionality, please explain your best guess as to where the problem lies.
- Post this document in the Lesson 7 assignment drop box on Canvas.
Above & beyond: Successful delivery of the listed requirements is sufficient to earn 90% on this assignment. The remaining 10% is reserved for efforts that go "above & beyond" these minimum requirements to improve your web map. This could include (but is not limited to): (a) using a combination of style properties not used in the walkthrough (see example [8] and look for other examples on the web) to produce a particularly nice symbology for your layer or an additional thematic layer you add, (b) producing some more advanced HTML output for selected features (e.g., showing an attribute table, including hyperlinks), and / or (c) adding other HTML elements to your page related to your map. Please add a brief description of what you did for "above & beyond" points to your text document.