5.5.1 Development Environments
Plain text editors like Notepad are OK for beginners getting to know web-publishing languages, but there are more advanced tools out there that make the developer's job easier. Integrated Development Environments (IDEs) are software applications that allow developers to write, test, and debug source code all in one application. IDEs also frequently provide auto-completion (i.e., a list of valid properties and methods available through an object) and syntax highlighting (i.e., different language elements shown in different colors/styles). Examples of popular IDEs include Microsoft Visual Studio and Eclipse. CodePen can be thought of as an online web programming IDE (as opposed to one installed on your own computer).
There are lots of IDEs suited for web development, as a web search for "web development ide" will show you. For the purpose of continuing on through this course, I'm going to recommend Notepad++. As its name implies, it's a step (or two) up from Notepad. My main reasons for pointing you to it are that it is free, it's easy to use, and it provides line numbers and syntax highlighting. Notepad++ is arguably not a true IDE since it's not possible to view your pages directly within the same application, but it does allow you to easily launch them in various web browsers, so I think that's a rather pointless debate.
Let's walk through a short set of steps to familiarize you with Notepad++.
- Download and install Notepad++.
- Open your hello_map app’s index.html page in Notepad++. An easy way to do this is to browse to it through your file system, right-click on it, and select Edit with Notepad++.
The first thing you should notice is the formatting applied to your code. HTML elements are shown in blue, attributes in red, and attribute values in purple. This happens because your file has a .html extension. Keep in mind that if you create a new page from scratch, you will not see this highlighting done until you save it with a .htm or .html extension.
Next, note the boxes just to the left of a few lines in your code. These boxes appear at the beginning of blocks of code that can be logically treated as a unit. - Click on the box next to the head start tag to collapse the code associated with the head element.
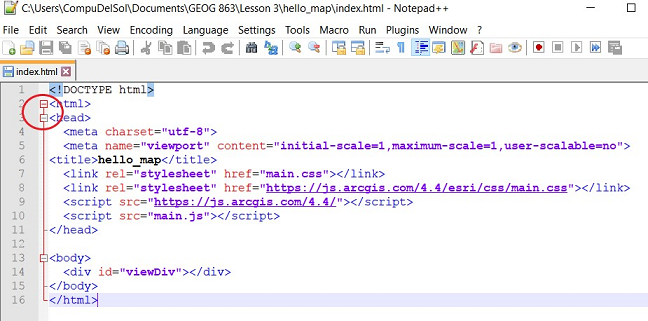 Figure 4.3 Collapsing the head section of an HTML doc in Notepad++
The minus that had been inside the box will change to a plus, indicating that clicking it again will re-expand that code unit. This is a feature of IDEs referred to as code folding. - Move your cursor down through the document and note that when the cursor is located within a start tag, that tag and its matching end tag will be highlighted (and vice versa). This highlighting can be very helpful, especially if you haven't done a good job of indenting your code logically.
- Now open the app’s main.js file in Notepad++ and move the cursor down the document until you reach the line where you create the Map object. Move the cursor to the right until you reach the opening brace. You should see that the brace is highlighted and a red line appears connecting the opening brace to its matching closing brace. The same behavior can be observed with brackets and parentheses. Given how often these characters are used in JavaScript -- and the importance of ordering them correctly -- this feature can be quite useful.
Now that we've worked with a more fully-featured source code editor, let's discuss some tips for working out the kinks in pages that aren't giving you the results you expect.