5.5 Coding Tips
5.5 Coding Tips
We'll end this lesson with some content that will hopefully make you a bit more successful as a coder. We’ll talk about development environments (where you write your code) and debugging tools. But first, here are a few tips that apply regardless of the kind of programming you're doing:
- Write your code in baby steps. Start with something very simple (or a working sample that you modify slightly), test it, add a small piece, test again, etc. Avoid writing long blocks of code without testing. The more untested code you write, the harder it will be to identify errors.
- When inserting an opening brace, bracket or parenthesis, insert the matching closing character at the same time. If you wait to do that until after you've finished entering the intervening statements, you're apt to forget.
- When the JavaScript console reports multiple errors, fix just the first error, then reload the page. One error can cause several others to appear downstream; fixing it can cause the rest to disappear.
- As with writing in general, the best way to get past a block is often to take a break and come back to the code later. With a fresh look at your code, it may take just minutes to find a bug that you had banged your head against the wall about for hours the night before.
5.5.1 Development Environments
5.5.1 Development Environments
Plain text editors like Notepad are OK for beginners getting to know web-publishing languages, but there are more advanced tools out there that make the developer's job easier. Integrated Development Environments (IDEs) are software applications that allow developers to write, test, and debug source code all in one application. IDEs also frequently provide auto-completion (i.e., a list of valid properties and methods available through an object) and syntax highlighting (i.e., different language elements shown in different colors/styles). Examples of popular IDEs include Microsoft Visual Studio and Eclipse. CodePen can be thought of as an online web programming IDE (as opposed to one installed on your own computer).
There are lots of IDEs suited for web development, as a web search for "web development ide" [1] will show you. For the purpose of continuing on through this course, I'm going to recommend Notepad++ [2]. As its name implies, it's a step (or two) up from Notepad. My main reasons for pointing you to it are that it is free, it's easy to use, and it provides line numbers and syntax highlighting. Notepad++ is arguably not a true IDE since it's not possible to view your pages directly within the same application, but it does allow you to easily launch them in various web browsers, so I think that's a rather pointless debate.
Let's walk through a short set of steps to familiarize you with Notepad++.
- Download and install Notepad++ [3].
- Open your hello_map app’s index.html page in Notepad++. An easy way to do this is to browse to it through your file system, right-click on it, and select Edit with Notepad++.
The first thing you should notice is the formatting applied to your code. HTML elements are shown in blue, attributes in red, and attribute values in purple. This happens because your file has a .html extension. Keep in mind that if you create a new page from scratch, you will not see this highlighting done until you save it with a .htm or .html extension.
Next, note the boxes just to the left of a few lines in your code. These boxes appear at the beginning of blocks of code that can be logically treated as a unit. - Click on the box next to the head start tag to collapse the code associated with the head element.
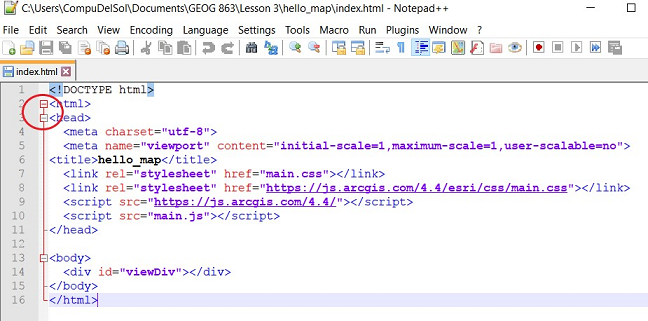 Figure 4.3 Collapsing the head section of an HTML doc in Notepad++
The minus that had been inside the box will change to a plus, indicating that clicking it again will re-expand that code unit. This is a feature of IDEs referred to as code folding. - Move your cursor down through the document and note that when the cursor is located within a start tag, that tag and its matching end tag will be highlighted (and vice versa). This highlighting can be very helpful, especially if you haven't done a good job of indenting your code logically.
- Now open the app’s main.js file in Notepad++ and move the cursor down the document until you reach the line where you create the Map object. Move the cursor to the right until you reach the opening brace. You should see that the brace is highlighted and a red line appears connecting the opening brace to its matching closing brace. The same behavior can be observed with brackets and parentheses. Given how often these characters are used in JavaScript -- and the importance of ordering them correctly -- this feature can be quite useful.
Now that we've worked with a more fully-featured source code editor, let's discuss some tips for working out the kinks in pages that aren't giving you the results you expect.
5.5.2 Debugging
5.5.2 Debugging
So, what do you do when you load your page in a browser and get...nothing? Thankfully, there are tools that can help pinpoint problems in your code without having to manually search line by line. Let's have a look at a couple of broken pages and how we can determine why they're broken.
- Load this Hello Map example [4] in IE, Firefox, or Chrome. Your browser window should be blank because of an error in the page.
- Open the JavaScript console as follows:
Chrome - click on the menu icon (3 stacked dots to the right of the address bar), then select More Tools > Developer tools > Console.
Firefox - click on the menu icon (3 stacked lines, also in the upper right of the window) and select Web Developer > Web Console.
MS Edge - click on the menu icon (3 stacked dots, also in the upper right of the window), then select More Tools > Developer tools > Console.
You should see one of the following error messages, depending on your browser. (The console may report warnings in addition to errors, in which case you’ll need to skip over the warnings or toggle them off.)
Chrome - Uncaught SyntaxError: Unexpected identifier; the page's name and the line of the error appear to the right of the message (main.js:14, in this case)
Firefox - Uncaught SyntaxError: missing } after property list; main.js:14:4
MS Edge - Uncaught SyntaxError: Unexpected identifier; main.js: 14
Each browser in its own way is reporting that it encountered something unexpected on line 14. If this was your own page, you could have a look at that line in Notepad++ or whatever editor you are using. Let's just look at the source code in the browser in this case. - Within the Console, click on the main.js link listed next to the error message to view the code being loaded from that file. Depending on the browser you’re using, the code lines may be numbered. The "problem" line may also be highlighted or have the cursor on it. (If the .js code won't load in the Console, view the page's source code using Ctrl-U, then click the main.js link.)
As is sometimes the case, the problem here can be found just before the flagged line: there is no comma after the setting of the zoom property on line 13. It may seem confusing that the browser is flagging line 14, when the line requiring a fix is line 13, but it actually makes sense if you remember that a property-value setting doesn’t need to be followed by a comma (i.e., when it’s the last one associated with the object). So the browser flags the line where it’s finding something unexpected. (It expects a comma or closing brace after the zoom property.) - Load the second Hello Map example [5] in IE, Firefox, or Chrome. Again, your browser window should be blank because of an error in the page.
- Using the error checking steps outlined above, you should identify the following error:
Chrome - Uncaught SyntaxError: Unexpected token ); on line 17
Firefox - Uncaught SyntaxError: expected expression, got ‘)’; on line 17
MS Edge - Uncaught SyntaxError: Unexpected token ')'; line 17
Line 17 is a pair of closing parentheses followed by a semi-colon. It’s logical to assume the second parenthesis closes the require statement’s arguments and that the first parenthesis closes some other entity in the code block. However, if you were to look at the code in Notepad++, you would see that the IDE matches the first parenthesis character up with the require arguments and that the second parenthesis has no match. The fact that the second parenthesis isn’t matched up with the opening parenthesis on line 1 indicates a problem. It turns out the first parenthesis shouldn’t be a parenthesis; it should be a closing brace (to go with the opening brace on line 4 defining the beginning of the callback function).
While checking for errors in this way can often be a big help, there are likely to be times when you're unable to identify the problem in your code. Another method for pinpointing problems is to produce some output at strategic points in your code. This could be as simple as an alert() statement that confirms that code execution reached a certain point, like
alert("Finished adding overlays");
You might also use an alert() box to display the contents of a variable or the property of some object:
alert("The coords are: " + pt.latitude() + ", " + pt.longitude());
An alternative to using alert() in this way is to write messages to the JavaScript console. This is especially preferable when you want to diagnose a problem with a loop and would rather not have to dismiss alert() boxes repeatedly. Writing messages to the console can be done as follows:
console.log("The value of i is " + i);
Over years of web development, I have found that these simple debugging strategies usually lead me to finding and fixing my errors.
5.5.3 JSLint/JSHint
5.5.3 JSLint/JSHint
One strategy for avoiding errors when you test your apps in a browser is to catch those errors in your development environment. A linter is a tool that is used to analyze code for potential errors before execution. Linters exist for many programming languages, but in a JavaScript context, JSLint is perhaps the best known. You can use JSLint online by navigating to JSLint [6], pasting your JS code into the big text box and clicking the JSLint button.
JSLint was developed by Doug Crockford in 2002 and the standards his linter enforces are described on the JSLint website. Many have found some of the JSLint rules to be overly strict (e.g., statements within a function are required to be indented exactly 4 spaces). For this reason, a more flexible alternative was developed as a community-driven open-source project: JSHint.
Many IDEs come equipped with one or both of these tools. Others can have the tools added through a plugin. Notepad++ had a JSLint plugin, but it does not work with the 64-bit version of the IDE (which you're likely to have installed). CodePen provides an Analyze JavaScript option on the JS editor panel's dropdown menu that is based on JSHint.
Pay attention to the availability and implementation of JSLint/JSHint in the IDE review portion of this week's assignment.
5.5.4 Beautifiers
5.5.4 Beautifiers
Especially when cobbling together snippets of code from various samples, it’s common for your code to become messy (e.g., indented inconsistently, varying amounts of whitespace, etc.). IDEs typically provide ways to indent or unindent blocks of code. In Notepad++, this can be done by highlighting the incorrectly indented code and hitting Tab or Shift-Tab, respectively. However, there are also beautifying tools available both online and within IDEs that can correct multiple kinds of errors across an entire document in seconds.
Here is a messy version of the Hello_Map JS code:
require([
    "esri/Map",
    "esri/views/MapView"
], (Map, MapView) => {

const map = new Map({
    basemap: "streets"
});


                const view = new MapView({
            container: "viewDiv",
            map: map,
            zoom: 4,
            center: [15, 65]
        });

});
This code, while perfectly valid as seen by browsers, is difficult for people to read because of the inconsistent indentation and large block of whitespace.
- Point your browser to jsbeautifier.org [7].
- Copy the messy code above and paste it into the large textbox on the jsbeautifier site.
- Click the Beautify JavaScript or HTML button either above or below the text box (or hit Ctrl-Enter). Voila! The messiness of this code is cleaned up.
There are several settings in the upper right of the page that you can use to tweak how the beautifier tidies your code. The first four dropdown lists are probably of the most interest:
- The first allows you to specify the number of spaces you wish to indent with (or use 1 tab instead). It’s considered good practice to use either tabs or spaces, but not to mix the two in the same document. Developers often have strong opinions in the space vs. tab debate. I lean toward using spaces since a space occupies one character regardless of the app you’re using to view the code, whereas a tab could be shown as 2, 4 or 8 characters wide depending on the app.
- The second list has to do with the amount of whitespace you want to appear between blocks of code (e.g., between two functions, after a loop or conditional expression, or as in this case, between the definition of two object variables).
- The third list allows you to specify the maximum width of your code before it gets wrapped to the next line.
- The fourth list involves the positioning of braces. Some developers (myself included) prefer to position the opening brace that goes with a function or object constructor on the same line as its “control statement”. Others prefer that the brace be placed on its own line.
I encourage you to experiment with these options to see how they affect the formatting of your code.
As with the linting tools, IDEs sometimes include a built-in beautifying tool or can have one added as a plugin. The only tool that I’m aware of for Notepad++ is JSToolNpp [8]. I’m not going to walk you through the use of this tool since I’m not crazy about how it formats object definitions. For example, it formats an object like this:
const map = new Map({
        basemap: "streets"
    });
whereas I’d prefer it to be formatted like this:
const map = new Map({
    basemap: "streets"
});
However, you are welcome to install and play with the tool if you like.
Finally, you should note that CodePen offers a beautifier on the JS editor panel's dropdown menu (Format JavaScript).
5.5.5 Style Guides
5.5.5 Style Guides
In the previous sections, we saw that both linting and beautifying tools can be customized based on personal preference. Application development often involves multiple coders contributing pieces to the end product. Editing application code, whether fixing bugs or adding additional functionality, is much easier when all of the code is formatted in the same way. When code jumps between different formats (i.e., style rules), the person trying to interpret the code is forced to waste valuable time adjusting his/her mindset to the different formats. And even in organizations in which team coding is not employed, it is rare that an application will only ever be modified by the original author. Coders go on vacation, leave the company, etc. For these reasons, many organizations go to the trouble of constructing a style guide – a set of rules that all of their coders will follow. Here is a JavaScript style guide used at Google:
Google JavaScript Style Guide [9]
Many of these rules are fairly advanced, but there should be at least a few you can grasp. For example, the guide's authors specify that all statements must be ended in a semi-colon even though you might be able to get by with omitting them. Multiline string literals should be constructed using string concatenation rather than the line continuation character. Under the Code formatting heading, you’ll find some of the personal preference items we discussed in the beautifying section. Opening braces should be found on the same line as what they’re opening, property settings in an object definition should be indented two spaces, etc.
If you work in an organization that already does JS development and you’re going to be joining a development team, you should look into whether there is a style guide you should be following. If you’re just starting a new team, it might be a good idea to put some thought into creating a guide.