Lesson 1: Creating Mapping Apps Without Programming
Overview
Overview
In this course, we'll be spending the bulk of our time learning how GIS web applications can be built using a mapping Application Programming Interface (API) created by Esri in combination with the core web development technologies of HTML, CSS, and JavaScript. However, before digging into those programming languages and that API, it's worth noting that Esri also provides non-programming tools for creating mapping apps. These tools don't provide the same level of control over the final product as one developed using code written on top of the API, but they might meet some of your app development needs. And as we'll see later in the course, a smart workflow is to use tools in ArcGIS Online to handle certain parts of the app development (layer symbology, popup window content, etc.) and develop the rest of the app through coding.
Objectives
At the successful completion of this lesson, you should be able to:
- overlay your own data on top of an Esri basemap using ArcGIS Online;
- embed your maps within a web page;
- build applications around your maps (providing greater interactivity and functionality) through the use of development tools from Esri.
Questions?
Conversation and comments in this course will take place within the course discussion forums. If you have any questions now or at any point during this week, please feel free to post them to the Lesson 1 Discussion Forum. (That forum can be accessed at any time by clicking on the Discussions tab.)
Checklist
Checklist
Lesson 1 is one week in length. (See the Calendar in Canvas for specific due dates.) To finish this lesson, you must complete the activities listed below. You may find it useful to print this page out first so that you can follow along with the directions.
| Step | Activity | Access/Directions |
|---|---|---|
| 1 | Work through Lesson 1. | Lesson 1 |
| 2 | Create a mapping app of your own choosing using Esri's Web AppBuilder or one of their configurable templates. | Post a link to your app in the Lesson 1 Discussion Forum. |
| 3 | Review another web mapping platform. | Post a link to your video review in the Lesson 1 Discussion Forum. |
| 4 | Take the Lesson 1 Quiz after you read the course content. | Click on "Lesson 1 Quiz" to begin the quiz. |
1.1 Building a Web Map (Map Viewer)
1.1 Building a Web Map
Several GIS technology vendors provide the means for non-programmers to create web maps without writing any code (e.g., Google's My Maps, CartoDB, ArcGIS Online), and the capabilities of these map authoring applications are increasing constantly. In this part of the lesson, we will explore Esri's ArcGIS Online (which I'll abbreviate as AGO hereafter).
- Follow this link to the Penn State home page at AGO [1]. You'll need to authenticate through Penn State WebAccess if you haven't already today. Once logged in, you should see the Home tab selected for the Penn State organizational account.
If you completed GEOG 483, your first hands-on GIS project involved helping "Jen and Barry" find the best place to open an ice cream shop in a parallel universe where the cities and counties of Pennsylvania have different names. We're going to work with the data from that scenario again here (and later in the course), since it contains examples of each geometry type and some good attribute data for demonstration purposes.
- Download and unzip the Jen and Barry's data [2]. (Even if you still have these shapefiles from an earlier course, you may want to download this copy since the shapefiles are zipped and ready for upload to AGO.)
This zip file contains a point shapefile (cities), a line shapefile (interstates) and two polygon shapefiles (recareas and counties). You can check out these shapefiles if you haven't encountered this scenario before, but hang on to the zip files since we'll be uploading them to AGO.
We're going to build a web map containing the Jen and Barry's data. The old Map Viewer made it possible to add a shapefile directly to the map, and for a while the new one did not but that functionality as been re-introduced. So we'll begin by creating hosted feature layers from the shapefiles you downloaded.
- Click on the Content tab, then on the New Item button in the upper left.
- Drag and drop the zipped cities shapefiles onto the large box that takes up the top half of the New Item dialog.
- AGO should recognize the contents of the zip as a shapefile. Accept the default option to both upload the data and create a hosted feature layer, then click Next.
- Assign a Title to the layer -- it should default to match that of the shapefile, though you're welcome to give it a different name. You can also specify a folder, tags, and a summary, if you wish. Click Save when done.
When the data has been uploaded, you should see a page of details about your new feature layer along with a number of buttons running down the right side of the page. In a real-world project, it would be a good idea to fill out the metadata on this page, especially the items marked REQUIRED.
- Click the top Open in Map Viewer button to add the data to a new web map.
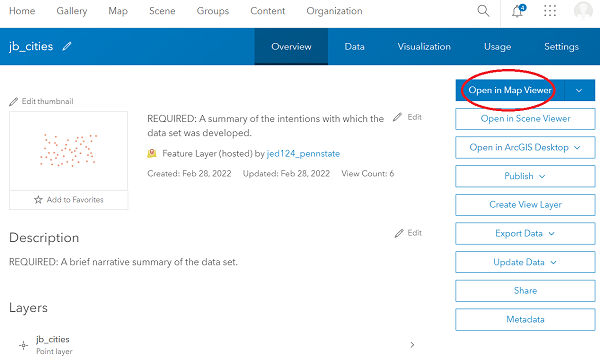
Figure 1.1 Opening a feature layer in the AGO Map Viewer
- AGO will display the cities using a single symbol by default. To modify the symbology, click on the name of your layer within the Layers panel or click the Options (3 dots) button followed by Show properties. The right side of the map should change to display various properties of your layer, in categories such as Information, Symbology, Appearance, etc.
Speaking of the "3 dots" button, note that this menu is where you'd go if you wanted to view the layer's attribute table or remove the layer from the map, among other options.
As in desktop software, you can create a thematic styling of your data in AGO. For example, you might choose to symbolize the Jen and Barry's cities based on the POPULATION field, selecting a style of Colors and Amounts (size) or Colors and Amounts (color). We won't do that here, instead sticking with the Location (single symbol) style, but let's modify that symbol.
- Expand the Symbology property group, if necessary, and click on Edit layer style.
- Next, click on Style Options, then click on the current symbol that was assigned by default. A panel of symbol properties should pop out on the left of the symbol.
Note that through this panel, you can choose from several symbol categories (Basic Shapes, Firefly, Government, etc.). You can also customize a number of other properties, such as size, rotation, transparency, fill color, and the symbol outline.
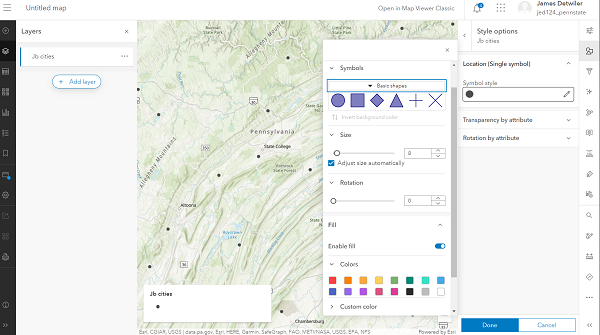
Figure 1.2 Changing layer symbology in AGO
- Select any icon that grabs you.
- To apply your change and wrap up your work with the layer's properties, click the X in the upper right of the symbol options panel, then click Done twice.
We're next going to add the other Jen and Barry's data, but first we should save this web map.
- About halfway down the black strip of buttons on the left side of the window, you should see a folder icon with a blue dot over it. (The blue dot indicates you have unsaved changes in this map.) Click this button, then on Save as.
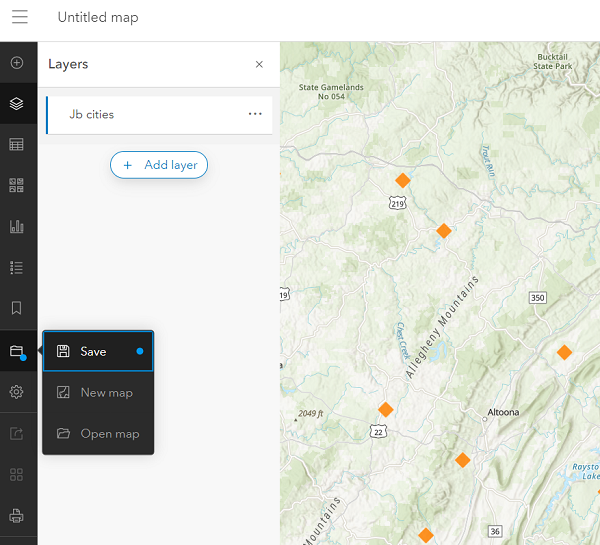
Figure 1.3 Saving the web map
- In the resulting Save map dialog, assign a Title of Jen and Barry - <your name or ID>. Optionally, add some tags and a summary, or change the folder where the map will be saved.
- Click Save map when finished. You should now see the title you assigned in the upper left of the window.
To add the interstates data, we need to import it to AGO through the Content tab as we did earlier for the cities.
- Return to the Content tab by clicking on the "hamburger" icon in the upper left of the window and choosing Content.
- Follow the steps used earlier to create hosted feature layers in your account from the interstates and counties shapefiles. You're welcome to also import the recareas, though you won't be asked to work with them in this walkthrough.
- Re-open the web map you saved earlier by returning to the Content tab, clicking on your web map and selecting Open in Map Viewer from its details page.
- On the Layers panel, click Add. You should be presented a list of layers in your AGO account.
- Locate your interstates layer and add it to the map by clicking the +Add button associated with that layer.
Let's symbolize this layer using values from its TYPE field.
- The layer's style settings should already be visible in the properties panel on the right side of the map. Under Choose Attributes, click the + Field button.
- Select the TYPE field, then click Add. Note that AGO intelligently applies the Unique symbols drawing style (based on the field holding text strings rather than numbers).
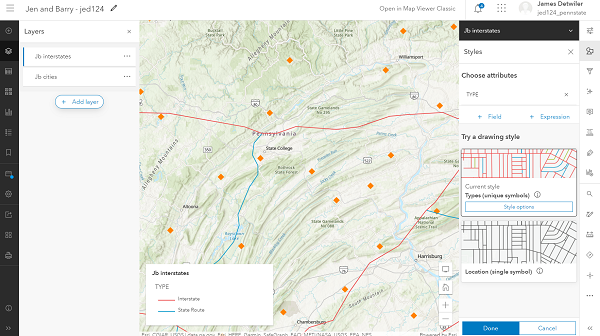
Figure 1.4 Displaying interstates by type - Click Style options. You should see a separate symbol for each of the two unique values in the TYPE field: State Route, Interstate, and Other.
- Modify the symbols to your liking. (A thicker line is intuitive for the Interstate features, a setting that can be made by changing the Width property.)
- Again, click X and Done twice when you're finished symbolizing the interstates layer.
- Following the same sort of procedure, add the counties layer to the map and set its symbology so that the county features are drawn using a hollow fill. (Polygon layers are symbolized with a fill color by default, but that can be disabled by clicking the No color button under the Fill Color heading.) You may also want to modify the outline properties.
Next, let's explore the pop-up windows that appear when the user clicks on a map feature.
- Click on one of the cities features to bring up a pop-up window.
Because the cities features overlap counties features, the pop-up results will include features from both layers. You should see text at the top of the window like "1 of 2" or "1 of 3" indicating this.
- Click on the right arrow to cycle through the pop-up results and note that the matching feature is highlighted on the map.
There are a number of improvements that could be made to the information displayed in this pop-up.
- Display the properties of the cities layer as you did earlier. It will probably default to showing the drawing styles.
- In the strip of buttons running along the right side of the window, click Pop-ups.
Values from columns in the layer's attribute table are displayed in the pop-up by enclosing the column within braces. Thus, the pop-up Title is set to display the value from the layer's NAME column using the expression {NAME}.
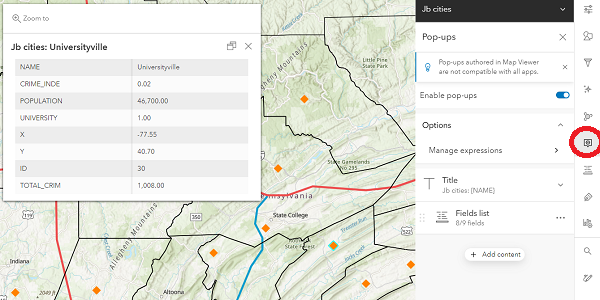
Figure 1.5 Configuring pop-ups
All of the layer's fields -- with the exception of FID -- will be included in the pop-up by default, but this can be customized.
- Click on Fields list, then on the x beside the ID, X, and Y fields, to exclude those fields from the pop-up content. Note that the pop-up that appears over the map is updated dynamically in response to your modifications.
- It's possible that the fields won't be listed in a logical order. Clicking on the 6 dots just to the left of the field name, click and drag the fields as necessary to order them as follows: NAME, POPULATION, UNIVERSITY, TOTAL_CRIM, CRIME_INDE.
There are other settings that can be applied to make the pop-up more human friendly. For example, some of the field names are abbreviated and/or include underscores. And the numeric fields display two digits after the decimal point, but that is meaningless for those fields.
- Looking again at the strip of buttons along the right, click on the Configure Fields button (one below the Popups button).
- Click on the TOTAL_CRIM field and in the panel that appears to the left, give it a new Display name and set the Significant digits property to 0 decimal places. Click Done to dismiss this panel.
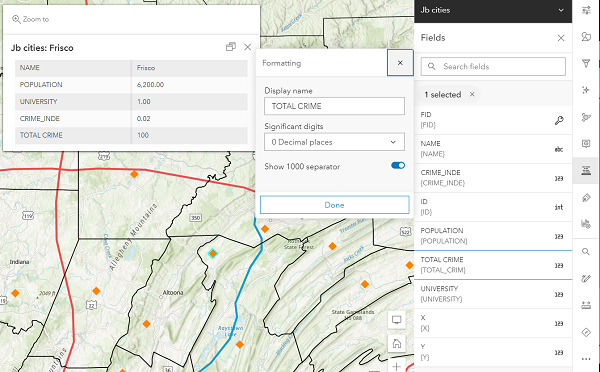
Figure 1.6 Making the pop-ups more user-friendly
Following a similar process, make similar improvements to other fields as appropriate. - Once done modifying the layer's settings, click on its entry in the Layers panel to toggle off its properties panel.
Test your changes by clicking once again on a cities feature.
Note that it is possible to customize pop-ups further (e.g., to string together values from multiple columns) or to display media such as images and charts.
Challenge → The UNIVERSITY field holds a 1 for cities that have a university and a 0 for cities that do not. This would be a bit more human-friendly if it displayed as Yes/No (or True/False). If you can work out how to implement such a change, feel free to share your solution in the Lesson 1 Discussion Forum.
We can also choose to utilize a different base map.
- In the strip of buttons running down the left side of the window, click on the Basemap button and choose one of the options. (A light base map is often preferable to a dark one, since your layers will stand out better.)
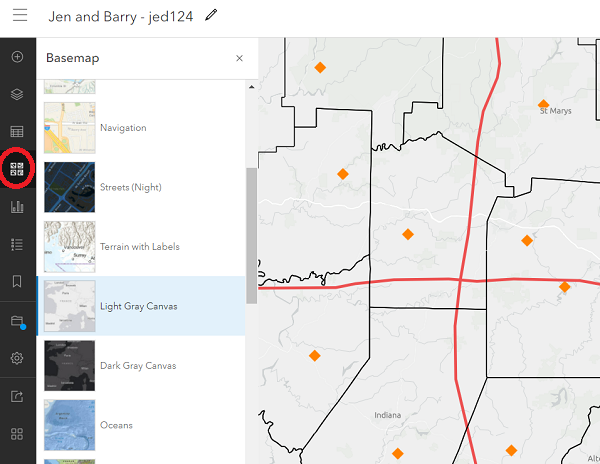
Figure 1.7 Changing the basemap
- Be sure to Save the changes you've made to your web map.
- Finally, make your map visible to others by clicking Share map (also on the left-hand toolbar).
- Set the map's visibility to Everyone (public), as we'll be embedding this map in a web page in a moment, then click Save.
Unless you also made the map's layers public -- the walkthrough didn't tell you to -- you should see a dialog warning you that they won't be visible, but also giving you a chance to rectify that.
- Click the Update sharing button to set sharing on the layers to public as well.
- To confirm that others will be able to see your map, try opening the URL in another browser (e.g., use Edge if you're currently working in Chrome).
In this section, we've been able to build a useful interactive web map without any programming. Move on to the next page to see how to take your ArcGIS Online map further -- still without programming -- by embedding it within a web page and using it as the basis for a web application.
1.1 Building a Web Map (Map Viewer Classic)
Note: This page walks through creation of the same web map as the previous page, just with the "Classic" version of the ArcGIS Online Map Viewer. You're welcome to skip over this page if you've already completed the Jen and Barry's web map on the previous page.
1.1 Building a Web Map
Several GIS technology vendors provide the means for non-programmers to create web maps without writing any code (e.g., Google's My Maps, CartoDB, ArcGIS Online), and the capabilities of these map authoring applications are increasing constantly. In this part of the lesson, we will explore Esri's ArcGIS Online.
- Go to the Penn State home page at ArcGIS Online [1] and click the Penn State WebAccess button to authenticate.
- Click on Map to begin work on a new map. If this opens some other map you've worked on previously, select New Map (top right) to start with a clean slate.
If you completed GEOG 483, your first hands-on GIS project involved helping "Jen and Barry" find the best place to open an ice cream shop in a parallel universe where the cities and counties of Pennsylvania have different names. We're going to work with the data from that scenario again here (and later in the course), since it contains examples of each geometry type and some good attribute data for demonstration purposes.
- Download and unzip the Jen and Barry's data [2]. (Even if you still have these shapefiles from an earlier course, you may want to download this copy since the shapefiles are zipped and ready for upload to ArcGIS Online.)
This zip file contains a point shapefile (cities), a line shapefile (interstates) and two polygon shapefiles (recareas and counties). You can check out these shapefiles if you haven't encountered this scenario before, but hang on to the zip files since we'll be uploading them to ArcGIS Online.
- In ArcGIS Online, click the Add menu, then select Add Layer from File.
As explained in the dialog, this option enables you to upload zipped shapefiles, delimited text files, and GPX (GPS interchange) files. Note the other options for adding data in this menu. We'll use them later.
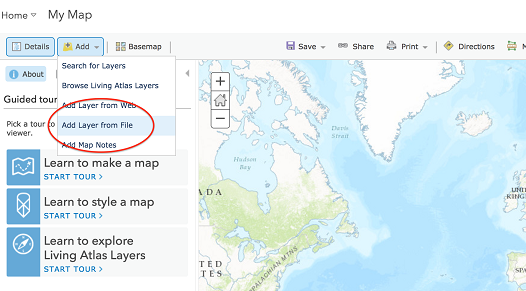 Figure 1.1 The Add Layer from File option in ArcGIS Online
- Click the Browse button, then navigate to your copy of the Jen and Barry's cities zip file.
- Accept the default Generalize features option.
We're importing these data purely for display purposes, so it makes sense to take advantage of the improved drawing speed that generalization provides. If we were conducting analysis that relied on highly accurate feature geometries, we would select the Keep original features option instead.
- Click Import Layer to complete the upload process.
ArcGIS Online will automatically get you started symbolizing your data by providing a two-step dialog for styling the cities layer. The first step involves selecting an attribute to show, while the second presents drawing style options based on the selection made in the first step.
By default, the layer is shown as graduated symbols based on the POPULATION column using the "Counts and Amounts (Size)" option. Note that symbolizing the cities with a color ramp would be done using the "Counts and Amounts (Color)" option. Let's change the display of the cities so that they are all drawn with the same symbol.
- Under Choose an attribute to show, select Show location only.
- Under Select a drawing style, default is Location (single symbol), select OPTIONS.
We'll change the symbol used for the cities in a moment, but first notice that it is possible to set the transparency and the scale range at which the layer is visible on this panel.
- Click Symbols.
Select any icon that grabs you. Note that there are a number of icon categories, that it is possible to customize the icon's size, and that you can also use your own image as the icon.
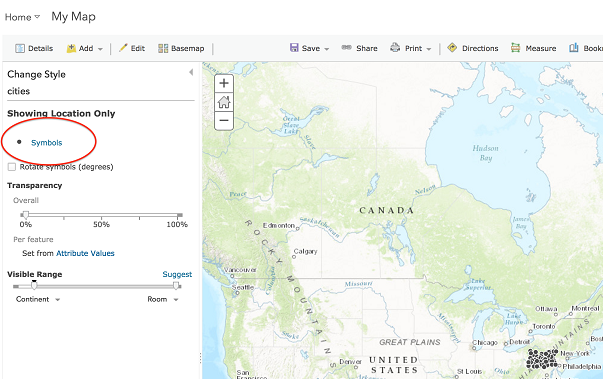 Figure 1.2 Changing layer symbology in ArcGIS Online
- Click OK to dismiss the symbology options and DONE to finish modifying the cities layer. You should see the cities layer listed under the Contents heading of the Details panel.
- Note the buttons that appear beneath the layer name, allowing you to see the layer's legend, open its attribute table, change the layer's style, perform analysis, and access a host of other miscellaneous options.
- Return to the Add Layer from File dialog and add the interstates shapefile as a layer. Again, ArcGIS Online will immediately launch into styling the new layer.
- Choose TYPE as the attribute to show and note that ArcGIS Online intelligently applies the Unique symbols drawing style (based on the field holding text strings rather than numbers).
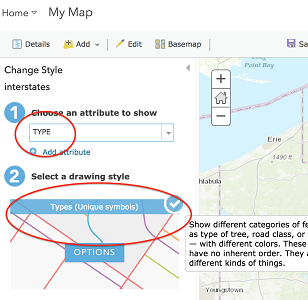 Figure 1.3 Symbolizing by an attribute in ArcGIS Online
 - Click OPTIONS. You should see a separate symbol for each of the two unique values in the TYPE field: State Route, Interstate, and Other.
- Modify the symbols to your liking. (A thicker line is intuitive for the Interstate features.)
- Again, click OK and DONE to return to the Details panel when you're finished symbolizing the interstates layer.
- Following the same sort of procedure, set the symbology of the counties layer so that the county features are drawn using a hollow fill. (Under the color palette is an empty square with a red line through it, which is used to specify "No color.") You may also want to create a darker outline color.
Next, let's explore the pop-up windows that appear when the user clicks on a map feature.
- Click on one of the cities features to bring up a pop-up window.
Because the cities features overlap counties features, the pop-up results will include features from both layers. You should see text at the top of the window like "1 of 2" or "1 of 3" indicating this.
- Click on the right arrow to cycle through the pop-up results and note that the matching feature is highlighted on the map.
There are a number of improvements that could be made to the information displayed in this pop-up.
- Click on More Options (3 dots) next to the cities layer and select Configure Pop-up.
Values from columns in the layer's attribute table are displayed in the pop-up by enclosing the column within braces. Thus, the Pop-up Title is set to display the value from the layer's NAME column using the expression {NAME}.
- Click on the Configure Attributes link just below the list of fields.
The dialog contains two sets of checkboxes: one for specifying which fields will be displayed and another for specifying which can be edited. Note that the checkbox in the header itself can be used to toggle all fields on/off.
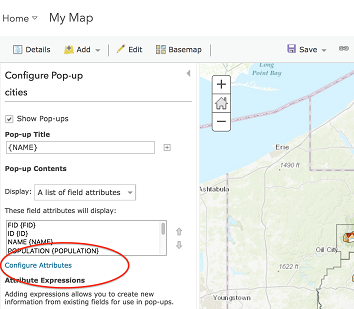 Figure 1.4 Configuring attributes in ArcGIS Online
- Editing capability isn't needed, so uncheck Edit for all fields.
- Under Display, uncheck the checkboxes next to the FID, ID, X and Y fields to exclude those values from the pop-up content.
- Click on the TOTAL_CRIM field alias and give it a new alias that makes the pop-up more human friendly. Do the same for CRIME_INDE.
The POPULATION, TOTAL_CRIM and UNIVERSITY values display with two digits after the decimal point, but that is meaningless for those fields.
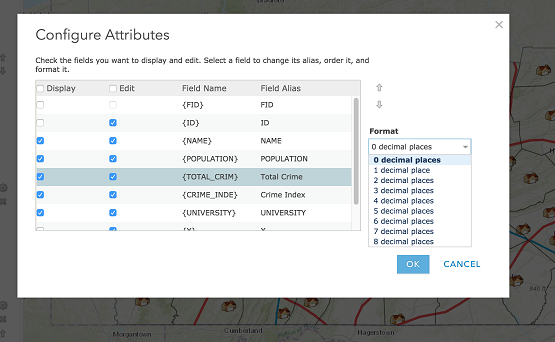 Figure 1.5 Assigning user-friendly field aliases in ArcGIS Online
- Click on the {POPULATION} field, then change the Format option from 2 decimal places to 0 decimal places. Do the same for {TOTAL_CRIM} and {UNIVERSITY}.
- Click OK to dismiss the Configure Attributes dialog, then OK again to save your pop-up changes.
Test your changes by clicking once again on a cities feature.
Note that it is possible to customize pop-ups further (e.g., to string together values from multiple columns) or to display media such as images and charts. It's also possible to utilize a different base map.
- Click on the Basemap button and choose one of the options. (A light base map is often preferable to a dark one, since your layers will stand out better.)
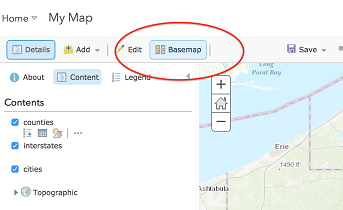 Figure 1.6 Changing the basemap in ArcGIS Online
 - Save your work by going to Save > Save As.
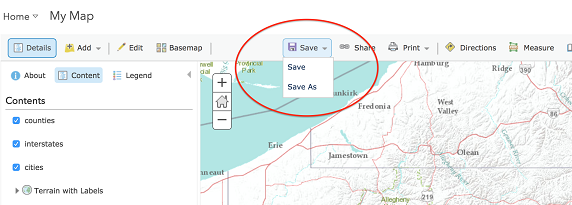 Figure 1.7 Saving a map in ArcGIS Online
 - To make it easy for me to find your map, please give it a Title of Jen and Barry - <your name>.
- Enter a logical Tag or two (e.g., GEOG 863) and an appropriate Summary (e.g., A map for GEOG 863, Project 1), then click SAVE MAP.
- Finally, make your map visible to others by clicking Share.
- Set the map's visibility to Everyone (public), as we'll be embedding this map in a web page in a moment.
- To confirm that others will be able to see your map, try opening the URL in another browser (e.g., use Chrome if you're currently working in Firefox).
In this section, we've been able to build a useful interactive web map without any programming. Move on to the next page to see how to take your ArcGIS Online map further -- still without programming -- by embedding it within a web page and using it as the basis for a web application.
1.2 Turning Your Map into an App
1.2 Turning Your Map into an App
The map created earlier in the lesson offers interactivity in the form of zooming in/out, toggling layers on/off, accessing information about map features by clicking on them, changing the base map, etc. This part of the lesson will begin by showing you how to embed your map within a separate web page. After that, we'll look at tools developed by Esri that make it possible to incorporate even more interactivity -- to turn your map into an app.
1.2.1 Embedding a Map
1.2.1 Embedding a Map
While it's sometimes preferable to share the link to your map -- allowing it to fill the viewer's browser window -- it can also be useful to embed the map within a web page.
- Save this example page [3] to your computer. (Right-click on the link and choose Save.)
- Open the page in a plain text editor of your choosing (e.g., Notepad).
- If your ArcGIS Online map is no longer open, go to our Penn State organization page [4], click the Content tab, and click on the map you created earlier.
What we're about to do is not (yet?) supported by the current Map Viewer, so rather than click on the Open in Map Viewer button, click instead on the dropdown arrow just to its right and select Open in Map Viewer Classic.
- Click Share, then EMBED IN WEBSITE.
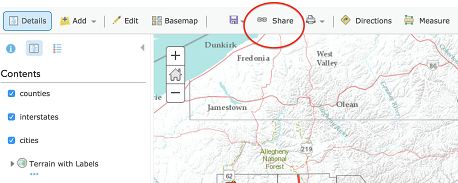 Figure 1.8 Opening the dialog for embedding a map in a website
Note that AGO provides a number of options for customizing the embedded map. For example, it's possible to specify the dimensions of the map, and to include widgets such as a base map selector or legend.
- After making settings to your liking, find the wide text box just above the Map Options. This box contains the HTML code required to embed your map within a web page. Click the COPY button to the right of that text box to copy the HTML code to your machine's clipboard.
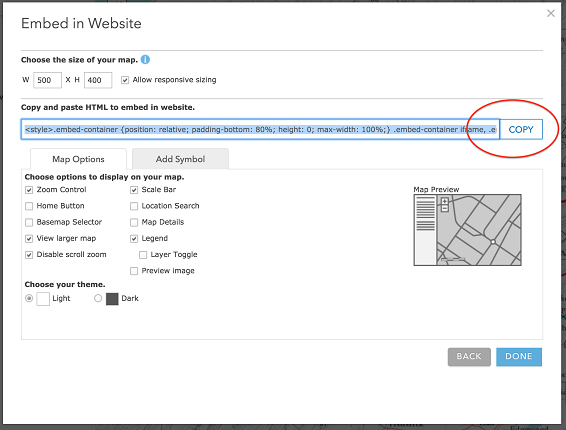 Figure 1.9 Copying the code for embedding a map in a website
 - Paste that code into your HTML document just beneath the My ArcGIS Online Map heading. Double-check the URL to your map. If it doesn't include the http: protocol, you will need to add it in front of //pennstate.maps.arcgis.com in the html code for your map to connect properly.
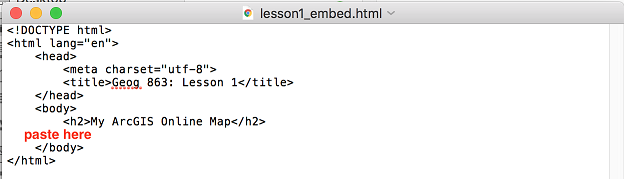 Figure 1.10 Pasting code to embed a map in a website
 - Save your HTML document with a name like lesson1.html.
- Using the File Explorer in Windows, browse to the document you just saved and double-click on it to open it in a web browser. (If .html files aren't set to open in a web browser on your machine, you may need to right-click and select Open With.)
- If you get an error that your map cannot be loaded or found (a blank grey box under your title), go back into your HTML file and add http: before //pennstate.maps.arcgis (etc.). so that it looks like:
http://pennstate.maps.arcgis.com/apps/Embed [5]......
1.2.2 Configuring an App Based on a Template
1.2.2 Configuring an App Based on a Template
The interactivity offered by this map is nice, but you may find yourself in situations where you need to go further. For example, maybe you want end users to be able to query the map's underlying data for features meeting certain criteria or to be able to edit the underlying data. Esri offers a couple of different non-programming options for those looking to build apps with greater functionality. The first of these is a set of templates that each meet a narrowly focused need (e.g., Basic, Nearby, Sidebar). As the app developer, you select the desired template and make a relatively small number of configurations to tailor the app to your needs. The second option is to use Web AppBuilder. This option is more open-ended, allowing you to build a less narrowly focused app by picking and choosing from a set of widgets.
We'll start with configurable app templates and to demonstrate their use we'll create an app for locating buildings on the Penn State Main Campus.
 As with the Map Viewer, Esri has an older set of configurable app templates and a newer one (which they've branded as Instant Apps). In this walkthrough, I'd like to show you how to include a logo and an opening splash screen in your app. It turns out that building such features into an Instant App is more difficult to do. A logo can only come from an organization-level shared theme setting and I don't see a splash screen option (though some Instant Apps templates offer a Details panel that can serve a similar purpose). So in this section, you'll be led through creating an app with an older template (with the logo and splash screen) and in the next section you'll see how a similar app can be built with one of the newer Instant Apps templates.
- In your Penn State ArcGIS Online organizational account, create a new map. Be sure to switch to Map Viewer Classic.
- Add the campus building data as a layer by going to Add > Add Layer from Web and pasting this ArcGIS Server map service:
https://mapservices.pasda.psu.edu/server/rest/services/pasda/PSU_Campus/... [6]
Notice that the ArcGIS Services are the default, but the dropdown menu allows you to add several other types of online data. - Zoom to the central part of campus and style the layer as desired.
- Save the map with the name PSU Buildings. Be sure to add some tags that would aid in discovering the map (e.g., Penn State, buildings) and optionally enter a summary.
- Click Share, then check the Everyone box to ensure your map is viewable to the public.
- Click Create a Web App.
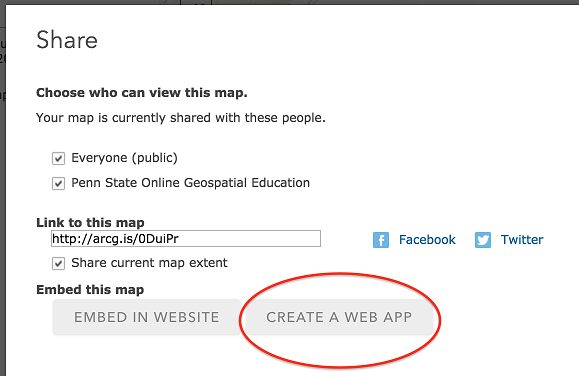 Figure 1.11 Accessing the app template options in ArcGIS Online
You'll be presented with a gallery of app templates on which you can base your own app. The gallery will default to Use Instant Apps under What do you want to do?, but you can see the older templates by choosing Show All. Browse the templates to get a sense of the variety of apps available.
We're going to create a Basic Viewer application and configure it so that users can search for buildings by name. - Click on the Basic Viewer template and select CREATE WEB APP. Note: You'll also see an Instant App template by the name of Basic, but be sure you choose Basic Viewer.
- Assign a title to the app (e.g., Penn State Main Campus Building Finder), add some tags that would aid in discovering the app (e.g., Penn State, buildings), optionally enter a summary, then click DONE. After a few moments, you'll be presented with a Configure page. The full set of configuration options for this template are organized under the tabs General, Theme, Options and Search. Let's start with the General tab, already shown by default.
- The app preview on the right initializes with a heading based on the underlying map name. Change this by setting the Application title to Penn State Main Campus Building Finder.
Other options under the General tab have to do with providing some background info to the user regarding the app's purpose and/or use. This can be done through a Details dialog or through a Splash Screen. Both options offer a WYSIWYG HTML editor for defining the content. The main difference is that the splash screen appears automatically when the app loads (but cannot be viewed after that), while the Details dialog can be opened whenever desired via a button. Some apps require no background info, while others are not as intuitive. You may choose to employ neither, just one, or both of these options, depending on the app.
For this app, let's go with a Splash Screen, but no Details. - Check the Splash Screen checkbox, then set the properties as follows:
Splash screen title: Welcome!
Splash screen content text: Enter a text string in the search box to find all buildings containing your search string.
Define custom button text: Close Figure 1.12 Defining Splash Screen properties in the Basic Viewer configurable app
 - Click Save to save your configurations so far and refresh the webpage. When the app preview reloads, you should see the changes you've made, including the splash screen.
- Now, move to the Theme tab and set the Title logo to http://www.e-education.psu.edu/geog863/sites/www.e-education.psu.edu.geog863/files/psu-facebook-avatar-180x180.jpg [7] and the Logo link to http://www.psu.edu [8]. Note that while the image is actually 180 pixels x 180 pixels, it will be dynamically resized to 48 pixels x 48 pixels.
- Feel free to experiment with the layout options. (You'll need to click Save to refresh the preview after selecting a different layout.) I'm partial to the Default, but you're welcome to choose a different one.
At the top of the Theme tab, you have the ability to customize the colors of the header background, header text, button icons, panel background and panel text. It turns out that Penn State's blue and white colors are already a pretty good match for the app's default colors. However, we can adjust the header background color to match the Penn State blue a bit better. - Open the Penn State shield used above in Firefox, then right-click on the image and choose Inspect Element. (Guidance on doing the next step in Chrome can be found beneath the figure below.)
- Under the Inspector tab, you should see an eyedropper icon. If you've worked in image editors like Photoshop, you should be familiar with how this tool works. Click on the tool to activate it, then click on the blue part of the shield. This will copy the hexadecimal value of that color to your clipboard. (The shield contains many shades of blue, so your color value is likely to be different from mine.)
 Figure 1.13 Using the browser's color picker
If you'd prefer to do this in Chrome, you should be able to access a similar tool by right-clicking on the image > Inspect; under the Styles tab, click the colored square next to the background-color property. The color picker dialog that appears contains an eyedropper tool. Click to select it, then click in the blue of the image as described above. That blue color will then be selected in the color picker. The dialog shows color values in the HSLA specification scheme by default; if you click the double-arrow button to the right of the color values, you can view the color in other specification schemes, including its hexadecimal (HEX) value.
- Return to the app and Paste the copied color value in to set the Header color property.
- Move to the Options tab and spend a few minutes examining the many ways you can customize the app GUI. Here are the settings I would make for this app:
- Display scalebar on map
- Turn off Bookmarks. (I didn't see a tool associated with this option on the GUI anyway and this option may not even be available to you.)
- Turn off Map Details. We left this option empty under the General tab earlier, opting to show a splash screen only.
- Turn on the Measure tool. You should experiment with this; it can be used to measure lengths and areas.
- Uncheck Display layer list. There's not much point in letting the user toggle the buildings on/off in this app.
The Basic Viewer template provides a box for the user to enter search text, which by default is set to work against Esri's world geocoder. We'll now carry out the most important of our customizations by wiring up the search box to a column in the buildings layer that holds the building names. - Click the Search tab, uncheck the Esri World Geocoder option and check the PSU Buildings option.
- Click the Edit button next to the PSU Buildings option.
- From the Search Fields list, select BLDG_NAME_.
- Set the Placeholder to Enter part of a building name.
- Check the Enable Suggestions box. This will find matches in the buildings layer and present them in a dropdown list as the user types.
With that, you've made all the necessary settings to tailor this template to your specific purpose. - Click Save and Close once you're satisfied with the app's settings. You'll be taken to your app's "item details" page (also accessible from your "My Content" page).
- To see the app as an end user would see it, click the View Application or Launch button to open it in a new browser tab.
- Test your new app by entering the name 'walker' in the search box. You should see that the app finds three buildings that make up the Walker Clubhouse (associated with the PSU golf courses), Walker Building (home of the Geography and Meteorology departments) and a bus shelter near Walker Building. Note how the settings you made when configuring are reflected in the app.
- Returning to the Details page for our app (visible by clicking on your map/app from "Content" under "Home" in ArcGIS Online) , note the various pieces of metadata that can be edited (thumbnail, description, access use and constraints, etc.).
- Note also that you would come here and click the Configure App button if you wanted to make changes to the app.
- Finally, and importantly, if you want others to be able to use your app, you'll need to click the Share button. In the Share dialog, you can select whether you want the app to be visible to Everyone, your Penn State group, or some other group to which you belong. Select Everyone in this case.
- And just to test your app's visibility, scroll to the bottom of the app's Details page and find the URL in the bottom right. Click the Copy button to copy the URL to your clipboard, then paste that URL into a different browser where you are not signed in to ArcGIS Online. If the app works properly, then you can safely share that URL with your end users.
Remember that there are many configurable app templates available to you as an app developer. Often there are multiple templates that can serve as logical starting points, and depending on the widgets employed by the template, you'll see different customization options.
1.2.2 Configuring an App Based on a Template (Instant Apps)
1.2.2 Configuring an App Based on a Template (Instant Apps)
Now let's see how a similar app can be built using one of the newer Instant Apps templates. (You can skip steps 1-5 if you already created and saved a PSU Buildings web map in the previous section.)
- In your Penn State AGOL organizational account, open a new Map, sticking with the current Map Viewer.
- Add the campus building data as a layer by clicking Add > Web service and pasting this ArcGIS Server map service:
https://mapservices.pasda.psu.edu/server/rest/services/pasda/PSU_Campus/... [6] - Zoom to the central part of campus and style the layer as desired.
- Save the map with the name PSU Buildings. Be sure to add some tags that would aid in discovering the map (e.g., Penn State, buildings) and optionally enter a summary.
- Click Share map, then check the Everyone box to ensure your map is viewable to the public.
- Click Create app. (It's the button below Share map.)
You'll be presented with a gallery of app templates on which you can base your own app. Browse the templates to get a sense of the variety of apps available. Note that how your map will look within a given template can be previewed by clicking on the desired template and selecting Preview.
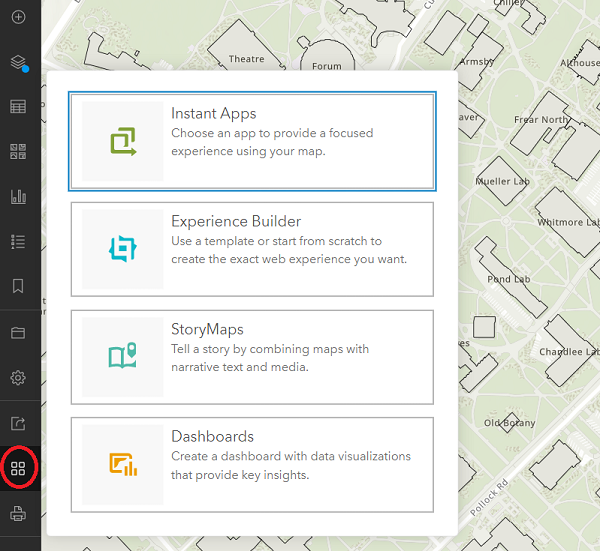 Figure 1.14 Creating an Instant App
We're going to create a Sidebar application and configure it so that users can search for buildings by name. The Basic template would be appropriate too, though it doesn't appear to offer a way of displaying the usage instructions that we showed through a splash screen in the previous app. - Locate the Sidebar template and click Choose.
- Assign a title to the app (e.g., Penn State Main Campus Building Finder Instant App), add some tags that would aid in discovering the app (e.g., Penn State, buildings), optionally enter a summary, then click Create App. After a few moments, you'll be presented with a page for Configuring the app. The app configuration process defaults to an Express mode, which presents a set of essential settings to consider in five categories.
If it's your first time with Instant Apps, you'll be presented with a dialog of tips before you can begin configuring. - Read over the tips, clicking Next to move from one to the next, then Done when you've read the last tip.
- Go to the Step 1 settings and note that the Map is already selected. This makes sense as you just chose to create an app from the Map Viewer, but you'd have the ability here to select a different map if you wanted.
- Click Step 2. About to move on to Step 2, which involves providing info that will help the user understand the purpose behind your app.
- Confirm the Header is toggled on and set the App title to Penn State Main Campus Building Finder.
The Step 2 settings offer one way to provide user instructions through an Introduction window. This adds an I icon to the map that the user can click on to get info on the map's purpose and/or instructions. Unfortunately, it can't be set to open when the app loads. There is another option that I like a bit better, so leave the Introduction panel toggled off. - Click Next to move on to Step 3.
- A legend is probably not necessary in this scenario, so toggle the Legend option off.
- Displaying info on selected buildings in a side panel is a nice feature, so leave the Pop-up panel toggled on.
- The Details panel should be enabled by default. It is the other way to provide user instructions. Edit its content to appear as follows:
Welcome! Enter a text string in the search box to find all buildings containing your search string.
Specify that it should also be open by setting the Select which panel to open at start option (top of the Step 3 settings) to Details. - Click Next again to move on to Step 4, which presents a number of interactivity settings. Take a moment to look over the available options, clicking on their info buttons if you're unsure what they mean.
The goal of this app is to provide the user with the ability to find a building by name, so we want the Search widget to be enabled. (It is by default.) However, its default behavior is to pass the entered text to the ArcGIS World Geocoding Service, which is not what we're looking for. Let's configure the app to use the buildings layer from the map as a Search source. - Under the ArcGIS World Geocoding Service source, click Add a source. You should be presented with options for specifying a layer source from a URL or from the map.
- Choose Map. In this case, the map contains just a single layer, which you should see listed.
- Click on that buildings layer to select it.
- Set the Layer Name to PSU Campus Buildings.
- We could set the Placeholder text to something more context-specific, but it would only appear if we were going to allow the user to select from multiple search sources (which we won't be doing). So leave this setting unchanged.
- From the Search field dropdown list, select BLDG_NAME_ . Note that you could add other fields to search as well, if desired.
- Click Done to complete the addition of the new source for the Search widget. You should now see both the geocoding service and the buildings listed as sources.
- As we don't really need to support geocoding, click on the three dots next to the Geocoding Service source, then click Delete.
- Finally, confirm that the Search open at start option is toggled on.
- Click Next to move on to the last group of settings, which control the theme and layout of the app's widgets. We'll leave these settings on their defaults, but note that we could choose a Light or Dark theme and move the widgets (a Home button, Zoom controls, the Search widget, and a Scalebar widget) to different positions.
- Click Publish and then Confirm to complete the configuration of the app.
After a few moments, you should be presented with a dialog containing some sharing options. Note that the app is not shared with the public by default. You have the ability to change that here if you wish. You'll also see buttons for sharing through social media and code that you could copy if you wanted to embed the app in a webpage like we embedded a web map earlier in the lesson.
- Click Launch to have a look at your app as an end user would see it.
The Details panel should be open on load, showing the user instructions.
- Try testing the search box (e.g., for Pattee Library) to confirm that it's working properly.
Now that you've seen how to quickly put together an app using a couple of different configurable templates, let's have a look at an option that provides a bit more flexibility.
1.2.3 Creating an App with the Web AppBuilder
1.2.3 Creating an App with the Web AppBuilder
Now let's try one of Esri's more open-ended options for creating apps, the Web AppBuilder.
- Re-open your Buildings map using Map Viewer Classic and click again on the Share button.
- Click Create a Web App and this time click on the Web AppBuilder tab rather than the Configurable Apps tab.
- Assign a Title of PSU Main Campus Buildings, add some tags that would aid in discovering the app (e.g., Penn State, buildings), optionally enter a summary, then click Get Started.
The Web AppBuilder will open with configuration options organized within tabs on the left side of the window and a preview of your new app on the right side. The app is dynamically linked to the configuration options so that changes made on the left will be reflected on the right immediately. The first of the configuration tabs is Theme, which provides access to settings that deal mainly with the app's appearance.
- Try out some or all of the available themes (Billboard, Box, Dart, etc.). The controls on the app preview are functional, so you can click on the Legend and Layer List controls to see how they would behave. Depending on the theme chosen, you will see different options under the Style and Layout headings.
- Click on the Map tab and note that it is possible to change the app's underlying Web Map and to override the map's initial extent and visible scale levels.
- Next, click on the Widget tab. This is where the real power of the Web AppBuilder becomes apparent.
The widgets available in Web AppBuilder can be categorized as off-panel or in-panel. Off-panel widgets are built into the app and can only be toggled on/off. Examples include the Scalebar and Coordinate widgets. In-panel widgets, on the other hand, can be added to or removed from the app. When adding an in-panel widget, the developer can position the widget within a container. If you experimented with the various themes, you saw that the shape and positioning of the widget container is something that differs across the themes. And for some themes, in-panel widgets can also be placed in numbered positions outside of the theme's container.
- Hover your mouse over some of the off-panel widgets and note the following:
- An eye icon appears in the widget's upper-right corner. The widget can be toggled on/off by clicking on this icon. Widgets that have been turned on are shaded dark blue, while those that are turned off are light blue.
- Widgets that are toggled on will have their position within the app highlighted in red.
- A pencil icon appears in the widget's lower-right corner. The widget can be configured by clicking on this icon. (For example, the Scalebar widget can be configured to show distance measured in English units, metric units, or both.)
- Turn on the following widgets: Attribute Table, Coordinate, My Location, Scalebar, Overview Map (you'll probably need to be using the Box theme for these).
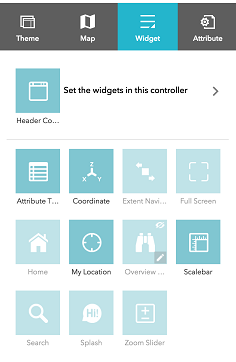 Figure 1.15 Choosing widgets in Web AppBuilder
 - Configure the widgets as follows:
- Attach the Overview Map to the top-right corner and initialize it in its expanded state.
- Modify the Attribute Table so that only the building name and abbreviation columns are visible. (Note that this can also be done for the web map itself, which is an important consideration if you're using the map as the basis for multiple apps serving multiple purposes/audiences.)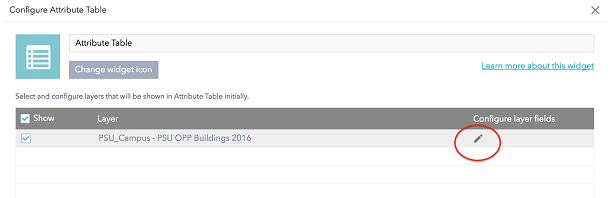 Figure 1.16 Configuring the Attribute Table widget in Web AppBuilder
Now let's modify the widgets that are held within your theme's widget container (or controller).
- Regardless of the theme you selected, you should see a Set the widgets in this controller link near the top of the tab. Click on this link. You should see the Legend and Layers List widgets by default.
For this simple map in which the title makes it clear what's being shown, a legend is unnecessary.
- Hover your mouse over the Legend widget and click on the X in the upper right to remove it from the app.
For the same reason, you could probably also remove the Layer List widget. However, this widget provides a context menu of options that could be of interest to users.
- Hover your mouse over the Layer List widget and click on the pencil icon to change its configuration.
- Uncheck the Show Legend box. The widget makes it possible to view a legend for each layer by clicking on a small arrow to the left of the layer name, but again, there's not much point in a legend here.
The widget also offers the ability to perform certain actions through the context menu. All of these items are turned on by default, but you can override that.
- Uncheck the Enable/Disable Pop-up box and the Move up/Move down box (with only one layer on the map, the Move options will be disabled anyway).
- Click OK to dismiss the Layer List dialog, then Save your app.
- Click the Launch button to open your app in a new tab and confirm that the various settings you've made have taken effect.
Now let's check out some of the other in-panel widgets that are available.
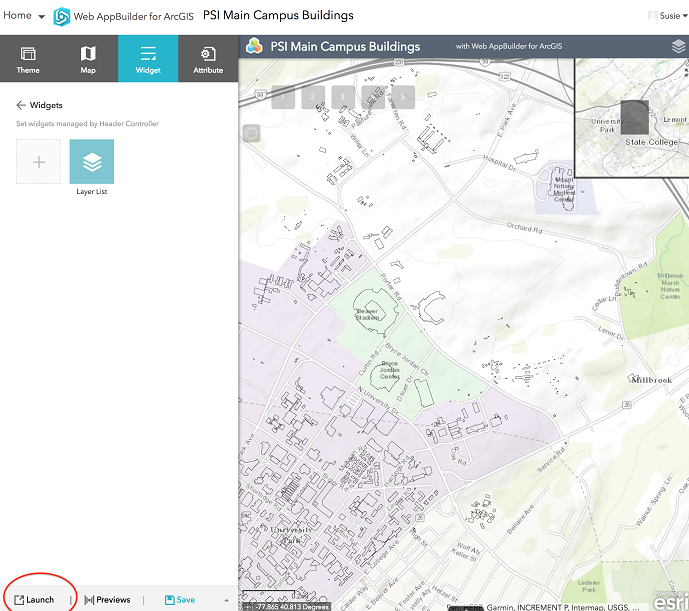 Figure 1.17 Launching an app preview in Web AppBuilder
- Close the tab containing your running app and return to the Web AppBuilder tab.
- Under the Widgets heading, click on the + sign to add a new widget. In addition to the Layer List and Legend widgets that we've already seen, you should see many others including Basemap Gallery, Edit, and Geoprocessing, among others. Being able to switch basemaps is a nice feature to have, even in a very simple demo like this, so let's provide that capability.
- Click on the Basemap Gallery widget and click OK. You'll be taken immediately to a configuration panel, which for this widget provides the ability to use your organization's basemap gallery (which will be the same as Esri's if your organization hasn't defined one) or configure a custom gallery for this app.
- Choose the Configure custom basemaps option, then click the Import button.
The Import basemaps dialog allows you to pick and choose from the full set of basemaps found in Esri's or your organization's gallery. Esri's gallery is selected by default.
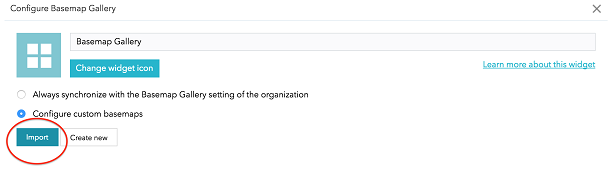 Figure 1.18 Customizing the basemap option in Web AppBuilder
- Click on each of the basemaps one at a time to add them to this app's gallery, with the exception of Imagery with Labels (it differs little from Imagery in this area), Oceans (not applicable to this area) and Terrain with Labels (not intended for use at this scale). Click OK twice to finish configuration of the Basemap Gallery widget.
- Click again on the + sign, add the Draw widget, check the box to Add the drawing as an operational layer of the map and click OK. This will enable the user to add custom features and annotation as a separate layer.
Now let's say you want the widgets to appear in a different order.
- Click on one of the widgets and drag it to a new position. You should see a red vertical line indicating where the widget will end up when you release the mouse button.
Before leaving the Widgets tab, there are a few more points worth mentioning:
- The Analysis widget provides access to several analytical tools that may be useful depending on the app's purpose (e.g., Create Buffers, Create Viewshed, etc.). Keep in mind though that usage of these tools may consume service credits allocated to your ArcGIS Online organization.
- The Edit widget can be used to develop online editing apps.
- The Geoprocessing widget can be used to "wire up" your app to a geoprocessing task.
- Full documentation for all of Esri's widgets can be found at Web AppBuilder for ArcGIS [9].
- Click on the Attribute tab to move on to a set of options that help with branding your app.
- Enter a sensible Title, such as Penn State University Park Buildings.
- If you're not interested in advertising for Esri, clear the text in the Subtitle box or assign your own.
- Set the app's logo (using the same Nittany Lion shield from the previous page) by hovering over the Logo icon, clicking the Custom link and browsing to the image on your computer. Note that the logo is not displayed for all themes.
- Click on Add New Link, enter www.psu.edu [8] in the first box (the text that you want to display) and the URL http://www.psu.edu [8] in the second box. Again, note that links are not displayed for all themes.
- Finally, Save your app, then click Launch to see the app as an end user would.
1.2.3 Creating an App with the Experience Builder
1.2.3 Creating an App with the Experience Builder
As we saw with the Map Viewer and configurable app templates, there is also a newer technology for building apps from scratch -- Experience Builder. Let's walk through creating a similar app on that platform.
- Re-open your Buildings map using the current Map Viewer, click Create app, then Experience Builder.
You'll be presented with several templates to use as a starting point. Each one is shown in wireframe form to give you a quick preview of its widget layout. Note that you can hover over these wireframes to get a description of the template or click the Preview buttons to get a better idea of the template's layout. A number of templates could work here; let's go with Foldable. - Click the Create button associated with the Foldable template.
- Feel free to go through the short tour of how Experience Builder works, or click Skip.
Where Instant Apps are designed to get an app up and running quickly by walking through a short set of numbered steps, Experience Builder is much more open-ended and can appear overwhelming at first. But let's break down the most important aspects of the interface.
The largest panel, in the middle, shows your app in a sort of design view referred to as the canvas.
To the left of the canvas is the sidebar, a panel whose contents depends on which of the four tabs on the very left side of the window is selected. These tabs, working from top to bottom, allow you to add new widgets to the app, access the widgets already included in it, define the data used by the app, and set an app theme.
To the right of the canvas is a settings panel, which shows settings associated with whatever widget is selected either in the sidebar or the canvas. - If it's not already selected, select the Page tab.
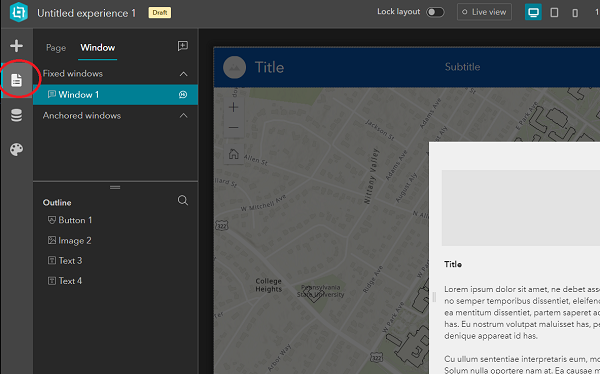
Figure 1.19 Selecting the Page tab in Experience Builder
On the canvas, you should note a "fixed window" -- having an ID of Window -- resembling a splash screen. - If the canvas is zoomed in on your app and you'd prefer to see all of its elements, you might like the Fit width to current window button, the second button in from the right side of the window, in the narrow strip of controls running along the bottom of the window.
"Window" contains placeholders for an image, two text elements (one for a title and one for the app description), and a button (to dismiss the window).
- Select Image 2, either in the sidebar or on the canvas. This will populate the settings panel to the right with the settings associated with that image.
- Working in the settings panel, modify Image 2 by going to Select an image > URL, and setting the URL to http://www.e-education.psu.edu/geog863/sites/www.e-education.psu.edu.geog863/files/PSU_UPO_RGB_2C.png [10].
- Double-click on the Title element (Text 3) on the canvas to edit that text and set it to Campus Buildings Map.
- Likewise, set the description (Text 4) to Enter a text string in the search box to find all buildings containing your search string.
We won't change anything else in the Window widget, but note that the checkbox text and button label are customizable. You might also choose to shrink the Window in size since the amount of text being displayed is small. - Finally, in the sidebar, hover your mouse over the Window entry. You should see a small "word balloon" icon that is identified as the Set as splash button. The Window widget should be set as a splash window by default, so you should not need to click this button. If you do, you'll be disabling the splash behavior. This isn't a very well designed setting as there doesn't appear to be any indicator for a window being set as splash or not...
- To access the map and other widgets in the background, click on the Page tab at the top of the sidebar. (The Window tab has been selected up to this point.) Again, the Fit width to current window button could come in handy here.
- Looking at the info in the sidebar, note that the app is composed of a single page, and that page contains a Sidebar widget (named Sidebar), not to be confused with the sidebar panel that is part of the larger Experience Builder interface. The Sidebar widget [11] covers the entire canvas and is a container for other widgets. As its name implies, it can be used to display widgets in a primary panel and a secondary panel (on the side).
The widgets nested within "Sidebar" can be viewed by expanding the containers listed in the Experience Builder sidebar.
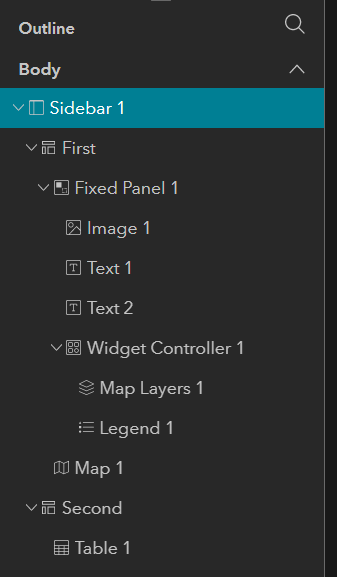
Figure 1.20 Contents of the Sidebar widget
The First (primary) container holds a Fixed Panel widget (the strip running across the top of the app) and a Map widget. The Second (collapsible side) container holds a Table widget. - Click on Sidebar in the sidebar and note in the settings panel that, among many other settings, it's possible to specify which side the Second container is docked on, the size of the Second container, and whether it is Collapsed or Expanded by default. Feel free to change any of these settings if you like.
As noted, the Second container holds a Table. Let's make sure that widget is configured properly. - Select Table in the sidebar to view its settings.
- Click New sheet > Select data, then expand the list of layers/tables in your PSU Buildings web map.
- Finally click on the buildings layer to select it as the source for Table's data. You should see the table become populated with data on the canvas.
As we did earlier, let's limit the fields shown in the table. - Click on the 7 selected dropdown, which will display each of the table's fields alongside a checkbox.
- Since we want to toggle off most of these fields, click the Clear Selection button in the lower right of the list.
- Toggle on the FID, BLDG_NAME_, and Shape_Area fields, then click again on the dropdown menu (which should now say 3 selected) to dismiss the field selection interface.
The rows showing in the table have no BLDG_NAME_ value, unfortunately. It would be nice if we could filter out unnamed buildings...
In the Sheet configuration panel, where the buildings layer is shown as the data source, there is a dropdown list with Default selected. The Default refers to the default view of the data. If the scenario called for it, we could define custom views of the data (say, those with a Shape_Area greater than a certain threshold), assign names to those views, and choose to have the widget show the data associated with one of the views. We don't need to do that, but let's look at configuring the Default view. - Click on the view dropdown. The Default view should appear with a small Settings button (gear icon) next to it.
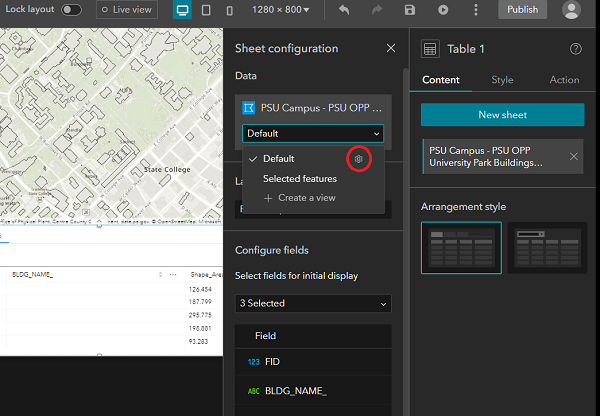
Figure 1.21 Accessing the Default view's settings
- Click on this Settings button.
The resulting dialog contains 3 tabs: Filter, Sort, and Records. Under the Filter tab, we could build a query that limits the rows returned to some subset, like just big buildings. Under the Sort tab, we can define sorting rules, and under the Records tab, we can control the number of rows that the table displays.
I encourage you to experiment with these capabilities. I attempted to display only rows where BLDG_NAME_ is not blank, but that didn't filter out the ones that have no name. I suspect those rows hold an empty string rather than a Null value, but had no luck with other attempts to filter them out. If anyone figures out how to solve this problem, please post how you did it in the Discussion Forum.
I also attempted to apply a useful sorting to the data. Sorting on BLDG_NAME_ isn't particularly useful as the empty rows still show up at the top of the list. And when I tried sorting in descending order on Shape_Area (putting the biggest buildings at the top), the data sorted properly in the dialog's preview, but not in the canvas. It appears that this is a known bug [12].
With the table configured, let's shift our focus to the strip of widgets found along the top of the app. - Click on Image (nested within Fixed Panel) in the sidebar.
- Set this image to display the PSU shield we used earlier in the lesson. Here's the URL again:
https://www.e-education.psu.edu/geog863/sites/www.e-education.psu.edu.ge... [7] - And let's make this image a link that opens the Penn State home page:
Set link > Link to URL > https://www.psu.edu [13] > Open in new window - Set the Title widget (named Text) to Penn State Campus Buildings and the Subtitle (named Text 2) to University Park. You may need to widen the Text element and shift the Text 2 element a bit to the right to get the text to show up properly.
As in our earlier apps, the Legend and Layer List widgets aren't really needed here. They could be removed individually by hovering over them in the canvas and clicking the X that appears in their upper-right corner or via the 3 dots menu in the sidebar. Or... - Since we don't need any widgets here, click on the 3 dots menu next to Widget Controller in the sidebar, then Delete to remove that complete set of widgets from the app. When asked whether you really want to do that, click Delete again.
The primary functionality that we want to build into this app is the ability to find a building by name. You may notice that there's already a Search icon in the upper right of the map, which seems promising. Let's see if we can configure that tool. - Select the Map widget in the sidebar. In the settings panel, note that we could choose to use a different web map or web scene as the source for this widget.
Scrolling down through the settings, note the Tools section, where we can see that the Zoom and Home tools are toggled on. Many other tools are available as well. However, there doesn't appear to be a way to customize the Search tool. Let's test out the app to see how that tool works. - First, give the app a more descriptive name by clicking on the Untitled experience 1 text in the upper left of the window and entering a new name like Penn State Main Campus Building Finder (Exp Builder).
- Next, click the Save button in the upper right to save the work you've done.
- Now, click the Preview button (the "Play" icon just to the right of Save) to open your app for testing in a new tab.
You should see "Window" appear in the foreground as a splash screen. (If you don't, you'll need to go back to Experience Builder, to the Window tab, then click the Set as splash button for the Window widget.) And you should be able to access the table by clicking the small arrow in the bottom middle of the app. - Open the Search tool and enter a test search term (e.g., Walker, for Walker Building, home of the Geography Department on the west side of campus). Depending on your search term, you may get a hit on a campus building, but you'll also get back matches on streets, towns, etc. It appears that the Search tool built into the Map widget is hardwired to use the ArcGIS World Geocoding Service.
How will we provide a way to search for matches in the buildings layer then? Well, we can configure the Map widget's built-in Search tool as we did earlier for the Instant App. - Return to the Experience Builder tab in your browser and expand the widget list within the Map in the sidebar. You should see an entry for the Search widget you just tested.
- Click on the Search widget to open its properties.
- Click on the New search source button and go through the same steps you followed earlier so that the widget is configured to search the BLDG_NAME_ field in the buildings layer.
- Save your work and confirm that the app now allows for searching the building layer.
With that, you've built a few apps that could be implemented in real-world scenarios using both newer and older Esri technologies. Best of all, you didn't have to write a line of code. One thing I hope you'll take away from this exercise is to remember that these no-coding tools exist and to look for opportunities to take advantage of them.
Move on to the next page of the lesson to solidify what you've learned here with an assignment that requires you to build another app using data and requirements of your own choosing.
Assignment: Build an App of Your Own
Assignment: Build an App of Your Own
This lesson's graded assignment is in two parts. Here are some instructions for completing the assignment.
Part I
First, I'd like you to build a web mapping app with Esri technology (using either a configurable template, Instant App, the Web AppBuilder, or the Experience Builder). You are welcome to select the app's subject matter (perhaps something from your work) and the functionality it provides. If you're unsure of what to map, you might try searching ArcGIS Online, where there is a wealth of data.
Details matter! Make sure your app looks professional by modifying anything that looks unfinished. Text a user sees, whether in a widget, popup, or elsewhere should be human-readable (or have good aliases) and not look like a default or coded name. Also choose appropriate symbology and consider hiding unneeded fields.
You will have another opportunity to select your own final project at the end of the term. Keep that in mind when selecting data and/or functionality to incorporate into this project.
Part II
There are other web mapping platforms that offer features similar to ArcGIS Online (e.g., CARTO [14], MapBox [15], SimpleMappr [16], MangoMap [17], MapHub [18], and MapLine [19]). For the second part of this week's assignment, I'd like you to experiment with one of these platforms, then share your thoughts on it in a recorded video. Here are some detailed instructions:
- Please go to the Assignment 1 Platform Review Sign-up page in the Lesson 1 module in Canvas to sign up for a platform. The sign-ups will be set up such that each platform will be covered by roughly the same number of students. (If there's another platform that you'd like to evaluate, check with the instructor first.)
- Limit your video to 5 minutes.
- In your video, be sure to discuss the following points:
- Cost
- Ease of use
- Data formats supported
- How it compares to ArcGIS Online (similarities, differences, things you like better)
- Can you build an app or just a map? (I.e., Is it possible to add functionality similar to Esri's Web AppBuilder widgets?) - What I'm looking for in this video is for you to talk through a demo of the platform. You may choose to summarize your major points through slides, though that's not required. You are not expected to have any face time in the video,
 though you certainly can if you like. There is a short tutorial on recording videos with ScreenPal in the course orientation, though you're welcome to record your video with some other software.
Deliverables
This project is one week in length. Please refer to the Canvas course Calendar for the due date.
- Post a link to your Esri app to the Lesson 1 Discussion Forum. (40 of 100 points)
- Post a link to your video review of a non-Esri web mapping platform to the Lesson 1 Discussion Forum (and/or Media Gallery in Canvas). This could be in the same or a different post as #1 above. (40 of 100 points)
- As part of your discussion forum post, include some reflection on what you learned from the lesson, how you might apply what you learned to your job, and/or concepts that you found to be confusing (minimum 200 words). (20 of 100 points)
- Complete the Lesson 1 quiz.
Summary and Final Tasks
Summary and Final Tasks
With that, you've finished working through the content on developing geospatial apps without programming. For some of you, especially those who work in an organization with an ArcGIS Online account, what you've learned in this lesson will sufficiently meet your app development needs. However, if you find that the available widgets can't quite be added together to form the app you want, you'll need to learn about web programming technologies. In the next lesson, you'll learn about HTML and CSS, languages that are used to define the content and presentation style of web pages. With that foundation laid, you'll be ready to spend the rest of the course learning about Esri's JavaScript-based Application Programming Interface (API), which provides developers a finer level of control over their apps than is possible with their non-programming options.
IMPORTANT: Beginning in Lesson 2, you'll be expected to post some of your assignments to a web server. If you haven't already done so, please have a look at the page on e-Portfolios [20]. In particular, the application for web space from PSU can take a business day or two, so you should get this taken care of in advance of having to post your Lesson 2 assignment.