Optional Lesson: Reading Data From a Database
Overview
Earlier in the course you learned how to add data stored in a few different formats (shapefile, KML, Fusion Tables). One drawback of those formats is that they aren't well suited to situations in which the data are changing frequently. (Fusion Tables may be better than the others in this respect, though it has other limitations as well.) This optional lesson focuses on the usage of a relational database as the source for your web map data. We'll see how map pages can be built to read in data from server-side scripts that dynamically extract the needed information from the database (which may be kept up to date through other business processes).
Objectives
At the successful completion of this lesson, students should be able to:
- describe the advantages/disadvantages of storing map data in a relational database vs. other data formats;
- use Structured Query Language (SQL) to extract data from a database;
- develop an efficient database schema for the storage of map data;
- understand the difference between client-side and server-side web scripting languages;
- embed PHP: Hypertext Processor (PHP) code in a web page to deliver dynamic content;
- use PHP to connect to a database and assemble the map data required for a mashup;
Note: This is another rather long lesson (two weeks in length).
Questions?
If you have any questions now or at any point during this week, please feel free to post them to the Database Lesson Discussion Forum. (That forum can be accessed at any time by clicking on the Communicate tab and then scrolling down to the Discussion Forums section.)
Converting a Shapefile to XML
Part of the database-driven approach to web mapping that will be demonstrated here is to output the data retrieved from the database in XML format. XML is often used in this way as a language- and platform-independent way to pass data between applications. As an example, here are the Jen and Barry's candidate city data stored in XML format [1]. And here is an alternate way of storing these same data [2].
Either form can be used to supply data for a mashup. However, I recommend using the first form for two reasons:
- It requires slightly less storage space (314 bytes vs. 497 bytes in this case), which results in a faster loading time for your mashup.
- The JavaScript code required to read the data is a bit less complex.
So, how do you go about putting the data into this format? Before we see how to do that in a database context, let's ease our way into the usage of XML in web mapping by working with a tool that I wrote for ArcToolbox. This tool can be used to export any point, line or polygon shapefile into the format shown above. This part of the lesson will guide you through the installation and usage of this tool.
- Download the mashup_tools.zip [3] file from our server.
- Unzip the folder so that all the files are sitting directly under:
XP/Win2000: \Documents and Settings\<your user name>\Application Data\ESRI\ArcToolbox\My Toolboxes

Vista or Windows 7/8 (make sure you have hidden files and folders displayed): \Users\<user name>\AppData\Roaming\ESRI\Desktop<version>\ArcToolbox\My Toolboxes
You should see at least three files: Mashup Tools.tbx, shp2xml.py and shp2csv.py. - Open ArcMap and the Catalog window.
- In the Catalog window, browse to Toolboxes > My Toolboxes > Mashup Tools.
Note
I used the Python programming language to create this tool. If you're interested in learning more about automating geoprocessing tasks with Python, check out our course on the topic (GEOG 485) [4].
Using the tool
The Mashup Tools toolbox contains a tool called Export Shapefile to XML. Its usage is straightforward, though here are some details, using the candidate_cities shapefile as an example:
- Add the candidate_cities shapefile to ArcMap.
- Open the Mashup Tools toolbox and double-click on the Export Shapefile to XML tool to open it.
- The Layer drop-down list will show all of the feature layers in the active data frame. Select the candidate_cities layer. (You could also click on the Browse icon to choose a shapefile not currently loaded in the active data frame.)
- After selecting a layer, the Fields drop-down list will display all of the fields in the selected layer. Select the NAME field from the list to make it appear in the selection below.
- Repeat the previous step for the POPULATION field and any other fields you want to include in the output.
- Click OK to perform the export. The output file will be written to the same folder that holds the input shapefile. Its name will match that of the shapefile with a .xml suffix (in this case, candidate_cities.xml).
- Open the output XML file in a web browser and confirm that it includes all of the desired data. The last two attributes of each record in the file will be the x and y coordinates of the point.
Note
When you use the tool on a line or polygon layer, the x and y attributes represent the centroid of the feature. Beneath each feature is then a list of the vertices that delineate that feature. For example, here are the coordinates of Pennsylvania's counties in XML format [5].
Now that you've seen how to convert GIS data to XML format, let's see how to write JavaScript that reads point data from an XML file and adds markers to a Google Map.
Reading Points from an XML File
Reading XML files in JavaScript requires using the XMLHttpRequest object that is built into all of the major web browsers. Unfortunately, creating this object requires slightly different code depending on the user's browser (one version of the code for Internet Explorer and another for the rest of the major browsers like Chrome, Firefox and Safari). Fortunately, JavaScript frameworks like jQuery have methods for "abstracting away" the messy details of working with the XMLHttpRequest object. In this part of the lesson, we'll see how jQuery's ajax() method can be used to read the contents of a file into memory. We'll then use other jQuery methods to parse the XML after it's been read in.
- First, create a copy of your page from Project 4 (the Jen & Barry's ice cream map) and remove the code in the initMap() function that adds the markers. You can use this version of the code [6] if you like.
-
Set up a reference to jQuery just above the existing script element:
<script src="https://ajax.googleapis.com/ajax/libs/jquery/1.11.3/jquery.min.js"></script>
References to the jQuery EasyUI JavaScript library and stylesheet aren't needed for this example.
-
In initMap(), insert a call to jQuery's ajax() method that passes the name of the XML file and stores the retrieved XML in a variable called xmlDoc using code like this:
$.ajax({ url: "candidate_cities.xml", dataType: "xml", success: function(xmlDoc){
  // data processing code will go here
}});
When using the ajax() method, only the url property is required. Other optional settings are detailed in the method's documentation [7]. In this context, we're setting the dataType property (specifying what kind of data we're reading in; other types that might be used in other contexts include "html", "text" and "json") and a function to execute if and when the request is a success. Here we're embedding the success function within the larger ajax() statement. jQuery passes the data to the success function so that it can be processed and since we're reading in XML data here, we call this variable xmlDoc. Because we've specified a dataType of xml, the data in xmlDoc is recognized as a set of XML DOM elements and thus ready to be handled using jQuery's DOM manipulation methods.
- Inside the ajax() code block, insert the following code:
$(xmlDoc).find("pt").each(function() {
});
This code uses jQuery's find() method to find all of the pt elements in the XML data. It then appends onto the find() method call a call to the each() method. This code essentially says, "Execute this function (which is empty at the moment) for each pt element found in xmlDoc." -
Within the each() method's embedded inline function, insert the following line:
var name = $(this).attr("name");This line makes use of the fact that the element being processed in the current iteration of the each() loop can be referenced using the this keyword. With "this" representing an XML element, we use the attr() method to retrieve the value held by one of its attributes (specifically the name attribute).
-
Add a similar line to retrieve the current element's population value:
var pop = $(this).attr("population");When obtaining the latitude/longitude values, we need to make sure that the returned value gets stored as a number and not as a string. Attribute values are always returned as strings, so we can use JavaScript's parseFloat() function to convert the string to a floating point number. -
Get the x and y values as follows:
var x = parseFloat($(this).attr("x"));
var y = parseFloat($(this).attr("y"));
With the latitude and longitude values obtained, the rest of the code inside the loop is fairly straightforward.
- Next, create a new LatLng object:
var pt = new google.maps.LatLng(lat, lng);
-
Finally, pass those variables as arguments to the createMarker() function:
createMarker(pt, name, pop);
-
Save the document and test it. You may refer to my version of the page [8] if yours is not working.
Note
You can test the copy of your page stored on your machine. Just make sure you have the candidate_cities.xml and cone.png files in the same folder with the page. Likewise, if you decide to run it from your personal web space, be sure to upload those files.
With that, you've seen how marker data can be parsed from XML data stored on disk. Now we'll shift to discussing the topic of relational databases. After working through some database fundamentals, we'll come back to the Jen & Barry's scenario and see how to script the retrieval of the cities from a database and output the data as XML so that it can be consumed by a page just like the one created here.
Relational Database Concepts
Why a database?
Reading your web map data from a shapefile or XML file works fine in certain situations. However, it's not difficult to think of scenarios in which using flat files like these presents problems:
- if the data are frequently changing, you'll need to have a step built into your business process that ensures there is an up-to-date copy of the files on the web server;
- if you want to provide the user with the ability to map subsets of a larger dataset, doing so with flat files data can be clunky;
- if you want to make it possible to allow updates of the data.
A major goal of this lesson is for you to learn how to write PHP scripts to extract data from a database and output it in XML form. Once you've built such a script, with just a minor tweak to your map page you can go from reading a static XML file to reading XML data generated on the fly based on up-to-date information from your database. But before we get to that point, let's first go over some basic RDBMS concepts.
Note
If you're experienced in working with relational databases, you can probably skip over the rest of this page.
What is a relational database?
A relational database is a system in which data are stored in tables of rows (records) and columns (fields). The defining characteristic of a relational database is that the full data set is broken down into multiple tables (each representing a single subject) and that relationships can be established between those tables through the use of key fields. Structured Query Language (SQL, sometimes pronounced "sequel") is used in an RDBMS to manipulate the tabular data.
There are many RDBMS software packages to choose from. In the commercial realm, Oracle has long been the most popular, followed by IBM's DB2 and Microsoft's SQL Server. In the open-source realm, MySQL and PostgreSQL are the major players. Microsoft Access is a relatively inexpensive package that is best suited for small datasets. Because of its user-friendly point-and-click environment, it is also frequently used as a "front-end" to more high-powered package — i.e., to connect to and manipulate data that are actually stored in a separate RDBMS.
In this course, we're going to create and populate MySQL databases using MS-Access as a front end.
Using SQL to select data
There are a number of database concepts that we should cover if you're going to build a database-driven mashup. Rather than start with database design concepts, which can be a bit dry, let's begin by looking at how SQL can be used to query an existing database. After getting a feel for the power of SQL, you should be more motivated to work towards understanding the less exciting steps involved in creating and populating a database.
The example queries in this section read data from a simple, two-table database of baseball statistics. Here are excerpts from these tables:
| PLAYER_ID | FIRST_NAME | LAST_NAME |
|---|---|---|
| 1 | Barry | Bonds |
| 2 | Hank | Aaron |
| 3 | Babe | Ruth |
| 4 | Willie | Mays |
| 5 | Sammy | Sosa |
| PLAYER_ID | YEAR | AB | HITS | HR | RBI | TEAM |
|---|---|---|---|---|---|---|
| 1 | 2006 | 367 | 99 | 26 | 77 | SFG |
| 1 | 2007 | 340 | 94 | 28 | 66 | SFG |
| 2 | 1954 | 468 | 131 | 13 | 69 | MLN |
| 2 | 1955 | 602 | 189 | 27 | 106 | MLN |
| 2 | 1956 | 609 | 200 | 26 | 92 | MLN |
First, let's look at a query that simply lists data from three selected columns in the STATS table:
| SELECT PLAYER_ID, YEAR, HR FROM STATS; |
|
Note the basic syntax used to list tabular data. The statement begins with the SELECT keyword and is followed by a list of the desired columns separated by commas. After the list of columns comes the FROM keyword and the name of the table in which the columns are found. The statement ends with a semi-colon. (Note that all columns can be retrieved using the asterisk; e.g., SELECT * FROM STATS;).
We can retrieve records that meet some criteria by adding a WHERE clause. For example, this query lists only those seasons in which the player had more than 50 home runs:
| SELECT PLAYER_ID, YEAR, HR FROM STATS WHERE HR > 50; |
|
This list is begging to be sorted from high to low. To do that, we need to add an ORDER BY clause:
| SELECT PLAYER_ID, YEAR, HR FROM STATS WHERE HR > 50 ORDER BY HR DESC; |
|
If you wanted to sort from low to high, you would replace the DESC keyword with ASC or simply omit that keyword altogether (i.e., ascending order is the default). Also, keep in mind that it is possible to sort by multiple fields. For example, it is common to sort lists of people first by their last name, then by their first name. Such an ORDER BY clause would look like this: ORDER BY LAST_NAME, FIRST_NAME.
By now, I'm sure you're wondering how to view the names of the players along with their stats. This is done by joining the two tables based on the PLAYER_ID column they share in common. The following query brings together the names from the PLAYERS table and the year and HR count from the STATS table for the 50+ HR subset we've been working with:
|
SELECT PLAYERS.FIRST_NAME, PLAYERS.LAST_NAME, STATS.YEAR, STATS.HR |
|
Note that the FROM clause in this statement sandwiches the keywords INNER JOIN between the names of the two tables. The FROM clause is then immediately following by an ON clause in which the key fields to be used to create the join are specified. The field names are prefaced by the names of their parent tables using a "table.field" syntax. You may have noticed that the field names in the SELECT clause were also prefaced by their parent table names. This is not technically necessary if it is clear to the SQL execution engine which table holds each field. In other words, the FIRST_NAME field is found only in the PLAYERS table, so there is no question as to where to find that field. If on the other hand a FIRST_NAME field existed in both tables, it would be critical to include a reference to the appropriate table. This example errs on the side of caution by including the parent table names.
One of the more powerful features of SQL is the ability to group records by one or more fields and calculate summary statistics for each resulting group. In the example below, each player's career home run total is calculated:
|
SELECT PLAYERS.FIRST_NAME, PLAYERS.LAST_NAME, Sum(STATS.HR) AS CAREER_HR |
|
The first item to note in this statement is its GROUP BY clause. This clause specifies that you would like the SQL execution engine to output all of the unique FIRST_NAME/LAST_NAME combinations. The other part of the statement to pay particular attention to is the Sum(STATS.HR) AS CAREER_HR part. This specifies that you would like to have the sum of the values in the HR field for each FIRST_NAME/LAST_NAME combination included in the output under a heading of CAREER_HR.
Earlier I mentioned that MS-Access is frequently used as a "front-end" to more powerful RDBMS packages like Oracle and MySQL. One of the reasons for this is that Access has a user-friendly graphical user interface (GUI) for building queries. For example, here is a look at the Access query GUI after building the previous query:

Database design
When building a relational database from scratch, it is important that you put good deal of thought into the process. A poorly designed database can cause a number of headaches for its users, including:
- loss of data integrity over time
- inability to support needed queries
- slow performance
Entire courses can be spent on database design concepts, but we don't have that kind of time, so let's just focus on some basic design rules that should serve you well. A well-designed table is one that:
- represents a single subject;
- has a primary key (a field or set of fields that uniquely identifies each record in the table);
- does not contain multi-part fields (e.g., "302 Walker Bldg, University Park, PA 16802");
- does not contain multi-valued fields (e.g., an Author field shouldn't hold values of the form "Jones, Martin, Williams");
- does not contain unnecessary duplicate fields (e.g., avoid using Author1, Author2, Author3);
- does not contain fields that rely on other fields (e.g., don't create a Wage field in a table that has PayRate and HrsWorked fields);
- contains a minimum of redundant data.
Let's work through an example design scenario to demonstrate how these rules might be applied to produce an efficient database. Those ice cream entrepreneurs, Jen and Barry, have opened their business and now need a database to track orders. When taking an order, they record the customer's name, the details of the order such as the flavors and quantities of ice cream needed, the date the order is needed, and the delivery address. Their database needs to help them answer two important questions:
- Which orders are due to be shipped within the next two days?
- Which flavors must be produced in greater quantities?
A first crack at storing the order information might look like this:
| Customer | Order | DeliveryDate | DeliveryAdd |
|---|---|---|---|
| Eric Cartman | 1 vanilla, 2 chocolate | 12/1/08 | 101 Main St |
| Bart Simpson | 10 chocolate, 10 vanilla, 5 strawberry | 12/3/08 | 202 School Ln |
| Stewie Griffin | 1 rocky road | 12/3/08 | 303 Chestnut St |
| Bart Simpson | 3 mint chocolate chip, 2 strawberry | 12/5/08 | 202 School Ln |
| Hank Hill | 2 coffee, 3 vanilla | 12/8/08 | 404 Canary Dr |
| Stewie Griffin | 5 rocky road | 12/10/08 | 303 Chestnut St |
The problem with this design becomes clear when you imagine trying to write a query that calculates the number of gallons of vanilla that have been ordered. The quantities are mixed with the names of the flavors and any one flavor could be listed anywhere within the order field (i.e., it won't be consistently listed first or second).
A design like the following would be slightly better:
| Customer | Flavor1 | Qty1 | Flavor2 | Qty2 | Flavor3 | Qty3 | DeliveryDate | DeliveryAdd |
|---|---|---|---|---|---|---|---|---|
| Eric Cartman | vanilla | 1 | chocolate | 2 | 12/1/08 | 101 Main St | ||
| Bart Simpson | chocolate | 10 | vanilla | 10 | strawberry | 5 | 12/3/08 | 202 School Ln |
| Stewie Griffin | rocky road | 1 | 12/3/08 | 303 Chestnut St | ||||
| Bart Simpson | mint chocolate chip | 3 | strawberry | 2 | 12/5/08 | 202 School Ln | ||
| Hank Hill | coffee | 2 | vanilla | 3 | 12/8/08 | 404 Canary Dr | ||
| Stewie Griffin | rocky road | 5 | 12/10/08 | 303 Chestnut St |
This is an improvement because it enables querying on flavors and summing quantities. However, to calculate the gallons of vanilla ordered, you would need to sum the values from three fields. Also, the design would break down if a customer ordered more than three flavors.
Slightly better still is this design:
| Customer | Flavor | Qty | DeliveryDate | DeliveryAdd |
|---|---|---|---|---|
| Eric Cartman | vanilla | 1 | 12/1/08 | 101 Main St |
| Eric Cartman | chocolate | 2 | 12/1/08 | 101 Main St |
| Bart Simpson | chocolate | 10 | 12/3/08 | 202 School Ln |
| Bart Simpson | vanilla | 10 | 12/3/08 | 202 School Ln |
| Bart Simpson | strawberry | 5 | 12/3/08 | 202 School Ln |
| Stewie Griffin | rocky road | 1 | 12/3/08 | 303 Chestnut St |
| Hank Hill | coffee | 2 | 12/8/08 | 404 Canary Dr |
| Hank Hill | vanilla | 3 | 12/8/08 | 404 Canary Dr |
| Stewie Griffin | rocky road | 5 | 12/10/08 | 303 Chestnut St |
This design makes calculating the gallons of vanilla ordered much easier. Unfortunately, it also produces a lot of redundant data and spreads a complete order across multiple rows.
Better than all of these approaches would be to separate the data into four entities (Customers, Flavors, Orders, and Order Items):
If one were to implement a design like this in MS-Access, the query needed to display orders that must be delivered in the next 2 days would look like this in the GUI: 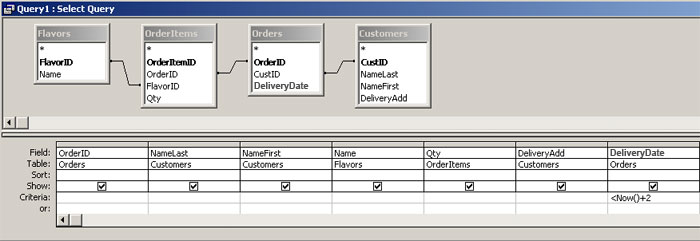
It would produce the following SQL: SELECT Orders.OrderID, Customers.NameLast, Customers.NameFirst, Flavors.Name As Flavor, If you aren't experienced with relational databases, then such a table join may seem intimidating. You probably won't need to do anything quite so complex in this course. The purpose of this example is two-fold:
Try This!To get some practice with building queries, work through this tutorial that references the same baseball statistics database utilized above.
|
Building a MySQL Database
In this part of the lesson, you'll learn methods for creating and populating tables in a MySQL database. Creating tables can be done using a web-based application called phpMyAdmin or a desktop application called MySQL Workbench. I will provide instructions for both applications.
After defining your tables, you'll download a special driver that will enable you to connect to the MySQL database using MS-Access. Using Access as a "front end," you'll have a user-friendly GUI for populating your MySQL tables and querying them.
Every step in this process could be completed using command-line SQL. (In fact, the GUI-based tools we'll be using simply generate and execute SQL code.) If you're an SQL expert, you're welcome to use SQL interfaces to complete these steps instead. My assumption is that most of you, like me, are not SQL experts and will find this methodology to be less frustrating.
MySQL Data Types
The data types used in MySQL for storing text strings are:
- CHAR: used for columns with values of an exact length
Ex: CHAR(2) for state abbreviations like "PA" and "NY"
- VARCHAR: used for columns with values of variable lengths up to 255
Ex: VARCHAR(25) for names - TEXT: used for free-form text such as comments of up to ~65000 characters
- MEDIUMTEXT: free-form text of up to ~1.6 million characters
- LONGTEXT: free-form text of up to ~4 trillion characters
The data types for storing integers are shown in the table below. As the table shows, columns of these types can be signed or unsigned. Unsigned columns can only hold positive values. Signed columns can hold both positive and negative values.
| Type | Signed Range | Unsigned Range |
|---|---|---|
| TINYINT | -128 to 128 | 0 to 255 |
| SMALLINT | -32768 to 32767 | 0 to 65535 |
| MEDIUMINT | -8.3M to 8.3M | 0 to 16M |
| INT | -2.1B to 2.1B | 0 to 4.2B |
| BIGINT | > ±2.1B | > 4.2B |
For numbers that have digits after the decimal point, there are two main data types:
- FLOAT: used for numbers with up to 7 significant digits
- DOUBLE: used for numbers with up to 16 significant digits
The data type limits above are approximate in many cases. To find more specific limits and to see other supported data types such as those dealing with dates and times, refer to the MySQL documentation [12].
Defining Tables
For this Jen and Barry's demonstration project, we're going to create three tables:
|
|
|
You can define these tables using either phpMyAdmin or the MySQL Administrator:
- Using phpMyAdmin
To connect to your database:- In a web browser, go to phpMyAdmin [13].
- Enter the Username and Password found in the file named dbinfo at the root of your personal web space (e.g., I can view my file at http://www.personal.psu.edu/jed124/dbinfo [14]). Your database username is the second item in the file; your password is the third.
- After you've successfully logged in, you need to select which database you want to work with. To do this, click on the Databases button at the top of the screen, then on the database that's named the same as your PSU access account ID.
To create a table:- When entering a database page, you’ll see a section of the page labeled Create new table on database <your access account ID>. In this case, enter candidate_cities in the Name box and 4 in the Number of fields box. Then click the Go button on the right side of the window.
- You should see 4 rows of textboxes, one for each field you said you wanted to create. Enter name in the first Field box.
- From the Type drop-down list, select VARCHAR.
- In the Length/Values box, enter 25.
- Repeat the previous 3 steps to add the population, x and y columns to the table (keeping in mind that numeric fields don’t require a “Length/Values” setting).
- After you've entered all of the field settings, click the Save button in the lower right of the window.
- Click on the Database link at the top of the page to create more tables.
- Repeat the steps above to add the other two tables (counties and county_geom) to your database.
- Using MySQL Workbench
To install MySQL Workbench:- Browse to MySQL Workbench [15].
- Near the bottom of the page, click the Download button next to Windows (x86, 32-bit) MSI Installer.
- Create a MySQL.com account if you like or click No thanks, just take me to the downloads!
- Click the HTTP link of the server nearest you to begin download.
- Run the downloaded .msi file and follow the on-screen directions.
To connect to your database:- Open MySQL Administrator (Start > MySQL > MySQL Workbench).
- Under the SQL Development heading, click the New Connection option.
- In the Setup New Connection dialog, enter a Connection Name of your choosing (such as PSU PHPDB).
- Enter the Hostname: instructdb3.ait.psu.edu.
- Enter the Username found in the file named dbinfo at the root of your personal web space (e.g., I can view my file at http://www.personal.psu.edu/jed124/dbinfo [14]) and click OK. Your database username is the second item in the file; your password is the third. The Setup New Connection dialog will disappear and you should see your connection listed in the box under the SQL Development heading.
- Click the Open Connection to Start Querying option just above the box. A Connect to Database dialog should appear.
- Select the connection you just created from the Stored Connection list. The Hostname and Username boxes should be populated with your connection parameters automatically.
- Click OK and then enter the password found in your dbinfo file when prompted. You should see a schema (i.e., a database) with your user ID and beneath it a list of Tables, Views and Routines (each list being empty at this point).
To create a table:- Click the Create a New Table button just above the large schema heading near the middle of the window. (It is the 3rd of 5 buttons.) A new_table dialog will appear with a number of tabs running along the bottom.
- Under the Table tab, give the table the name candidate_cities.
- Switch to the Columns tab where you should see a cursor flashing in a text box beneath the Column Name heading.
- Enter name in the text box (this column will hold the names of the cities), then hit Tab or Enter.
- Set the column's Datatype to VARCHAR(25).
- Double-click the empty space under the column you just defined to begin defining a new column.
- Repeat steps 3-5 to add the other three candidate_cities columns.
- Repeat the steps above to add the other two tables (counties and county_geom) to your database.
- Right-click on the idnew_table column that was defined by default and select Delete Selected Columns.
- Click Apply, then Apply SQL and Finish to create the table.
- When done creating tables, click Close to dismiss the new_table dialog.
Although we didn't need them in this scenario, you may have noticed the checkboxes to the right of the Datatype heading. I won't go through all of them, but the ones that I've used most often are PK (to declare a column as a primary key), NN (to disallow Null values in a column), AI (to automatically increment the value in that column by 1 when a new record is added), and Default (to specify the default value assigned to the column when a new record is added).
Later in the lesson, we'll populate these tables. As you might have guessed, name is the key field in the two county tables that will allow us to join the attribute information with the geometries. If you were to build a real mashup in this sort of scenario, I would recommend using a column of shorter length (preferably a numeric column, like the U.S. Census Bureau's FIPS) as the key field. When we populate the county_geom table with the vertices of the features in the counties shapefile, it will have over 5600 records (107 vertices for Thompson County, 44 for Viceroy County, etc.) Each vertex record will contain the name of its parent county. This is a needless waste of space, and probably more importantly, table joins and sorts based on long character strings such as these perform more slowly than those based on numeric IDs. The shapefile didn't include a shorter ID and I don't think it's worth the effort to add one, so just keep in mind that we're not following a best practice here.
Installing the MySQL ODBC driver
This part of the process involves downloading and installing a driver that will enable you to view MySQL data within a Microsoft product, such as Access.
- Download the appropriate driver at: http://dev.mysql.com/downloads/connector/odbc/ [16]. Getting the right driver/combination of drivers has been tricky for some folks in the past. If you're on a 64-bit machine, I suggest starting with the 64-bit driver. If the connection steps below don't work, try installing the 32-bit driver too (leaving the 64-bit driver installed). If you're on a 32-bit machine, I think the 32-bit driver by itself should work.
- Under Windows downloads, click Pick a mirror.
- Create a MySQL.com account if you like or click No thanks, just take me to the downloads!
- Click the HTTP link of the server nearest you to begin download.
- Run the downloaded .msi file and follow the on-screen directions.
Setting up an ODBC connection
In this part of the tutorial, you'll specify parameters that can be used by Access to connect to your MySQL database.
- Open the ODBC Data Source Administrator by going to:
- Start > Control Panel > Administrative Tools > Data Sources (XP).
- Start > Control Panel > System and Maintenance > Administrative Tools > Data Sources (Vista).
- Start > Control Panel > System and Security > Administrative Tools > ODBC Data Sources (Windows 7/8).
- Under the User DSN tab, click Add.
- In the Create New Data Source dialog, select the MySQL ODBC 5.x DRIVER (should be near the bottom of the list) and click Finish.
- In the resulting dialog, make the following settings:
- Data Source Name: mysql_<your PSU access account ID> (or any name of your choice)
- TCP/IP Server: instructdb3.ait.psu.edu
- User: found in your dbinfo file
- Password: found in your dbinfo file
- Select your database from the Database drop-down list. If you receive an error message, double-check your settings.
- Click OK to save the connection settings. You should see your data source listed under the User DSN tab and can dismiss the ODBC Data Source Administrator window and close the Administrative Tools window.
Linking to your MySQL tables in MS-Access
- In Access 2003:
- Open Microsoft Access and select File > New.
- In the New File dialog box, select Blank Database.
- Specify a name (like mysql_jenbarry.mdb) and location for your database and click Create.
- With the new Access database opened, select Tables from the Objects list.
- Click New, then Link Table.
- In the Files of type field, select ODBC Databases.
- Select your ODBC connection under the File Data Source tab and click OK.
- Enter your MySQL User ID and Password and click OK.
- Select the three tables created in MySQL above and click OK.
You'll be prompted to select a primary key for each table by picking a column (or combination of columns) that uniquely identifies each record. Note that you must select a primary key if you plan to add or modify data in the table. If you will not be altering the table's records, you can just click OK. - Select NAME as the unique identifier for the candidate_cities and counties tables, and VID for the county_geom table.
- In Access 2007:
- Open Microsoft Access, and from the Getting Started window select Blank Database.
- In the Blank Database pane, specify a name (like mysql_jenbarry.accdb) and location for your database and click Create.
- The new database will open with a new blank table called Table1. Close this table.
- Click the External Data tab, then the More drop-down list in the grouping of buttons labeled Import.
- From the drop-down list, select ODBC Database.
- In the Get External Data dialog box, select Link to the data source... and click OK. This option will enable you to modify the data in the MySQL tables utilizing Access, whereas the Import the source data... option would create an unlinked snapshot of the MySQL data.
- Select your ODBC connection under the File Data Source tab and click OK.
- Select the three tables created above and click OK.
You'll be prompted to select a primary key for each table by picking a column (or combination of columns) that uniquely identifies each record. Note that you must select a primary key if you plan to add or modify data in the table. If you will not be altering the table's records, you can just click OK. - Select NAME as the unique identifier for the candidate_cities and counties tables, and VID for the county_geom table.
- In Access 2010:
- Open Microsoft Access, and from the Getting Started window select Blank Database.
- In the Blank Database pane, specify a name (like mysql_jenbarry.accdb) and location for your database and click Create.
- The new database will open with a new blank table called Table1. Close this table.
- Click the External Data tab, then ODBC Database.
- In the Get External Data dialog box, select Link to the data source... and click OK. This option will enable you to modify the data in the MySQL tables utilizing Access, whereas the Import the source data... option would create an unlinked snapshot of the MySQL data.
- Select your ODBC connection under the File Data Source tab and click OK.
- Select the three tables created above and click OK.
You'll be prompted to select a primary key for each table by picking a column (or combination of columns) that uniquely identifies each record. Note that you must select a primary key if you plan to add or modify data in the table. If you will not be altering the table's records, you can just click OK. - Select NAME as the unique identifier for the candidate_cities and counties tables, and VID for the county_geom table.
Populating a table through manual entry
The Jen and Barry's candidate_cities shapefile (the same dataset used in Lesson 3) contains only four records and just a few attributes, so its data can be entered manually.
- Load the shapefile into ArcMap and open its attribute table.
- Add two new Double fields to the attribute table named X and Y.
- Right-click on the X field header and select Calculate Geometry.
- Choose X Coordinate of Point from the Property list and confirm that the values will be in the GCS/NAD27 coordinate system and in Decimal Degree units. Click OK.
- Repeat this step to populate the Y field.
- Leaving ArcMap and the attribute table open, return to your Access database and open the candidate_cities table.
- Manually enter the values for the four candidate cities. You may notice a slight delay after entering a value and tabbing into the next cell. This is because the values must be transferred across the Internet to your MySQL database hosted at PSU, instead of being stored on a local disk.
Adding the X and Y coordinate values to the attribute table as outlined above is my recommended strategy when you are looking to transfer the coordinates of point features to a database. In the next section, we'll see how to insert records into a MySQL table in bulk, rather than manually. Later, we'll see how to transfer the coordinates of line or polygon features to a database.
Populating a table using an SQL query
The query writing tutorial you completed earlier in the lesson had you dealing exclusively with SELECT queries. We're now going to add the county feature attributes to the database by importing a copy of the shapefile's DBF table and writing what Access calls an Append query to add values from selected columns in the local counties table to the MySQL counties table.
- Access 2003:
- In Access, click New in the database window, then select Import Table and click OK.
- In the Files of type drop-down list, select any of the dBASE (dbf) options.
- Browse to the location of the Jen and Barry's counties shapefile, select the counties.dbf table and click Import. After the table has been successfully imported, click Close.
- Double-click on the counties table to open it and confirm that the values imported correctly. Note that the icon beside the counties table in the database window indicates a table whose values are stored locally as part of the .mdb file, whereas the icon beside the tables added earlier indicates a linked table whose values are stored in some other database.
- Now, select Queries from the Objects list.
- Double-click on Create query in Design view.
- In the Show Tables dialog, double-click on counties to add that table to the query, then click Close.
- Just to the left of the Run button (exclamation point icon) is a pull-down menu. Select Append Query from this menu. Upon making this selection, you're asked to specify which table you want to append values to.
- Select the linked MySQL counties table from the Table Name drop down list and click OK. Note that an Append To row is added to the design grid between the Sort and Criteria rows.
- Double-click on the NAME field from the local counties table to add that field to the design grid. Note that NAME is also automatically entered as the Append To value. What's happened here is that Access scanned through the MySQL counties table for a field by the same name. It found one, so it made the assumption that you wanted to append the values to that field.
- Double-click on the AGE_18_64 field from the local counties table to add that field to the design grid. Note that in this case, nothing appears in the Append To area of the design grid because there is no field by that name in the MySQL table.
- In the design grid, click in the Append To cell under the AGE_18_64 column and then select WORKFORCE from the drop-down list.
- Repeat the step above to specify that you want to append values from the NO_FARMS87 and POP_SQMILE fields in the local counties table to the FARMS and POP_DENSITY fields in the MySQL counties table.
- Click the Run button to execute the query. You should receive a confirmation message asking if you really want to append 43 records. Click Yes.
- Open the MySQL counties table and confirm that the values were appended correctly. Once satisfied that your MySQL counties table has been populated properly, the local counties table is no longer needed.
- Go back to Tables in the database window, right-click on the local counties table and select Delete.
- Access 2007/2010:
- In Access, click the External Data tab, then click on the More drop-down menu in the grouping of controls labeled Import. Select dBASE File from that menu.
- In the Get External Data dialog, click the Browse button to locate the counties.dbf file, then click OK to import the data. After the table has been successfully imported, click Close.
- Double-click on the counties table in the Navigation Pane to open it and confirm that the values imported correctly. Note that the icon beside the counties table in the Navigation Pane indicates a table whose values are stored locally as part of the .mdb file, whereas the icon beside the tables added earlier indicates a linked table whose values are stored in some other database.
- Now, create a new query by clicking the Create tab and the Query Design button.
- In the Show Tables dialog, double-click on counties to add that table to the query, then click Close.
- In the group of controls labeled Query Type, click the Append button. Upon making this selection, you're asked to specify which table you want to append values to.
- Select the linked MySQL counties table from the Table Name drop down list and click OK. Note that an Append To row is added to the design grid between the Sort and Criteria rows.
- Double-click on the NAME field from the local counties table to add that field to the design grid. Note that name is also automatically entered as the Append To value. What's happened here is that Access scanned through the MySQL counties table for a field by the same name. It found one, so it made the assumption that you wanted to append the values to that field.
- Double-click on the AGE_18_64 field from the local counties table to add that field to the design grid. Note that in this case, nothing appears in the Append To area of the design grid because there is no field by that name in the MySQL table.
- In the design grid, click in the Append To cell under the AGE_18_64 column and then select WORKFORCE from the drop-down list.
- Repeat the step above to specify that you want to append values from the NO_FARMS87 and POP_SQMILE fields in the local counties table to the FARMS and POP_DENSITY fields in the MySQL counties table.
- Click the Run button to execute the query. You should receive a confirmation message asking if you really want to append 43 records. Click Yes.
- Open the MySQL counties table and confirm that the values were appended correctly. Once satisfied that your MySQL counties table has been populated properly, the local counties table is no longer needed.
- Right-click on the local copy of the counties table in the Navigation Pane and select Delete.
Note
Look at the SQL code generated by the GUI and note that what Access refers to as an Append query is actually an INSERT query in standard SQL syntax. Though we didn't do it in this tutorial, other attributes of polygon features that you might want to consider storing in a mashup database are the centroid coordinates of the polygons. These values can be added to the attribute table using the same ArcMap Calculate Geometry command utilized above. Those polygon centroid coordinates could then be used to label the polygons with custom markers in lieu of using a third-party labeling extension.
Transferring line/polygon coordinates to a database
Unlike point features that have a 1:1 relationship between their geometries and their attribute table records, line and polygon features have multiple x/y coordinate pairs (vertices) associated with each attribute table record. Thus, the Calculate Geometry method outlined above cannot be used to transfer line/polygon geometries to a database.
In an earlier lesson, you used a custom tool written in Python to export the coordinates of features to an XML file. We're now going to use the other tool in that toolbox to export those coordinates to a comma-separated-values (.csv) text file. This csv file can then be imported into Access and its values appended to the appropriate MySQL table, just as we did in the previous section with the county attributes.
- In ArcToolbox, open the Mashup Tools toolbox and run the Export Shapefile to CSV tool.
- For the Layer parameter, browse to the Jen and Barry's counties shapefile.
- For the ID Field parameter, select the NAME field.
Note
Unlike the XML tool, the CSV tool only allows for the selection of one field instead of many. This is based on the assumption that other attributes can be added to the database by importing the attribute table itself as described in the previous section.
- Click OK to perform the export, then click Close to dismiss the results dialog.
- Import the CSV file into your Access database as outlined above. (Keep in mind that you're importing a Text File rather than a dBASE File.)
- Again following the steps laid out in the previous section, append the coordinate records from the local table to the linked MySQL county_geom table.
Note
The coordinate fields in the CSV file will be labeled Lat and Lon. Be sure you match these fields up correctly with the fields in the MySQL table: Lat = Y, Lon = X. The file also includes a Part value. This is required for multi-part polygon features (such as the state of Hawaii). None of the counties in the Jen and Barry's scenario have multiple parts, so this value will be 1 for every record.
With that, you've completed the first step in constructing a database-driven mashup. The next step is to write a server-side script to extract the necessary data from the database and feed it to a JavaScript program much like what you've already written. The PHP language is often used for reading data from a database, so that is what we'll be using. The next part of the lesson talks about PHP generically and gives you some practice writing basic PHP scripts. Later in the lesson, we'll come back to this database and see how PHP can be used to retrieve data from it.
PHP
PHP is a recursive acronym – an abbreviation referring to itself – that stands for PHP Hypertext Preprocessor. It is a free and open-source web scripting language that, like JavaScript, is intermixed with HTML in a web page to generate content on the fly. Unlike JavaScript, PHP code must be executed by a web server as opposed to by the machine viewing the page. This is why PHP is often referred to as a server-side language, while JavaScript is referred to as a client-side language. The PHP website [17] and the PHP Tutorial from the w3schools website [18] are good resources for tutorials and language documentation for PHP.
A basic PHP file looks something like this:
| <html> <head> <title>PHP example</title> </head> <body> <?php echo “Hello world”; ?> </body> </html> |
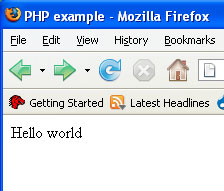 |
Important items to note in looking at this example are:
- PHP code is embedded within the HTML code.
- PHP code is enclosed within the <?php and ?> tags.
- The echo keyword is used to output a string. (Print may also be used in place of echo.)
- All PHP statements must end with a semicolon. (Unlike JavaScript, in which the ending semicolon is optional.)
- The document must be saved with a .php extension. This ensures that the server interprets and executes the PHP code in the file before sending the page to the client.
Note that either of the following alternatives can be used to produce the same result:
| <html> <head> <title>PHP example</title> </head> <body> <?php echo “<strong>Hello world</strong>”; ?> </body> </html> |
<html> |
Comments in PHP
As with other programming languages, PHP programmers can add comments to their code to make it easier to follow or to "comment out" code that isn't working. The short example below shows how to add a single-line comment and a comment block.
  <html>
    <body>
      <?php
        // This is a comment

        /*
        This is
        a comment
        block
        */
      ?>
    </body>
  </html>
Variables in PHP
As in JavaScript, variables in PHP are untyped - meaning a developer need not specify a data type when beginning to use a variable. Unlike JavaScript, variables cannot be declared using a keyword like var. They are simply created using a name beginning with the $ character and referenced as in the example below:
<html>
  <head>
    <title>PHP example</title>
  </head>
  <body>
    <?php
      $msg = "Hello World";
      echo $msg;
    ?>
  </body>
</html>
The first character after the $ must be either a letter or an underscore (not a number).
PHP string concatenation
Whereas JavaScript uses the + operator to concatenate strings, PHP uses the . (period). See the example below:
<html>
  <head>
    <title>PHP example</title>
  </head>
  <body>
    <strong>
    <?php
      $last = ‘Mouse’;
      $first = ‘Mickey’;
      echo $first . $last;
    ?>
    </strong>
  </body>
</html>
PHP operators
All of the following PHP operators work the same as they do in JavaScript (notes added in parentheses for those that may not be obvious to you):
| Arithmetic |
+, -, *, /, ++ (increment by 1), -- (decrement by 1) |
| Comparison | == (equals), != (not equals), >, <, >=, <= |
| Logical | && (and), || (or), ! (not) |
One area of difference in operators between the two languages is the concatenating assignment operator, which is often used to append additional text onto an existing string variable. For example, given a JS variable called x containing the string "Hello", additional text can be appended to x using the statement:
x += " World";
This syntax is often used in place of:
x = x + " World";
As you might guess, the PHP equivalent of the "+=" operator is ".=":
$x .= " World";
Conditional statements in PHP
The basic syntax of an if construct is the same as in JavaScript. The if condition must be placed in parentheses and all statements to be executed under the condition must be enclosed within braces. The only difference is that the "else if" construct is one word instead of two words:
if ($temp < 32) {
   echo “It’s freezing!”;
}
elseif ($temp > 90) {
   echo “It’s too hot!”;
}
else {
   echo “It’s comfortable.”;
}
PHP arrays
An array can be created in PHP using the following syntax:
$states = array("PA", "NY", "NJ", "DE");
Obtaining an individual array element is done by specifying the position of the element in brackets:
echo $states[0];
Loops in PHP
PHP offers two main types of loops (while and for) whose syntax and behavior is the same as in JavaScript. while is used to execute a block of code as long as some condition is met:
$i=1;
while($i<=5) {
  echo "The number is " . $i . "<br />";
  $i++;
}
for is used to execute a block of code a certain number of times:
for ($i=1; $i<=5; $i++) {
  echo “The number is “ .$i . “<br />”;
}
PHP's date() function
Of the many functions built into PHP, one of the more useful is date(), which is used to display both dates and times in various formats. The key to using the date() function is supplying a string argument that specifies the desired format. The following examples demonstrate its use:
| Code | Example Result |
| echo "Today is " .date("l"); | Today is Monday |
| echo "The date is " .date("n/j/Y"); | The date is 11/3/2008 |
| echo "The current time is " .date("g:i:s a"); | The current time is 4:04:25 pm |
A complete list of formatting characters can be found at w3schools [19].
The date() function can also be used to format dates other than the current date. This is done by supplying a timestamp for the function's optional second parameter. A timestamp is the number of seconds since midnight, January 1, 1970. Assuming you don't know that value off the top of your head, you can calculate it using the mktime() function. The syntax of this function is: mktime(hour, minute, second, month, day, year). The following example demonstrates using the date() and mktime() functions together:
echo “July 4th, 2020 is a “ . date(“l”, mktime(0,0,0,7,4,2020));
String functions in PHP
Like other programming languages, PHP provides a number of functions that are used to manipulate strings. Some of the more useful of these include:
- strlen() — returns the length of a string
- strpos() — returns the position of one string inside another
- strtolower() — converts a string to lower-case
- strtoupper() — converts a string to upper-case
- substr() — returns part of a string
Again, a more complete listing of PHP string functions can be found at w3schools [20].
PHP practice exercises
To help you gain a bit of comfort with PHP before we dive into its use in retrieving data from a database, please complete the following practice exercises. For each of the exercises, be sure to save your code with a .php extension and upload it to the special php folder in your personal web space to test it.
Note
While the www.personal.psu.edu [21] server is configured to handle PHP scripts, it's not able to connect to the MySQL databases that have been set up for us. For that purpose, we'll use the phpdb.aset.psu.edu server instead. Although these practice exercises don't involve a database, to avoid confusion I'm going to recommend you use the phpdb server to execute all of your PHP scripts. This server is configured such that you can omit your access account ID from the URL. For example, I uploaded a script called date_function.php to my phpjed124 folder. I can execute that script and view its output using the URL https://phpdb.aset.psu.edu/phpjed124/date_function.php [22]. You can follow the same pattern to execute your scripts.
- Create three variables (x, y, and z). Assign a value of 9 to x, a value of 7 to y and then make z equal to the sum of those two variables. Display the contents of the z variable on the screen using an echo statement.
Solution to Practice Exercise 1 [23] - Use the date() function to display your birthday in the following format:
Friday, December 5, 2008
Solution to Practice Exercise 2 [24]
In this part of the lesson, you read about PHP and got some practice with it. In the next part, you'll read a brief bit on the topic of setting up HTML forms to accept input from the user and accessing that input within your PHP scripts.
Reading from a MySQL Database with PHP
PHP's database support
PHP is a popular open-source language for building web pages that draw dynamic content from a database. It has functions for extracting data from all of the major RDBMS packages. This part of the lesson focuses on using PHP with MySQL. If you're considering retrieving data from a package other than MySQL, you should visit PHP's Database Extensions page [25].
The University server we're using in this course is actually equipped with the MySQL Improved Extension (MySQLi) [26] rather than the older MySQL Extension [27]. The old extension enables interaction with a database through a set of functions whose names begin with mysql_. Generally speaking, the improved extension has all of the same functions, just with names beginning instead with mysqli_. One of the improvements the MySQLi extension offers developers is the ability to write code in an object-oriented or a procedural style. My experience has been with the original MySQL Extension, which is strictly procedural, and I have not yet had a chance to experiment with the object-oriented style. Therefore, my examples are written in the procedural style. You are welcome to write object-oriented code if you'd prefer.
In looking at the reference documentation on the php.net site, it appears that it is geared toward those using the object-oriented style. Because this could make it harder for you to follow my examples, I'm going to refer you instead to another site that appears to be hosting an older version of the reference documentation that I've found easier to follow. For example, the first function we'll use is called mysqli_connect(). You can find a description of this function at this site: PHP Manual:mysqli-connect [28]. You can also jump to descriptions of any of the other mysqli_ functions used in the lesson by clicking on their links. Unfortunately, finding this same function in the php.net version of the documentation is much more difficult because it's listed under the heading of mysqli::__construct (the object-oriented version of the function). This is just one example of why I'm directing you away from the current documentation at php.net.
Connecting to MySQL with PHP
Using the MySQLi Extension, connections are made to MySQL databases using the mysqli_connect() function (reference documentation cited above). This function accepts 6 optional arguments, the first 4 of which we'll need in this class: the name of the server hosting the database, the user's name, the user's password and the name of the database. It returns a link to the database that is needed by other mysqli functions (e.g., the one needed to execute SQL queries). I would make a connection to my database and store the returned link in a variable like this:
<?php
$link = mysqli_connect("instructdb3.ait.psu.edu","inst_4","password","jed124");
?>
When connecting to your database, you should replace my database name (access account ID) with yours and replace my user name and password with the values supplied to you in the dbinfo file that was put in your personal web space.
Writing SQL to retrieve the desired data
This stage of the mashup building process is another of the reasons I recommend using Access as a front-end to your MySQL database. Its query building GUI can be an effective tool for generating the SQL needed by a mashup, particularly if the query requires joins or group by operations. For example, if my PHP script needed a career home run list from a MySQL version of the baseball stats database, I'd use Access to build the query much like you did during the SQL tutorial. I'd then switch to SQL View and copy and paste the SQL code into my PHP script, storing the SQL string in a variable for use later.
There's just one problem with this methodology: the version of SQL employed by Access is of a slightly different dialect than that of MySQL. Some of these differences can be seen by comparing the same query in the two different dialects next to one another:
Access:
SELECT [players]![first_name] & ' ' & [players]![last_name] AS player, Sum(stats.hr) AS career_hr
FROM players INNER JOIN stats ON players.player_id = stats.player_id
GROUP BY [players]![first_name] & ' ' & [players]![last_name]
ORDER BY Sum(stats.hr) DESC;
MySQL:
SELECT CONCAT(players.first_name, ' ', players.last_name) AS player, Sum(stats.hr) AS career_hr
FROM players INNER JOIN stats ON players.player_id = stats.player_id
GROUP BY CONCAT(players.first_name, ' ', players.last_name)
ORDER BY Sum(stats.hr) DESC;
The difference that is likely to make the most impact on your query writing is the way that Access places table/field names inside brackets and the way that it signals a parent-child relationship between a table and field using an exclamation point. In the standard SQL used by MySQL, there are no brackets around table/field names and a parent table is connected to its child field using a period.
The other difference that can be seen in this example is that concatenation is done in MySQL using the CONCAT() function, whereas strings are concatenated in Access using an ampersand (&) or a plus sign (+).
More of the differences between Access SQL and MySQL SQL can be found at SQLzoo.net [29]. Despite the differences, I still find modifying the code generated by the Access query GUI easier than producing the code wholly from scratch, but your mileage may vary.
Plugging the MySQL-friendly version of the SQL into the PHP script looks like this:
<?php
$link = mysqli_connect("instructdb3.ait.psu.edu","inst_4","password","jed124");

$sql = "SELECT CONCAT(players.first_name, ' ', players.last_name) AS player,
   Sum(stats.hr) AS career_hr
   FROM players INNER JOIN stats ON players.player_id = stats.player_id
   GROUP BY CONCAT(players.first_name, ' ', players.last_name)
   ORDER BY Sum(stats.hr) DESC;";
?>
Executing the SQL
The next step is to execute the query held in the $sql variable using the mysqli_query() function. mysqli_query() requires a database link for its first argument and a query string for its second argument. When executing a SELECT query as we're doing here, mysqli_query() returns a result object, which like the database link, should be stored so that it can be used later by other mysqli functions:
$result = mysqli_query($link, $sql);
Note
If there is an error in your query syntax, mysqli_query() will return a value of FALSE instead of a result object. Also keep in mind that your query may have perfectly valid syntax, but yield no records because of either flawed logic in the query's design or a simple lack of data meeting the criteria at that time. An example of flawed logic would be a query that attempts to select records having an hr value less than 0 (which is impossible). An example of the second situation would be a query that attempts to select records where the last_name is 'Rodriguez'. There are no records presently in the database meeting that criterion (though if I were to re-populate the database with the current top 10 home run hitters, there would be). In both cases, the query will return a result object because of its valid syntax, but it will contain 0 rows. (See the usage of the mysqli_num_rows() function below.)
Obtaining the query results
The mysqli_fetch_array() function can be used to obtain one row of data from your query result. The values in that row are returned as an array, which is typically stored in a variable. An individual value can then be obtained from the array variable by supplying the name of a column in brackets. For example:
$row = mysqli_fetch_array($result);
$player = $row['player'];
// OR
// $player = $row[0]; // assuming "PLAYER" is 1st field
There are two main ways to process all of the records returned by a query. The first involves determining how many records were returned using the mysqli_num_rows() function, then setting up a for loop to carry out the necessary processing that many times. The other method involves taking advantage of the fact that mysqli_fetch_array() returns 0 if the last row has already been fetched. With this method, a while loop can be used to continue processing until mysqli_fetch_array() returns 0. Both methods are demonstrated below, with the while loop commented out:
$num_results = mysqli_num_rows($result);
for ($i=0;$i<$num_results;$i++) {
   $row = mysqli_fetch_array($result);
   $player = $row['player'];
   $hr = $row['career_hr'];
   echo $player .', '. $hr .'<br />';
}

// OR
//while ($row = mysqli_fetch_array($result)) {
// $player = $row['player'];
// $hr = $row['career_hr'];
// echo $player .', '. $hr .'<br />';
//}
The second method is a bit more slick, though if you find it harder to follow, you're welcome to utilize the first method, which is a bit more straightforward.
The complete career home run script [30]is below (http://phpdb.aset.psu.edu/phpjed124/career_hr.php [30]) Note that the script includes a check of the $result variable to make sure the query returned a result. Note also the last line of the script which closes the connection to the database.
$link = mysqli_connect("instructdb3.ait.psu.edu","inst_4","password","jed124");

$sql = "SELECT CONCAT(players.first_name, ' ', players.last_name) AS player,
   Sum(stats.hr) AS career_hr
   FROM players INNER JOIN stats ON players.player_id = stats.player_id
   GROUP BY CONCAT(players.first_name, ' ', players.last_name)
   ORDER BY Sum(stats.hr) DESC;";
$result = mysqli_query($link,$sql);
if ($result != 0) {
   $num_results = mysqli_num_rows($result);
   for ($i=0;$i<$num_results;$i++) {
      $row = mysqli_fetch_array($result);
      $player = $row['player'];
      $hr = $row['career_hr'];
      echo $player .', '. $hr .'<br />';
   }
} else {
   echo 'Problem with query!';
}

mysqli_close($link);
Note
When running a PHP script that reads from your MySQL database, be sure to use the phpdb.aset.psu.edu server as shown in the URL above. It is specially configured to read data from our MySQL databases, whereas php.scripts.psu.edu is not.
Incorporating data from a database into a mashup
To convert a mashup based on a local XML file (like what was demonstrated earlier in the lesson) to one based on data coming from a database, there are really only two main steps:
- Write a PHP script using the methodology described above and output the data values in XML format.
- Change the ajax() statement so that it reads the XML produced by the PHP script instead of from the XML file.
Here is the source code for a PHP script that reads the candidate cities data from my MySQL database and outputs the values as XML [31] (http://phpdb.aset.psu.edu/phpjed124/get_cities.php [31]):
<?php
$link = mysqli_connect("instructdb3.ait.psu.edu","inst_4","password","jed124");

$sql = "SELECT name, population, x, y FROM candidate_cities ORDER BY name;";

$result = mysqli_query($link,$sql);
if ($result != 0) {
   header("Content-type: text/xml");
   echo '<shapes>';

   $num_results = mysqli_num_rows($result);
   for ($i=0;$i<$num_results;$i++) {
      $row = mysqli_fetch_array($result);
      $name = $row['name'];
      $pop = $row['population'];
      $x = $row['x'];
      $y = $row['y'];

      echo '<pt name="' .$name. '" population="' .$pop. '" x="' .$x. '" y="' .$y. '" />';
   }

   echo '</shapes>';
} else {
   echo 'Problem with query!';
}

mysqli_close($link);

?>
The statements to pay particular attention to are in bold. First, a header statement is added so that browsers receiving the output from this script will know that it is in XML format. Next, the start tag for the root element of the XML data is echoed to signal the beginning of the XML packet. Then inside the loop the current city's attributes are echoed in XML form.
This line can be tricky as it involves the use of both single and double quotes and a lot of concatenation. The literal text being echoed is in single quotes, but part of that literal text is a number of double quotes (because the values that are being retrieved from the variables represent element attribute values in the XML output and such values must be enclosed in quotes) . Perhaps the best way to produce a statement like this is to forget about quoting the attribute values at first, then add those quotes in later. Here is the statement without the attribute value quotes (i.e., no double quotes):
echo '<pt name=' .$name. ' population=' .$pop. ' x=' .$x. ' y=' .$y. ' />';
And here is the statement with caret symbols in place of where the double quotes ought to be (since it may be hard for you to differentiate between single and double quotes when they're right next to each other):
echo '<pt name=^' .$name. '^ population=^' .$pop. '^ x=^' .$x. '^ y=^' .$y. '^ />';
With the PHP script written, the next step is to modify the JavaScript you used earlier in the lesson so that it reads the output from the PHP script instead of an actual XML file:
$.ajax({ url: "get_cities.php", dataType: "xml", success: function(xmlDoc){
Because of the restriction that JavaScript can only read files in the same directory, you'll need to store your html page in the same folder as the PHP script. This means you may also need to copy your custom marker icons to the special PHP folder as well, or specify absolute paths to them in your code.
Polygon data example
Earlier in this lesson, I guided you through loading polygon attributes and geometries into MySQL. Now let's see how to retrieve polygons from MySQL and display them on a map.
The example page we're going to examine displays two maps of political party registration in Pennsylvania's 67 counties [32]: one depicting numbers from December 2007 and the other from April 2008, just before the state's presidential primaries.
First, have a look at the three tables involved in this mashup:
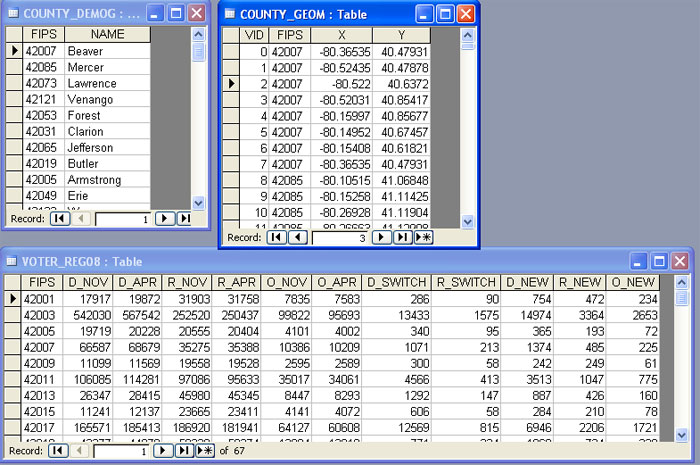
Note that each table contains a FIPS field, which is used to conduct joins between the tables. Now, let's look at the PHP script that's used to retrieve the required data [33](http://phpdb.aset.psu.edu/phpjed124/voter_reg.php [33]):
<?php
$link = mysqli_connect("instructdb3.ait.psu.edu","inst_4","password","jed124");

$sql = "SELECT COUNTY_DEMOG.FIPS, COUNTY_DEMOG.NAME, VOTER_REG08.D_NOV,
    VOTER_REG08.D_APR, VOTER_REG08.R_NOV,
    VOTER_REG08.R_APR, VOTER_REG08.O_NOV, VOTER_REG08.O_APR,
    VOTER_REG08.D_SWITCH, VOTER_REG08.R_SWITCH,
    VOTER_REG08.D_NEW, VOTER_REG08.R_NEW, VOTER_REG08.O_NEW
    FROM COUNTY_DEMOG
    INNER JOIN VOTER_REG08 ON COUNTY_DEMOG.FIPS = VOTER_REG08.FIPS;";

$result = mysqli_query($link,$sql);
if ($result != 0) {
    header("Content-type: text/xml");
    echo '<shapes>';

    $num_results = mysqli_num_rows($result);
    for ($i=0;$i<$num_results;$i++) {
        $row = mysqli_fetch_array($result);
        $fips = $row['FIPS'];
        $name = $row['NAME'];
        $d_nov = $row['D_NOV'];    $d_apr = $row['D_APR'];
        $r_nov = $row['R_NOV'];    $r_apr = $row['R_APR'];
        $o_nov = $row['O_NOV'];    $o_apr = $row['O_APR'];

        echo '<poly name="' .$name. '" d_nov="' .$d_nov. '" d_apr="' .$d_apr. '"
          r_nov="' .$r_nov. '" r_apr="' .$r_apr. '"
          o_nov="' .$o_nov. '" o_apr="' .$o_apr. '">';

        $sql = "SELECT X, Y FROM COUNTY_GEOM WHERE FIPS='" .$fips. "' ORDER BY VID;";

        $coords = mysqli_query($link, $sql);
        if ($coords != 0) {
            $num_coords = mysqli_num_rows($coords);
              for ($j=0;$j<$num_coords;$j++) {
              $rec = mysqli_fetch_array($coords);
              $x = $rec['X'];
              $y = $rec['Y'];
              echo '<v x="' .$x. '" y="' .$y. '" />';
            }
        }

        echo '</poly>';
    }

    echo '</shapes>';
}
The basic idea behind this program is to query the voter_reg_08 table to get a list of all the counties along with their voter registration information. A for loop is used to step through this list one county at a time. Within the loop, the county's name and registration figures are echoed as an XML element called poly.
Also within that loop, another bit of SQL is used to query the county_geom table for the coordinates of the vertices that form the geometry of the county being processed by the loop. A second loop is then embedded within the first to cycle through the records in the coordinate list. These coordinates are then echoed as an XML element called v (short for vertex) which is a child element of the parent poly element.
After the internal loop is complete, the poly element is closed with its end tag. Likewise, after the external loop is complete, the root element (shapes) is closed with its end tag.
As for the JavaScript code used for the page, I recommend that you view its source to follow along with this discussion. Just as the PHP script used two loops to produce the XML output, the function embedded in the ajax() statement uses two each() to read the XML. The first loop works through all of the elements in the XML packet with the tag name poly. Within the loop, the raw voter counts are obtained for the current county and converted to percentages. From those percentages, the margin separating the two major parties is computed and passed to a function called get_color(), which returns a hexadecimal color value that varies depending on the margin (dark blue for heavily Democratic counties, dark red for heavily Republican counties, etc.).
Note
I used ColorBrewer [34] to obtain the color values.
After a bit of code concerned with constructing the tables below the maps, the coordinates for the current county are obtained by getting all of the child elements of the parent poly element (referenced by the rec variable) with the tag name v. Recall that a Polygon is constructed from an array of LatLng objects, so a new empty array variable called pts is created. This array variable is then populated by a second loop that steps through all of the v elements. For each vertex, the x and y values are obtained and used to create a new LatLng object. That LatLng object is then added to the pts array.
After the vertex loop, a new Polygon is created from the pts array, assigned the appropriate color for that county and added to the map. A function named handle_clicks() is also called to pop up an info window for the polygon when it is clicked. This function is complicated a bit by the fact that the page contains two maps, something you won't have to worry about unless you create a similar two-map page.
That concludes this part of the lesson on the topic of reading data from a relational database and incorporating it into a mashup. Earlier in the course we saw how form elements can be used to further develop your map's user interface. Now that we've covered the use of relational databases, let's revisit the use of form elements, this time in a relational database context.
Sending Form Input to a PHP Script
It's not difficult to imagine scenarios in which the data to be mapped are just a subset of a larger database. In fact, Lesson 7 demonstrated a county viewer app that allowed the user to view the counties within a selected state. And you may have created an app of that sort for the Lesson 7 assignment. However, the logic used in the county viewer example -- looping through all the records in the shapefile, but only adding overlays for the records associated with the correct state -- is a bit clunky.
Using a relational database provides a much more efficient solution to the problem. PHP scripts can be written to accept input parameters and these input parameters (perhaps obtained from a form) could then be used to generate SQL Select statements that retrieve the subset of data needed to fill the user's request.
Let's return to the baseball stats database to illustrate this point. I've written a script called get_stats.php that expects to receive the name of a player as an input. To see the output of this script, click on the links below:
http://phpdb.aset.psu.edu/phpjed124/get_stats.php?first=Barry&last=Bonds [35]
http://phpdb.aset.psu.edu/phpjed124/get_stats.php?first=Babe&last=Ruth [36]
We saw this same kind of syntax at the beginning of the course when discussing Google Maps URLs. Note the following:
- The name of the script is followed by a question mark, then by a set of parameters and their values.
- Parameter names appear on the left side of the equals sign; their associated values appear on the right.
- Parameter/value pairs are separated from one another by the ampersand character.
When writing a script that accepts inputs such as get_stats.php, the input values are available through a global array called $_REQUEST. Getting an individual value from the array involves specifying the parameter name in brackets. For example:
$first = $_REQUEST["first"];

$last = $_REQUEST["last"];
These values can then be plugged into an SQL statement that retrieves the appropriate records. For example:
$sql = "SELECT PLAYERS.FIRST_NAME, PLAYERS.LAST_NAME, STATS.YEAR, STATS.HR, STATS.RBI
FROM PLAYERS INNER JOIN STATS ON PLAYERS.PLAYER_ID = STATS.PLAYER_ID
WHERE PLAYERS.FIRST_NAME='$first' AND PLAYERS.LAST_NAME='$last';";
Put into a mapping mashup context, the basic steps for constructing an application that allows the user to select a subset of data to map are as follows:
- Build an HTML form containing the desired elements.
- Write a PHP script that is prepared to accept input values entered through the form and retrieve the appropriate data from the database.
- Using JavaScript and the DOM, obtain the user's form inputs.
- Programmatically construct the URL of the PHP script that will retrieve the correct data by appending parameter/value pairs to the name of the script.
- Insert that URL into a jQuery ajax() statement.
- Map the data as covered earlier in the course, perhaps using different symbols for different categories of data.
Let's look at a simple mapping example that illustrates this process. First, here is a slightly modified version of the get_cities.php script that was discussed earlier (with modified code in bold):
https://phpdb.aset.psu.edu/phpjed124/get_cities.php [37]
<?php

$city = $_REQUEST["city"];

$link = mysqli_connect("instructdb3.ait.psu.edu","inst_4","password","jed124");

$sql = "SELECT name, population, x, y FROM candidate_cities ";

if ($city) {
    $sql .= "WHERE name = '" .$city. "' ";
}

$sql .= "ORDER BY name;";

$result = mysqli_query($link,$sql);
if ($result != 0) {
    header("Content-type: text/xml");
    echo '<shapes>';

    $num_results = mysqli_num_rows($result);
    for ($i=0;$i<$num_results;$i++) {
        $row = mysqli_fetch_array($result);
	$name = $row['name'];
	$pop = $row['population'];
        $x = $row['x'];
        $y = $row['y'];

        echo '<pt name="' .$name. '" population="' .$pop. '" x="' .$x. '" y="' .$y. '" />';
     }

     echo '</shapes>';
} else {
     echo 'Problem with query!';
}

mysqli_close($link);
?>
The difference in this version of the script is that it's prepared to accept the name of a city if a city parameter is included in the URL. If a city parameter is included (as in https://phpdb.aset.psu.edu/phpjed124/get_cities.php?city=Nittanytown [38]), then the original SQL statement is changed to include a WHERE clause that limits the results to just the specified city. If a city parameter is not included in the URL, then the script will retrieve the data for all the cities, just as before.
Next, have a look at this page that enables the user to select a city from a drop-down list to map:
https://phpdb.aset.psu.edu/phpjed124/candidate_cities_db.html [39]
Here is a list of the important points to note while examining this page's source code:
- The page is set up similar to the shapefile-based example from Lesson 7, with the key being that the "Add to Map" button has its onclick attribute set to a function named process().
- The process() function gets the user's selected city, and then passes it to another function that handles the display of desired features (here that other function being called load() rather than render()).
- The load() function is defined to accept the name of a city to map. If an empty string is supplied for this parameter, then all of the cities will be retrieved and mapped.
Note
There are numerous ways to pass the selected city to the load() function besides the one shown here. These alternatives include eliminating the process() function and invoking the load() function directly from the onclick() event attribute or eliminating the "Add to Map" button and triggering the mapping process in response to the select element's onchange event.
Before leaving the topic of forms, there is one more concept that some of you may find useful for your own projects: how to dynamically populate a drop-down list with data from a database. We'll see how that can be done in the next part of the lesson.
Populating a Drop-down List from a Database
In many cases, it is sensible to hard-code a set of drop-down list options right in the HTML portion of a page as was done in the previous example. However, when the contents of a list are frequently changing, such an approach would require a lot of needless page updating. Just as you can use PHP to retrieve data to be overlaid on a map, you can also use it to dynamically populate a drop-down list.
To illustrate one approach to this problem, let's look at a slightly modified version of the Jen and Barry's page from earlier in the lesson [40].
It looks and behaves the same to the end user. However, this version pulls the names of the cities from MySQL. Note that in place of the select element that had been hard-coded before, there is now simply an empty div (with an id assigned). The other difference in this version can be found at the beginning of the initMap() function. There before the initialization of the map is a jQuery ajax() call. This code reads the output of a script called get_city_list.php and inserts that text into the empty placeholder div. Here is the source code of get_city_list.php:
https://phpdb.aset.psu.edu/phpjed124/get_city_list.php [41]
<?php

$link = mysqli_connect("instructdb3.ait.psu.edu","inst_4","password","jed124");

$sql = "SELECT name FROM candidate_cities GROUP BY name;";

$result = mysqli_query($link,$sql);
if ($result != 0) {
    echo '<label>City:';
    echo '<select name="city">';
    echo '<option value="">all</option>';

    $num_results = mysqli_num_rows($result);
    for ($i=0;$i<$num_results;$i++) {
        $row = mysqli_fetch_array($result);
        $name = $row['name'];
        echo '<option value="' .$name. '">' .$name. '</option>';
    }

    echo '</select>';
    echo '</label>';
}

mysqli_close($link);

?>
The logic behind this script is rather straightforward. It first outputs the start tags for the list's label and select elements, followed by the "all" option (for displaying all the cities). It then loops through the records returned by a query that selects a unique list of cities. The query's GROUP BY clause wasn't really necessary for this table, but I included it because such a clause is often useful for eliminating duplicates. For example, imagine developing a real estate application that enabled users to select a school district from a list and see all of the available properties in that district. You would want each school district to show up in the drop-down list only once, but the table holding the property listings is likely to contain multiple occurrences of each district. A GROUP BY on the school district field would yield a list without duplicates (and sorted alphabetically).
This concludes the content on relational databases and their use in a web-mapping context. On the next page you'll find a project scenario that you can complete as a way of putting what you've learned here into practice and/or to earn extra credit.
Mapping the 2012 Election
The scenario for this lesson's optional assignment is to map the results of the 2012 presidential election at the county level for a state of your choice. You can use the classification scheme I used in my voter registration map or come up with your own. Here are the data you'll need to complete the project:
- U.S. counties shapefile [42]
- Election data [43]
Note that the data for some states appear to be unreliable (e.g., Colorado, Utah, Wyoming). The data were downloaded from The Guardian [44] in the UK, which unfortunately was the only place I could find free nationwide county-level results. Be sure the state you select passes the "smell" test.
Here's a basic outline of the major steps to complete:
- In ArcMap, use the Mashup toolbox to export a CSV file of the county polygon coordinates for your selected state.
- Import the coordinate data and election data into a new Access database.
- Examine the coordinate and election data and develop a plan for how you will store the data in MySQL. Be sure to identify key fields that can be used to associate the election information with the county geometries. (The FIPS codes in the election data don't match those in the counties shapefile because they lack the two-digit state code. You'll need to work out how to fix this.)
- Create the tables you envisioned in the previous step in your MySQL database using either phpMyAdmin or the MySQL Workbench.
- You should already have an ODBC data source associated with your MySQL database after completing the lesson.
- In your Access database, use the ODBC data source to add links to the MySQL tables you created.
- Build an Append query to add the coordinate data to your MySQL table.
- Build another Append query to add the election data to your MySQL table.
- Write a PHP script that retrieves the data required for your mashup and output the data in XML format. You may find it helpful to use the Access query GUI to generate the necessary SQL. Important notes:
- The PHP script must be uploaded to the special php folder that was added to your personal web space (e.g., phpjed124)
- To run the script, you must use the phpdb.aset server (i.e., enter a URL like https://phpdb.aset.psu.edu/phpjed124/get_cities.php [37]).
- Build a web page containing JavaScript that reads the data outputted by your PHP script, creates polygons from the coordinate data and symbolizes the polygons based on the leading vote-getter in each county. Because of the same-domain restriction of the XMLHttpRequest object, you'll need to upload your page to your special php folder and open it using the phpdb.aset server for it to be able to read the data outputted by your PHP script (i.e., enter a URL like https://phpdb.aset.psu.edu/phpjed124/candidate_cities.html [45]).
- Add a sidebar that lists the vote percentages for each candidate in each county.
If this election brings up bad memories for you, you're welcome to map a different election. You may also feel free to map the election results at the voting district level rather than at the county level.
Note
When selecting a state/county to map, beware of multi-part and donut polygons. These types of polygons require a different kind of storage in the database, different methods of retrieval from the database and different methods for turning them into Google Maps Polygon objects.
If you're very comfortable with the material from this lesson, you may want to try mapping a place that has some of these special polygons for an extra challenge. Otherwise, I'd recommend sticking with a place that's comprised of all simple polygons. If you're unsure whether your place of interest includes any special polygons, go ahead and export its coordinates to CSV. The tool's dialog box will warn you if any were encountered.
Deliverables
This project is optional and is not graded. However, it can be submitted to the instructor for feedback and/or to earn up to 5 points added to your overall course grade (on a 100-point scale).
- Post the map with data extracted from your MySQL database along with a clickable sidebar listing selected attribute information to your e-portfolio.
- Below the map, include some reflection on what you learned from the lesson and/or any concepts that you found to be confusing (minimum 200 words).