In the previous part of this lesson, you copied a map document to your EC2 instance. However that map is still only available inside ArcMap on your instance. Now you'll take the step of publishing the map as a web service so that it can be used by anyone.
Whenever you publish a service, you begin the process in ArcMap, having opened the map document that you would like to publish. You run an analysis process on the map to find anything that might prevent it from being drawn by ArcGIS Server's drawing engine. You then set service properties and publish the service.
Opening and analyzing the map
- Log in to your instance using Windows Remote Desktop Connection.
- Start ArcGIS Pro and create a new Project.
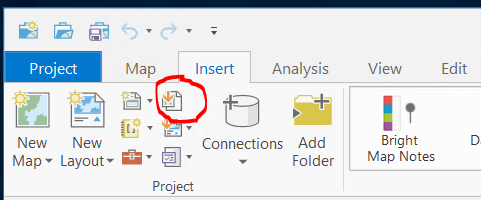
- We're going to import an existing map that was saved as an .mxd file earlier. Click the Insert tab and click the Import Map icon.
- You should see the Appalachian Trial layers appear in the Contents pane in Pro. These layers reference the data you uploaded to the C:\data folder.
- Scale ranges have been set on the layers to symbolize them differently as the user zooms in and out. Group layers are used to organize the layers for each scale range.
- The layers have been given intuitive names. This ArcMap table of contents won't be available to the user of the web service. However, apps that use the service will sometimes construct a legend or table of contents given information that the app can read for the service. Since the app is going to read the layer names, it's important to name them intuitively. For example, "Trail" is a more user-friendly layer name than the default "Centerline". Also, the default data frame name of "Layers" has been changed to "Appalachian Trail Shelters".
- The bright colors and shadowed labels of this map have been chosen with the anticipation that the map will overlay satellite and aerial imagery. The imagery itself has not been included in the map because it will be obtained through a different web service. When designing web services, it's a good practice to separate base map layers such as imagery into their own services. The trail data we are working with consists of business layers, or operational layers. These types of layers are usually the main datasets of interest in the web map, and they are often separated into their own services and symbolized with the anticipation that they will overlay the base map service.
- Save your ArcGIS Pro project using the Project tab.
- We are now going to make a connection to the ArcGIS Server instance running on your EC2 machine. Open the Insert tab, click Connections, expand Server, and choose the New ArcGIS Server option.
- Enter the URL to your Server instance. It will look something like, https://baxtergeog865su23.e-education.psu.edu/server. (You may need to click the Enter key on your keyboard to get the window to recognize that you've entered something. This step is sometimes a bit quirky.)
- In the Sign In window that appears, enter the login for your EC2 ArcGIS installation. This is the Site Admin username and password that you supplied in the Cloud Formation template.
- In the Catalog pane in ArcGIS Pro, you should now see a Server folder and your instance inside it.
At this point, your ArcGIS Pro session is connected to two different ArcGIS Server (Portal) sites: the Penn State organization (pennstate.maps.arcgis.com) that you initially used to sign in, and your personal ArcGIS Server (e.g., https://baxtergeog865su23.e-education.psu.edu/server). Before we publish our data to the server, we need to inform ArcGIS Pro which of these two servers to use.
- At the upper-right of the ArcGIS Pro window, click where you see your name and "Penn State University." Click the option to Switch Active Portal, and choose your Server on EC2.
Now we can publish our data to the Server.
- Click the Share tab, choose Web Layer, and click Publish Web Layer.
- In the Share As Web Layer pane, enter a name, summary, and tag for your data.
- Since you already copied data and registered the C:\data folder with Server in an earlier step, there is no need to copy the data to server at this point; it’s already there and is in a folder that Server has access to. Accordingly, click the radio button for Map Image under Reference Registered Data. Had we not already registered the C:\data folder with Server, we would need to choose one of the options to copy the data to our server at this point.
- In the Portal Folder dropdown, choose the root option.
- You can put your ArcGIS Server services in "folders" if you want to group them together for security or logistical purposes. These don't translate to physical folders on disk, they are just an organizational mechanism. For example, you might remember seeing the PrintingTools and Geometry services in the Utilities folder back when you were touring Manager. In the lesson exercises, we won't bother with folders because you won't have that many services to keep track of.
- Check the box to Share the data with Everyone.
- Click the Analyze button, and then examine the Messages window that appears.
- (You may see an error asking you to “allow assignment of unique numeric IDs for sharing web layers.” If so, you can click the link to open your Map Properties and check the box to Allow.)
- The Messages window displays a report of anything that might prevent the service from being created. The ArcGIS Server drawing engine is optimized for speed on the web and does not support some of the less-common layers and symbols that you can view in ArcGIS Pro. If your map contains something that's not supported, you will see an Error in the report and you must remove the layer from your map before you can publish.
The report also lists Warning and Info messages about things that might slow down or otherwise hinder your service once its published. On the web, speed is king. It's usually worth your time to fix as many of the warnings as you can before publishing your service.
If you don't understand a particular message, you can right-click it and click Help to see documentation about that specific message.
The most important warning you see in your Trail map is that the data is stored in a different coordinate system than the data frame. This means the data frame is projecting the layers "on the fly" every time the map draws. Since this projection is computationally intensive, it's best if your server does not have to perform it on every map draw, especially if hundreds of people will be hitting the service at the same time. Let's change the data frame projection to match the source data and re-analyze.
- Without closing the error window, return to the Contents pane, right-click the map name at the top (Appalachian Trail Shelters), and click Properties.
- Click the Coordinate System tab, then browse to Projected Coordinate Systems > World > WGS 1984 Web Mercator (Auxiliary Sphere), and click OK.
Your data frame projection now matches the projection of your data. The Web Mercator (Auxiliary Sphere) projection is a common one used by online mapping services such as ArcGIS Online, Bing Maps, and Google Maps.
- In the Share As Web Layer pane, click Analyze again, and notice that the warning about the coordinate system has gone away.
- In the Share As Web Layer pane, click the Configuration hearding and examine the available options.
ArcGIS Server capabilities define the ways that users can access your service. All web services have strictly defined ways that they are allowed to communicate with clients. They also expose a set of methods or operations, which are things they can do (like draw a map). By adding more capabilities here, you thereby expand the ways that clients can use your service. The WMS capability, for example, allows clients to communicate with your service through the Open Geospatial Consortium (OGC) Web Map Service (WMS) specification, an open specification for how GIS map web services should communicate.
Since you're publishing a simple service for test purposes, leave the default capabilities. In Lesson 3, you'll get a chance to work with the Feature option.
- In the Share As Web Layer pane, click Analyze again. You should see no warnings now that you've corrected the coordinate system mismatch.
- Click the Publish button to finish publishing the data to the Server.
This creates a web service for your map. In a few seconds, you should be able to see the service listed in the web Manager or the Catalog pane in ArcGIS Pro.
When you publish a service, a copy of your map is placed in a special folder on your server (arcgissystem). If you ever update the layers or symbology in your map, you must overwrite your service so that a new copy of the map can be placed there. You overwrite a service using the same wizard that you use for publishing. In the first panel, you choose Overwrite an existing service instead of Publish a service. - Open the Services Directory and verify that you see your new trail service. The URL to your Services Directory, which you can use from any machine, is https://namegeog865####.e-education.psu.edu/server/rest/services (substituting your own name). If you don't see your service, it's ok.
- If you don't see your Trail service on the Services Directory page, it's likely because it is not set to be visible to the Public. One way to see your service is to click the login link at the upper-right of the Services Directory page and sign in with the ArcGIS credentials you established with Cloud Formation.
- To be sure that all clients are able to view your Trails service, return to the Server Manager page (https://namegeog865####.e-education.psu.edu/server/manager), view the list of services, click the Sharing icon and select Everyone.
Ways of working with web services
When you publish a service, you are giving the server a set of things that it can do with a particular map. In order for this to be useful to anyone, the client application and the server need to be able to communicate with each other in a way that both understand. There are several ways that an ArcGIS Server map service can allow itself to communicate with client applications.
REST
Representational State Transfer (REST) allows a client to discover information about a service or invoke operations on a service using a known structure of URLs. REST is not really a communication protocol, but rather an architecture; a way of building a web service so that it has a hierarchy of resources and operations that can be accessed by formulating the correct URL.
The actual bits of information sent "across the wire" can vary in format, but JavaScript object notation (JSON) is often used. JSON is desirable because of its well-known structured format and the fact that it can compact information into a minimal amount of characters.
Here's an example of some JSON that describes a Pennsylvania municipalities map service. Take a few moments to examine all the properties exposed in this JSON. This is actually an easy-to-read format of JSON with extra line breaks and spaces called "pretty JSON." Removing the spaces to get pure JSON makes it more difficult for you to read, but reduces the information that the computer has to read and can, therefore, make your web service more efficient.
REST is stateless, meaning that any one request cannot depend on information sent in a previous or future request. All requests are independent of each other. This requirement can make for some interesting architectural considerations. For example, to support an interactive web editing session with REST, you must send an entire digitized feature to the database at once; you cannot send the feature vertex by vertex as it is digitized.
Because of REST's simplicity and efficiency, the Esri web mapping APIs for JavaScript, Flex, and Silverlight communicate with ArcGIS Server web services using REST.