Now that your site has been created and started, you can get ready to log in to the instance and start working with your software. Some of these steps will be similar to what you did in Lesson 1, but please follow them closely.
- Log in to the AWS Management Console, navigate to the EC2 region where you built your site in Cloud Formation (probably N. Virginia), and click Security Groups.
When Cloud Formation created your EC2 instance, it also created a security group for that instance. You might remember from Lesson 1 that you need to add a rule to this security group allowing Remote Desktop connections through port 3389. - Click the name of the security group that Cloud Formation created. The name should be similar to what you called your Instance.
- In the lower panel, click the Inbound Rules tab and click the Edit button.
- If it's not already there, click Add Rule, and add a rule of type RDP.
- In the Source box, be sure it's set to 0.0.0.0/0 so that any computer can access it via Remote Desktop, and click Save Rules. It's best practice to only allow this type of access to only specific client IPs, like your local computer. But we're going to open it up to any IP for the purposes of this class.
- Follow the procedure you learned in the previous lesson to confirm that your Elastic IP is associated with your new EC2 Instance that was created by CloudFormation. If it's not, check the box next to your Elastic IP and click Actions > Associate address to associate it with the new Instance.
- In the AWS Management Console, click the Instances link on the left side. From the list of instances, right-click your instance name and click Get Windows Password.
- Browse to the key pair file (.pem) that you saved in Lesson 1 and decrypt the password, just like we did in the previous lesson.
- On your local computer, open Windows Remote Desktop Connection.
- In Remote Desktop Connection, click the Options button > Local Resources tab > More button and ensure that the box for Drives is checked, then click OK. This will permit you to copy data from your machine on to the remote machine (in this case, your Amazon EC2 instance).
- In Remote Desktop Connection, under the General tab, type or paste the elastic IP address of your instance into the Computer input box.
- In the User name input box, type Administrator, then click the Connect button.
- In the Password input box, carefully type or paste the password you decrypted, then proceed with logging in.
Notice that Amazon gives you a pretty strong password for this instance, but it's not one you're liable to remember easily. You should change the administrator password once you've logged in.
- On your instance (not your own computer), click Start (Windows button) > Administrative Tools > Computer Management and follow the same steps we did in the previous lesson to change the Administrator password. Go back and look at the steps if necessary. Do not skip this step, because you want to have a password you can remember and not the real complex one supplied by Amazon.
The password rules are fairly stringent; please see them in the image in Figure 2.1, below.
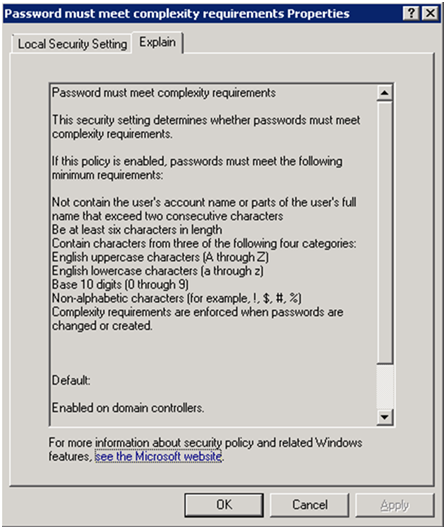 Figure 2.1: Password Security Setting
Install Google Chrome
The following paragraph talks about disabling IE enhanced security on your EC2 machine. An alternative to doing that is to simply install the Google Chrome browser on your EC2 machine and use it instead of Internet Explorer. You may use Internet Explore to browse to the Google site to download and install Chrome.
Disabling IE ESC
As a security precaution, it's usually not a good idea to go around browsing the web from your production server machine. To do so is to invite malware intrusions onto one of your most sensitive computers. The operating system on your instance, Windows Server 2012, enforces this by blocking Internet Explorer from accessing most sites. This is called IE Enhanced Security Configuration (ESC).
IE ESC gets burdensome when you're using the server solely for development or testing purposes like we are. To smooth out the workflows in this course, you'll disable IE ESC right now and leave it off for the duration of the course.
- Start Windows Server Manager by typing its name from the Windows Start Menu.
- Click Local Server.
- Scroll over to the right and find IE Enhanced Security Configuration. Click the On link to access the options for turning it off.
- Select Off for both users and administrators and click OK.
You're now ready to begin working with your EC2 instance.
Remember that if you are going away for more than an hour, you should stop your instance using in the AWS Management Console. (Only stop your machine Instance. Leave your storage volume(s) and Elastic IPs as they are. Deleting them may require that you completely rebuild your virtual machine.)