Lesson 2: ArcGIS Server up and running on Amazon EC2
Overview
In the previous lesson, you learned the basics about servers and clouds, and you got some experience setting up an EC2 instance. In this lesson, you’ll learn a little bit more about how a server can augment your GIS. You will also set up a new instance running Esri ArcGIS Server, which you will use in Lessons 2 through 4.
ArcGIS Server is just one part of Esri's ArcGIS Enterprise product suite that they market for sharing GIS across the web and internal organizational environments. We'll discuss ArcGIS Enterprise and Portal from time to time in later lessons; however, we are going to focus on ArcGIS Server here. Fortunately, the ArcGIS Server piece is relatively easy to get running in the cloud, and we'll concentrate on ArcGIS Server to understand how maps and GIS datasets you make on your desktop are exposed across the web.
Although you could potentially install ArcGIS Server on your own home or work computer, in this course, you will run ArcGIS Server on the Amazon Elastic Compute Cloud (EC2). Basically, you pay Amazon an hourly fee to run ArcGIS Server on their machines. This is an easy way to practice with a real server without compromising or adjusting your own machine. Running ArcGIS Server on Amazon EC2 also helps you learn about the cloud by using it.
Lesson Objectives
At the successful completion of this lesson, you should be able to:
- understand cloud computing architectures in an infrastructure as a service (IaaS) model;
- set up an ArcGIS EC2 instance;
- understand the methods of moving data to the cloud;
- create a simple map service on that instance accessible via the Internet.
Deliverables
- Complete L02: Assignment
- Participate L02: Discussion
Introduction to ArcGIS Server
ArcGIS Server is Esri software that allows you to expose your GIS as a set of web services. It is just one component in a larger software suite called ArcGIS Enterprise that enables organizations to deploy their GIS onto the web. In Lesson 5, we'll talk more about the different parts of ArcGIS Enterprise.
Web services are software code or components that run on a specialized machine called a server. Web services receive requests from other apps and machines, called clients. The request might be to send some information or process some data. GIS web services do things related to sending and processing geographic information. Here are some examples of types of web services offered by ArcGIS Server.
- A map service exposes your map as a web service. It originates with an ArcMap document (MXD) that you "publish" on the server. Clients can use the map service to request a map image at any scale or extent in a variety of image formats. Depending on how the service is configured, the server either draws the map on the fly, or sends back some pre-drawn map images (tiles) that are retrieved from a cache. Clients can also request the geometry (vertex locations) and attributes of any feature in the map.
- A geoprocessing service allows clients to request that the server perform some GIS action or analysis and send back the result. For example, the client might send the vertices of a parcel to the server and request that the server run a model to buffer the parcel and select all other parcels that fall within the buffer. A geoprocessing service works with tools and models that you have run in ArcMap.
- A geometry service calculates lengths, areas, and spatial relationships.
- A number of other service types allow for synchronizing geodatabases over the Internet, analyzing raster images, and so on. Additionally, ArcGIS Server services can expose further, optional subsets of actions through a concept called “capabilities.”
ArcGIS Server components
ArcGIS Server works through the concept of distributed computing, in which you can increase the power of your server by adding more physical machines. For this reason, ArcGIS Server is made up of several different components that you can either install all on one machine or spread out among many machines. We won’t examine these components in much detail in this course, because you will have ArcGIS Server installed for you, and you will only be using one machine. However, below is a brief introduction of the most common components.
- GIS server – The GIS server is the component where ArcGIS Server does its work. You can install the GIS server on one or many machines (although you are required to have paid the applicable Esri licensing fees for each machine). If you want to add more computing power to your ArcGIS Server system, the easiest way is by installing the GIS server on more machines and connecting them to your system.
The default setting is for all GIS servers in your site to make available the same set of web services, meaning you could make a request to any GIS server for any service. The GIS servers communicate with each other and distribute the load evenly. For advanced workflows, you can optionally organize the GIS servers in "clusters" that run dedicated subsets of services. For example, you might have three normal sized machines in Cluster A that run all your map web services, and one big machine in Cluster B that runs your geoprocessing web services. - Web server and Web Adaptor – The GIS server component mentioned above has some rudimentary ability to serve out web services, but in most deployments of ArcGIS Server, you'll want to connect it to your organization's existing web server. The web server receives the web service requests when they first come in from client applications. It then forwards the requests to the GIS server. Esri makes available a supplemental installation called the Web Adaptor, whose purpose is to connect ArcGIS Server with your web server.
Including a web server in your architecture allows you to monitor and control the URL or web address that people use for your server. Some organizations also perform authentication (challenging the user for a name and password) at the web server level of the architecture. Web servers can further be configured to block traffic from specific addresses, providing a layer of protection for your site.
A web server is also useful for hosting web applications. Once you design a nifty app to show off your web services, you need a machine to host it on. This machine should be a secured server that can handle the amount of traffic coming into your app. In this course, you'll use the same EC2 instance for your web server and GIS server, which is a common practice in small deployments. The web server software you'll use is Microsoft Internet Information Services (IIS). It comes pre-installed on your instance. - Database – Most servers sit between a client who wants some specific piece of information and massive collections of raw data sitting in a database. Web services provide structured access points to the data. The location of your GIS database is important to consider when building a cloud architecture for ArcGIS Server.
In ArcGIS Server deployments, the data can either reside in a collection of files (such as Esri shapefiles or file geodatabases), in a larger relational database management system (RDBMS) such as Oracle or Microsoft SQL Server, or in the built-in DataStore. Certain "middleware" components of the ArcGIS Server software facilitate communication between ArcGIS and the RDBMS (in former days these components were called ArcSDE).
The database can either reside directly on the ArcGIS Server machine or it can reside on its own dedicated machine. Putting the data and ArcGIS Server on the same machine can save money, but the database and the server compete for resources and this architecture ultimately has problems with scaling.
No matter where you put the data, you need to register your data locations with ArcGIS Server [1]. This provides the server with a list of known data sources. If you attempt to publish a web service to ArcGIS Server and the data sources are not registered with the server, the data is copied to the server [2] at the time that you publish. This may be a convenient way to copy small datasets to the cloud, but it is not a scalable way to transfer and organize large amounts of data.
Because migrating a large database "across the wire" to the cloud is cumbersome, many individuals wonder if they can deploy a server in the cloud and leave their database "on premises". Such an architecture results in multiple "hops" between geographically dispersed servers just to satisfy one request and is not nearly as efficient as situating the database in the cloud.
ArcGIS Server accounts and security
When you run a program on the Windows operating system, it runs as a specific user account and can only do things that the account can do. This is why you sometimes see Windows popping up messages that the program needs Administrator permissions to continue. That type of message means that the account running the program is not an administrator, so you need to manually confirm that it should temporarily be allowed to do something that only an administrator would ordinarily be allowed to do.
ArcGIS Server uses an account to run the GIS server, called the ArcGIS Server account [3]. This account is specified during the ArcGIS Server installation. You won't do much with the ArcGIS Server account in this course because it comes preconfigured when you run ArcGIS Server on Amazon EC2.
If you run ArcGIS Server in your own organization, you need to remember to give the ArcGIS Server account permission to read any GIS data used by the server. The account also needs permission to write to any datasets you will edit.
How you will work with ArcGIS Server in this class
In this class, you’ll work with your own ArcGIS Server that runs on Amazon EC2. It has a GIS server and the ArcGIS Server account already configured. After logging in to your server, you’ll publish some map services and use them in a web app that you create. You’ll also learn techniques for speeding up your map services, using a tile cache, and how to use a map service for web editing.
This lesson gets you to the point of setting up a server, publishing a service, and making a simple web map on ArcGIS Online.
Introduction to ArcGIS Cloud Formation Templates
In the previous lesson, you used the AWS Management Console to set up an EC2 instance. When you build an ArcGIS Server site on Amazon EC2, you typically use a different approach, in our case, a resource called Cloud Formation [4]. This consists of a text file that pre-defines all of the parameters of the site you intend to build on the AWS platform, which can be deployed to install everything in an unmanaged manner. Cloud Formation templates exist, which can be customized to deploy the precise system you need. ESRI has developed Cloud Formation Templates that are already set up to do the heavy lifting of installing ArcGIS Enterprise in AWS, leaving us to provide only a few parameters.
It's possible to build simple one-machine ArcGIS Server sites manually with the AWS Management Console. You can even put several of these "siloed" sites under a load balancer to get more computing power. However, to get the full benefit of the ArcGIS Server architecture, in which multiple GIS servers process and balance loads in a peer-to-peer fashion, Cloud Formation Templates are the way to go.
Getting access to the ArcGIS Enterprise AMIs
Cloud Formation uses some Esri-created Amazon Machine Images (AMIs) behind the scenes to create your ArcGIS site. These AMIs have ArcGIS Server, ArcGIS Pro and in some cases, a database installed on them.
The AMIs require that you "bring your own license" and apply it to any Esri software that you run on the EC2 instances. In other words, Esri pricing is not built into the hourly fees for the instance, like it is with Windows. The Esri AMIs are accessible by anyone in the AWS Marketplace, but you must log in with your Amazon account and accept the terms and conditions for using them.
- Go to the AWS Marketplace page for the Esri ArcGIS Enterprise 10.9.1 AMI [5].
- Click the Continue to Subscribe button and log in with your Amazon account.
- Click to Accept Software Terms.
This doesn't actually launch anything right now, it simply establishes that you agree to the terms of using the particular AMI, but if you don't perform this step and accept the terms, Cloud Formation will fail when you try to create a site. In fact, if you ever experience Cloud Formation failures in the future, you should check to make sure you have accepted the software terms for the exact AMIs that you are trying to use. There's nothing else you need to do on the AMI Marketplace page.
Security Requirements for ArcGIS Enterprise
Recent versions of ArcGIS Enterprise and Server now require that all communications be performed over a secure channel. This means that anyone making a request for a map service or web app from your ArcGIS Enterprise/Server machine must do so using the https protocol rather than traditional http. You may have noticed that many websites you visit now appear with an https URL. Https uses something called, Secure Socket Layer (SSL) to encrypt all traffic that is sent between clients and the web server. In this way, any text that's sent, including passwords, usernames, and other content, is protected from hackers who might try to intercept or monitor it. Implementing SSL on a web server is good practice, which is why many websites and web services are utilizing it.
Enabling SSL on a web server isn't a trivial process, however, and it requires that an SSL Certificate be obtained and installed. SSL Certificates are issued by authoritative providers that verify the identity of your web server and provide an assurance that the communication channel clients establish with the server are properly encrypted. It makes sense that only authorized providers issue SSL Certificates, otherwise anyone could generate them and deploy them improperly. Further complicating this process is that SSL Certificates are attached to the fully-qualified domain name rather than the IP address of a web server.
Every web server has an IP number, which has the form xxx.xxx.xxx.xxx, that uniquely identifies it on the Internet, but clients typically don't use that number to communicate with it. Instead, clients (like you in your web browser) use a fully-qualified domain name to call a server. A fully-qualified domain name is a URL you would enter to visit a website, for example, www.pasda.psu.edu [6] or www.arcgis.com [7]. Domain names are linked to IP addresses using a registry called DNS (Domain Name System). Anyone wanting to attach a domain name to their server's IP must make a request to a DNS server. This request is performed by authorized Internet service providers.
So, to enable SSL on our ArcGIS Enterprise/Server machines, we need to do two things: (1) assign a unique, fully-qualified domain name to our Elastic IP in DNS, and (2) generate and install an SSL Certificate that refers to our domain name. To facilitate the setup of our ArcGIS machines in AWS, I have performed these steps for you. I assigned you a domain name in the form, namegeog865####.e-education.psu.edu, and registered it in DNS by linking it to the Elastic IP you created in Lesson 1. I also generated SSL Certificates for you using the same domain name I assigned you. That being completed, the process of installing and configuring these on your ArcGIS machines is trivial using the Cloud Formation Template; all you need to do is reference your domain name and SSL Certificate in the template and Cloud Formation does the rest.
Building an ArcGIS Server site with Cloud Formation
In this part of the lesson, you'll use Cloud Formation to create an ArcGIS Enterprise site on Amazon EC2.
Clean Up Lesson 1 Resources
Before we proceed to create a new EC2 machine instance for Enterprise, I recommend that we terminate the instance and storage you created in Lesson 1. We won't use that machine or its storage subsequently, so we may as well remove it and not incur any more potential costs.
- In your AWS Console, browse to your Elastic IP and disassociate it from the Lesson 1 machine instance. (Do not delete your Elastic IP. You will reuse it throughout the course.)
- In your AWS Console, browse to your EC2 Instances and Terminate the one from Lesson 1.
- In your AWS Console, browse to your Elastic Block Storage Volumes, and delete the Volume that was created for your Lesson 1 machine instance. (Important Reminder: Don't delete a volume for a machine instance that you still plan to use. Regardless of whether the Instance is Running or Stopped, the storage Volume needs to exist. To delete a storage volume is akin to removing a physical hard drive from your desktop computer; it doesn't matter if your computer is on or off, if you throw out the drive the machine is useless.)
Create an S3 Bucket for Config Files
To simplify the Cloud Formation installation, we will upload a few config files to an S3 Bucket, from which the template can access them. You will refer to them later as you customize the template parameters.
- Log into AWS and click the Services menu.
- Select S3 under the Storage section.
- Click the Create Bucket button and proceed to create a bucket with the name, deploymentbucketNAME, replacing “NAME” with your own last name. For example, mine would be deploymentbucketbaxter. This bucket name can be anything, but must be unique.
- All other settings may be left at their default values.
- Upload the following three files from the Student Downloads page in the Course Resources module in Canvas to your S3 bucket:
- The ArcGIS Server license file (.prvc)
- The ArcGIS Portal license file (.json)
- The SSL Certificate file (.pfx)
- The CloudFormation template file (.json)
Launch Cloud Formation Template
- Log into your AWS Management Console.
- Browse to the CloudFormation section under Services menu (you may need to expand All Services).
- Click the Create Stack button and choose the New Resources option.
- Leave the Template is Ready option selected, and leave the Amazon S3 URL option selected.
- Return to your S3 Bucket and click on the CloudFormation template .json file you uploaded.
- On its overview page you should see an Object URL.
- Copy that URL and paste it into the Amazon S3 URL box back in the CloudFormation template.
- Click the Next button.
- Refer to the document, Geog865CloudFormationParameters, in the Course Resources module in Canvas for details on what to enter on the Specify Stack Details page of the stack creation. In this section, you will provide a name for your Instance, the Elastic IP you'll associate with it, what type of AWS machine you'd like it to run on, all the license files for Enterprise/Server/Portal, passwords for the Windows and ArcGIS user accounts that will be created, your fully-qualified domain name, and the SSL Certificate that will secure your site. You may leave all other settings at their defaults. When you've entered all the information, click Next.
- On the Configure Stack Options page, be sure that the Stack Failure Options section is set to "Preserve successfully provisioned resources." By setting this parameter, if the cloud formation process encounters an error when setting up the ArcGIS components your EC2 Instance will persist. This way you can use Remote Desktop to log into your machine and investigate what the problem was. Without changing this setting, the entire EC2 Instance would be deleted making it difficult to troubleshoot.
- On the next page, check the box acknowledging the IAM resources note, and click Create Stack.
- The process will take some time to complete, likely an hour or more, and it may not be obvious that anything is happening. You will see an indication of what is going on in the Status column, and if you check the box next to the Stack Name, you will see more details under the Events tab.
- DO NOT PROCEED until the Status column for your stack on the Cloud Formation page shows "CREATE_COMPLETE" in green text.
- See the Debugging Resources section below if you encounter errors.
- When the Stack indicates that it is complete, return to your AWS Console and browse to your EC2 Instances.
- Check to see that your new machine is successfully running, evidenced by a green “running” indicator and that it is no longer “initializing.” (Even if you see your new instance here, don’t proceed until the Cloud Formation stack is also complete.)
Your new machine instance is now set up and ready for you to log into and start working with ArcGIS Server.
Debugging Resources:
If you receive an error in the CloudFormation Event page, you may see information about which step in the process caused the issue; the error may appear in red text on the stack page. The Event logs in CloudFormation sometimes aren't too helpful however. This is because, often, the error occurs after CloudFormation has successfully created your EC2 Instance and while the ArcGIS software is being configured on the machine instance itself. Errors in the CloudFormation template don't report specifics about any errors encountered on the EC2 Instance, rather, the errors are logged in files saved on your EC2 instance. To view those logs, check to see If your EC2 Instance was created and still appears in your AWS Management Console. (If it is not there, repeat the CloudFormation process, being sure that the "preserve successfully provisioned resources" is set to True.) If it is there, proceed to create your Windows username and password and use Remote Desktop to log into it. On your EC2 virtual machine, open a File Explorer and use the View - Options - Change Folder and Search Options settings to be sure you can see protected operating system files, see file extensions, see hiddn folders, etc. The log folder that ArcGIS generates is hidden by default.
Browse to C:\cinc and open arcgis-enterprise-primary.log in a text editor. You'll see entries with their respective timestamps as they occured during the install. Scroll through the entries in chronological order until you encounter one with a Warning or Error indicator. That should indicate what the issue was. It is very common for us to enter the name of a license file, domain name, or anything else incorrectly in the CloudFormation template. The log file in C:\cinc usually provides information we can use to deduce where the error/typo occurred. If you are unable to interpret the error logs and find the culprit, feel free to send the log file to me and we will get to the bottom of it.
A tour of the ArcGIS Server site
Now that you have an ArcGIS Server site running, let's take a quick tour to give you a feel for what's there.
- Be sure you've given your machine Instance enough time to get booted up and get your site started.
- From your web browser, visit your Manager URL, which will look like, https://namegeog865####.e-education.psu.edu/server/manager/. (Substitute your own name and semester, of course.)
Note: Sometimes it takes a few minutes after you've started your site for Manager to become available. If you get a blank screen or an error, wait a few minutes and try again.
The nice thing about Manager is that you can run it from any computer that has an Internet connection. Later on, you'll learn how to make a remote desktop connection into your EC2 instance, but some administrative functions are exposed in Manager and don't require the hassle of remote desktop. - Log in to Manager using the site administrator credentials you designated in the Cloud Formation Template.
- Click the Services tab and Manage Services subtab, then examine the pre-generated services that ArcGIS configures for you.
There is a SampleWorldCities map service that you can preview by hovering over the thumbnail icon and clicking View. - Back in the list of services, you should see a Sharing Properties icon to the right of the SampleWorldCities service. Click the icon and check the box next to Everyone. This defines the service as public and available to everyone browsing your server, regardless of whether they are logged in. By default, services are set to only be visible to their author when signed in.
- From the left-hand list of service folders, click System. These services (Caching Controllers, Publishing Tools, etc.) are used internally by ArcGIS Server when publishing services, building tiled map services (which you'll learn about in Lesson 6), and so forth. You don't have to do anything directly with these services, and you should leave the ones running that are running and leave the ones stopped that are stopped.
- From the list of folders on the left, click Utilities. You can optionally start the PrintingTools service to include printing functionality in web applications that you build. This service takes all the layers in a web map and makes a single printable image, which is not always an easy task to program on your own when the layers are coming from different web services.
Another pre-generated service called Geometry helps with simple measurement and editing operations if you are programming web applications. The GeocodingTools service is used for finding addresses and is associated with Portal for ArcGIS, another part of ArcGIS Enterprise that we'll learn about in a future lesson. Finally, the Search service allows for creating a searchable index of your organization's geographic data. - Click the Site tab and the Server Configuration subtab.
Here you can view technical information about how your site is configured.
Notice the Directories and Configuration Store locations. These are key folders required by the ArcGIS Server site which you may have to prepare and configure if you ever set up ArcGIS Server on premises. Cloud Formation creates shared folders for these and grants the ArcGIS Server account permissions to them (Cloud Formation also created the ArcGIS Server account for you).
The Data Store menu item is also important. Here you need to add a list of folders and databases that you'll be using with your web services. - Click the Security tab.
If you have services that need to be restricted to certain subgroups of users, you can configure your list of users in this section of Manager. Some organizations import their existing list of Windows users to ArcGIS Server, although using Manager you can alternatively set up a list of users from scratch. Once you have a list of users, you place them in roles and then lock down your services to allow only certain roles. You can also grant roles privileges to administer ArcGIS Server or publish services.
The above procedures are beyond the scope of this course but can be explored in your final project if you would like. In the course exercises, you'll have just one user who can log into Manager, which is the primary site administrator that you designated in Cloud Formation. Anyone who has the URL to your site will be able to view your web services because by default there are no rules restricting access to your web services. - Click the Logs tab.
This is where ArcGIS Server writes messages about what it is doing. The logs can be an invaluable troubleshooting tool, and you should return to this screen whenever you run into a problem you can't diagnose. The server can write very detailed messages down to the coordinates and draw time of every single map and layer it creates for every user. However, for performance and for ease of traversing the log messages, the logs are configured to only write Errors and Warnings by default.
You should now have a good feel for what's running on your ArcGIS Server site and the settings available there. The next item of business is to log into the EC2 instance itself and move some data there. This will allow you to publish your own web services on the ArcGIS Server site.
Logging in to your instance
Now that your site has been created and started, you can get ready to log in to the instance and start working with your software. Some of these steps will be similar to what you did in Lesson 1, but please follow them closely.
- Log in to the AWS Management Console, navigate to the EC2 region where you built your site in Cloud Formation (probably N. Virginia), and click Security Groups.
When Cloud Formation created your EC2 instance, it also created a security group for that instance. You might remember from Lesson 1 that you need to add a rule to this security group allowing Remote Desktop connections through port 3389. - Click the name of the security group that Cloud Formation created. The name should be similar to what you called your Instance.
- In the lower panel, click the Inbound Rules tab and click the Edit button.
- If it's not already there, click Add Rule, and add a rule of type RDP.
- In the Source box, be sure it's set to 0.0.0.0/0 so that any computer can access it via Remote Desktop, and click Save Rules. It's best practice to only allow this type of access to only specific client IPs, like your local computer. But we're going to open it up to any IP for the purposes of this class.
- Follow the procedure you learned in the previous lesson to confirm that your Elastic IP is associated with your new EC2 Instance that was created by CloudFormation. If it's not, check the box next to your Elastic IP and click Actions > Associate address to associate it with the new Instance.
- In the AWS Management Console, click the Instances link on the left side. From the list of instances, right-click your instance name and click Get Windows Password.
- Browse to the key pair file (.pem) that you saved in Lesson 1 and decrypt the password, just like we did in the previous lesson.
- On your local computer, open Windows Remote Desktop Connection.
- In Remote Desktop Connection, click the Options button > Local Resources tab > More button and ensure that the box for Drives is checked, then click OK. This will permit you to copy data from your machine on to the remote machine (in this case, your Amazon EC2 instance).
- In Remote Desktop Connection, under the General tab, type or paste the elastic IP address of your instance into the Computer input box.
- In the User name input box, type Administrator, then click the Connect button.
- In the Password input box, carefully type or paste the password you decrypted, then proceed with logging in.
Notice that Amazon gives you a pretty strong password for this instance, but it's not one you're liable to remember easily. You should change the administrator password once you've logged in.
- On your instance (not your own computer), click Start (Windows button) > Administrative Tools > Computer Management and follow the same steps we did in the previous lesson to change the Administrator password. Go back and look at the steps if necessary. Do not skip this step, because you want to have a password you can remember and not the real complex one supplied by Amazon.
The password rules are fairly stringent; please see them in the image in Figure 2.1, below.
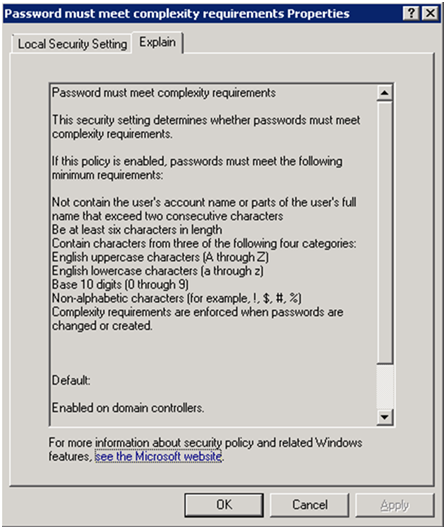 Figure 2.1: Password Security Setting
Install Google Chrome
The following paragraph talks about disabling IE enhanced security on your EC2 machine. An alternative to doing that is to simply install the Google Chrome browser on your EC2 machine and use it instead of Internet Explorer. You may use Internet Explore to browse to the Google site to download and install Chrome.
Disabling IE ESC
As a security precaution, it's usually not a good idea to go around browsing the web from your production server machine. To do so is to invite malware intrusions onto one of your most sensitive computers. The operating system on your instance, Windows Server 2012, enforces this by blocking Internet Explorer from accessing most sites. This is called IE Enhanced Security Configuration (ESC).
IE ESC gets burdensome when you're using the server solely for development or testing purposes like we are. To smooth out the workflows in this course, you'll disable IE ESC right now and leave it off for the duration of the course.
- Start Windows Server Manager by typing its name from the Windows Start Menu.
- Click Local Server.
- Scroll over to the right and find IE Enhanced Security Configuration. Click the On link to access the options for turning it off.
- Select Off for both users and administrators and click OK.
You're now ready to begin working with your EC2 instance.
Remember that if you are going away for more than an hour, you should stop your instance using in the AWS Management Console. (Only stop your machine Instance. Leave your storage volume(s) and Elastic IPs as they are. Deleting them may require that you completely rebuild your virtual machine.)
Exploring the instance
ArcGIS Server on Amazon EC2 comes preconfigured with some running services and data. These can help you understand how the server works and they're also a good way to verify that your server is running correctly. Let's take a few minutes to look at these items.
- On the desktop of your EC2 instance, open a web browser (Internet Explorer) and enter the url for your Services Directory. The url has the form, https://namegeog865####.e-education.psu.edu/server/rest/services (substituting your own name). Each ArcGIS Server has this simple page called a Services Directory that helps you explore what services are available on the server. Application developers (i.e., programmers) can also use the Services Directory to get certain information that is useful when writing code to use ArcGIS Server.
- In the Services Directory click SampleWorldCities, then in the View In row of links at the top, click ArcGIS JavaScript. This opens a web browser to a preview of the sample service on the instance. We already caught a glimpse of this service in Manager earlier.
- In your browser's address bar, examine the URL of the SampleWorldCities service. It should look like this: https://namegeog865####.e-education.psu.edu/server/rest/services/SampleWorldCities/MapServer?f=jsapi
- Copy the URL that you see in the web browser address bar and paste it in a web browser on your own computer (not your EC2 instance). You should see the same thing as you did from your EC2 instance (be sure you've already set the SampleWorldCities Sharing Properties to allow Everyone to view it, like we did in a few pages earlier). Your computer made a request to ArcGIS Server running on the EC2 instance, somewhere off in Amazon data center land. The instance then sent the image back to your home computer. You have successfully created a public GIS server!
All services are driven by GIS data. With ArcGIS Server, these are the geodatabases, shapefiles, map documents, and so on, that you are accustomed to working with in ArcMap and ArcCatalog. The sample services here are no different. Let's examine some of the data that drives these services. The data is preconfigured on your instance. - Maximize your remote desktop session again and open Windows Explorer on your instance (click the folder icon in the taskbar).
Notice that you have a C: drive of 100 GB. Cloud Formation sets up this drive when you create your instance. The C: drive is on the instance itself, meaning that your instance has a 100 GB hard drive.
You might remember that you specified the size of this particular drive when you were in the Cloud Formation template. The course instructions told you to leave the default at 100 GB, which is the minimum required by ArcGIS Enterprise.
EBS volumes have some great advantages. You can create and destroy them at any time, just like instances (but only if you're done with them and the machine they're running on). But you can also take "snapshots" of your volumes and store them on EC2. This allows you to create multiple "clones" of the hard drive that you might attach to different instances. The snapshots also give you a backup of your data in case your original EBS volume fails (yes, hardware does occasionally fail even in an Amazon data center).
Looking in Windows Explorer, you should also see that your own local hard drives are available. These are listed in a fashion like "C on MYMACHINE". This makes it easy to copy and paste data from your local machine onto your instance. - Minimize your remote desktop session. On your local computer, log in to the AWS Management Console and from the left-hand menu, click Volumes.
You should see the 100 GB volume associated with your instance. You are actually charged a storage fee for having these volumes, and you cannot stop the clock on this fee even if you stop your instance. However, the fee for these volumes is relatively small compared to the fee you incur for running your instance.
Installing ArcGIS Pro
- To facilitate some administrative tasks, we will install ArcGIS Pro software on our EC2 instances. You may also install Pro on your personal computer, but to be sure it works for class purposes, and because it doesn't run on Macs, we'll run it on our EC2 instances for now. Many of the tasks we can perform using the web-based Server Manager site can also be performed with ArcGIS Desktop or ArcGIS Pro, and as each environment evolves it may become more efficient or comfortable to use one versus the others.
- Using Remote Desktop, log in to your EC2 machine instance.
- Follow the steps on the Student Downloads page in the Course Resources module in Canvas to acquire and install ArcGIS Pro.
Now that you've seen what's preconfigured on your server, you'll learn a little more about how you can copy your own data onto the instance and start your own mapping web service.
Moving data to the cloud
One of the most challenging aspects of moving to a cloud deployment is transferring data from your local (on-premises) environment onto the cloud. In this section of the lesson, we'll look at special problems that arise in data transfer scenarios. We'll also discuss ways data can be moved to Amazon EC2, and you'll copy some GIS data to your own instance in preparation for publishing a web service.
Challenges of data transfer
For your data to go from your machine to commercial cloud services such as Amazon EC2 or Amazon S3, it must go "across the wire", meaning it is transferred through the Internet onto the cloud-based server. This can pose the following issues:
- Your datasets may be so large that they are not feasible to transfer across the Internet in a reasonable amount of time.
- A slow Internet connection or low bandwidth makes it impossible to transfer your data in a reasonable amount of time.
- Your data may be sensitive enough that transferring it across the Internet would require extra security measures or is not an option altogether.
Let's examine these problems one at a time.
Large datasets
GIS data collections can be very large: up to terabytes in size. This is often the case when imagery is involved, but even vector datasets with a broad amount of coverage or detail can prove unwieldy for an Internet transfer.
When moving large datasets to the cloud, you have to plan for enough time to move the dataset and, if possible, increase your bandwidth. After doing a test transfer of a few hours or days, you should be able to get an idea of the rate of data transfer, and you can thereby extrapolate how long it would take to transfer the entire dataset.
If this amount of time is unreasonable (say, months) you may consider shipping the data directly to the cloud provider on a piece of hard media. The cloud provider can then load the data directly onto the cloud much faster than you could send it over the Internet. Amazon provides such a service called AWS Snowball [8]. You load up your data on a ruggedized secure device called a "Snowball" and ship it to Amazon. In the old days of computing this technique was called "sneakernet", since you could sometimes put your data on a floppy disk and walk it across the office to another computer faster than you could send it electronically.
Internet connection limitations
Cloud-based data centers like Amazon's are built to handle high levels of data traffic coming in and out. However, your connection going out to the cloud may be limited by a slow connection or lack of available bandwidth. Some IT departments and internet service providers (ISPs) throttle or cap the amount of data that can be transferred from any one machine or node in the network. These types of policies are sometimes put in place to prevent the use of streaming sites such as BitTorrent that violate company policy or simply monopolize the organization's available bandwidth. However, sometimes these policies can negatively affect legitimate business needs such as transferring data to the cloud. If you find yourself in a situation with low bandwidth, it might be helpful to visit with your IT department to understand if your machines are being throttled and could be granted an exception. If an exception is not possible due to other bandwidth needs within the company you might explore whether your data transfer could occur during off-hours such as nights or weekends.
Sensitive data
Confidential or proprietary datasets, such as health records, may require extra security measures for transfer to the cloud. When dealing with sensitive data, the first question to answer is whether it is legal or feasible for the data to be hosted in the cloud in the first place. For example, some government organizations responsible for national security may possess classified or secret data that could never be uploaded to Amazon's data centers no matter the measures taken to ensure secure data transfer. Also, some organizations may not have the desire or permission to host datasets on servers that are physically located in a different country.
Other types of datasets may be okay to host on the cloud but must be encrypted during transfer, to prevent a malicious party from using any data that may be stolen en route to the cloud server. Secure socket layer (SSL) connections (HTTPS) and secure FTP are two techniques for encrypting data for Internet transfer.
Techniques for data transfer
Sometimes the ability for one computer to directly "see" or communicate with another computer is hindered by firewalls or network architectures. For example, your computer at work is probably allowed to only access the file systems of other computers on your internal network. You could potentially open up a folder on your Amazon EC2 instance for access by anyone but this opens a security risk that malicious parties could find the folder and copy items into it.
There are a number of strategies that people use to get around these limitations when transferring data into Amazon EC2 and other cloud environments, these include:
- Copy and paste through Windows Remote Desktop. This is the technique we'll use in this course because it's convenient. However, it may not be appropriate for highly sensitive data.
- Use of a "digital locker" type of site like Dropbox.com, where you are allowed to upload a certain amount of data onto the site (for example, 2 GB). You can then log into your instance and download the data onto whatever drive you choose. You could even use your allotted Penn State PASS storage for this technique. Upload the data to your PASS space using your local computer, then log in to your instance and download the data from your PASS space.
- A secure FTP (file transfer protocol) connection configured by your IT department. FTP is an Internet protocol designed for transfer of files, but if the data is sensitive, you should encrypt it before you send it this way.
The ArcGIS Server on Amazon EC2 help has an overview of data transfer techniques. Please take some time right now to read Strategies for data transfer to Amazon Web Services [9].
Copying the Appalachian Trail data to your EC2 instance
In this part of the lesson, you'll copy some data to your EC2 instance in preparation for publishing a web service. Before you attempt these steps, you should be logged in to your EC2 instance through Windows Remote Desktop Connection. If you followed the steps earlier in the lesson for connecting via Remote Desktop then your local disk drives should be available to the instance.
- Download and unzip the Appalachian Trail data [10] to a location on your local computer (not your EC2 instance).
This is National Park Service data obtained from the Pennsylvania Spatial Data Access (PASDA) website. In this exercise, we'll pretend this is a dataset that you've been using for years at work that you now want to transfer to the cloud. - Open Remote Desktop Connection to your EC2 instance and then open Windows Explorer.
You should see something like the following, where you have a set of drives listed for your instance and a set of drives listed for your local computer. The drives on the local computer will be followed by the computer name. For example, in image 2.2, below, the local computer is named EED-RSLT053, and the C drive is available from it. There is also one drive available on the EC2 instance, which is also C.
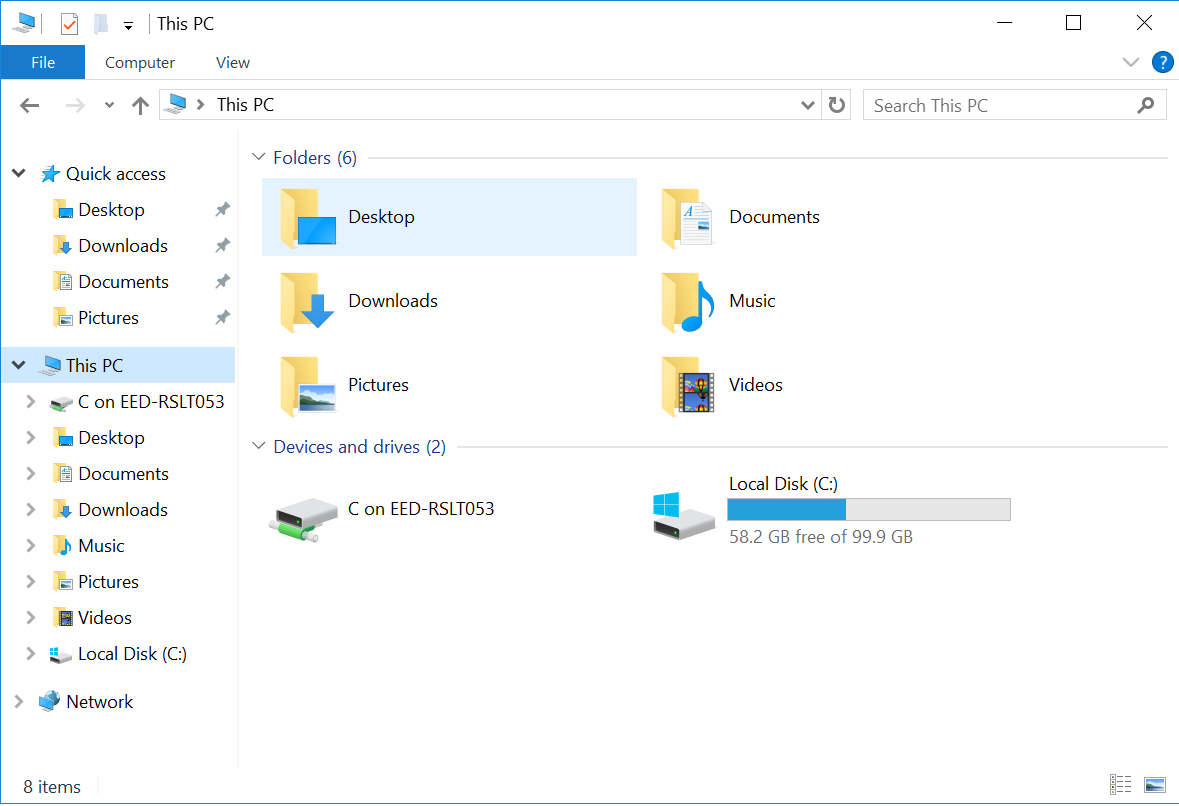 Figure 2.2: Available drives
 - Browse to the folder on your local computer where you downloaded the Appalachian Trail data, right-click the folder, and click Copy.
- Browse to the C: drive on your instance, and create a new folder called, data.
- Navigate into the C:\data folder, right-click, and click Paste. This should put your data at C:\data\AppalachianTrail.
- Open and explore the AppalachianTrail folder. It contains a map document displaying the Appalachian Trail and shelters along the trail. The trail and shelter datasets are feature classes in an Esri file geodatabase. You will publish this map as a web service in the next part of the lesson.
Registering your data with ArcGIS Server
For simplicity in this course, you'll follow the workflow of transferring all data to your EC2 instance, working with ArcGIS Desktop on your EC2 instance, and publishing to ArcGIS Server on your EC2 instance. Theoretically, you could do most of the desktop work on your own computer and then publish up to the server when you were ready. However, any time you introduce separate computers into the architecture, especially on different networks (in the case of your home computer and your EC2 instance), things can get more complicated. Because you have a limited time available to learn about ArcGIS Server, I want you to spend the time experimenting with the capabilities of the server, not worrying about network issues or which machine contains the data.
However, in large organizations, these challenges of distributed architectures are inevitable. Some GIS shops might have a GIS server administrator who controls access to ArcGIS Server, and a number of cartographers and desktop GIS users who just prepare the maps for publishing. This latter group of "publishers" work on machines that are separate from the server and may even reside on a different subnet than the server. In some cases, the publisher machines and the server machines use different copies of the data that are kept in sync by an automated process, and the paths to the data used by the publishers may be different than the paths used by the publishers.
To help manage these scenarios, ArcGIS has the ability to "register" a data location, meaning that you provide ArcGIS Server with a list of data locations you typically use. If the publishers use a different path to the data than the server uses, you can provide both the paths. Then, when you publish a service, the map is copied to the server and all the paths in the map are switched to use the server's path instead of the publisher's path.
This can be a difficult concept to conceptualize with just a verbal explanation, so please take a few minutes to read the help topic registering data on ArcGIS Server [11]. This has some diagrams of different situations where data registration can be particularly useful. It is one of the most important help topics for ArcGIS Server.
Please note that if you try to publish a service and ArcGIS Server does not find any of the data paths in your map in its list of registered folders and databases, the data will be packaged up and copied to the server [2]at the time you publish. The copying ensures that no data paths will be broken in the published service. This automatic data copying is an interesting feature in some scenarios where the publishers do not have the rights to log in to the server machine, but it is not an appropriate workflow for managing large amounts of data. The best approach is to make sure you set up workable data locations on the publisher's machine and the server machines, and then carefully register those locations with ArcGIS Server. In some cases, like ours, the publisher's machine and the server machine will be viewing the same path to the data.
Follow the steps below to register your C:\data folder with ArcGIS Server:
- On your EC2 instance, open a web browser and connect to your ArcGIS Server Manager, as you did earlier.
- Click the Site tab, and open the GIS Server section.
- Click on the Data Store link along the left to see a list of the registered data locations.
- You'll see a button to the right where you can Register. Change the dropdown list to Folder, since we will be registering a folder on your server.
- In the Register Folder dialog, enter a name for your folder such as, "C Drive Data."
- Enter C:\data in the Publisher Folder Path box.
- Type your machine's name in the Publisher Folder Hostname box; it will look something like EC2AMAZ-NMPERYP. You can find your machine's name by opening the Server Manager from the Windows Start Menu and looking for the Computer Name under Local Server.
- Check the box to set the Server Folder Path to be the same as your Publisher Folder Path.
- You should now see your C Drive appear in the list of registered locations, and you can confirm that it's valid by clicking the Validate button and seeing a green check mark.
Now you're ready to publish a map web service using your Appalachian Trail dataset that you placed in C:\data. You'll do this in the next section of the lesson.
Publishing a service
In the previous part of this lesson, you copied a map document to your EC2 instance. However that map is still only available inside ArcMap on your instance. Now you'll take the step of publishing the map as a web service so that it can be used by anyone.
Whenever you publish a service, you begin the process in ArcMap, having opened the map document that you would like to publish. You run an analysis process on the map to find anything that might prevent it from being drawn by ArcGIS Server's drawing engine. You then set service properties and publish the service.
Opening and analyzing the map
- Log in to your instance using Windows Remote Desktop Connection.
- Start ArcGIS Pro and create a new Project.
- We're going to import an existing map that was saved as an .mxd file earlier. Click the Insert tab and click the Import Map icon.
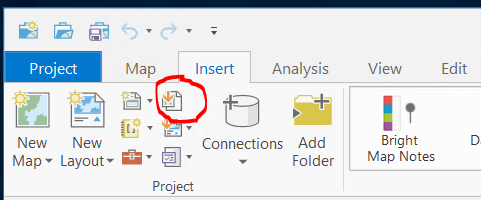
- You should see the Appalachian Trial layers appear in the Contents pane in Pro. These layers reference the data you uploaded to the C:\data folder.
- Scale ranges have been set on the layers to symbolize them differently as the user zooms in and out. Group layers are used to organize the layers for each scale range.
- The layers have been given intuitive names. This ArcMap table of contents won't be available to the user of the web service. However, apps that use the service will sometimes construct a legend or table of contents given information that the app can read for the service. Since the app is going to read the layer names, it's important to name them intuitively. For example, "Trail" is a more user-friendly layer name than the default "Centerline". Also, the default data frame name of "Layers" has been changed to "Appalachian Trail Shelters".
- The bright colors and shadowed labels of this map have been chosen with the anticipation that the map will overlay satellite and aerial imagery. The imagery itself has not been included in the map because it will be obtained through a different web service. When designing web services, it's a good practice to separate base map layers such as imagery into their own services. The trail data we are working with consists of business layers, or operational layers. These types of layers are usually the main datasets of interest in the web map, and they are often separated into their own services and symbolized with the anticipation that they will overlay the base map service.
- Save your ArcGIS Pro project using the Project tab.
- We are now going to make a connection to the ArcGIS Server instance running on your EC2 machine. Open the Insert tab, click Connections, expand Server, and choose the New ArcGIS Server option.
- Enter the URL to your Server instance. It will look something like, https://baxtergeog865su23.e-education.psu.edu/server [12]. (You may need to click the Enter key on your keyboard to get the window to recognize that you've entered something. This step is sometimes a bit quirky.)
- In the Sign In window that appears, enter the login for your EC2 ArcGIS installation. This is the Site Admin username and password that you supplied in the Cloud Formation template.
- In the Catalog pane in ArcGIS Pro, you should now see a Server folder and your instance inside it.
At this point, your ArcGIS Pro session is connected to two different ArcGIS Server (Portal) sites: the Penn State organization (pennstate.maps.arcgis.com) that you initially used to sign in, and your personal ArcGIS Server (e.g., https://baxtergeog865su23.e-education.psu.edu/server [12]). Before we publish our data to the server, we need to inform ArcGIS Pro which of these two servers to use.
- At the upper-right of the ArcGIS Pro window, click where you see your name and "Penn State University." Click the option to Switch Active Portal, and choose your Server on EC2.
Now we can publish our data to the Server.
- Click the Share tab, choose Web Layer, and click Publish Web Layer.
- In the Share As Web Layer pane, enter a name, summary, and tag for your data.
- Since you already copied data and registered the C:\data folder with Server in an earlier step, there is no need to copy the data to server at this point; it’s already there and is in a folder that Server has access to. Accordingly, click the radio button for Map Image under Reference Registered Data. Had we not already registered the C:\data folder with Server, we would need to choose one of the options to copy the data to our server at this point.
- In the Portal Folder dropdown, choose the root option.
- You can put your ArcGIS Server services in "folders" if you want to group them together for security or logistical purposes. These don't translate to physical folders on disk, they are just an organizational mechanism. For example, you might remember seeing the PrintingTools and Geometry services in the Utilities folder back when you were touring Manager. In the lesson exercises, we won't bother with folders because you won't have that many services to keep track of.
- Check the box to Share the data with Everyone.
- Click the Analyze button, and then examine the Messages window that appears.
- (You may see an error asking you to “allow assignment of unique numeric IDs for sharing web layers.” If so, you can click the link to open your Map Properties and check the box to Allow.)
- The Messages window displays a report of anything that might prevent the service from being created. The ArcGIS Server drawing engine is optimized for speed on the web and does not support some of the less-common layers and symbols that you can view in ArcGIS Pro. If your map contains something that's not supported, you will see an Error in the report and you must remove the layer from your map before you can publish.
The report also lists Warning and Info messages about things that might slow down or otherwise hinder your service once its published. On the web, speed is king. It's usually worth your time to fix as many of the warnings as you can before publishing your service.
If you don't understand a particular message, you can right-click it and click Help to see documentation about that specific message.
The most important warning you see in your Trail map is that the data is stored in a different coordinate system than the data frame. This means the data frame is projecting the layers "on the fly" every time the map draws. Since this projection is computationally intensive, it's best if your server does not have to perform it on every map draw, especially if hundreds of people will be hitting the service at the same time. Let's change the data frame projection to match the source data and re-analyze.
- Without closing the error window, return to the Contents pane, right-click the map name at the top (Appalachian Trail Shelters), and click Properties.
- Click the Coordinate System tab, then browse to Projected Coordinate Systems > World > WGS 1984 Web Mercator (Auxiliary Sphere), and click OK.
Your data frame projection now matches the projection of your data. The Web Mercator (Auxiliary Sphere) projection is a common one used by online mapping services such as ArcGIS Online, Bing Maps, and Google Maps.
- In the Share As Web Layer pane, click Analyze again, and notice that the warning about the coordinate system has gone away.
- In the Share As Web Layer pane, click the Configuration hearding and examine the available options.
ArcGIS Server capabilities define the ways that users can access your service. All web services have strictly defined ways that they are allowed to communicate with clients. They also expose a set of methods or operations, which are things they can do (like draw a map). By adding more capabilities here, you thereby expand the ways that clients can use your service. The WMS capability, for example, allows clients to communicate with your service through the Open Geospatial Consortium (OGC) Web Map Service (WMS) specification, an open specification for how GIS map web services should communicate.
Since you're publishing a simple service for test purposes, leave the default capabilities. In Lesson 3, you'll get a chance to work with the Feature option.
- In the Share As Web Layer pane, click Analyze again. You should see no warnings now that you've corrected the coordinate system mismatch.
- Click the Publish button to finish publishing the data to the Server.
This creates a web service for your map. In a few seconds, you should be able to see the service listed in the web Manager or the Catalog pane in ArcGIS Pro.
When you publish a service, a copy of your map is placed in a special folder on your server (arcgissystem). If you ever update the layers or symbology in your map, you must overwrite your service so that a new copy of the map can be placed there. You overwrite a service using the same wizard that you use for publishing. In the first panel, you choose Overwrite an existing service instead of Publish a service. - Open the Services Directory and verify that you see your new trail service. The URL to your Services Directory, which you can use from any machine, is https://namegeog865####.e-education.psu.edu/server/rest/services (substituting your own name). If you don't see your service, it's ok.
- If you don't see your Trail service on the Services Directory page, it's likely because it is not set to be visible to the Public. One way to see your service is to click the login link at the upper-right of the Services Directory page and sign in with the ArcGIS credentials you established with Cloud Formation.
- To be sure that all clients are able to view your Trails service, return to the Server Manager page (https://namegeog865####.e-education.psu.edu/server/manager), view the list of services, click the Sharing icon and select Everyone.
Ways of working with web services
When you publish a service, you are giving the server a set of things that it can do with a particular map. In order for this to be useful to anyone, the client application and the server need to be able to communicate with each other in a way that both understand. There are several ways that an ArcGIS Server map service can allow itself to communicate with client applications.
REST
Representational State Transfer (REST) allows a client to discover information about a service or invoke operations on a service using a known structure of URLs. REST is not really a communication protocol, but rather an architecture; a way of building a web service so that it has a hierarchy of resources and operations that can be accessed by formulating the correct URL.
The actual bits of information sent "across the wire" can vary in format, but JavaScript object notation (JSON) is often used. JSON is desirable because of its well-known structured format and the fact that it can compact information into a minimal amount of characters.
Here's an example of some JSON that describes a Pennsylvania municipalities map service [13]. Take a few moments to examine all the properties exposed in this JSON. This is actually an easy-to-read format of JSON with extra line breaks and spaces called "pretty JSON." Removing the spaces to get pure JSON makes it more difficult [14] for you to read, but reduces the information that the computer has to read and can, therefore, make your web service more efficient.
REST is stateless, meaning that any one request cannot depend on information sent in a previous or future request. All requests are independent of each other. This requirement can make for some interesting architectural considerations. For example, to support an interactive web editing session with REST, you must send an entire digitized feature to the database at once; you cannot send the feature vertex by vertex as it is digitized.
Because of REST's simplicity and efficiency, the Esri web mapping APIs for JavaScript, Flex, and Silverlight communicate with ArcGIS Server web services using REST.
Viewing your service in a web map
Each GIS web service has its own specific purpose. It may support analysis performed inside an organization, or it may be intended to be used by anyone on the web. In this lesson, we'll assume that the Appalachian Trail service you just published is intended to be used by anyone on the web to explore and use in their own maps.
So, how could someone use your trails service in their own web map? A programmer could put the URL of your service directly into web app code and then write appropriate code to display the map. That's a topic for a different course, and ultimately writing code is something that many people cannot or will not do. In this part of the lesson, you'll use the ArcGIS Online map viewer, an interactive web map designing tool, to see how you can put together several services into a web map.
You might say that the ArcGIS Online map viewer is "running on the cloud". It is software as a service (SaaS), meaning you don't have to install any software in order to use it. When you save maps on ArcGIS Online, they are not saved to your computer, rather they are saved on an Esri server. You can come back and work with your maps from any computer as long as you tell the application who you are by logging in.
To perform this exercise, your Amazon EC2 instance must be running, but you can do the steps on your local computer.
- Open a web browser to the ArcGIS Online homepage [15].
You can use the ArcGIS.com map viewer without signing in; however, you will sign in so that you can save and re-use your maps. - Click the Sign In link, and choose the Your ArcGIS organization's URL option. We will login using Penn State's ArcGIS Online Organization, in which all Penn State students automatically have accounts. Enter "pennstate" to connect to the Penn State organization at pennstate.maps.arcgis.com, and sign in with your regular Penn State Access ID.
- Click the Map link near the top of the screen. This takes you to the map viewer.
You learned in an earlier part of the lesson that a web map typically consists of a basemap and operational layers. The map viewer gives you a basemap already. - Change the basemap service by clicking the Basemap icon and choosing Imagery.
You can experiment with some of the other basemaps if desired. The trails service is symbolized with an imagery basemap in mind.
Now you'll add the operational layer, which is your trails service. Notice that although the trails service has several layers inside (Shelters and Trail), it's common to refer to the entire service as one layer in the context of the web map. - Click the Layers icon and choose Add > Add Layer from Url.
- Change the drop-down to ArcGIS Server Web Service and type the full URL of the service on your server in the URL box and hit Add to map. The URL takes the format
https://namegeog865.e-education.psu.edu/server/rest/services/<your service name>/MapServer.
To get the full URL of your service, you can open a separate browser window and enter the following,https://namegeog865.e-education.psu.edu/server/rest/services. You should see a hyperlink on the rest services page for your map service. Click it, and note the URL in the browser. This is what you can copy and paste into the ArcGIS Online map above. - Find your trail service and add it to the map.
Go ahead and explore your web map, perhaps zooming in to some shelters at a large scale (where you can see the shelter labels). You can also experiment with the buttons at the top of the table of contents, such as Legend. - Position your map on a place of interest to you, and save your map using the icon in the menu along the left.
- Enter a title, tags, and summary for your map, and click Save Map. Tags are just key terms that can aid others who may be searching or browsing for maps.
If you want to see or return to any maps you have saved, you can click Content > My Content. This screen also gives you the option to share your map with the public. Sharing your map at this time is not recommended because your server is stopped most of the time, so this map will not be of much use to the browsing public.
So, what good is this map that you've made? As mentioned above, if you have a permanently running server with a permanent address, you might choose to save your map and share it with the public. People could then search for and view the map in ArcGIS.com. Another way the map can be used is by web app developers. Each map saved on ArcGIS.com is assigned an ID. Esri has designed their web programming frameworks (APIs) for JavaScript, Flex, and Silverlight such that a developer can just reference a map ID in the code, rather than building the map "from scratch".
Assignment: Sharing your web map
For this week's assignment, create a new document and insert the following:
- A screen capture of your web map. Please ensure that your screen capture is unique (not identical to anyone else's). A compressed image format, like JPEG or PNG is recommended.
- A short summary of how things went for you. Did you run into any issues getting it to work? Did you discover anything interesting you could do that was not covered in the lesson?
- In this lesson, we brought together several web services layers in the style of a "mashup". I'd like you to think a bit about some useful applications of this technique. In a thoughtful paragraph, give an example of two or more map layers you can think of that might be useful to overlay from different web sources. Explain how the GIS server technology you just used might help facilitate this process. If you're having trouble thinking of some, search around for maps on the web and see what people are doing.
When you are finished working on this lesson, remember to stop your Instance in the AWS Management Console.
Cloud Computing Discussion: Cloud GIS for Each of Us
How cloud computing services are defined and used is a key part of understanding cloud computing and foundational knowledge in this course. However, cloud computing definitions vary from source to source. For this week's discussion assignment, I'd like you to look back at the NIST definition of cloud computing [16] we are using in this course, and also read Chapter 2 of The Cloud at Your Service (available here as a preview from the publisher [17]). Then, compare Rosenberg and Mateos' definition of cloud computing with the NIST-based definition.
Deliverables for this week's emerging theme:
- First, submit a post in this lesson's discussion on Canvas that compares Rosenberg and Mateos' definition of cloud computing with the NIST-based definition and indicate which you prefer. If someone else has already posted what you would have said, either respond with a new point of your own, or make some other observation about cloud service definitions.
- Second, include in your post (or perhaps better, make a second post) that describes how you are currently using cloud computing, at work and at home, and how you plan to use cloud computing in the future. What tasks do you think would be uniquely suited to cloud computing?
- Third, I'd like you to offer additional insight, critique, a counter-example, or something else constructive in response to one of your colleagues' posts.
- Brownie points for linking to other technology demos, pictures, blog posts, etc., that you've found to enrich your posts so that we may all benefit.