Lesson 4: ArcGIS Server performance and rasterized map tiles
Overview
There's so much to learn about ArcGIS Server and GIS server technology in general that it's impossible to cover it all in this course. Instead, we've chosen to focus on some of the issues most commonly faced by people setting up and running a GIS server. In Lesson 2, you learned how to set up a server and a web service, and you viewed that service on the web. In Lesson 3, you took that a step further and learned how to prepare data for editing over the web. You also made a fully-featured web application.
In Lesson 4, you will learn how to build rasterized tile caches to improve the speed of your map services. This is a practice used by major web mapping services such as Google Maps, Bing Maps, MapQuest, and the ArcGIS Online services that you have already used in this course.
Building and maintaining tile caches requires careful strategy and planning, far beyond just knowing how to push the buttons to make tiles. For this reason, map tiling can be a fun and intriguing subject to study.
Lesson Objectives
At the successful completion of this lesson you should be able to:
- understand how to design a map for tiling;
- create and maintain a rasterized map tile cache; and
- create a substantive application using your knowledge of ArcGIS for Server.
Deliverables
- Complete: L04: Assignment
- (No discussion this week)
Ways to serve maps and the role of tiled services
By this point in the course, you may have observed that there's more than one way to take raw GIS data from your server and put it into a map in someone's web browser. Recall some of the map services you used in the previous two lessons:
- The AppalachianTrail and BighornReferenceLayers services used the server to draw a new map every time the user panned or zoomed. The completed map image was then sent to the user's computer for immediate display in the web browser.
In ArcGIS Server-speak, this is a dynamic map service, because it is drawn "dynamically", or on-demand, by the server. Dynamic map services are the default that you get when you publish a map service to ArcGIS Server, but it's not just Esri services that use this pattern. The Open Geospatial Consortium (OGC) Web Map Service (WMS) also uses this approach of sending back a dynamically-drawn image based on URL parameters sent from the requesting computer.
Dynamic map services are easy to set up, but they are not the fastest or most scalable type of service (scalability refers to how many clients can be served at one time). Accessing data and drawing a map image require the server to do work, and if a large number of people are requesting maps at the same time, the server can get overwhelmed. Complex maps with many layers or fancy symbols may take the server an unreasonably long time to draw.
Recognizing that dynamic drawing speed was suboptimal in early versions of ArcGIS Server, Esri wrote a streamlined drawing engine for the server and introduced it as an option at 9.3.1, using a special type of file you had to explicitly create called an MSD (map service definition). Starting from 10.1, the optimized drawing engine is used in all map services and the MSD takes a behind-the-scenes role. However, even a dynamic service, based on the optimized drawing engine, may not be appropriate for some heavily-used or complex maps. - The BighornHabitat layer from the previous lesson containing sheep sightings and habitat was not drawn dynamically by the server. Instead the coordinates of all the vertices of the points and polygons were sent to the web browser as text, and the browser did the work of drawing the features. This approach can be thought of as using client-side graphics, because the client (web browser) uses its graphic-drawing technology to put the features on top of the map.
ArcGIS Server map services can optionally be drawn as client-side graphics. OGC Web Feature Services (WFS) are also designed to be queried and drawn by the client machine.
Client-side graphics are great for providing interactivity to your web applications. Once you get all the geometry and attributes of the features onto the client machine, you don't have to go back to the server any more. You can change the shape or color of a feature in real time, allowing for highlighting of features, reclassification, or making edit sketches.
Client-side graphics are not appropriate in every case. Most browsers have a limit on how many points or vertices they can draw before they really start to slow down. Also, you saw in the previous lesson how symbology was limited using client-side graphics. The diagonal hash line symbolizing the habitats could only be drawn with a simple solid fill. This is because web browsers know how to draw a limited set of symbols; for example, they can't use the whole gamut of ArcMap polygon fills. - The imagery service from ArcGIS Online that you used as a background for your bighorn sheep map was a tiled (or "cached") map service. In these types of services, the server just hands out little square images (tiles) of the map that it has stored in a cache on disk. These images are usually generated by the server administrator at a number of different scales before the service is made available to the public. Then, when web users request to see a map, the server does not have to do the work of drawing the map; it can just send back whichever tiles are needed to fill the map request.
A server can send out tiles a lot faster than it can draw maps; therefore, tiled map services are quicker and can accommodate a lot more users than the other two types of services. Just take a look at how fast the imagery layer loads in your bighorn sheep app, or how quickly all the basemaps appear in the ArcGIS.com map viewer. If you have a complex map (especially a basemap) or a map that will be viewed by a lot of people, it's usually worth the effort to make a tile cache.
Like the two other choices above, tiled maps also have their unique drawbacks. The biggest one is the time investment and server power needed to generate the cache, along with the disk space necessary to store it. Also, because a cache represents a snapshot of your data at one point in time, it requires maintenance. If your source data or your map symbology is edited, you have to update the corresponding tiles in order for people to see the changes.
In this lesson, you'll learn about designing a map with the goal of building a tile cache. You'll get a chance to make some tiles and use them on the web. Since the number of tiles in a cache can multiply with each scale level added and become unmanageably large, you'll also learn about strategies for building and updating very big caches.
A word about vector tiles and rasterized tiles
A word about different tile types before we begin: There are two main types of tiles commonly used in web maps today. The kinds of tiles we've been talking about above can be thought of as rasterized tiles; in other words, they are images made up of grids of pixels. Rasterized tiles are easy for clients to draw because most apps and all web browsers know how to display an image like a JPG or a PNG; however, the server has to construct the image and, after that, you're stuck with the colors and symbols you chose.
To get around issues with rasterized tiles, another type of tiles called vector tiles have been increasing in popularity. Vector tiles are similar in concept to rasterized tiles in the sense that they are square packets of information structured in a pyramid motif and sent by the server; however, they contain vector coordinates instead of a picture of the data. This allows the styling to be easily changed. Vector tiles are displayed as client-side graphics, so the client software needs to understand what a vector tile is and how to deal with it. Older mapping software and APIs may not be able to consume vector tiles.
We will talk more about vector tiles in Lesson 5 when we work with Mapbox software, since Mapbox pioneered this format and based their company on it. Esri vector tile support [1] is growing, although it has lagged behind that of Mapbox.
Be aware that all the remaining content in Lesson 4 refers to rasterized tiles, and some of the design and performance considerations discussed may be very different when thinking about vector tiles.
Increasing your instance size for this lesson
Building rasterized cache tiles is CPU and memory-intensive. Your server is making thousands of repetitive map draws, sometimes with a very complex MXD in the background. You can build a cache a lot faster if you assign the tile creation to a powerful machine.
This short-term need for high computing power is a perfect use case for cloud computing. A lot of offices don't have a powerful machine to spare for building tiles (usually their beefiest machine is the server that's already hosting their live apps and web services). In this situation, a server administrator could launch a high memory and/or high CPU instance for just a few hours for the purpose of building tiles. The extra cost is often worth the time savings that it takes to build the cache. Once the tiles are created, the machine can be shut down or scaled down.
For this lesson only, you'll change your ArcGIS Server site to run on a memory-optimized instance [2]. This costs significantly more than the general purpose instance [3] type that you've been using, but it will allow you to work with a complex map document and build cache tiles much faster.
- Log in to the AWS Management Console and, if it is not already stopped, stop your ArcGIS Server machine instance.
- Right-click your instance, and select Instance Settings > Change Instance Type.
- Choose r4.4xlarge, and click Apply.
- To see the specs for all instance types, check out the Amazon EC2 Instance Types [4] page and drool away. Then take yourself back to reality by viewing the Amazon EC2 Pricing [5] page.
- Start your machine instance when you are ready to work with it.
Now that you are running on an instance that costs (at the time of this writing) $1.064/hour as opposed to 40 cents/hour, it's more important than ever that you remember to stop your site when you are done working on your lesson materials for the day. Also, be sure to set your instance type back to m4.2xlarge after building all your tiles in Lesson 4.
Designing a map for tiling
You'll find during this lesson that a rasterized tiled map service takes a lot of planning. Let's look at a few of the considerations needed to get a map ready for publishing as a tiled service. You'll download and examine a predesigned map and publish it as a service in preparation for making some tiles yourself.
To cache or not to cache?
The first question to settle is whether or not to make a tile cache at all. If the map is going to put strain on your server or take a noticeable amount of time to draw (these two often go together), then you need to consider making a tile cache. Most vector basemaps that give geographic context to your web map contain a lot of layers and fall into this category. This is one reason that splitting up your layers into basemap services and business layer services is a good idea; you can potentially cache the basemap while leaving the business layers uncached.
Is it necessary to cache the business layers, since that kind of data changes more frequently? Google used to do it with the Wikipedia layer in Google Maps [6]. With so many features (Wikipedia articles) to show, and with the amount of traffic Google Maps receives, it was burdensome on the servers to draw those points on the fly. (Sadly, the Wikipedia layer is no longer offered.)
In addition to high traffic scenarios, you can also consider caching business layers when the map covers a relatively small extent, the data doesn't change very often, or the data is displayed at small scales only. Layers like weather radar need to be updated frequently, but are rarely viewed at large scales and require relatively few tiles in the cache, thus the update can be performed in a reasonable amount of time.
Choosing scales
There are a lot of decisions you need to make about how to set up your tile cache, but the first choice is the set of scales at which you are going to generate tiles. These scales represent the snapshots at which web users will see your map. They also determine how long it's going to take to create the cache, and which other web services the cache will be able to overlay. Ideally, you'll decide on your set of cache scales before you start designing your map.
Keep these things in mind when choosing a set of scales:
- If you already know that your map is going to overlay, or be interchangeable with, another tiled map service, then you should match the scales of that map service. Many server administrators set out to build caches that will overlay Google Maps, Bing Maps, or ArcGIS Online. In these cases, the choice of scales is easy. You have to match the Google/Bing/Esri scales, which are thankfully the same and are built into ArcGIS Server as an option.
- Larger scales require more tiles to cover the extent of the map. It takes four times as many tiles to cache a map at 1:1000 than at 1:2000. Thus, avoid building tiles at scales zoomed in farther than you need to see. It's worth noting that you can put scales in your "tiling scheme" (the Esri term for a set of scales and other cache properties), but you don't necessarily have to build tiles at all those scales. For example, in this lesson, you'll choose to use the Google/Bing/Esri tiling scheme which includes scales all the way down to approximately 1:1000, but you won't build tiles at the largest scales, because those aren't necessary for your map.
- Most tiled web maps halve the scale's denominator when zooming in (for example, the next scale beyond 1:48000 would be 1:24000, then 1:12000 and so on). The Google/Bing/Esri tiling scheme follows this pattern, and if you decide to enter your own scales, you might choose to follow it as well. Scale sets that increase slower than this rate tend to make the user feel some tedium when zooming in, and can cause you to create a lot more tiles than you really need.
Designing the map
Creating detailed vector basemaps of the type that are typically cached presents a grand cartographic challenge. In contrast to paper cartography, in which the map has to be designed at just one scale, the web basemap has to be designed to look good at every scale in your tiling scheme.
Designing this type of multilevel basemap can require you to include varying symbols at different levels of your map. For example, a road might be represented with a 3-point line width at a large scale, a 1-point width at a medium scale, and may not be visible at all at a small scale. Since ArcMap does not allow scale-dependent symbols, you'll sometimes need to add multiple copies of the same layer into your map, set different scale ranges on them, then assign appropriate symbols for each scale range.
It's also important to choose muted colors for the base map that look good, but do not overwhelm other layers placed on top. Go to Google Maps: Designing the Modern Atlas [7] to see some examples of how the Google Map design has toned itself down over time to be more accommodating to overlays.The Esri Light Gray Canvas basemap is another study of designing a basemap specifically as a backdrop for more important thematic or operational layers.
When web mapping exploded during the past two decades, some cartographers expressed their chagrin at the simple, uniform maps churned out by websites. Some may have thought their very jobs and livelihood were threatened. However, the years have shown that cartography holds a critical place in web mapping. Projects like the OpenStreetMap terrain layer [8] and the Esri World Topographic Map [9] incorporate very advanced cartographic techniques. In a sense, map tiling gave cartographers a ticket to ride in the web world, since these detailed maps would be too slow to serve dynamically.
No wonder some GIS professionals shrink at the thought of trying to design such a map on their own. Some organizations that lack an in-house cartographer have just limped along with the same symbols they used when more primitive map server technology was available. Others have imitated the colors and symbols of the ubiquitous Google Maps in their own basemaps (perhaps in response to a manager's demand, "Make our maps look like that!").
In response to queries about how the ArcGIS Online basemaps were constructed, Esri has released sample ArcMap documents using all the ArcGIS Online base map symbols. People can insert their own data into the map or simply copy the symbol settings into their own maps. Examining one of these maps provides a good lesson in multilayer basemap design.
Examining and publishing a street map
In this part of the lesson, you'll download and examine a map template that Esri has provided for the ArcGIS Online street map. This sample map covers the Little Rock, Arkansas region. You'll then publish the map as a service and get it ready for creating tiles in the next section of the lesson.
- If necessary, start your ArcGIS Server site. You will need to use your instance a few steps down the road.
- On your local machine, open a web browser to the ArcGIS.com map viewer [10] (which you used in Lessons 2 and 3) and then choose the Streets basemap.
This is an approximation of the map you'll be working within this part of the lesson (I say approximation because Esri has updated some of the symbols slightly since they released the template you're going to download). Zoom in and take note of some of the layers that appear and disappear as you do so. Also, note how the symbols for features like rivers and cities change as you zoom in and out. - On your EC2 instance, extract the street map template files found in the Course Resources module in Canvas into a location under C:\data. The cleanest way to organize it may be to place the map and data directly under a folder named C:\data\LittleRock. Notice that the files include an MXD and a file geodatabase with a bunch of sample data.
- On your EC2 instance, import and open StMap_Template_LittleRock_WebM.mxd in ArcGIS Pro.
- Save your ArcGIS Pro project.
The first thing you should notice is how long it takes this map to draw and label. Take a look at the number of group layers and sublayers in the table of contents, and you'll see why. In addition to the sheer number of layers available, a lot of the layers are symbolized with complex symbols such as multilayer lines that take more time to draw. The performance of this map on the web will not be acceptable unless it is tiled.
The map coordinate system is WGS 1984 Web Mercator (essentially the same as WGS 1984 Web Mercator (Auxiliary Sphere), which you used in previous lessons). This is the projection used by ArcGIS Online, Bing Maps, and Google Maps. It was not designed for geographic accuracy nor aesthetic purposes, rather for convenience. You could fit the whole world on a square tile. You'll go ahead and use this projection in this lesson, even though you can certainly make a tile cache in whatever projection you want.
As you examine the table of contents, notice that this map is organized with group layers, each corresponding to a scale range. This particular map is designed for viewing at about 1:1,000,000 scale down to 1:4,500 scale. Any other scale is not going to result in a map being drawn. The layers were painstakingly copied, symbolized, and grouped so that the map would look good at each scale.
To view the map at the ArcGIS Online, Bing, and Google scales, click the scale dropdown at the bottom of the ArcGIS Pro map and click Customize.
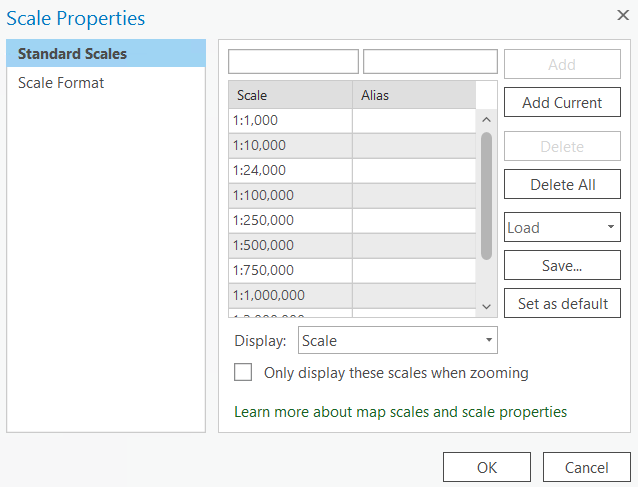 Figure 4.1 Customizing the scales list
Then click Load, and click ArcGIS Online / Bing Maps / Google Maps. Click OK, and you will see the ArcGIS Online, Bing, and Google scales appear in the dropdown. Take some time to jump between them and examine the layers and symbols that will be in your tile cache. Figure 4.2 The ArcGIS Online, Bing, and Google scales appear in the dropdown menu
- Navigate your map so that it covers the full Little Rock region and then save the ArcGIS Pro project.
- Leaving ArcGIS Pro open, move on to the next part of the lesson.
Creating a server-side cache of map tiles
Now that you've finished designing your map, you're ready to start creating the cache of map tiles. As an advance notice, you should plan at least one continuous hour to work on this page of the lesson.
In this lesson, you'll learn how to create tiles using ArcGIS Server. However, tiles can be created using many other types of GIS and mapping utilities. Mapnik [11] is an example, which is used to create the tiles for OpenStreetMap.
Map tiling has become so popular that the Open Geospatial Consortium (OGC) has even released the Web Map Tiling Standard (WMTS) detailing an open specification on how mapping web services should expose their tile sets. ArcGIS Server services that have a tile cache can respond to WMTS-formatted requests.
Creating a tile cache with ArcGIS Server
When you publish a map service or image service in ArcGIS Server, you can define whether it will have a cache and what the cache properties will be. You can either build the tiles right at the time the service is published, or you can instigate the tile building later using geoprocessing tools like Manage Map Server Cache Tiles. Building the tiles at publish time is appropriate for smaller cache jobs, and that's what we'll do in this lesson.
- Make sure you are logged in to your EC2 instance and displaying your Little Rock project in ArcGIS Pro. In other words, you should be at the exact same point where you left off in the previous section of the lesson.
- Click Share - Web Layer - Publish Web Layer, and start the process of publishing a map service named LittleRock using the pattern from previous lessons.
- This time, in the Data and Layer Type section, click the radio button specifying the Tile option under Copy all Data.
- Before you publish this new service, click the Configuration tab and click the edit button next to the Tile layer. Here is where we can customize the properties of the tile cache that will be generated.
- In the Tiling Scheme section, choose ArcGIS Online / Bing Maps / Google Maps from the list. This specifies the scales at which maps will be tiled and cached, and this will align with the scale-dependent symbology we set in the map in ArcGIS Pro. You'll see a slider to change the range of scales at which tiles will be generated. Adjust the slider so the selected scales range from 1,115,581 - 4,514. This way, a collection of map tile images will be generated for each of the scales that are designed in our map. You could expand the range to include additional scale levels, but it wouldn't benefit our map, since a larger scale (more zoomed in) would be utilizing the symbology designed for 1:4,514. Realize, that for each larger (zoomed in) scale you add, the amount of tiles will increase by around 4, since each tile is divided in to four sub tiles at the next scale. These tiles are very small images, however, the storage requirements of all those little images really adds up as we increase scale levels, so be careful how many levels you add. I recommend not going any larger that the scale of 1:4,514.
- Leave the Image Format option set to MIXED. This specifies that the smallest possible image format will be used for each tile. This is particularly useful for the edges of your map that may be blank or other areas that are mostly transparent. JPEG files are generally the smallest storage size, but they don't support transparency like PNG files do. So areas that require transparency will be stored as PNG files and other areas will be JPEGs to minimize the amount of storage required.
- In the Options section, select the Cache Automaticaly on the Server option. This causes the server to generate all tile images at all scales immediately upon publishing the service. The other options Allow tiles to be generated on-the-fly as clients hit the service and zoom and pan across the map. Initil hits by those clients will be slightly slower, since tiles need to be created in real-time, but any subsequent requests for the same map areas and scales will utilize those tile images and be really fast.
- In the Estimate section, you can ask ArcGIS Pro to make estimates for the number to tiles and the corresponding storage space required for the cache you are planning to create. You can go back and change the number of scales in the slider and re-calculate the storage estimate to see the impact of each larger scale. The map we are caching covers a relatively small area so our storage requirements are low, but you can imagine how large these numbers can get when caching imagery at more scales and for larger areas.
- Go back to the General tab and go ahead and click Publish.
- The process of generating all the tile images takes some time. You should see a progress bar along the bottom of the ArcGIS Pro window. It should get to a message indicating the the service has been published and that caching is in progress. In a web browser, go to your Server Manager site and click on the Services Tab. Along the left, click the Hosted link and you should see your Little Rock service in the list. Next to the service's name you will see a small icon (looks like four little tiles) to View Cache Status. Click that icon and you'll see a progress window that indicates how many tiles have been generated. You may also want to open the Task Manager on your EC2 machine to see how hard it is working. Right-click the task bar at the bottom of your computer's desktop (be sure you click on your Remote Desktop EC2 computer, not your local desktop computer's task bar). Clicking the Performance tab will show how much CPU and RAM are being utilized.
- The cache you're building for this lesson should take under an hour to generate. Do not stop your instance while tile generation is in progress.
I have sometimes run into repeated crashes of the tiling processes when trying to build tiles of this map. If the reported number of tiles is not increasing when you view the status, or you get an error message about a crash, just take note of the scale level at which the tiles stopped generating, and move ahead to the next steps. It's not critical that you finish creating all the tiles for this Little Rock map; it's just for practice.
- While your tiles are being built (or afterward), take a moment to open Windows Explorer and navigate to the path: C:\arcgisserver\directories\arcgiscache\Hosted_LittleRock\Little Rock, AR\_alllayers.
Take a look around. You'll see folders for each scale level of your cache. You should also see large files with the extension .bundle. A bundle file is Esri's way of storing a large number of tile image files in one compressed file. You can optionally store each tile as an individual image file (.jpg or .png) using what ArcGIS Server calls the Exploded storage format, but when your cache starts containing thousands or millions of images it can be tedious for Windows to copy it around, assign permissions, or frankly do anything with it. Bundles are the way to go.
- When you are done creating tiles (or if you stopped because of a crash), open a web browser on your local computer and open the Services Directory. The URL will look like this: https://namegeog865####.e-education.psu.edu/server/rest/services/
- If you don't see your LittleRock service in the Hosted folder, return to the ArcGIS Server Manager (https://namegeog865####.e-education.psu.edu/server/manager) in your browser, and repeat the steps we performed in earlier lessons to make your service viewable by the public (Everyone).
- Back on the rest services page, click your LittleRock service, and choose to View in ArcGIS JavaScript.
- Zoom and pan around the map for a while, and note how quickly the tiles appear. Note that if your tile caching processes crashed, then you'll only be able to zoom in to the scale level at which the tiling stopped.
- When you are done creating and experimenting with tiles, stop your AWS Instance.
- Following the same pattern you used earlier in this lesson, open the AWS Management Console, and set your instance back to the m4.2xlarge Instance Type.
Strategies for building large tile caches
The tile cache you just built was pretty straightforward. You just gave the tool a map with symbology defined for each scale level, it created tiles, and within a few minutes, you had your cache. In this case, you were fortunate that you just needed a cache of Little Rock, Arkansas. But what if you needed a cache of the entire United States, or world, down to a large scale like 1:4,500? This could take days or weeks to build, and could require terabytes of disk space. Even if you were successful at building such a cache, would you be able to do it again if the source data were updated?
This section of the lesson discusses strategic approaches for building large caches. These are presented in the order that they should be considered, meaning that if you skip down and implement one of the later strategies first, you still may end up doing things inefficiently.
Using an existing tile cache
If you need a tile cache that covers an enormous area at large scales, it would be worth your while to consider using one that someone else has built. Why go to the trouble if someone else has done it already? You've seen these types of worldwide tiled map services already throughout this course. They include ArcGIS Online, Bing Maps, and Google Maps. The companies who have built these caches have spent many thousands of dollars and hours collecting the data (often competing against each other for the best quality), building the tiles, and purchasing the hardware to serve them out in a rapid way. If you can get away with using them, you may save much time and resources.
The disadvantage of using someone else's tiles is that you cannot guarantee the accuracy or currency of the data. You don't get to choose the symbology or projection of the data either. Usually, you have to work in the Mercator projection.
Finally, if the tiled service goes offline for some reason or you lose your connection, you may have no control over when it will reappear. No server, whether it's maintained by Microsoft, Google, or Esri, can guarantee 100% uptime; however, this applies to your own servers as well. It's likely that these third-party services have better hardware infrastructure than your own when it comes to serving tiles; however, those tiles must still cross the Internet to get to your app, and that opens the door to potential connectivity problems.
Some organizations, especially those in the military and intelligence communities, have much of their network blocked from Internet access. Recognizing this, some tiled map service providers sell an appliance, basically a big server containing all the map tiles that can be plugged into your network. This eliminates the Internet access requirements, but still requires you to load periodic updates to the appliance. The Esri Data Appliance for ArcGIS [12] is an example of this type of appliance.
Creating tiles selectively
Some areas of a web map generate a lot more attention than other areas. Someone looking for directions to a particular house may zoom in down to the largest available scale in an urban area. However, in the middle of the desert where there are few geographic features to see, it's unlikely that someone would ever zoom to a very large scale such as 1:1100 (the largest scale offered by ArcGIS Online/Bing Maps/Google Maps).
Creating tiles at small scales isn't a problem since it takes relatively few tiles to cover the map, but if you are limited on time or disk space, it pays to be selective about which tiles you cache at the largest scales.
Some GIS professionals have a hard time accepting the fact that they don't need to create every tile at every scale. They feel that all places are created equal, and shudder at the idea that someone might zoom to an area of their map and see a "Data not available" image. In fact, such an experience is now commonplace among laypeople who use web maps, who tend to blame themselves when they see a "Data not available" tile ("Oh, I zoomed in too far") as opposed to blaming the server administrator ("Why isn't there a map here!?")
A useful website for countering the idea that "all places are created equal" was Microsoft Hotmap, an old project by Microsoft Researchers to visualize tile usage in Virtual Earth (now Bing Maps). This site is no longer functioning, but a screenshot below will give you an idea of its appearance. You could open Hotmap and zoom into your town, then use the Select Data Level dropdown to visualize tile usage at different levels. At the zoomed out data levels, most of the tiles are requested fairly often. But when you get down to the zoomed in data levels (17 - 19), some clear patterns begin to emerge regarding where people want to see tiles: urban areas, major roads, coastlines, and other areas of interest. There are also some places where people never or rarely view tiles: wilderness areas, bodies of water, and so on. These are the tiles you don't want to spend your resources creating and storing (for more images and analysis see Fisher D 2007 Hotmap: Looking at geographic attention. IEEE Transactions on Visualization and Computer Graphics 13: 1184-91 [13] and Fisher D 2009 The Impact of Hotmap. WWW Document [14].

A few years ago, one of the authors of this course undertook a project to selectively cache the state of California using the observed usage patterns in Hotmap. He and his colleague combined urban areas, roads, coastlines, and places of interest into a single vector dataset that covered about 25% of the land area of California, but included about 97% of its population. The use of this dataset to define tile creation, as opposed to the entire state boundary, saved nearly 1 million tiles when caching down to the 1:4500 scale (see Quinn S and Gahegan M 2010 A predictive model for frequently viewed tiles in a web map. Transactions in GIS 14: 193-216).
When using ArcGIS Server to create tiles, there are a couple of settings on the Manage Map Server Cache Tiles tool that allow you to be strategic about which tiles you create. These are the ability to check on and off the scales you want to create, and the ability to pass in a feature class boundary that will define the area of tile creation. For a large caching job, you'll probably run the tool at least twice. The first time, you'll have only the small scales checked, and you won't pass in a feature class, you'll just create all the tiles. The second time, you'll have only the large scales checked, and you will pass in a feature class constraining the area where you want to create tiles, just like you did in the previous section of the lesson where you passed in the urban Little Rock feature class.
Optimizing the map drawing speed
The faster a map draws dynamically, the faster it will create cache tiles. All GIS software has its potential tweaks that can be made to increase performance, and ArcGIS is no exception. You've already learned, for example, that you can analyze your map using the Analyze button and see a list of potential performance issues.
Anything you can do to reduce computation will help your map draw faster. Matching the coordinate system of your source data, your data frame, and your web map will eliminate any costly projection on the fly. Saving out your labels to annotation (a way of storing labels in a database) will relieve the server from having to make label placement decisions while it is drawing your map. Spatial indexes [15] can help your map more quickly find the features that it needs to draw for each requested tile.
Increasing computing resources
The more computing power you can put behind creating tiles, the faster you can build your cache. CPU and memory restraints are often more of a problem than having enough disk space to store the tiles.
There are two ways you can increase your server computing power, scaling up or scaling out. Scaling up means you replace your existing machine with something more powerful, like we did in this lesson. Scaling out means that you add more servers to your architecture, with these servers possibly all having the same size and spec.
The concept of having more than one server working on one job is called distributed computing. Although distributed computing can allow you to do great things, it comes with some unique challenges. All machines have to be able to see the data and access it, which may require some adjustment of paths used in your maps. For example, in a distributed setup, you want to use network paths like \\server\data, instead of local paths like c:\data. Cloud Formation sets up your site so that if you put your data in C:\data on the site server instance (one named SITEHOST, for example), you can reference it through the path \\SITEHOST\data from any machine in your site.
Distributed computing may also require some adjustment of security settings so that the tile creation software has permissions to access the data from any machine. In ArcGIS Server, this is accomplished by giving the ArcGIS Server account permissions to your data folder (Cloud Builder does this for you), and registering the data folder with ArcGIS Server (you did this earlier in the course).
Building a cache in the cloud
Cloud computing can be an attractive environment for building caches, because you can access a higher level of computing power than you might typically have in your office. Usually, you only need it for a short period (a few hours or days to create all the tiles), so the prospect of renting a server by the hour becomes very attractive.
One challenge with building tiles in the cloud is moving them around. First, you have to get your data onto the cloud so that your caching software can quickly get it as the tiles are being drawn. Then you have to move the tiles back to their final home, which may be on premises. Both of these transactions involve moving data across the Internet and can be influenced by your organizations' bandwidth and security policies.
When creating tiles with ArcGIS Server on Amazon EC2, it's a lot easier to scale up than to scale out. As you have seen, Amazon offers the option to change the instance type (in other words, CPU, memory, etc.) without terminating the instance. This is very handy when you start doing something and realize you need a bigger machine, although you are required to stop the instance before you change size. Some of the largest instance types on Amazon EC2 have an enormous degree of CPU power and may negate the need to scale out. Scaling out ArcGIS Server on Amazon EC2 is accomplished by adding more GIS server machines to your site.
Summary
Think back over the above strategies and consider why the techniques at the beginning should be employed before those at the end. It can be exciting to think about how many tiles you can build with distributed computing and all the computing horsepower that's available through the cloud. You may actually save the most time and resources by carefully planning which scales you want to create and selectively generating tiles at the largest scales. If the cache is still going to be overwhelmingly large, consider using an existing cache or a data appliance. By using a combination of the above strategies, you can usually find a way to build the cache you need, whatever the size.
Maintaining and updating a tile cache
A tile cache is just a picture of your data at one point in time. If that data ever changes, you need to update the cache. This final section of the lesson gives some practical considerations for updating and maintaining a cache over time.
Update strategy should affect the decision to make a tile cache
Your update strategy probably should have come into consideration before you even decided you were going to create a cache. If you need to see data in real time, or you have frequent changes occurring over broad extents of the map, then creating a tile cache may not be appropriate.
For each map, there's a threshold of acceptable data currency. For a neighborhood street map available in your handheld GPS, you may find it acceptable if the street data is updated once every three months. For a tax assessor looking at land parcels, it may be acceptable to have the data current to within the past day or two. For a 911 operator tracking a vehicle's progress, a delay of more than a few seconds may not be acceptable.
If the cache update can be performed within the threshold of acceptable data currency, then it may make sense to create a cache. If the cache cannot be updated that quickly, then caching should not be used.
Focusing cache updates
There are two approaches for cache updates; generate the entire cache, or focus the updates on places where the data has changed. If your entire cache can be rebuilt within the threshold of acceptable data currency, then it may be easier to do the first option, you can just kick off a rebuild of all the tiles and be done.
If your cache is very large and it is undesirable to rebuild the entire thing, then you need some way to track places that have been edited (for the sake of this discussion, we'll call these "dirty areas"). You can then pass the dirty area polygons into your caching tools to define where tile updates should occur.
So how do you find the dirty areas? One approach is to track them as edits are being made, each transaction can be logged to a database and, at the end of the edit session, the spatial extents of all the transactions can be exported to create a vector dataset of dirty areas.
If real-time tracking of the dataset editing is not an option, you can attempt to compare two datasets directly for attributes or spatial features that do not match. This type of strategy is required when you receive a dataset update without any record of how it was created (such as from a data vendor every six months). It requires that features have at least one key field in common between the two datasets. Comparing attributes is necessary if map symbolization or labeling could change based on a field value.
Accomplishing either of the above solutions in ArcGIS requires custom programming. Fortunately, this problem is common enough that people have posted some scripts and tools online that help address it. The Show Edits Since Reconcile [16] tool, written by Tom Brenneman, compares two versions of an ArcSDE geodatabase and outputs a feature class of spatial discrepancies. It can be installed into your list of toolboxes in ArcGIS. A similar tool Compare two feature classes in a file geodatabase [17], written by Sterling Quinn, is designed for those who do not have their data in ArcSDE.
Basing an ArcGIS tile cache update on dirty areas requires some degree of caution. A feature class full of small, adjacent polygons can cause the Manage Map Server Cache Tiles tool to work slowly and inefficiently. If there are a lot of small dirty areas in close proximity, they should be merged before the dirty areas feature class is used to define a caching job.
Automating cache updates
It's common to perform tile cache updates on a regular basis, such as every three months, every week, or every evening. Because caching is so resource-intensive, many server administrators like to build the updated tiles on a staging server and then copy them to their production server. This avoids disruption to those who are viewing tiles on the live website.
Whether you use a staging server or not, it's wise to perform the update during times when the fewest possible individuals will be using your site. For most sites, this is during the early morning hours or the weekend. Since you probably do not want to log in at 2 AM Sunday morning to run your caching tools, it's worth exploring whether your tile caching software can be automated and scheduled to run at given times.
The ArcGIS tools, for example, can be automated using a Python script. Python is a relatively simple programming language to learn, and it can be used to run any ArcGIS tool, including Manage Map Server Cache Tiles. For a full update process, you might decide to chain several tools and functions together in one script, such as:
- Compare two feature classes in a file geodatabase (to find the dirty areas)
- Manage Map Server Cache Tiles (passing in the dirty areas feature class to define where tiles are created)
- A copy function to move the new tiles from the staging server onto the production server
Once you have a script that does everything you need, you can use your operating system to schedule it to run on a regular basis. Task Scheduler, included with Windows, is an example of a program that can run scripts on a repeated basis at any time you specify (such as nights or weekends).
Python scripting with ArcGIS is taught in Penn State's Geog 485: GIS Programming and Software Development [18]. If you're curious to see an example of a Python script that updates a cache, check out the ArcGIS help topic Automating cache creation and updates with geoprocessing [19].
Assignment: Putting it all together with ArcGIS Server
In this assignment, you will put together all of the ArcGIS Server skills that you learned in Lessons 2 - 4. Starting with a folder of raw GIS datasets, you will compose maps, publish them as web services, and assemble those services into a web application. You will create a video tour of your web application so that you don't have to leave your server running as the project is graded.
The data for this assignment consists of vector feature classes covering an area around a town. I downloaded these from the State of California Geoportal [20] (formerly the California Spatial Information Library - CaSIL) and did some post-processing on them so that they cover the same extent. Don't worry too much about what town this really is; for this assignment, consider that it could be Anytown, USA.
Download the data for this assignment [21]
The scenario
Pretend you work for a town that up until now has only done GIS in the desktop realm (maybe there is no pretending needed). You are moving to ArcGIS Server for the first time. You want to take your GIS data and make it available in a series of highly-focused web applications.
Your first application will focus on your urban flooding dataset. This is a point feature class that shows areas in the city that tend to pool with water and flood during a storm event. Your web app will allow "non-GIS-trained" personnel in other city departments to add and remove points from this layer.
You've been asked to create a basemap web service that will be used as a backdrop in this web application and other apps your town will create in the future. You must design this basemap yourself and create a tile cache for it. An existing basemap from ArcGIS Online, Bing Maps, or Google Maps cannot be used because the map needs to show your town's own data. However, you can imitate design principles and techniques used in those maps.
You are also to create a separate web service containing only the urban flooding layer. This layer should be exposed as a feature service and should be editable. This involves loading the source data into SQL Server Express as shown in Lesson 3.
Once you have created these two web services, you must overlay them in a web application that allows the urban flooding service to be edited by the application user. Do this using the ArcGIS Web AppBuilder unless you already have extensive coding experience with another API such as the ArcGIS API for JavaScript.
Because this assignment takes a fair amount of time, there is no cloud computing discussion assignment this week.
Deliverables and grading
To minimize the amount of time your cloud-based server is left running, this project will be graded based on a short video tour of your app. You should record this using Zoom, Screencastomatic, or a comparable screen recording utility of your choice. Your video must demonstrate the following features in your ArcGIS Services Directory and your flooding application. Each item is worth 3 points, resulting in a total of 30 points available for this project (making it three times the value of a typical weekly assignment):
- The application contains a basemap service that has a tile cache built at appropriate scale levels (not too large, not too small). To verify this, show the Services Directory page for this service and scroll down to the section that displays all the cache scales.
- The application contains a second service that displays only the urban flooding layer. This service should have Feature Access enabled so that it can be edited. Show the Services Directory to prove that it indeed is a feature service.
- The basemap has been cartographically designed not to overwhelm any operational services that are placed on top of it.
- The basemap has been designed to be cartographically sound at all cached scales. The symbology and amount of detail shown adjust appropriately as you zoom in and out. Zoom in and out in your application, and point out how you have designed the basemap using appropriate scale ranges and symbol changes.
- The urban flooding service has been designed to easily stand out when placed on top of the base map. If necessary, transparency has been set at an appropriate level.
- The web application allows the user to edit the urban flooding layer. In your video, show that you can add a point and edit its attributes.
- The services, the layers within them, and the attributes within them are intuitively named so that an end user can understand them. You can edit the dataset schemas to accommodate this requirement if needed.
- The web application starts at an appropriate initial extent, contains an intuitive title, and includes other customizations as appropriate.
- The video includes a short oral summary of things you learned, things you enjoyed, and challenges you faced when completing the project. If you can't fit this all in the video, you're welcome to write it up and post it as a comment when you share the video URL.
- The video is no longer than 5 minutes.
I recommend you use your video recording software to export an .MP4 file or some other easily shareable format. You can either host the file on YouTube, your PSU Microsoft OneDrive space, or some other online repository and provide a link (make sure it is viewable to the faculty). Zoom [22] is a tool available to PSU faculty, staff, and students that will easily allow you to screen share and easily record your screen. Zoom recordings will save as an .MP4 file. If you don't want to put the video online or can't get that to work, you can upload it to Canvas. Contact your instructor if these options don't work.
Do not host the video on your EC2 instance. Your instance should be stopped when you are not working on this course.