Lesson 9: GIS on your own cloud using Portal for ArcGIS
Overview
In this course, you’ve seen how specialized server-based software such as ArcGIS Server can be used to distribute GIS resources and processing throughout an organization and, more broadly, to the public. This software is powerful, but requires advanced administration and usage skills. You’ve also become familiar with a number of providers who offer mapping and GIS services on the public cloud. The simplified and often browser-based interfaces of these SaaS providers are very attractive to organizations that want to put spatial data and analysis in the hands of users who aren’t trained in GIS. At the same time, some organizations may feel hesitant about how much of their data and operations they want to transfer onto a third-party cloud service. Concerns can include security of data, control over service uptime, and the amount of fees paid to the cloud provider.
For these reasons, organizations sometimes desire to build a cloud locally (i.e., “in house” or “on-premises”), so they can offer the simplified SaaS user experience while maintaining complete control over hardware, software, security, infrastructure, and related costs. Some SaaS cloud providers make their software available to install locally for this purpose. You’ve already seen how CARTO is an open-source project that can be installed in a local environment [1]. Most people would rather pay CARTO for a subscription than go to the trouble of setting up and maintaining a local instance; therefore CARTO continues to operate successfully as a business, however, the option for an on-premises deployment exists.
In this lesson, we’ll discuss how a local implementation of ArcGIS Online can be deployed using an Esri product called Portal for ArcGIS. We'll also take a deeper look at Esri's means for organizing maps and data through its ArcGIS Online organizational subscription services.
Lesson Objectives
At the successful completion of this lesson, you should be able to:
- describe how organizations could deploy software as a service (SaaS) solutions on their own internal clouds;
- understand the relationship between publicly available ArcGIS Online organizational pages and internal deployments using Portal for ArcGIS; and
- Perform some administrative tasks on your Server and Portal installations.
Deliverables
- Complete: L09: Assignment
- Participate: L09: Discussion
The role and context of Portal for ArcGIS
To understand Portal for ArcGIS, it’s helpful to examine how Esri server-based GIS products evolved. Years ago, Esri customers had to deploy ArcGIS Server onsite in order to publish web services. Eventually, ArcGIS Online was released with an interface that allowed people to publish feature services and (rasterized) tiled map services in the cloud without owning ArcGIS Server.
These ArcGIS Online hosted services were popular with customers that needed to make basic mashups with basemaps and thematic overlays but didn’t want to implement a full-blown ArcGIS Server. Other useful features included the ability to create, save, and share web maps using the map viewer tools you’ve been exercising in the past few lessons. This was done within the umbrella of an ArcGIS Online “organization” that Esri customers could create and administer.
In order to allow their customers the option to run such a solution on premises, Esri introduced Portal for ArcGIS. This gave organizations a basic browser-based interface where employees could upload data, make GIS web services, create maps, and share them with others at their workplace. It had the same features as an ArcGIS Online organization, but a connection to the Internet was not required.
This new Portal for ArcGIS product could be connected or “federated” to an ArcGIS Server site to give greater exposure to ArcGIS Server web services throughout the organization. The ArcGIS Server could further be configured as a “hosting server” in order to power the feature services and tiled map services published by portal users. Thus, the ArcGIS Online and ArcGIS Server functionalities were brought together. At version 10.5, Esri rebranded the ArcGIS Server + Portal for ArcGIS and their supporting components as ArcGIS Enterprise and developed a more integrated installation experience.
Esri now encourages customers to install Portal for ArcGIS as a user-friendly interface to their ArcGIS Server deployment. Think about the way you have been looking at your own ArcGIS Server site so far: because you are an administrator, you have access to ArcGIS Server Manager. That's easy enough to navigate, but your server users would just see the REST Services Directory, a very minimalist application that was built with developers (i.e., programmers) in mind. Portal for ArcGIS gives a nicer looking face to these services and can also function as a collaborative tool for internally sharing GIS services, maps, and data.
At this point, stop and read the following article very carefully, paying attention to the graphical figures. It describes in detail the different levels of integration you can configure between a portal and an ArcGIS Server site.
About using your portal with ArcGIS Server [2]
When learning about Portal for ArcGIS, be aware that the term “portal” is a term broadly used across the web that can mean several different things. Even in GIS contexts, a portal is traditionally a site where a person can go to find data downloads. Indeed, Esri still makes available software called GeoportalServer for building these types of sites. Portal for ArcGIS, however, is broader than these traditional portals in the sense that people can publish items to a back-end server. They can also use interactive tools on the portal to make and share maps. In this way, the portal goes beyond being a data catalog to acting as a multi-purpose GIS platform.
Touring ArcGIS portals and organizations
This lesson provides a tour of some public facing ArcGIS Online organizational pages while also describing how Portal for ArcGIS is configured and used.
Exploring some ArcGIS Online organizational pages
Organizations wanting to share access to maps and data links with the public will often do this on ArcGIS Online using “organizational” pages that are similar to look and function to Portal for ArcGIS. It is rare or unlikely that you will find a Portal for ArcGIS implementation open to the public because, in most cases, portals are isolated to internal environments for security and resource management purposes; however, looking at these organizational pages on ArcGIS Online can give you an idea of how a portal interface feels and behaves. Esri sometimes even refers to ArcGIS Online as a type of portal (lower-case "p"), not to be confused with the Portal for ArcGIS (upper-case "P") software product meant to be installed on internal infrastructure. We will keep this distinction between a lower-case portal and upper-case Portal in mind and use it throughout the lesson.
See this article for Esri’s official take on the difference between ArcGIS Online organizational subscriptions and Portal for ArcGIS deployments: Understand the relationship between Portal for ArcGIS and an ArcGIS Online subscription [3].
The first page we'll explore is a portal for City of Aurora, Colorado Maps [4]. The page looks somewhat like the default ArcGIS Online site, but it’s been customized with the city’s logo image and some local maps. Click the Gallery link, and you’ll be taken to some web maps that the city has shared with the public. Try a few of them. If you’re a small government, this is a real simple way to get some maps online without having someone with a ton of JavaScript experience on staff.
The Groups link is a place where collaborative groups can be configured for different purposes. Later, we’ll take a look at an organization with some extensive groups. Aurora is not heavily using this feature.
Now, take a look at this portal for City of Rio de Janeiro, Brazil [5]. It uses the same sort of layout and concept, except everything is in Portuguese. Explore around a little bit with a few of the maps in the gallery.
Here’s one more example from the International Joint Commission [6]. Go to this page and explore. Then click the Groups link. The International Joint Commission is a large governmental organization made up of US and Canadian offices. The groups page allows maps and other resources to be organized around local sub-jurisdictions. Click a group name, and then click the Content tab to see some of the maps shared in each group.
The three pages we’ve looked at all have a similar look and feel, as they have just undergone some minor customization from the default style. An example of a page with a bit more customization is Boston Maps [7]. Navigate around this page for a while and you’ll see that although the style on the surface looks a bit different, underneath you have the same core links and structure.
Finally, take a closer look at our own organizational ArcGIS Online instance at Penn State [8]. In this case, you can sign into the site to get access to more content and functionality than you had in the other cases. In the Penn State organization, you can create content (maps, apps, etc.) and upload data, all of which are hosted by esri's servers in the cloud (likely running on AWS or Azure infrastructure). As the sites are utilized, apps developed, and data uploaded, credits are consumed. Credits cost real money, and the amount can add up very quickly, particularly when uploading large quantities of data (imagery can be a culprit) or running geoprocessing tasks repeatedly (think of running a geocoding operation on addresses across the country). As we discussed earlier, these personalized ArcGIS Online organizations are a quick and easy way for you to create your own portal, but they aren't free. Being thoughtful about how they will be used and if restrictions should be put in place to prevent users from consuming excessive credits (intentionally or accidentally) is a good idea.
Tour of Portal for ArcGIS
Because most Portal for ArcGIS deployments are not public facing, this lesson does not offer an interactive tour; however, please watch this video segment [9] from the 2016 Esri International User Conference where product evangelist Derek Law demonstrates an example portal. This link starts at about 28 minutes in, and you should watch it until at least minute 32.
Notice that the user experience of Portal for ArcGIS is nearly the same as with an ArcGIS Online organizational page. The main difference is that the back end hardware is managed by your organization, not Esri. The name and password that you use when you log into the portal is also managed by your organization; Esri does not store or do anything with those credentials, and something like your ArcGIS Online developer account would not work for logging into someone's portal.
If you are still not entirely certain of the purpose or functionality of the portal, or if you are confused about the difference between Portal for ArcGIS and ArcGIS Online, I recommend watching the entire presentation in the above video link. The beginning part of the video is introductory chatter, and the technical material starts at about 7 minutes in.
Setting up a portal
Back in Lesson 2, we installed ArcGIS Enterprise. Per the Esri help topic What is ArcGIS Enterprise [10], the product comes with:
- ArcGIS Server
- Portal for ArcGIS
- ArcGIS Data Store (this holds data used by the portal)
- ArcGIS Web Adaptor (this is a small application that allows the portal and server to hook onto your organization’s existing web server)
Up to this point, we've only really interacted with the ArcGIS Server portion of the Enterprise suite of products. And that's perfectly reasonable, because Server is the backbone of Enterprise, and is the component that does the heavy lifting of publishing your data and services. There are many use-cases in which only an ArcGIS Server is utilized in a production setting. Portal is an optional component and one that may be very useful in some cases. A very common setting for a Portal installation is an organization that has a collection of datasets to manage and some number of users that need to interact with the data with varying levels of access and editing privileges. Portal provides a way to interact with Server through a GUI that presents functionality, like users, groups, permissions, and sharing, in a perhaps more user-friendly manner. Read more about Portal on the esri website [11].
As we saw earlier, installing and configuring ArcGIS Enterprise requires close collaboration with IT staff in your organization. In particular, if you recall, there were a couple things I needed to set up for you before you could run the CloudFormation installation. The installation requires a fully-qualified domain name and an SSL certificate that will allow for encrypted connections. These are things that we typically don't acquire on our own; instead, we work with our local IT folks or other organizations to set them up for us. Let's revisit these items and talk about why they are necessary for an Enterprise installation.
Internet Protocol (IP) Addresses
Every computer that's on the Internet, whether a physical machine like your desktop or laptop computer, a physical computer server in a server farm somewhere in the world, or a virtual machine like the ones we created in AWS, has a unique number that identifies it on the network. This is its IP number (or address). IP numbers typically have the form of four sets of values separated by periods, and the values can be between one and three characters. For example, 123.4.56.789 is a possible IP address.
(In order to expand the range of possible IP numbers, a new style of IP addresses with much longer values has been developed. This is called IPv6, and you may see computers with such numbers, particularly when connecting to wi-fi networks hosted by large Internet Service Providers (ISPs) like Verizon or Comcast. But we won't get into that here and just focus on IPv4.)
When we created our EC2 Instances in AWS, they were assigned a local IP number that's only unique within the Amazon ecosystem. So, we created an Elastic IP number and attached it to our Instance so that our machine is now uniquely identified on the Internet. Organiaztions, like Penn State and Amazon, are allocated a specific range of IP numbers that it is allowed to use for its computers, and those IP numbers are unique and do not exist in any other place on the Internet. By creating an Elastic IP (and paying a fee to reserve it for ourselves), Amazon assigned each of us one of its allotted IP numbers, which assures us that our IP address is, in fact, unique.
Domain Name System (DNS)
At this point, our virtual machine (EC2 Instance) is uniquely identifiable on the Internet. You could open a web browser and type the IP number into the address bar and connect to your computer's web server. But, as you know, it's rarely the case that you enter an IP number to visit a website. Rather, we use a more friendly-looking address to reference a server. These fully-qualified domain names (FQDN) consist of a specific server name, like baxtergeog865xxxx, and a domain, like e-education.psu.edu. In Geog865, we all have addresses on the same domain (e-education.psu.edu), but we each have our own individual name in front of it. Like IP numbers, these FQDNs are unique on the Internet and are a more convenient way to specify a web address. However, for that to work, the FQDN must be associated with the IP number of the machine it's intended for.
DNS is the resource that registers domain names and their corresponding IP addresses on the Internet. DNS entries must be made by an authoritative provider to be sure that the information is properly registered on the Internet, so that anyone typing the name into their browser will direct them to IP address of the correct server. In Geog865, I asked the IT department to register our names in DNS, since they have authoritative access and ownership over the e-education.psu.edu domain. Amazon has it's own mechanism called Route53 [12], which may be used for some domain names [13]. When we began this semester, I asked you to send me your Elastic IP. I then created a FQDN for you (using your last name and semester with geog865xxxx.e-education.psu.edu). Finally, I provided your domain name and corresponding IP address to the Penn State IT folks to register then in DNS.
Secure Sockets Layer (SSL)
Another reason it is important for us to utilize a FQDN (and why it is required by ArcGIS Enterprise) is that we need to enable Secure Sockets Layer (SSL) on our servers. SSL encrpyts all traffic to and from our webserver to make it more secure and harder for hackers to intercept. You know that SSL is enabled on a website when you see the https prefix on its URL instead of http. Most web servers, ISPs, and software products (like ArcGIS Enterprise) are now requiring SSL to be enabled. Similar to DNS, SSL is enabled by generating a certificate from an authoritative provider that is specific to a particular domain name. SSL certificates aren't associated with IP addresses, which is one reason why it is neccessary for us to utilize FQDNs on our ArcGIS Enterprise installs.
The SSL certificate verifies your web address’s identity and is usually obtained for a fee from a certificate authority. IT departments typically manage the acquisition and distribution of these certificates throughout their organizations. In the case of our Geog865 installations, I asked the Penn State IT department to request an SSL certificate containing all of our domain names from an authoritative provider, in our case, an organization called InCommon. I provided this certificate, in the form of a .pfx file, to everyone to supply to the CloudFormation template. You can inspect your SSL certificate by visiting your ArcGIS Server or Portal website and clicking the lock icon next to the https url and browsing its contents.
CloudFormation
Deploying ArcGIS Enterprise on clouds like AWS or Microsoft Azure might be simpler in some ways than doing it on-premises because Esri has automated parts of the configuration process with tools like Cloud Formation [14]. This is possible because all the software and configuration on the AMIs are well known. Installation in your on-premises environment could become complex if you are running some kind of software, scan, or policy that doesn't "play nicely" with one of the ArcGIS Enterprise components. Furthermore, if you're not on the IT staff, you might have greater control over cloud accounts and environments than you typically do in your on-premises environment. Tools, like Enterprise Builder [15], exist to facilitate the installation of Enterprise on an existing machine.
Since we used the Cloud Formation template to install Enterprise on our AWS machines, Portal was installed as well. You should be able to connect to your Portal with a URL like namegeog865####.e-education.psu.edu/portal. You should see a default-looking ArcGIS Online page, which illustrates essentially what Portal is: your own local, stand-alone instance of ArcGIS Online.
Sign in using the ArcGIS Site Admin username and password you created in the Cloud Formation template. You will see options to manage Members (users), view your software licenses (esri software like ArcGIS Pro and other extensions have the option to be licensed through Portal in some cases), monitor the usage of your Enterprise installation, and configure the Settings of your Portal. Explore the Settings options that are available and check out esri documentation to learn more about options like configuring your home page [16] with a custom look and feel, managing your Servers, and specifying default settings.
Administering ArcGIS Enterprise
For this week's assignment, we're going to perform a few admistrative tasks to be sure our Server and Portal sites are running smoothly. Return to your AWS Console and start the EC2 instance you used in Lessons 2 - 4.
There a number of ways to access configuration options for ArcGIS Enterprise. Two of these options are via a web browser. Depending on how your Enterprise installation is configured, you may need to use a browser on the EC2 instance itself through a Remote Desktop connection rather than from your local computer. In these cases, administrative access has been disabled from remote client machines. This is a setting you could change on your server, as well as confirming the appropriate firewall ports are open. For now, visit these sites from a browser on your EC2 machine:
- ArcGIS Server Manager (e.g., baxtergeog865####.e-education.psu.edu/server/manager), which allows us to manage map services but has limited administrative control of the underlying site.
- ArcGIS Server Administrator Directory (e.g., baxtergeog865####.e-education.psu.edu/server/admin), which provides access to many of the underlying configuration settings of the Server, WebAdaptor, DataStore, and Portal installations. Be careful when exploring this site, as one erroneous alteration could render your Enterprise server unusable.
- ArcGIS Pro (or ArcGIS Desktop), from which you can make a connection to your server and explore its properties and contents.
Let's explore the ArcGIS Server Manager site. Visit your Manager site with a url like, baxtergeog865####.e-education.psu.edu/server/manager.
Under the Services tab, you should see the various services you've created so far in the course lessons. Click the pencil icon next to one of your services to see the options you have to administer them. Explore the various sections by clicking the tabs along the left of the window. A few things to look for in particular:
- Under Paramaters, you'll see a setting for Maximum Number of Records Returned by Server. This is a setting for vector services that will limit the number of individual features rendered for a client request. For example, if you have a large roads layer, with hundreds of thousands of individual line segment features, the server will stop rendering the map when it reaches the number of features specified in this setting. If a client zooms out sufficiently far when viewing the service, not all of the road features will appear on the map. This setting can be useful in preventing the server from getting overloaded by a client request that inadervtently calls for the rendering of so many features that the server maxes out its CPU capacity trying to draw everything. Setting this number low protects the server from becoming overwhelmed and slowing down any other requests, but does so at the expense of all features being displayed on a requested map.
Similarly, the Maximum Image size settings put a limit on the size of the map image the server will generate for a client request. If a client with a very high resolution monitor and large pixel dimensions, a map image of that very large size will be requested of the server; the larger the image, the longer it takes the server to process the request and the more resources (CPU, RAM, etc.) will be utilized. Capping image size at a certain pixel range will guard against excessively large images being requested and bogging down the server.
- Under Pooling, your service is probably set to utilize a Shared Instance Pool. Check out this documentation page to learn about Pooling and service instances [17]. Basically, each client request for a service is processed by a service instance on the server. By default, ArcGIS Server creates a set of shared instances that can process a request for any service that is configured to use the shared pool. These instances can be seen on your server using the Windows Task Manager. When connected to your EC2 instance via Remote Desktop, open the Task Manager by right-clicking the task bar along the bottom of the screen and choosing Task Manager. Activate the Processes tab, and expand the ArcGISServer EXE background process.
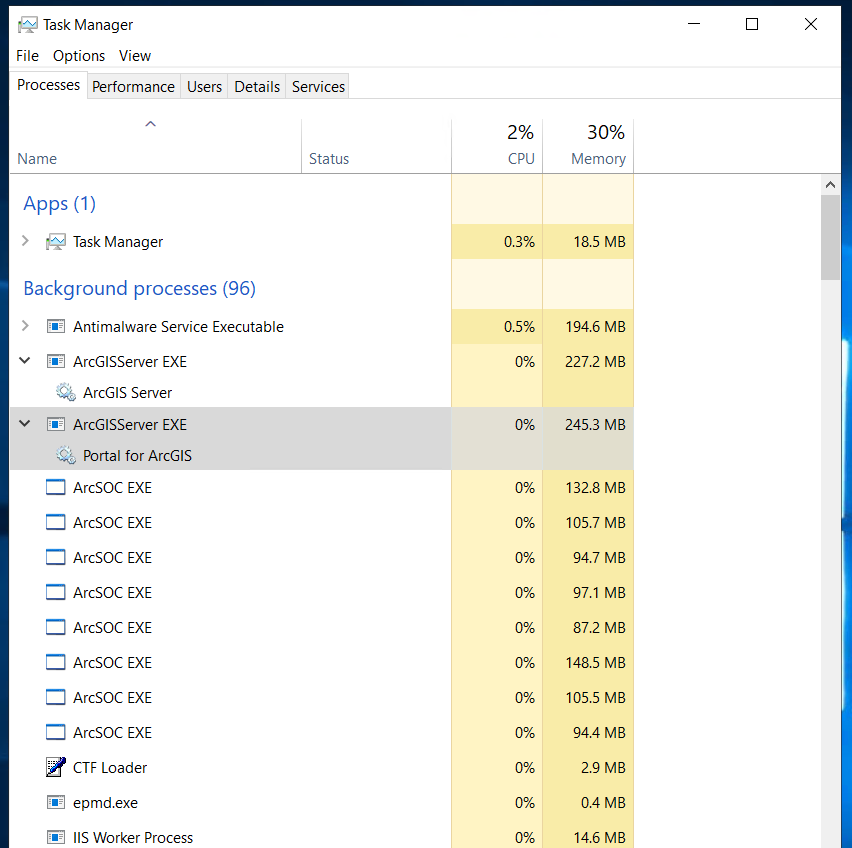
Each of the ArcSOC EXE items you see listed represents one service instance. Some are part of the default pool of shared instances, and others are dedicated to a specific map service. Let's configure a service to utilize its own dedicated instance(s) and see how it appears in Task Manager. First, count the number of ArcSOC EXE processes you see in Task Manager. Next, back on the ArcGIS Server Manager site, change a service's Instance Type setting to Dedicated Instance Pool. After doing this, you will be able to specify the maximum and minimum number of instances for the service. Set the minimum to 5 and the maximum to 10. Return to the Task Manager on your EC2 machine and you should see several more ArcSOC EXE processes listed. Initially, you'll probably see 5 new ArcSOC processes. Your server can now process 5 concurrent client requests for this service in parallel. If, say, there is a time when there are 8 concurrent client requests for this service, ArcGIS Server will spin up three more ArcSOC processes to handle the requests. This can continue up to the maximum number of processes you allow (in our case 10). Beyond that, concurrent requests in excess of 10 will need to wait until prior requests are processed before being addressed. There are tradeoffs of changing these settings and there's no configuration that is ideal for every scenario. It depends on how many client requests you expect services to receive, how long it takes requests to be processed, and how much CPU and RAM resources your server machine has when deciding how to configure things. In any case, you can see some of the options you have for tuning your particular server environment.
For this week's assignment:- Take a couple screen grabs of your Task Manager and ArcGIS Server Manager before and after changing a service's instance type settings and include them in your assignment submission.
- Also, write a paragraph that describes a scenario in which you might configure services with different pooling options and what the ramifications of those setting might be.
Under the Site tab in the ArcGIS Server Manager, you'll see a few sub-sections that contain many of the properties of your Server's configuration. Among these are:
- Directories: paths to the folder locations on your server where various files are stored.
- Machines: a list of all of the physical or virtual machines in your architecture. In this class, we have only set up a single machine, but you may have an architecture that includes several machines that help distribute heavy loads from clients.
- Data Stores: a list of all the folder and database locations where the data behind your map services are stored. You should see the Data folder and Geodata database we set up in an earlier lesson. You'll also see the default Data Store locations for relational (raster and vector) and tile cache data.
Another useful page on this site is the Software Authorization sub-section. Click that heading and you'll see the licensing information for you installation. This can be useful when determining when you need to renew licenses or remember which extensions you have access to.
- For this week's assignment:
- Take a screen grab of your Server Authorization page.
Finally, click on the Logs tab of the ArcGIS Server Manager site.
The View Logs sub-section is a place you can go to view error logs generated by your ArcGIS Server. This can be a very useful place to look when services aren't working properly. You can change the level of log detail to view by changing the Log Filter dropdown; the Debug option will show you the most information. You can also change the way logs are generated and stored on your server by clicking the Settings button. The Debug option will result in the most comprehensive log files, which you can filter any way you'd like when viewing, but it's not recommended to leave your logs configured to Debug for very long because the log files stored on your server will get very large and take up a lot of space. But when troubleshooting a problem it's good practice to set the log setting to Degub temporarily to investigate the problem and to then revert it back to Warning or Severe afterwards to save space.
The Statistics sub-section is a very useful resource for monitoring the client usage of your server. You will see graphs of a few default reports on the statistics page that you can click and interact with. Click on the Total Requests for the Last 7 Days graph. You will see all of the services running on your server listed along the left. You can toggle the visibility of them individually to see their usage on the graph. You also have the option to specify the timeframe of the statistics report. Often, when running your own ArcGIS Server installation you will want to understand how your services are being utilized by clients, or you may need to generate numbers for other people in your organization to demonstrate the value of the services you provide. These dynamic graphs are a useful tool, and you may export the data as a .csv spreadsheet and extract information using a tool like Excel. Back on the main Statistics page, you can click the New Report button to create a custom view and save it as a thumbnail. You might create a custom report of a handful of your services and a relevant timeframe for your organization, maybe the last month, and export a report regularly to monitor usage over time.
You can also generate reports using a custom toolbox in ArcGIS Pro. This can be useful if you need to create a report that the web-based interface won't support. For example, the Statistics page in the ArcGIS Server Manager will only list a limited number of services in the toggle list. If you need to generate a report of more services, you'll need to run a custom tool in ArcGIS Pro to create and save the report. Below, we will see where custom reports are stored in the adminstrative section of ArcGIS Server.
- For this week's assignment:
- Create a new report, save it to your Statistics page, and take a screengrab of the Statistics page showing thumbnails of the default reports and your new custom one.
Open a new browser tab and visit the ArcGIS Server Administrator Directory (baxtergeog865####.e-education.psu.edu/server/admin). Log in with your siteadmin credentials. I don't recommend making any changes here, but feel free to explore the various sections to see the types of information that's available.
From the root page, click on the usagereports link. You will see a list of some default reports; if you create custom reports using ArcGIS Pro, they will appear on this page. You have the option to export the data from any of these to an .html, .json, or .csv file.
Back on the root page, click on the System link. From here you can view the licensing information of your installation, web adaptor configurations, and the directories where logs, tile caches, and other files are stored, among other things. Click on the webadaptors link. You will probably only see one web adaptor, with a long alpha-numeric name, listed. Click on the web adaptor name and you'll see that it specifies the name of the machine, its IP address, and the port (80 or 443) that it uses. In a production setting, the web adaptor will specify the fully-qualified domain name (e.g., baxtergeog865####.e-education.psu.edu) of your server and its public IP address (your Elastic IP). Recall that the web adaptors link our ArcGIS sites with the machine's web server, which in our case is IIS (Internet Information Services). There will be a separate web adaptor configured for the server and portal portions of your site. In the cloud formation template, we specified a name for our server site ("server") and our portal site ("portal"). The cloud formation template didn't do that for us here (although our sites still work), but in a production setting, you will have web adaptors listed here that link both the server and portal urls to your installation.
Finally, let's open our web server to see that both the server and portal folders have been created for us. From the desktop of your EC2 instance, click the Start button and type IIS. Click on Internet Information Services Manager when it appears in the list. Expand your server to view the contents of the Default Web Site. You should see two virtual directories listed: server and portal.

Virtual directories link a url folder name to a physical folder location on our server. The urls for these two directories take the form:
- https://baxtergeog865####.e-education.psu.edu/server
- https://baxtergeog865####.e-education.psu.edu/portal
Enter each of these in a new browser window and you will see that they take you to your server and portal sites. Back in IIS, right-click on either the portal or server virtual directory, choose Manage Application, and click Advanced Settings. You will see a path on your server's C: drive that contains the web content for each site. You can use Windows Explorer to browse to those folders and see their contents. In summary, the web adaptors link the two urls above to the virtual directories in the web server. When installing ArcGIS Enterprise in a production setting or using tools other than cloud formation, there is a post-install setup procedure to get this all configured. Esri provides documentation [18] detailing how that process works. Not something we want to mess with here, but something you'll need to do when configuring ArcGIS Enterprise in your production environment.
Assignment: Administrative Tasks
For this week's assignment, please create a single document containing all of the following:
- A screen grab of Task Manager.
- A screen grab of the Server Authorization page.
- A screen grab of the Statistics page showing your custom report.
- A paragraph discussing the implications of different service pooling configurations.
Cloud Computing Discussion: The future of cloud computing and cloud GIS
For this week’s discussion, we will think together about the future of cloud computing, and by extension, of cloud GIS. Please read What's the future of cloud computing? [19] Also, please read The Cloud as a Tectonic Shift in IT: The Irrelevance of Infrastructure as a Service [20]. This blog post by the CTO of CloudBees contains some interesting predictions about the future of IaaS, PaaS, and SaaS.
If you have the optional textbook, you can supplement this with the chapter titled “Cloud 9: The future of the cloud.”
Please pick one of the predictions from the articles or book chapter that you find interesting, and write about why you found it interesting. For example, you could find one of the predictions thought-provoking, or you might disagree with the authors. Also, please make your own prediction about how the advent of cloud computing will effect GIS. One way to approach this would be to extend the prediction you reacted to into GIS. Then, respond to one of your classmate's predictions.
Deliverables for this week's technology trend:
- Post a comment in the Canvas L09: Discussion addressing one of the predictions from the book chapter or article for this week. Also, please write your own prediction on where cloud GIS is headed.
- Then I'd like you to respond to one of your colleagues' predictions.
- Brownie points for linking to other technology demos, pictures, blog posts, etc., that you've found to enrich your posts so that we may all benefit.