Lesson 7: Unity I
Overview
Overview
In this and the next two lessons, you will be working with the Unity3D game engine, simply referred to as Unity throughout the rest of the course. Unity is a rather complex software system for building 3D (as well as 2D) computer games, and other 3D applications. Hence, we will only be able to scratch the surface of all the things that can be done with Unity in this course. Nevertheless, you will learn quite a few useful skills related to constructing 3D and VR applications in Unity dealing with virtual environments. Furthermore, you will become familiarized with C# programming (the main programming language used in this engine) through a series of exercises that guide you on developing your first interactive experience in a game engine.
This lesson will begin with an overview to acquaint you with the most important concepts and the interface of Unity. It will cover basic project management in Unity, the Project Editor interface, manipulation of a 3D scene, importing 3D models and other assets, and building a stand-alone Windows application from a Unity project. Moreover, you will learn how to create a very simple “roll-the-ball” 3D game using C#, which will prepare you for more advanced interaction mechanics we will be implementing in the next lessons.
Learning Outcomes
By the end of this lesson, you should be able to:
- Explain the role of interaction for 3D/VR projects and the role of game engines for enabling access to 3D models
- Create 3D projects in Unity3D, import 3D models, and understand the basic concepts and interface elements of the Unity editor
- Manipulate scenes and add script components to game objects
- Import custom Unity packages into a unity project
- Develop a basic understanding of the physics engine of Unity (e.g. gravity, collision detection)
- Run projects inside Unity and build stand-alone applications from them
- Have a basic understanding of how to make an experience come “alive” by programming behaviours for game objects
Lesson Roadmap
| To Read |
|
|---|---|
| To Do |
|
Questions?
If you have any questions, please post them to our "General and Technical Questions" discussion (not e-mail). I will check that discussion forum daily to respond. While you are there, feel free to post your own responses if you, too, are able to help out a classmate.
The Unity3D Game Engine
The Unity3D Game Engine
Unity is a game engine developed by Unity Technologies. Development started over a decade ago and the initial version of Unity was released in 2005. Unity has experienced rapid growth, in particular over the last few years, and is undoubtedly the most popular game engine out there. According to the Unity website, 50% of mobiles games, and 60% of AR/VR content are made with unity. The company has over 2000 employees and more than 3 billion devices worldwide are running unity [1]. There have been several major releases of Unity over the years with new minor versions being released on a regular basis. The current major release is Unity 2019 with the latest stable version being version 2019.1.10 at the time of this writing. In 2010, Unity Technologies launched the Unity Asset Store, an online marketplace where developers can obtain and sell assets for their Unity projects including tools and extensions, scripts, artwork, audio resource, etc. (Unity Asset Store [1]). Today there exists many side products and activities around the Unity platform. For instance, Unity offers its own Certification Program (Unity Certification [2]) to interested individuals and has its own VR/AR division called Unity Labs (Unity Labs [3]).
One of Unity’s main advantages is that it is cross-platform both during development time and deployment. Unity applications can be deployed for many platforms including Windows, macOS, Linux, and different mobile operating systems. That means not only can you choose on which operating system you want to create your 3D application but once it has been created, it can be deployed to a large variety of devices. For instance, you can build stand-alone programs for the common desktop PC operating systems (Windows, macOS, Linux, etc.) as well as versions for different mobile phones (e.g., Android-based phones and iPhones). Of course, the differences in performance and hardware resources between a PC and a mobile phone need to be considered, but there is support for this in Unity as well. In addition, Unity has been a front-runner when it comes to building VR applications and supports or provides extensions for a large variety of consumer-level VR devices such as the Google Cardboard, Gear VR, Oculus Rift, HTC Vive, and other mainstream HMDs. Three of the most popular VR development plugins (a series of libraries and pre-made game objects that facilitate access to HDMs and enable developers to program different functionalities) for unity are SteamVR (by Valve corporation), OVR (also known as Oculus integration, by Oculus), and VRTK (a community-based plugin by Sysdia solutions).
While its origin is in the gaming and entertainment industry, Unity is being used to develop interactive 3D software in many other application areas including:
- simulation (Universe Sandbox [4]);
- educational/training simulations (Surgical Anatomy of the liver demo [5]);
- design, architecture, and planning;
- virtual cities and tours;
- data visualization (NOAA [6]);
- history and cultural heritage;
- cognitive science research;
- and last but not least geography and GIS.
More examples can be found at Made with Unity [7]
In this course, we will use Unity to build simple interactive and non-interactive demos around the 3D environmental models we learned to create in the previous lessons. You will also learn how to produce 360° videos from these demos such that these can be watched in 3D using the Google Cardboard. Lastly, you will learn how easy it can be to add physics to different geometrical objects in unity and make them “behave” the way you want.
Assignment (Unity 3D/VR Application Review)
Search the web for a 3D (or VR) application/project that has been built with the help of Unity. The only restriction is that it is not one of the projects linked in the list above and not a computer game. Then write a 1-page review describing the application/project itself and what you could figure out how Unity has been used in the project. Reflect on the reasons why the developers have chosen Unity for their project. Make sure you include a link to the project's web page in your report.
Grading Rubric
| Criteria | Full Credit | Half Credit | No Credit | Possible Points |
|---|---|---|---|---|
| URL is provided, the application/project uses Unity, is not already listed on this page, and is not a game. | 2 pts | 1 pts | 0 pts | 2 |
| The report clearly describes the purpose of the application/project and the application itself. | 3 pts | 1.5 pts | 0 pts | 3 |
| The report contains thoughtful reflections on the reasons why Unity has been chosen by the developers. | 3 pts | 1.5 pts | 0 pts | 3 |
| The report is of the correct length, grammatically correct, typo-free, and cited where necessary. | 2 pts | 1 pts | 0 pts | 2 |
|
Total Points: 10 |
References
[1] Unity [8] (accessed on July 16, 2019)
Downloading and Installing Unity
Downloading and Installing Unity
Before providing an overview of Unity’s main concepts and interface, let us start by downloading and installing Unity so that you can follow along and immediately start to experiment with the things you will learn about. Unity comes in three different versions: the “Personal” is completely free, while the “Professional” comes at a monthly fee ($125 at the time of this writing), and the “Plus” at a monthly fee (25$ at the time of this writing). For our purposes, the Personal Edition is completely sufficient. If you are interested in knowing more about the differences between the versions, an overview is provided at unity Store [9].
Please follow the instructions below to download and install the Personal Edition of Unity:
-
Go to Download Unity [10] and click on “Download Unity Hub“. The Hub is a new mechanism for managing the different versions of the Unity editor you want to install on your machine.
-
Execute the downloaded file (UnityHubSetup.exe) and go through the installation dialog. Once the installation is finished, if you have checked the “Run Unity Hub” option at the end of the installation process, when you click on Finish, the Unity Hub will open. Alternatively, you can also navigate to your desktop and double click on the newly created Unity icon named “Unity Hub” to start it.
-
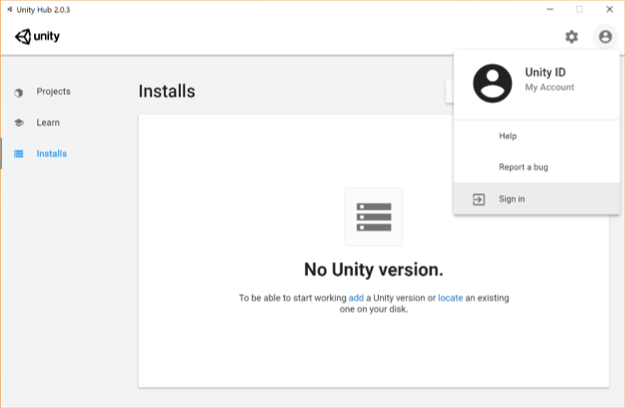
You should be able to see a window as depicted below. Locate the profile icon on the top right corner of this window, click on it, and then select “Sign in”. A new window will pop up asking for your login information. Sign in with your unity account. If you do not have a unity account, go ahead and create one using the “create one” link on the pop-up window, and then sign in.
 Credit: Unity [11]
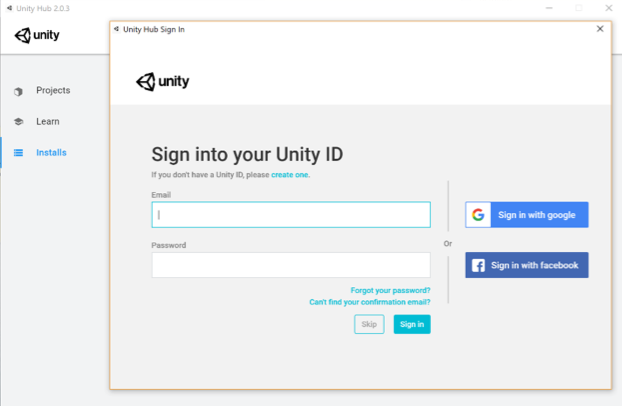 Credit: Unity [11]
 -
Once you are signed in, make sure the “Installs” category is selected on the left panel (the one highlighted with the red area in the figure below) and click on the blue “Add” button. A new window with pop up where you can select which version of unity you want to install. At the time of writing this, the latest stable version is 2019.1.10f1. Please download this version as it is compatible with the rest of the instructions given in the course (if you choose to install a new version of the editor, you might need to change some of the c# codes we will be using). To do so either click on the "Download archive" on the window that has poped up, or follow this link (https://unity3d.com/get-unity/download/archive [12]). This action will open a new tab in your default web browser. On that web page, select the Unity 2019.X, navigate to almost the end of the page and then click on the green button next to "Unity 2019.1.1" that says "Unity Hub". This will open this version of Unity editor in the Unity Hub for you to download and install.
This action will automatically proceed to the next dialog window in the Unity Hub, where you can select which extra modules to install. If you do not have Microsoft Visual Studio, it will be automatically selected for you on this list. Moreover, if you are developing on Linux or Mac, make sure to select the relevant “Build” module for your OS, so can deploy your virtual experience as a desktop application later. Click “Next” and wait until the installation is finished (This could be a lengthy process, so be patient).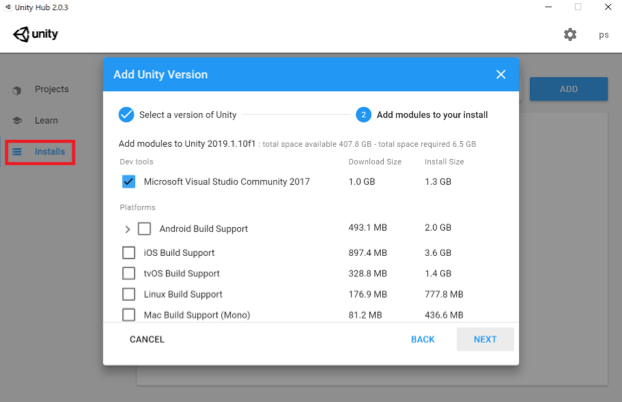 Credit: Unity [11]
 -
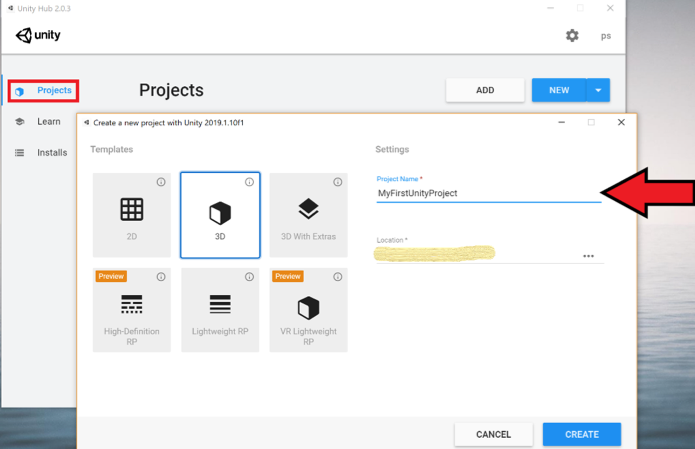
Once the installation is complete, you should have a Unity icon (with a specific version) on your Desktop and “Unity” in your Start Menu. Before Starting Unity, we need to create a project. To do this, make sure the “Projects” category is selected in the Unity Hub (the one highlighted with the red area in the figure below) and click on the blue “New button”. Unity provides several templates for us to choose from (depending on the purpose of the project, e.g. 2D, 3D, VR lightweight RP, etc.). For the purpose of this lesson, we will use the default 3D template. Change the name of your project to “MyFirstUnityProject”. You can also change the location where the project will be saved to another address if you want (this is optional and solely based on your preference). Press “Create”, and after a few minutes the unity editor will be ready for us to use.
 Credit: Unity [11]
Unity Interface and Basic Unity Concepts
Introduction
Unity Interface and Basic Unity Concepts
Introduction
A Unity project consists of one or more Scenes and each Scene is formed by a set of GameObjects located in the Scene. The name GameObject obviously is based in Unity’s main purpose as a game engine but these entities can be anything that we would want in a 3D application: 3D models of buildings, terrain, lighting sources, cameras, avatars, etc. They can also be non-physical things, in particular, abstract entities just serving as containers for scripts that perform some function such as realizing changes in the environment when the 3D application is executed. The main programming language used to write scripts in Unity is C#.
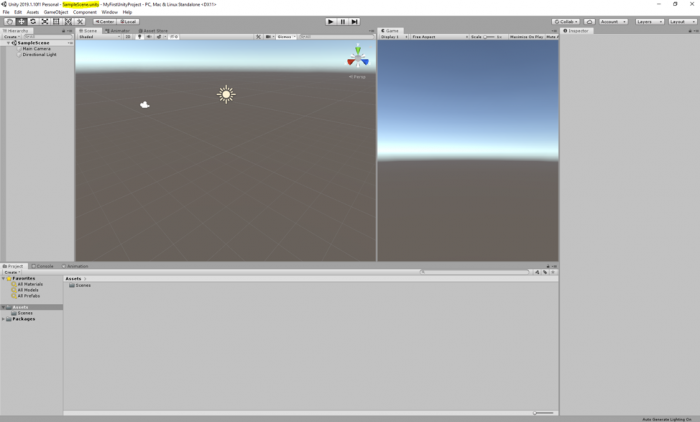
When editing a project in Unity as well as when executing a Unity project, only one Scene is active at any given moment. Each Scene has a name and you can see the name of the currently active Scene in the title bar: There are four parts separated by hyphens, the version of Unity, the name of the Scene, the name of the project, and the platform currently chosen to build the Unity project for. The Scene name part right now will be “SampleScene” as this is a default scene automatically create by Unity whenever a new project is created.
In a computer game built in Unity, each level would be a different Scene. In addition, things like cut scenes and menu screens would also be realized as individual Scenes. The game code will then have to implement the logic for switching between the Scenes. Similarly, in a non-game 3D application, you could also have several Scenes to switch between different environments, e.g. an outdoor model and several indoor models.
To give you an example of having more than one scene in a project, as well as how a scene can be populated with gameobjects, we have prepared for you a unity package that contains a scene called “Main”, populated with terrain, and a few classic buildings of the PSU campus in State College. Download this Unity Package [14]. Once the download is complete, simply double click on it, and an import window inside the Unity editor will pop up showing the folder structure inside the package. By default, all the folders should be selected. Click on import, and all the selected folders will be added to the “Assets” structure of your project. If you receive a warning saying that the package was exported using an earlier version of unity, simply click on "Continue".
This is a relatively large package (almost 200MB), and therefore it could take a while before the import is complete.
Once the import is finished, you may notice that a new folder called “Historic Campus” is added to your project folder structure under Assets (highlighted in the figure below). In addition, another folder with the title “Standard Assets” is also added, which is a collection of ready-to-use assets provided by Unity to speed up development time. The standard assets folder contains a “first-person controller” prefab that is used in the historical campus scene.
This folder structure is used to organize the resources of your project. It is good practice to organize your files into folders based on some meaningful structure and add a sensible title to the folders.
If you select the “Historic Campus” folder with your mouse, you can see that its contents are listed on the down-center part of the project panel in the editor. This is another way to view and navigate your project folder structure. There are several subfolders inside the Historic Campus folder that contain the 3D models, textures, and other resources used in the scene. To open the imported scene of the historical campus, simply double-click on the “main” scene. We will this scene to go over the basics of unity.
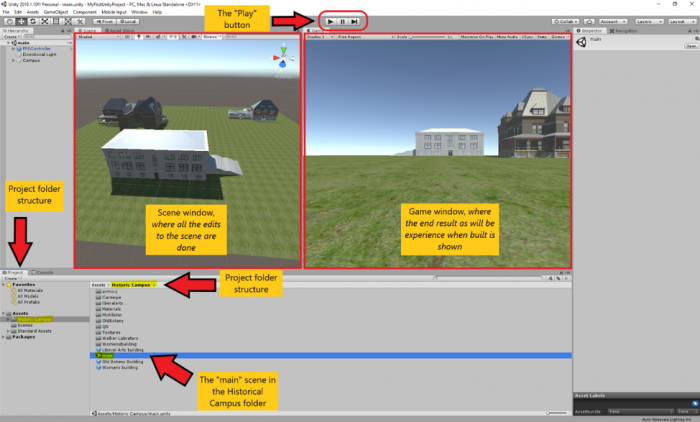
If you click on the small “Play” button on the top center of the editor (alternatively you can use the “Ctrl + P” shortcut), you can run the scene and see it in action. Currently, the scene has three buildings, a simple flat plane, and a first-person controller. Use your mouse to look around, and the WASD keys to navigate the environment. Once you are done experimenting, you can stop the scene from running by either clicking on the play button again or pressing “Ctrl + P”.
Overview on Main Windows in the Project Editor
Overview on Main Windows in the Project Editor
As you may have already noticed in the previous section, there are two main windows in the editor that show two different views of the scene. The window you will mostly look at when creating a Unity project is the Scene Window currently open in the left-center of the screen. It shows a 3D view of the Scene you are currently working on, in this case consisting of a few historic PSU campus buildings from the year 1922 and an underlying plane. The window on the right-center of the screen is called the game window and shows the output of the scene when the project is built. The game window allows you to have a feeling of how this scene of your virtual experience will look like from a user’s perspective, while you are developing. Evident from its title, and as you have already experienced, once you “play” your scene you experience it in this window.
You can alter the arrangement of all the panels and windows to your liking by simply dragging them around. For instance, if you prefer not to see the game window while you are editing your scene, you can drag its panel header and drag it next to the scene window and then drop it.
Video: Unity - Moving windows around (00:12) This video is not narrated.
If you click into the scene window to give it focus, you can then use the mouse to change the perspective from which you are looking at the scene. The details of how this goes are affected by a set of buttons at the top left. The seven buttons on the left are the main ones to control the interaction with the scene and the objects in it with the mouse. For now, make sure that the first button (i.e. Hand tool) is selected as in the screenshot below:

Now go ahead and try:
- Use the mouse wheel to zoom in and out
- Move the mouse with the left button pressed to pan
- Move the mouse with the right button pressed to look around
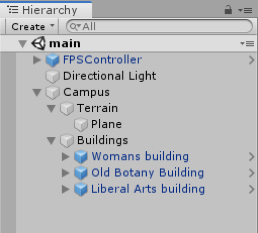
You will learn more details about how to interact with the Scene Window soon. Let us now turn our attention to the panel on the left, which is the Hierarchy panel. It lists the GameObjects in the Scene. Currently, these are the “FPS Controller”, a “Directional Light” and the “Campus” 3D model. The panel is called “Hierarchy” because GameObjects are organized in a hierarchy and the panel shows us the parent-child relationships. The “Campus” object is actually just a container for grouping the 3D objects of the individual buildings, and of the terrain together. By clicking on the small arrow on the left, you can expand that part of the hierarchy and will see the sub-entities of the “Campus” object, called “Terrain”, and “Buildings”. As you probably already noticed, these objects, in turn, are just containers. “Buildings” for instance contains the models of the individual buildings shown in the Scene.
You can double-click on any entity in the hierarchy to change the view in the Scene Window to focus on that particular object. Try this out by double-clicking on some of the buildings, e.g. starting with the “Woman’s building” object.
You may already have noticed that selecting an object in the Hierarchy Window, either by double-clicking it or by just doing a single click if you don’t want the view in the Scene Window to change, has an effect on what is displayed in the window on the right side of the Scene view. This is the Inspector Window, which has the purpose of displaying detailed information about the selected object(s) in our Scene as well as allowing us to modify the displayed properties and add new components to a GameObject that affect its appearance and behavior. If you select the “Liberal Arts” building and check out the Inspector Window you will see that there is a bunch of information grouped into sections, including so-called components attached to the object that will determine how the object will be rendered in the scene. Now compare this to what you see when you select the “FPS Controller” object or the “Directional Light”. Since these are special objects with particular purposes other than being displayed in the Scene, they have special properties related to that particular purpose, for instance, the FPS controller has a child called “FirstPersonCharacter”. This gameobject has a camera component attached to it (as the camera should move when the player character moves around the scene) with multiple parameters (e.g. Filed of view). As an experiment, change the value of the field of view parameter using the slider to see its effect.
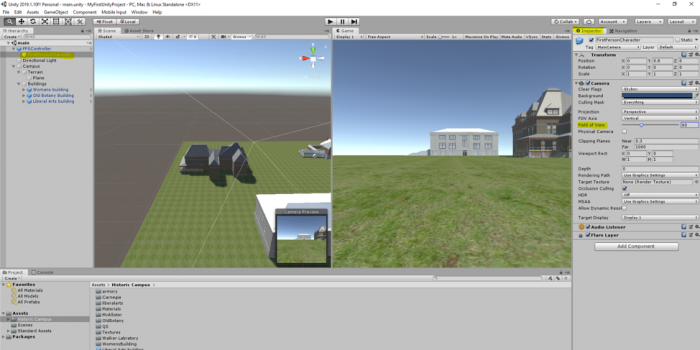
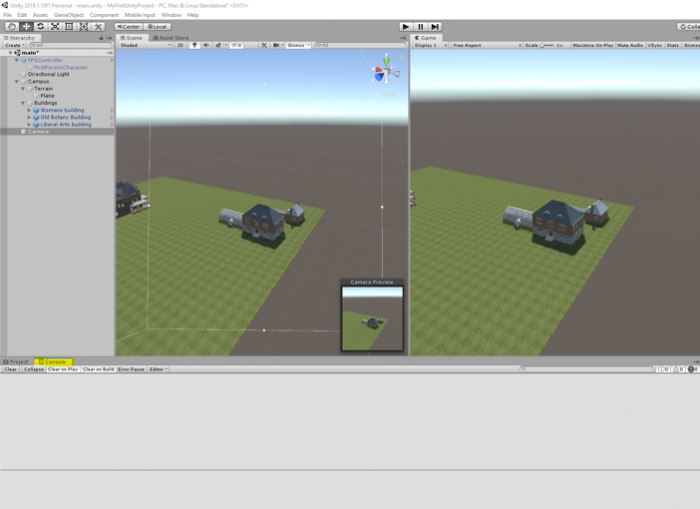
The “Directional Light” is one of several possible light sources that Unity provides. It essentially simulates the sunlight and will be used to render the Scene, resulting in shadows, etc. Instead of having a camera component attached to a child of the FPS controller object, we could have added a static “Main Camera” to the scene. The camera object determines what will be shown when the Unity project is being run, either inside the Unity editor or after we exported it as a stand-alone application. To see the difference, disable the FPS controller and add a main camera to the scene as shown in the video:
Video: Unity - Adding a camera and moving it around (01:06) This video is not narrated.
We first need to disable the FPS Controller by unchecking it in the inspector panel. Then, we need to add a static camera to our scene. To do this, we will click on the GameObject menu on top of the editor and select camera. Next, we need to adjust the rotation and position of our static camera so it captures the part of the scene we want to show. To do this, we will use the menu we have addressed previously to switch our mouse functionalities. In the video, you have seen the use of the Move and Rotate tool. Note that the same results could be achieved by manipulating the numerical transform values of the camera GameObject in the inspector menu. To try this, observe the numerical values while you use the mouse to move or rotate the object, or alternately, change the numerical values to see their effect.
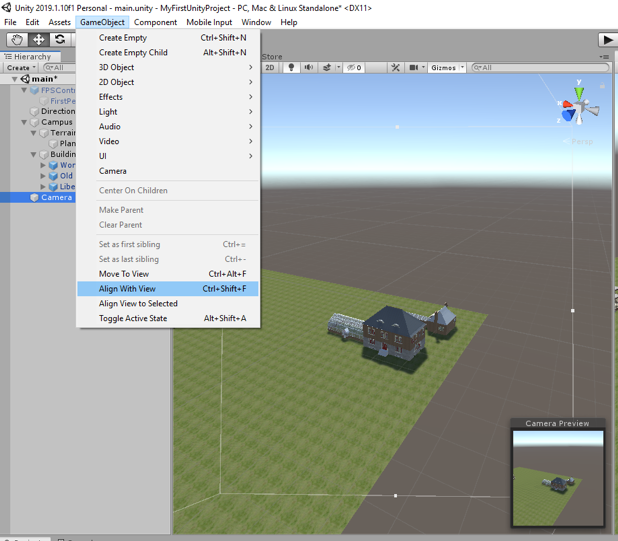
A very handy way to change the camera perspective (and also the position and orientation of other GameObjects) is by first changing the Scene view to the desired perspective and then telling Unity to use that same perspective for the camera object. This can be accomplished by using "GameObject -> Align With View" from the Gameobject menu bar, or by simply using the keyboard shortcut CTRL+SHIFT+F. To practice this, double-click the Old Botany building to have Scene view focus on this building. Now select the Camera object (single click!) and use Align With View. See how the camera perspective in the Camera Preview has changed to be identical with what you have in the Scene view? On a side note, the GameObject menu also has the function “Align View to Selected” which is the inverse direction of “Align With View”: it can, for instance, be used to change the Scene view to your current camera perspective.
The last panel we will cover in this section is the “Console”. This panel displays warning and error message when Unity experiences any problems with your project or prints messages that you log in your source code (e.g. for debugging purposes).
As was previously mentioned, the way the individual windows and panels are arranged here is the default layout of the Unity editor. But you can freely re-arrange the windows in pretty much any way you want, for instance by clicking on the project tab and dragging it to a different part of the screen. The Layout drop-down menu at the top right allows you to switch between predefined layouts as well as define your own layouts. If somehow the layout got messed up, you can select "Default" there and it should go back to the standard layout that we have been using here so far.
By now, you should be able to move and rotate GameObjects in the scene and play and stop the scene. With respect to the latter, there is an important and useful functionality to know about the Play Mode: While in Play Mode (either running or paused), you can still make changes to the objects in your scene, e.g. by changing parameters in the Inspector panel. However, in contrast to changes you make in Edit Mode, these changes will only be temporary; they will not be saved in your Scene. So when you stop play and go back to Edit Mode, these changes will be gone. This can still be very useful because it allows you to try out things while the project is running and immediately see the impacts.
Building a Project
Building a Project
The last thing we want to quickly mention here is how you actually build a stand-alone application from your Unity project, so basically how to create a stand-alone program for a platform of your choice that does the same thing that you get in the Unity editor when in Play Mode. This is done by going "File -> Build Settings…", which opens a new dialog:
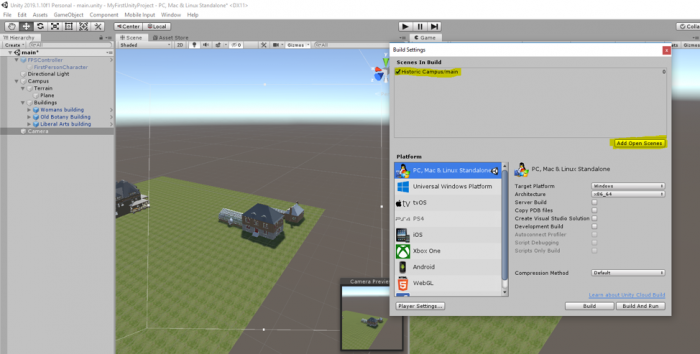
In the pane at the top, you can select the Scenes that should be included in the build. Click on the “Add Open Scenes” button to add the current scene to the build window. At the bottom left, you select the target platform for your build. It is possible to install extensions to build applications for other platforms than you currently see here. The one relevant for this course is “PC, Mac & Linux Standalone” and you then have to select “Windows” as the Target Platform on the right. With the “Player Settings” button at the bottom, you can set more parameters that affect your build. Pressing “Build” will start the process of compiling the stand-alone application, while “Build & Run” will in addition run the program after the compilation process has finished. When you have all parameters for your build already set, you can use “Build & Run” directly from the File menu. When you click "Build" you will be asked to choose a folder to save the project in. In the following save dialog, navigate to your “Documents” folder and use “Walkthrough” as the file name under which the application will be saved. Then click “Save”. Unity will show you the progress bar for building the application which can take a few minutes. If you have a Mac, the windows application would not be played on your computer. You need to create a Mac application.
Getting More Familiar with the Editor
Getting More Familiar with the Editor
It is time to get more familiar with the interface and components of the Unity Project Editor and get some practical experience. The Unity web page [15] provides video tutorials on the basics and some advanced aspects of the Project Editor that we are going to rely on here. So please grab a cup of coffee, tea, or whatever you prefer, and watch the videos listed below. Please pause often to try out and practice the things explained there on the project you have. In particular, make sure to practice changing the view by panning and zooming, as well as quickly changing the perspective with the View Gizmo and manipulating objects in the Scene view. If something goes completely wrong, you can always delete all the folders and re-import the unity package and then start over.
Video: Interface Overview (2:17 min)
Navigating the Unity editor interface is easy. The core of the interface consists of five main panels. The Scene View, the Hierarchy, the Game View, the Project panel and the Inspector panel. The Scene View is where you'll visually construct your game, manipulating objects in 2D and 3D. The Game View is where you will preview your game, and this becomes active when you hit the play button, allowing you to playtest at any time inside the editor. The Hierarchy lists all objects in the scene in alphabetical order and in hierarchical order in order to show parenting, a way of grouping objects. The Project panel shows all assets that you are currently working with, in one place, giving you quick access to everything you are building your game with from scripts to textures, 3D models, video, and audio. The Inspector is a context-sensitive panel that shows the properties of whatever object, asset or setting panel you've selected. Click on something new and the Inspector immediately switches to show properties of that thing. The play controls allow you to playtest the game, pause, and progress frame by frame for more detailed testing. The tools in the top left allow you to navigate the Scene View and also manipulate objects visually. There are also toggles to allow for switching between local and world space and center or pivot point based rotation. The Layers dropdown allows you to quickly show and hide layers of content in your game. The Layout dropdown allows you to switch between differing layouts of the Unity interface. In the top right of the interface are the layers and layout dropdowns. This concludes the interface overview. Continue to watch tutorials to learn more about each individual panel. Subtitles by the Amara.org community
Video: The Scene View (4:20 min)
The Scene view is where you will visually construct your game. And this can be navigated by making use of the buttons above the view. These buttons correspond to the Q, W, E and R buttons on the keyboard. The first button, the Hand Tool, is purely for navigating. With this tool selected drag with the left mouse button to pan, and with the right mouse button to look around First Person style. Hold the Alt key with this tool and left mouse button drag will let you orbit around the point you were looking at. Whilst Alt and right mouse button dragging will zoom the view. With any object selected in the hierarchy, you can focus on the object either by double-clicking the object's name or by pressing F with the mouse cursor over the Scene view. The remaining three buttons allow you to adjust position, rotation, and scale of objects. By dragging the corresponding axis handles you can move objects in X, Y or Z. Likewise, this also applies to moving in 3D by dragging from the center, although this is not necessarily recommended for moving in 3D space. Likewise for rotating you can rotate in all three axes, or you can just drag from within those, but again a lack of control will occur when trying to drag in all three axes at once. And again with scaling you can scale objects in all three individual axes or drag from the center point in order to scale uniformly. In this instance, it is recommended to drag from the center in order to keep scale properties in proportion. In the main bar of the Scene view, you will see two drop-down menus that handle how the Scene view is rendered. You can switch to wireframe or look at alpha of how your objects are displayed for example. These are followed by three toggles. The first toggle toggles lighting in the scene The second - whether a skybox is rendered or not. And the third allows you to preview audio from the game from wherever the editor camera is currently located. The editor camera simply refers to the camera that you are looking at the Scene view from. It is not a camera object in your scene. So for example, if I were to move my camera very far away from the sound source and preview the audio again. You can hear that it's quieter than it was before. To the right of the panel are the Gizmo menu and search box. The Gizmo menu lets you adjust gizmos, the 2D icon shown in the Scene view to help you identify components in the scene. Such as lights, audio sources or cameras. These can be adjusted by size and also be toggled between 2D and 3D. The search field lets you search for a particular object by searching for its name. And this highlights the object by fading out other objects in your scene. Again, if you are not focused on the actual object that you've found by searching then you can simply use the Focus feature to find it. This search also singles out the object in the Hierarchy so by then selecting the object you were looking for and pressing F to focus, or double-clicking - you will then be taken to that object. The final part of the Scene view you should understand is the View Gizmo itself. This allows you to switch from Perspective 3D view to Orthographic cameras from sides, top and bottom. When dragging to orbit your view in Orthographic view you will be switching to Isometric view. You will be notified of this by the term ISO written underneath the View Gizmo but do not confuse this with actual 3D Perspective view and be aware that you can switch back to Perspective view simply by clicking on the white cube in the center of the View Gizmo.
Video: The Game View (3:11 min)
The Game View in Unity is invoked when the Play button is pressed. In this, you can playtest your game and get an idea of what the gameplay will be like when it's built. This can be paused and stepped forward at any time in order to give you more accurate testing. You can also tweak things whilst you are in play mode in order to see what the gameplay is like with different settings. The game view also allows you to set resolution specific to the target platform that you're using. For example, my game view is set to Standalone with a resolution of 1280 by 720. If I choose to then maximize on play the game view will restrict to exactly that resolution so that I can see what it will look like. To adjust this I go to Edit - Project Settings - Player and this shows me the default screen width and height under resolution. If I edit this I will see the change made immediately in the game view. And if I choose to switch to a different target platform I will get the resolution for that setting. For example, if I switch to Web Player and return Web Player is then featured as the target platform I'm building for and the preview mode for the game view. In addition, to Maximise On Play, the game view also has a Stats button to allow you to see performance statistics based on your game and also the ability to show Gizmos in the same way that the Scene view shows them already. As you can adjust things whilst in play mode you should also be aware that any changes that you make will be undone when returning to your project. This is specific to changes that are based on game objects in your scene and not game objects that reference assets in the project. For example, if I was to change something relating to a material that change is made to the original asset. Whereas if I was to change something on a specific component that change will be undone when play is pressed again. It's also worth being aware that when you press play, your game is running and you can hint this by going to Unity - Preferences on Mac or Edit - Preferences on PC. You can choose under Colours a play mode tint, I've chosen a shade of blue, but I can make this any colour that I need to. That way, when you press play the rest of the interface will change to this colour. This is to remind you that you are in play mode and will lose changes if you continue to work in that mode.
Video: The Hierarchy and Parent-Child Relationships (3:48 min)
The Hierarchy in Unity is a complete list of any object in your open scene. Objects are listed from A to Z order, but it is also possible to create hierarchies of objects which are in turn listed in A to Z order. Hierarchies of objects mean that they are grouped, with the topmost object being called the Parent Object and the rest being referred to as Children or Child objects. These objects then have their transform values based upon that of their parent object. For example, the position of an object when loose in the hierarchy is based on its distance from the world origin or zero point. But when this object is made a child of another object it's position is relative to that of its parent. In this example, the character object is at the origin of the 3D scene, the position (0, 0, 0). And there is a cube object at position (5, 1, 5). But when the character object is made a child of the cube - its origin, or zero point, is then the position of the parent object, the cube. Now the character's position is said to be (-5, -1, -5). This being the distance from the cube object, it's parent and therefore it's origin position. We can also see that with Pivot Point Rotation enabled the rotation is now based on the parent object rather than rotating around its own axis. The same then applies to movement and scaling. And this will apply until that object is no longer a child. Other features of the hierarchy are the Create button and Search field. The create button on the hierarchy acts as a mirror of the Game Object - Create Other top menu and this will allow you to create various different things that you will need to construct your games in Unity. Whilst the search field works in a similar way to the search field in the Scene view, allowing you to narrow down objects using their name. The scene view then reacts by greying out other objects allowing you to see the object you've searched for more easily. You can also make use of the modifier T: in order to search for types of object. Type here being considered as one of the objects components. For example, if I search for T:Light there is only one light in my current scene, one on the end of the players gun. And if I search for T: Audio Source I'll be narrowed down to 3 objects, the only ones in the scene that happen to have audio source components attached to them. When searching in this way, the bottom of the hierarchy shows the path to the object that you've found. Damage audio source being the one I have selected, Player being its parent and Cube being the parent of that object. This means that when canceling the search you can easily see where your object is. It will also remain selected and the parent objects of that object will be expanded to show where it's located.
Video: The Project Panel and Importing (2:34 min)
The Project Panel is where you store all of the assets that make up your game. Anything you create with the panel, and any asset you import, will be kept here. You can create Unity-specific assets by clicking the create button at the top. Or import assets created in an external application. You can import by right-clicking, by using the top menu or simply by adding files to the assets folder in your operating system or by saving from another application. The project panel is a mirror of your assets folder. And when viewing the assets folder in your operating system you'll notice that meta files are created for every asset that's placed into the project. Note that once the asset is in you should always use the project panel to move it around or edit it rather than using your operating system as this can break lines in the library of your project. The project panel has two styles of view, one and two-column. These can be switched by clicking the context menu button in the top right. One column view lets you see assets in a simple hierarchy as shown here. Two-column view gives you more flexibility and more options to work with assets. You can select, move and duplicate assets in the project. Create and organize into folders. As well as label assets and search for them. Assets can also be previewed in a thumbnail form by dragging the slider at the bottom, with hierarchies then being shown with a right-arrow that can be used to expand or collapse them. Assets can also be searched for and sorted by their name, their type, a label or by a favourite grouping. To create favourites you could perform a search and then click the star button in the top right and give your new group a name. You can even search the assets store from the project browser. By typing in the standard search field and switching from assets to asset store.
Video: The Inspector (4:19 min)
The Inspector panel in Unity is a panel for adjusting settings for any object, asset, and editor preference. For objects, the inspector begins with a title, a checkbox for you to check if the state of the object will remain static in the game. This means it's a valid candidate for light-mapping and navigation mesh baking. And then the tag and layer drop-downs. Tags allow you to assign a tag to one or many objects in order to address them via code. Whilst layers allow you to group objects and apply certain rules to these layers such as lighting or collision rules. After these elements, the inspector then lists the components attached to an object. Beginning with the transform, the default position, rotation and scale of your object. On any component the inspector allows you to adjust fields in various ways. You can drag over the values, you can click and retype, or you can choose to reset the values using the cog icon to the right of the component. In addition to the cog, there is also a link to the reference material on the component and you can get to this by clicking the blue book icon, and this will open the documentation page on this component. A context-sensitive panel, the inspector changes to whatever you have selected, meaning that you can adjust any object and immediately dive into settings and back. Because Unity makes use of dragging and dropping to assign values sometimes you may click on items that take you to their settings, rather than the one you wish to apply them to. And for this reason, you can lock the inspector in order to work with a particular item and then unlock once you are done assigning settings. For example, on this game object, I have a script component to which I must assign an array of textures. But when I select my first texture I want the inspector to remain on my game object, rather than showing the texture's settings. I could simply hold down the mouse or I can simply select the object and click on the lock at the top of the inspector. This way when I select one or many textures I can then drag and drop without the inspector changing focus. Once I am done with this, I simply click the lock again and I can then select anything that I need to. The inspector also offers a way of finding assets used on objects. For example materials. When clicking on an asset used within a renderer you can see that asset highlighted inside the project panel. It does this by highlighting with a yellow outline. This helps you easily find the assets that your game objects depend upon. In this example, we can see an object that has a material assigned to its renderer. This particular material is then previewed at the bottom of the inspector and I can adjust that material directly from here. However, the other two objects that I don't have selected also use this material, so I must bear in mind that the actual material I am adjusting is the original material asset inside the project and not a particular instance of an object in the same way that I can adjust the scale of this object without adjusting any other objects that also have a scale value. Components within the inspector can also be disabled by clicking the checkbox to the left of their name. And the entire object can be disabled by clicking the checkbox next to its name at the top of the inspector. When objects are disabled in this way you'll notice that their name is greyed out inside the hierarchy panel. And that's the basics of the inspector in Unity.
Video: Build and Player Settings (1:50 min)
The Build Settings can be accessed from the File menu by going to File - Build Settings. A build, in development, is a term used to describe an exported executable form of your project. And given Unity's multiplatform nature this varies for each platform. For web players, Unity will export an HTML file with example embedding code and a .Unity 3D file which contains your game and will be run by the Unity web player plug-in in your browser. For standalone Unity will export an executable version of your game for PC, Mac, and Linux. For iOS Unity exports an Xcode project that can be opened in Apple's Xcode SDK and run on the device for testing and submission to the app store. For Android Unity exports an APK file that can be opened in the Android SDK. Flash exports an SWF file associated assets, and yet again an HTML file with example embedding code. Google Native Client exports a Google Chrome browser compatible web player game. And for consoles Unity builds directly to your hardware development kit. The build settings work with Unity's player settings to define settings for the build that you create. Split into cross-platform and per-platform you can set some basic values at the top and then choose settings below that are specific for the platform you are developing for. One thing to note as a beginner is that the resolution in the Resolution and Presentation area is the setting you can select for the game view. For details of other per-platform settings refer to the manual link below.
Video: Game Objects and Components (2:12 min)
Game Objects are the items that make up your Unity scenes Everything within a scene is considered a game object and these objects are made up of a number of components. Each has a necessary transform component that contains the position, rotation, and scale of the game object. Components can be added using the Add Component button at the bottom of the inspector. Or by using the Component top menu. Scripts are also considered as components and can be added using the aforementioned menus. They can also be created and added using the Add Component button. components can be removed, or copy-pasted using the cog icon to the right of their representation in the inspector. You can then select another object and paste them by clicking on the cog icon. You can also add a script to an object by dragging it to the hierarchy or to the object in the scene view. And you can even drag and drop to empty space in the inspector in order to add a script as a component. Game objects are seen in the hierarchy view as a list, with a hierarchy of parent-child relationships demonstrated by arrows to the left of their name. The Hierarchy is a list of all the game objects in the scene and as such everything that you see in the scene view is also listed in the hierarchy. And when selecting a game object in either view it's selected in both.
Advanced Unity Concepts
That was quite a bit of new material but now you a very good understanding of the unity editor. We are almost done with our video tutorials before we engage in some fun practical work in the next section where we will build a very simple game! Please take a few minutes to learn about some of the more advanced features of unity using the following three videos.
Video: Prefabs (1:32 min)
Prefabs in Unity are preconfigured game objects that you create in the scene and store in the project. They can then be instantiated or cloned, meaning to create an instance of them during the game. They have all manner of uses and are a key part of development in Unity. They are used for everything from rockets to enemies, to procedural levels. To make a prefab simply create your game object in it's desired configuration in your scene, from whatever components you need, and then drag it to the project panel to save it as a prefab. It can then be deleted from the scene. To edit a prefab you can either select it in the project and adjust properties in the inspector. Or drag an instance of it back into the scene, edit it in the inspector, and then press the apply button at the top. This saves changes back into the prefab and you can then remove the instance from the scene yet again. Also, if you have many instances of a prefab, and you make edits to one of them, and decide you would like others to be the same you can hit apply. The other instances will inherit this update from the prefab's settings. Likewise, if you make a change to one of your instances and you decide you don't like it anymore you can revert to the settings of the prefab by clicking the revert button at the top.
Video: Tags (1:35 min)
Tags are a way of identifying game objects in Unity. As a name of a single object could identify it, it can be useful to set tags also. For example, you may have an object called Ork or Tank but these could all be tagged Enemy, and in your code, you could check for any objects that have the tag Enemy. Likewise, a script on an enemy could check for a player character by looking for a player tag. To assign a tag to an object, select it and use the drop-down menu at the top of the inspector. If the tag you want isn't already present then add a new tag. You can add a tag by clicking the option at the bottom of the menu and then entering it in the list of tags at the top of the tag manager. Once you've done this, return to the object you wish to place the tag on and select it from the drop-down. There are a number of functions in code, which will allow you to find objects with tags, the simplest one of these is GameObject.FindWithTag, which allows you to specify a string with the name of the tag inside it. This script is attached to my enemy object and I can use that to find an object with the tag Player. So I'll set my robot to be tagged Player and when the game starts my enemy is seeking out that object and looking at it. Likewise, you could find multiple objects with the same tag by using FindGameObjectWithTag. See the scripting reference for more examples of this.
Video: Layers (2:38 min)
Layers are used to indicate some functionality across many different game objects in Unity. For instance, layers can be used to indicate which object should be drawn in the scene view, should ignore raycasts, or are invisible to the camera. Here we have a scene with 2 orbs in it. We can see that both orbs are on the layer Default. If we wanted to change the layer of 1 of the orbs we could click the Layer drop-down in the inspector and select a new layer. We can see that this orb is now on the Ignore Raycast layer and will not be hit by any raycasts that pass through it. We also have the ability to define our own layers. We can do so using the Tag And Layer Manager window. To access the tag and layer manager window either select Add Layer from the Layers drop-down or click Edit - Project Settings - Tags And Layers. Here we can see all of the built-in layers as well as add our own. Let's create an Ignored By Camera layer. We can place our other sphere on this newly created layer by selecting it and choosing the New Ignored By Camera layer from the Layers drop-down. This sphere is now on the Ignored By Camera layer. The layer has no inherent functionality however so let's modify our camera to ignore it. In the Culling Mask property of a camera we can select which layers are seen by the camera and which are not. By clicking the drop-down and unselecting the Ignored By Camera layer all objects on that layer will no longer be visible to that camera. Let's run our scene. We can see that only a single orb appears. The other orb, the one on the Ignored By Camera Layer is not rendered to the screen. We can also use layers to determine what appears in the scene view. By clicking on the Scene Layers drop-down at the top right of the Unity editor we can select and deselect layers. Doing so will cause all objects on those layers to disappear.
Walkthrough: Using Unity to Build a Stand-Alone Windows Application
Walkthrough: Using Unity to Build a Stand-Alone Windows Application
Introduction
In this walkthrough, we will use Unity to build a stand-alone Windows application from a SketchUp model. It will be a rather simple application, just featuring a keyboard-controlled camera that allows for steering the camera in a 3D scene with a single building.
Close Unity for now and download the Old Main model we are going to use here as a SketchUp .skp file. [14] You should still have the Unity project “MyFirstUnityProject” from the beginning of the lesson with just an empty scene ("SampleScene" in the scenes folder). This is what we will use for this walkthrough. The first task we have to solve is to export the 3D model from SketchUp into Unity.
Note: If the Old main model is too heavy for your personal computer, you can use the model for Walker Laboratory [16].
Exporting from SketchUp into Unity
Exporting from SketchUp into Unity
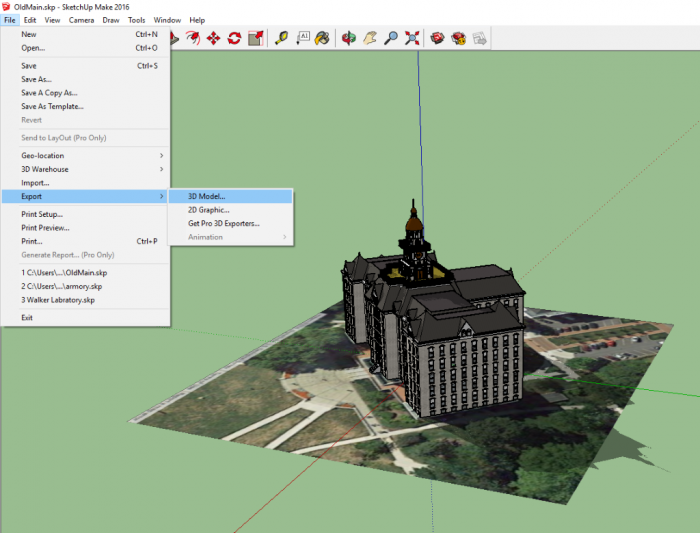
Unity allows for importing 3D models in different formats. Typically the files with the 3D models can be simply put into the Assets folder (or some subfolder of the Assets folder) of a project and then Unity will discover these and import them so that they show up under Assets in the project. Until very recently, there was no support to directly import SketchUp .skp files into Unity and, therefore, 3D models had to be exported from SketchUp in a different format as shown in the figure below.
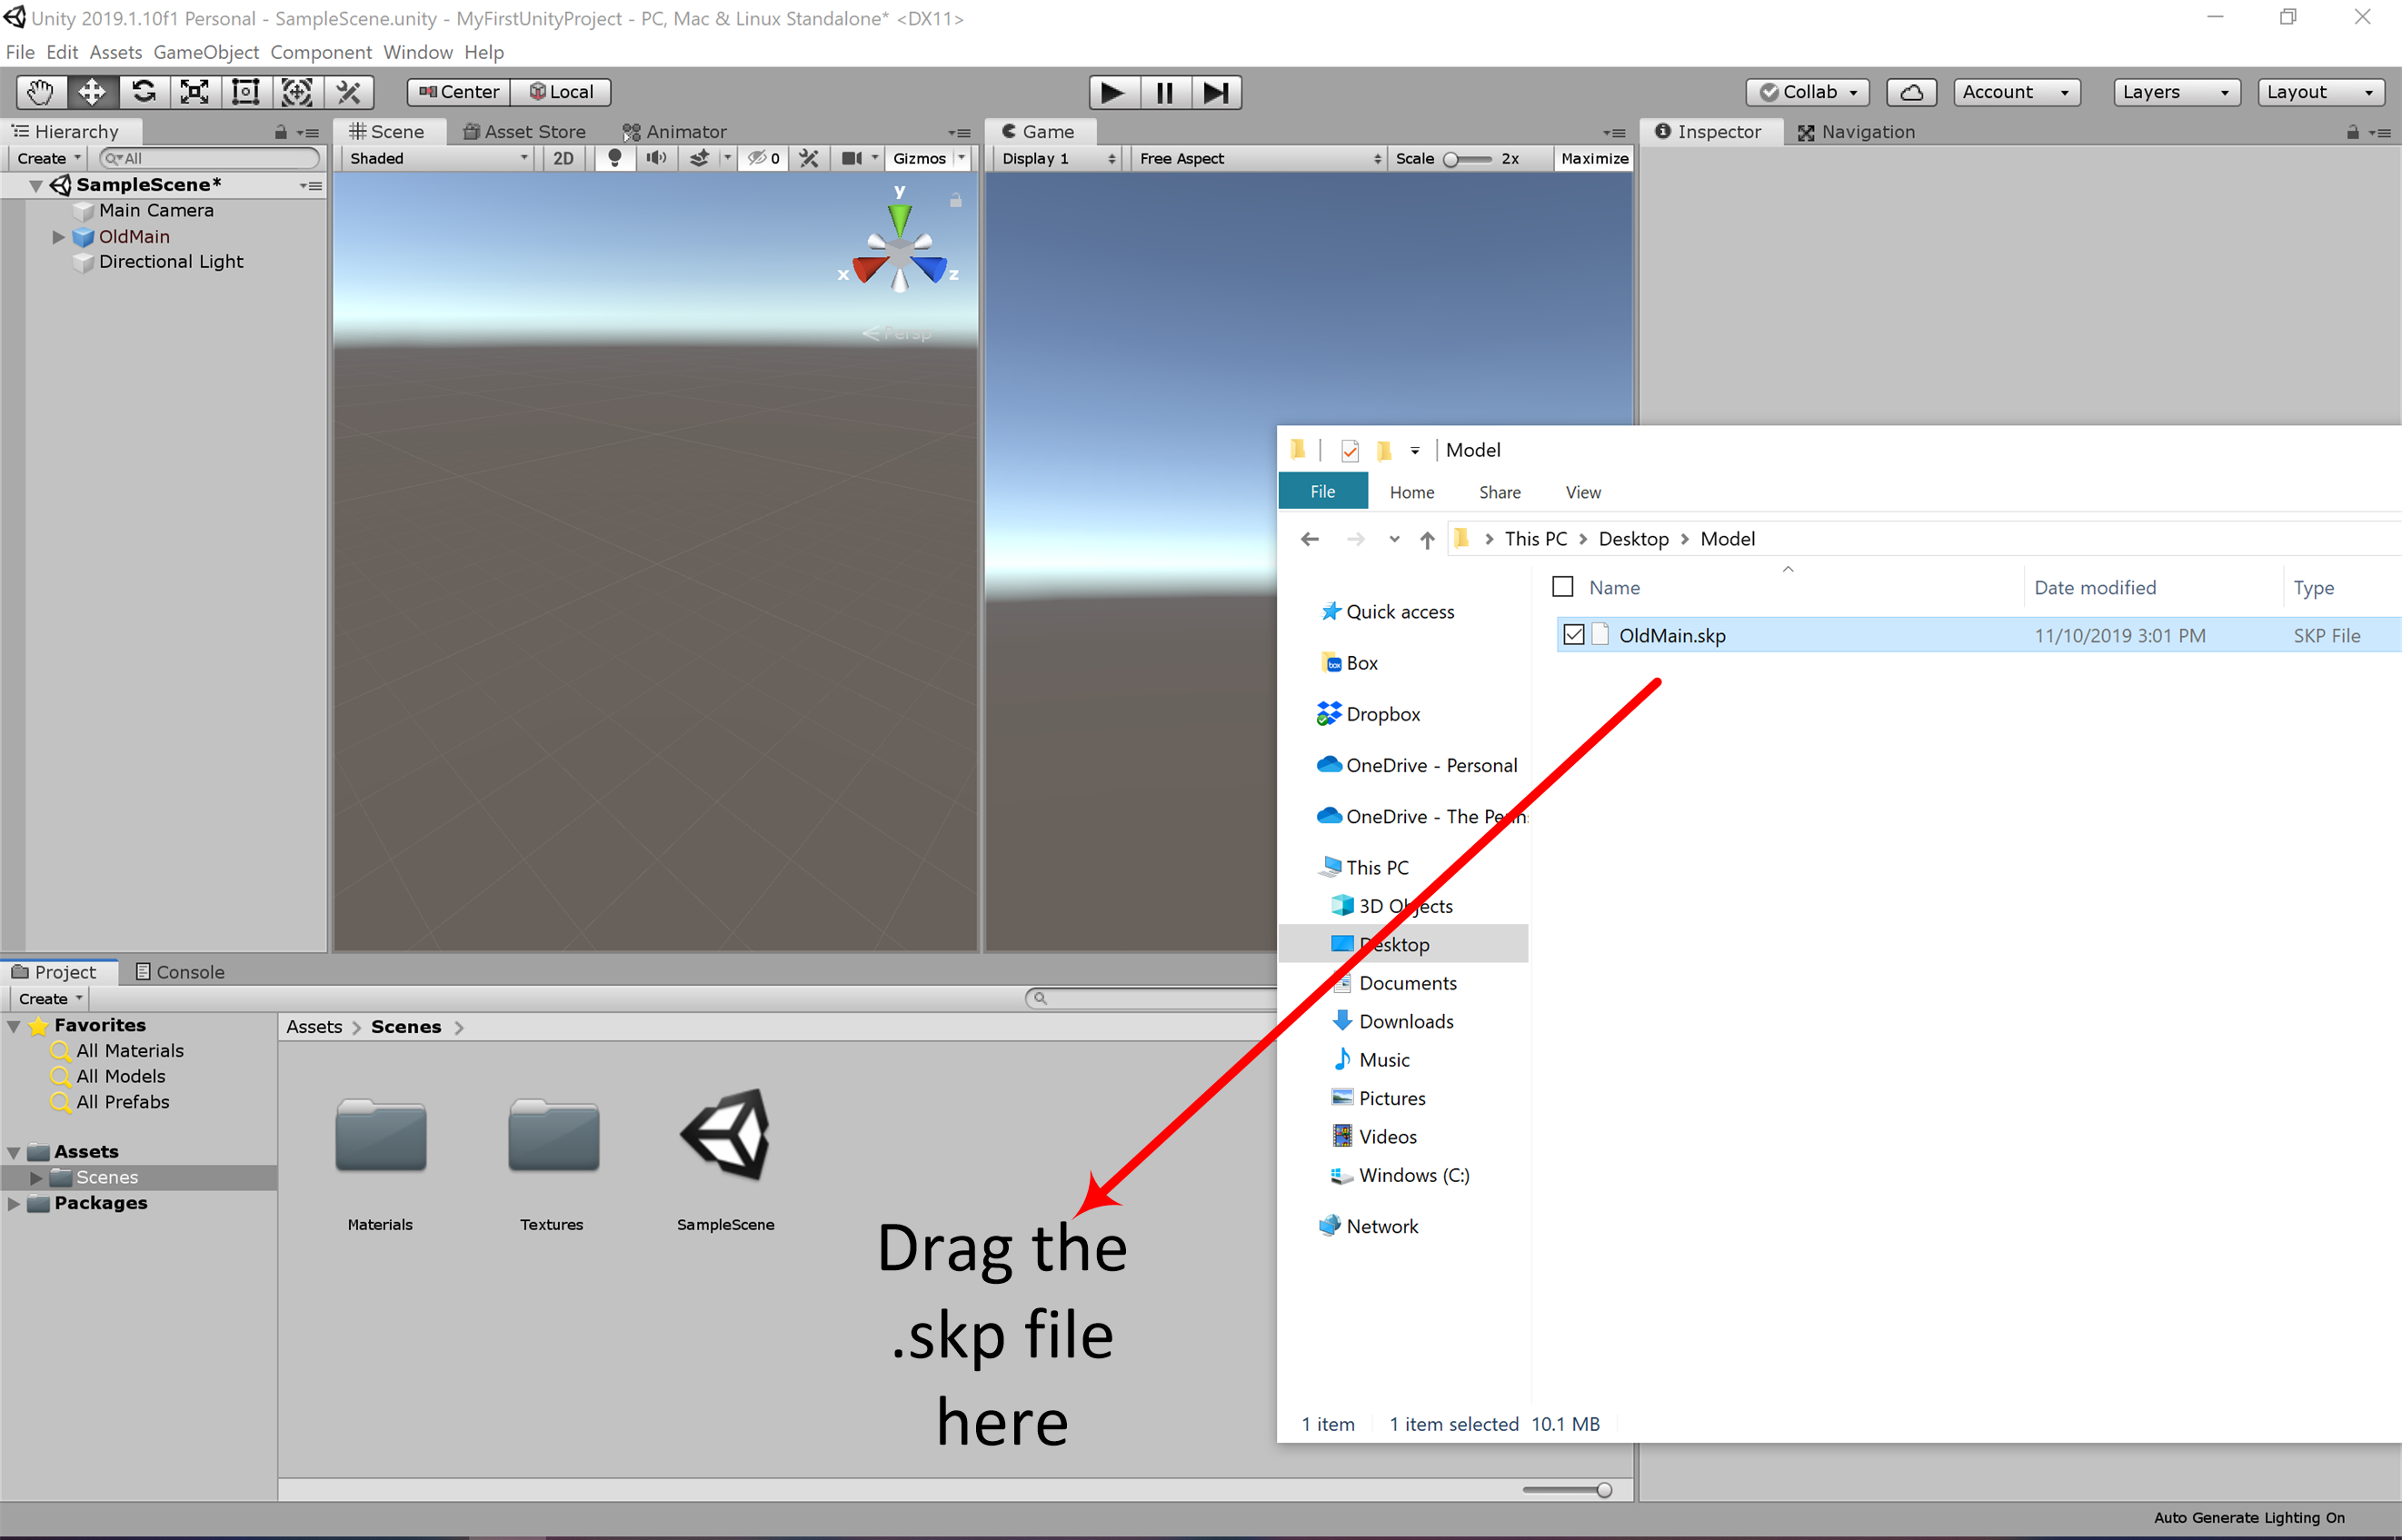
However, direct import of SketchUp .skp files is now possible. So we are simply going to put the downloaded .skp file into the Assets folder. Before that, please make sure that neither Unity nor SketchUp are currently running! Then perform the following steps:
- 4.1 Copy the downloaded file OldMain.skp into the “Assets” folder under “…Documents\UnityProjects\MyFirstUnityProject” (adjust the location where you have saved your project if it's not in Documents)
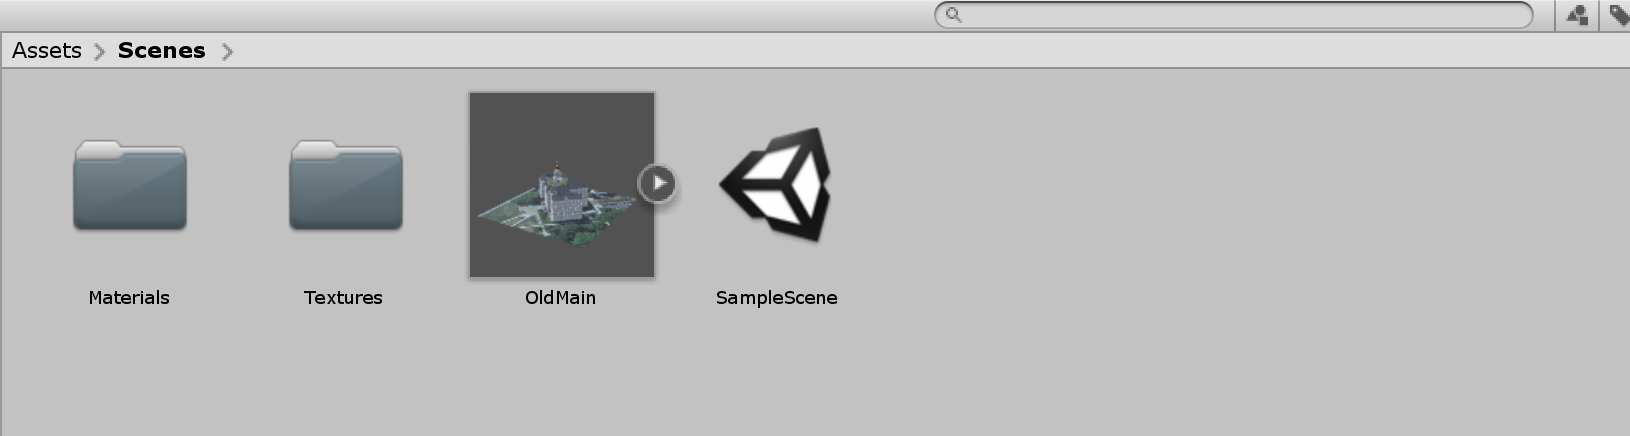
- 4.2 Start Unity again and open the “MyFirstUnityProject” project. Unity will immediately recognize the new file in the Assets folder and import it. If you look in the Assets pane of the Project Window, you will see that several things have been added there in addition to the SampleScene. The two folders called “Materials” and “Textures” contain the components required to render the Old Main model. The asset for the Old Main 3D model itself will appear under the name “OldMain” as an icon with a little arrow on the right side. Selecting it will show a preview and settings for importing the model into the Scene in the Inspector Window.
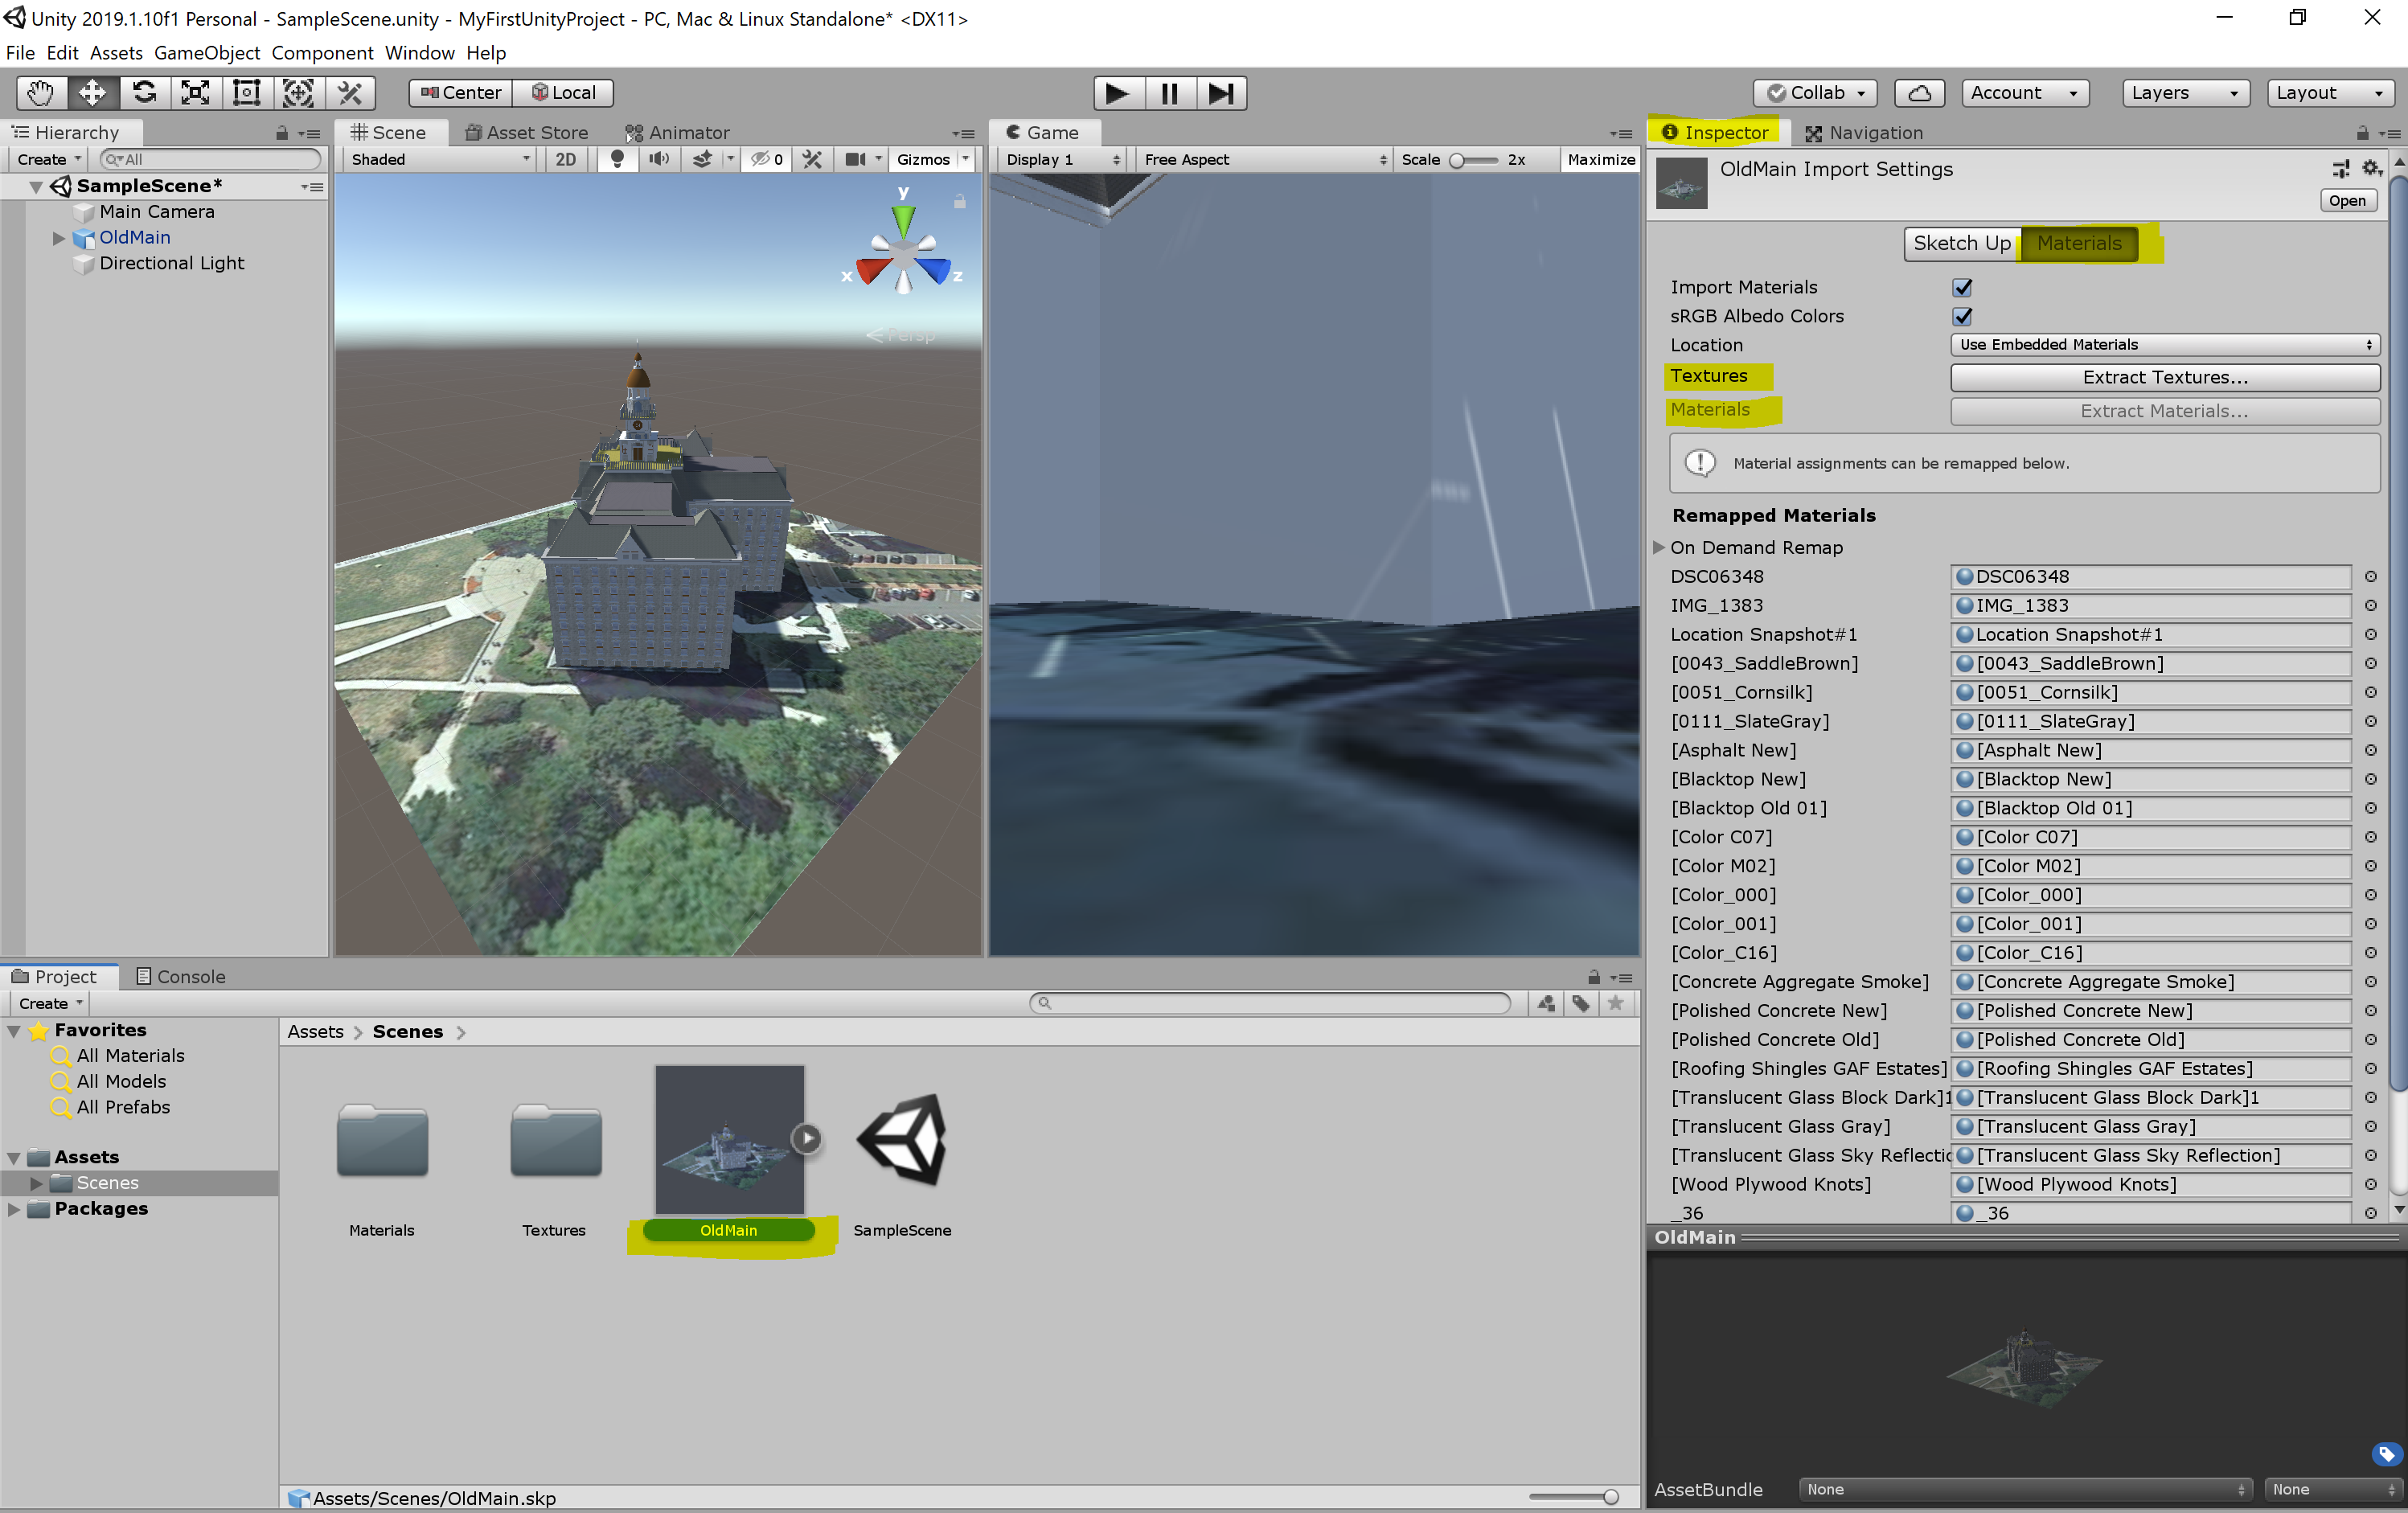
If the above method does not work for your case, you can always simply add the skp model into the editor by dragging and dropping it into the folder structure. You may have noticed that the Building object we have imported looks rather dull and is missing lots of textures and materials. To fix this problem, we need to extract all the materials and textures from the prefab of the model so that Unity knows how to map them. Select the prefab of the model you have imported into your folder. You can see that in the inspector menu it is detected that this is a SketchUp model, but all the materials for the individual components of this model are missing (labeled as none).
To fix this, click on the “Extract Textures …” button in the inspector panel. Create a new folder in the pop-up window and rename it to “Textures”, and then click on “Select Folder”. Do the same for Materials by clicking on the “Extract Materials …” and creating a new folder called “materials”. Once done, the model should have all the materials and textures added to it.
Adding the Model to the Scene
Adding the Model to the Scene
The next thing we are going to do is place the Old Main model in the Scene and make a few more changes to the Scene.
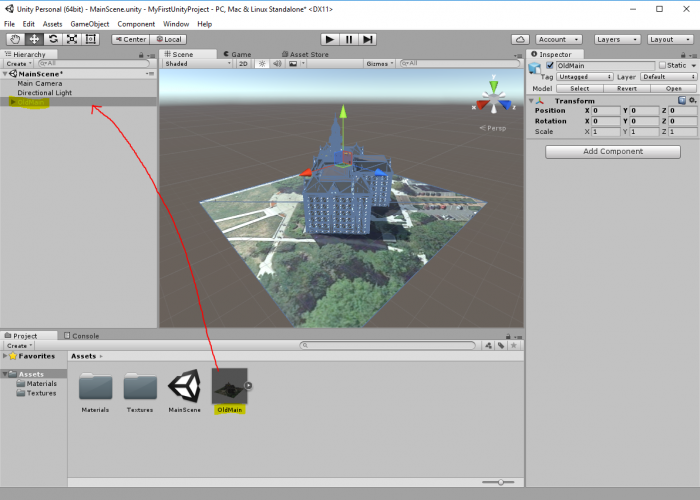
- 5.1 To add the model to the Scene, drag it from the Assets pane to the Hierarchy Window and drop it somewhere into the area below the “Main Camera” and “Directional Light” GameObjects. Most likely, things will look a bit strange in the Scene view because the building model is so large that it contains the current viewing position as well as the locations of the camera and lighting source. So as a first step to fix this, double-click the OldMain object in the Hierarchy Window and then zoom out a bit until you see the building somewhat similar to what is shown in the screenshot below.
 Credit: Unity 3D [18]
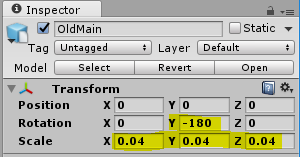
 - 5.2 While we now can see the entire building in the Scene Window, the camera and lighting source are still inside the building. So what you should do is scale down the “OldMain” object by a factor of 0.04. You can do this by selecting “OldMain” and directly editing the scale values in the Inspector Window. An alternative approach would have been to use the Scaling Tool as explained in one of the videos earlier in the lesson. But since we want a factor of exactly 0.04, directly editing the numbers is easier here. In addition, we want to turn the building around the Y axis by 180° so that the side facing the sunlight is the front side.
 Credit: Unity 3D [18]
 -
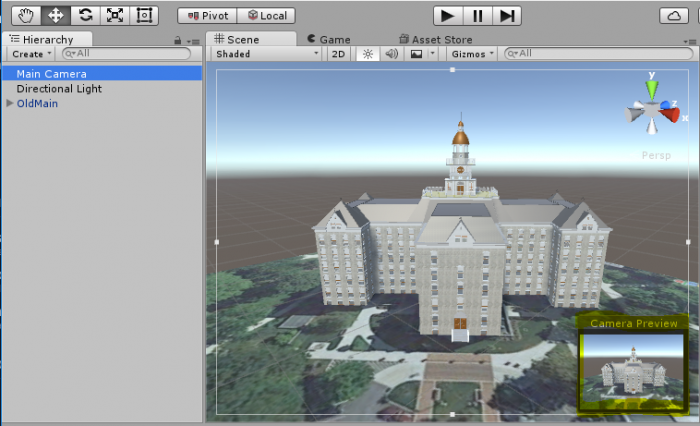
5.3 If you select the “MainCamera” and look at the Preview (or try out Play Mode), you will see that this is now quite a bit away from the building. So let us place the camera such that we have a nice view of the building from the sunny side and the building roughly fills the entire picture. Remember that one way to do this is by changing the Scene view to the desired perspective and then use “Align With View”.
 Credit: Unity 3D [18]
 - 5.4 Finally, press Play to enter Play Mode and have a quick check whether things are looking good in full size. You can click on the small drop-down icon at the top right of the Game Window and click “Maximize” to maximize the window. Stopping Play Mode will switch back to the Scene Window and the normal layout.
 Credit: Unity 3D [18]
Making the Camera Keyboard-Controlled
Making the Camera Keyboard-Controlled
To make things at least a little bit interactive, we now want to be able to move the camera freely around in the scene using mouse and keyboard. Such interactivity is typically achieved by adding script components. So in this case, we want to attach a script to the “MainCamera” object that reads input from the mouse and keyboard and adapts the camera position and rotation accordingly.
We won’t teach you scripting with C# for this functionality because we can reuse some existing script. A resource for Unity scripts and extensions outside of the Asset Store is the Unity3D Wiki. As it happens, we find a script published under the Creative Commons Attribution-ShareAlike license there to realize the free-flight camera control we are looking for. The script can be downloaded here [14].
Let us have a very short look at the code. If you have some programming experience, you will recognize that there are a bunch of variables defined early on in the script (public float … = …) that will determine things like movement speed, etc. of the camera. These variables will be accessible from the Unity Inspector Window once we have attached this script to our camera. The actual functionality to control the camera is realized in the function Update() { … } . GetAxis(…) is used to read information from the mouse, while GetKey(…) is being employed to check the status of certain keys on the keyboard. The content of the variable called “transform” roughly corresponds to what you always see in the Transform section of the Inspector Window and is used here to change the camera position and rotation based on the user input. The Update() function of a script that is attached to a GameObject in the scene will be called for every tick (= rendered frame) when the project is executed. So in Play Mode, the keyboard and mouse will be constantly checked to achieve a smooth control of the camera.
Here are the steps to add this code as a script asset to our project and then attach it to the camera object in the Scene:
- 6.1 There are several ways how the steps to add the code can be performed. We here start with adding a new C# script file to our projects assets. Use "Assets -> Create -> C# Script" from the main menu. This adds a script to your Assets folder and it will appear as an icon in the Assets pane at the bottom of the editor. You are now supposed to give the script a name. It is important that the name of the script file is the same as that of the class being defined in the file, which in this case is “ExtendedFlycam”. So please use this name and make sure that the capitalization is correct (upper-case E and F).
 Credit: Unity 3D [18]
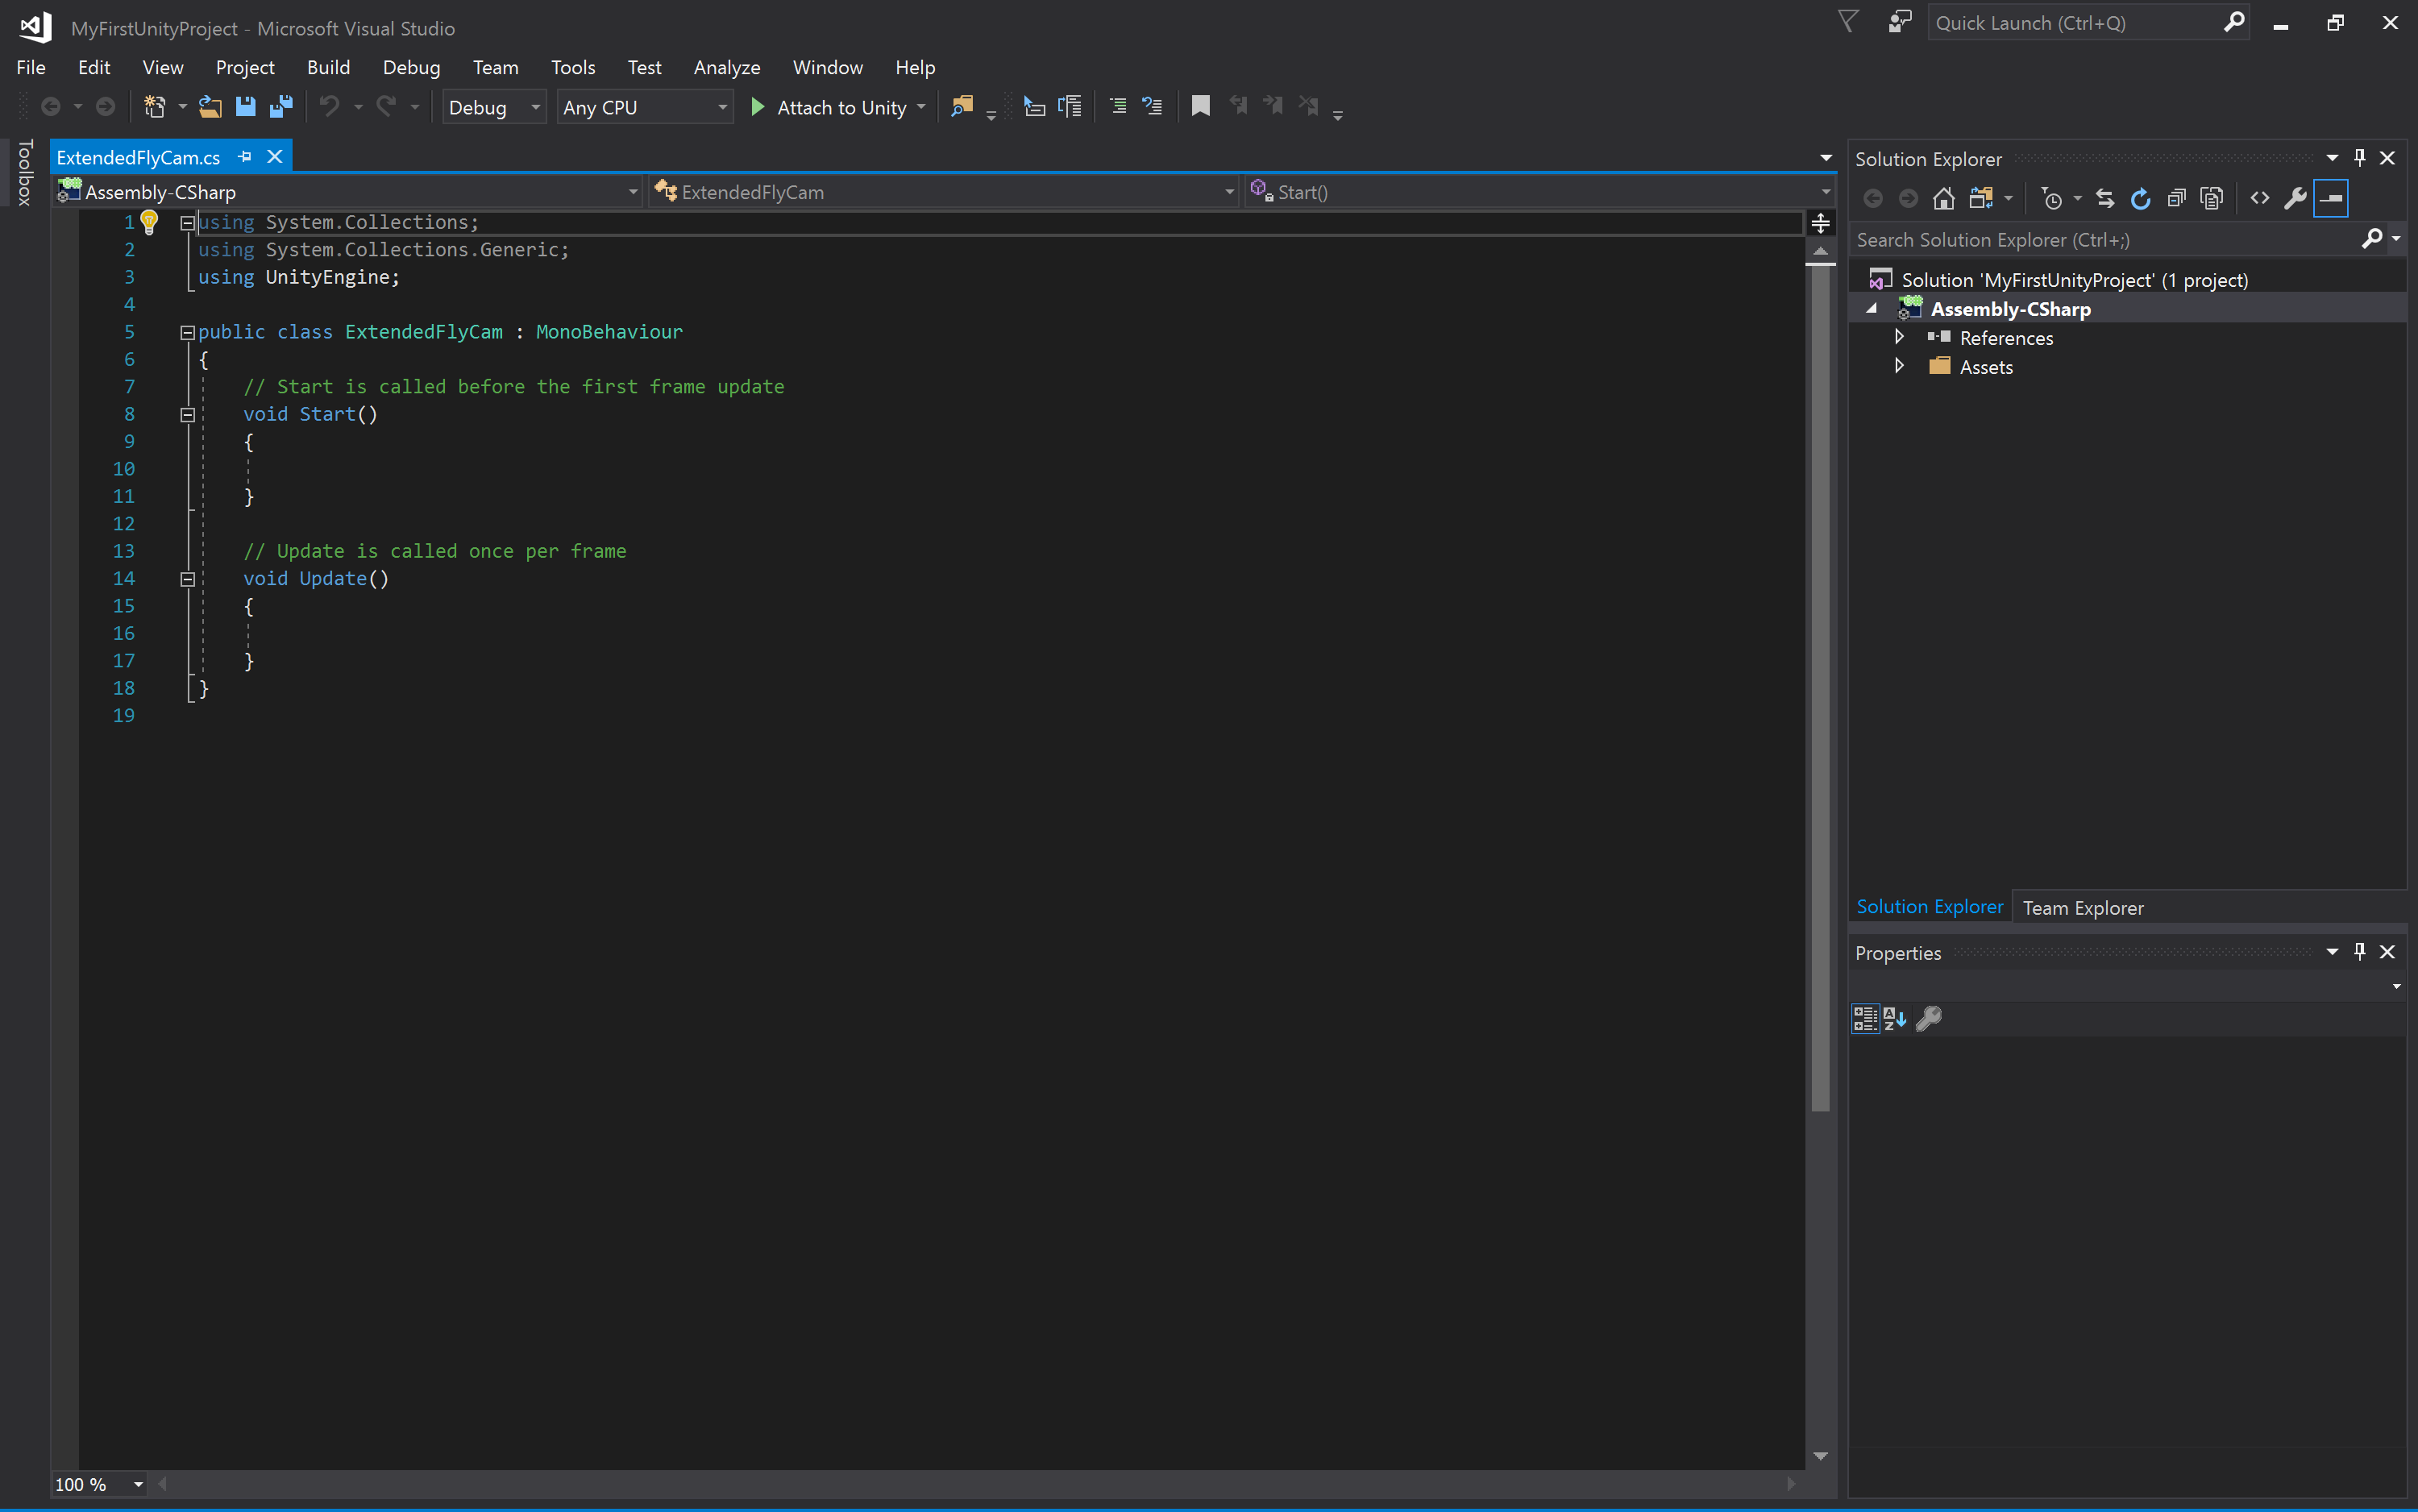
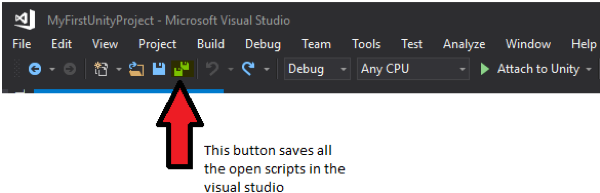
 - 6.2 You can click on the script icon to see the script code in the Inspector Window. Currently, this is just the standard template code for a Unity script that Unity generated automatically. Now double-click the script icon, which will open the script in Visual Studio. You may have to switch over to Visual Studio manually if the window doesn’t show up in the foreground on your screen. (Opening the visual studio could take a few minutes, and you might be asked to sign in, if you do not have an account, go ahead and create one, or explore the other options provided to you. You should be able to create a free personal account to use visual studio)
 Credit: Visual Studio [19]
 - 6.3 You now see the template code in Visual Studio. Select everything and delete it so that you get an empty document. Then use copy & paste to copy the entire code from the text file you downloaded in the browser into the script window in Visual Studio. Press CTRL+S to save the changes, then switch back to Unity. Unity may report some warnings because some of the code uses deprecated functions but let’s ignore that here.
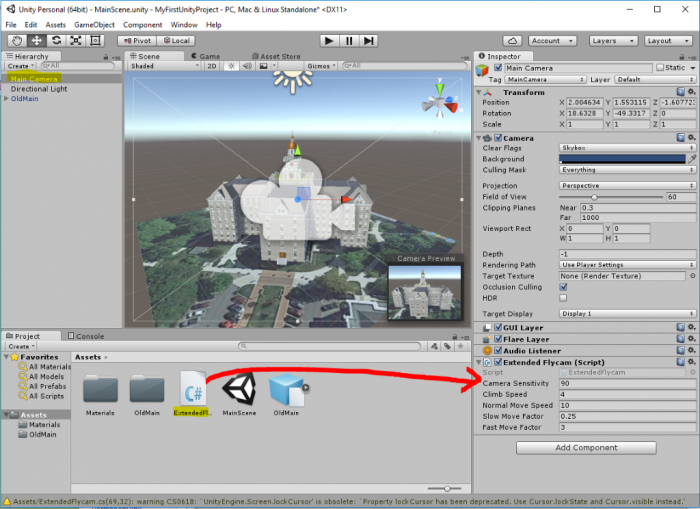
- 6.4 We now need to attach the script as a component to the “MainCamera” object. To do so, you can simply, select the “MainCamera” object and then drag the script from the Assets pane to the free area in the Inspector Window where the “Add Component” button is located. The script now appears as “Extended Flycam (Script)” in the Inspector Window and here you see the variables we talked about at the beginning exposed as parameters.
 Credit: Unity 3D [18]
 - 6.5 It is now time to give this a try: Please enter Play Mode. You should immediately be able to turn the camera with the mouse and move the camera forward, backward, and sideways using the keys W, S, A, D or alternatively by using the cursor keys.
So you can now move the camera around the building (and actually also below it or into the model). The control is maybe a bit sensitive, so you may want to change some of the parameters of the camera script a bit (e.g. sensitivity and move speed). Just play around with the values. Since the mouse is now taken for the camera control, the best way to exit Play Mode is by pressing CTRL+P. - Now build a Windows application to share with your instructor for your assignment. Make sure that you zip the folder before you upload it.
First Game in Unity: Roll-the-ball
First Game in Unity: Roll-the-ball
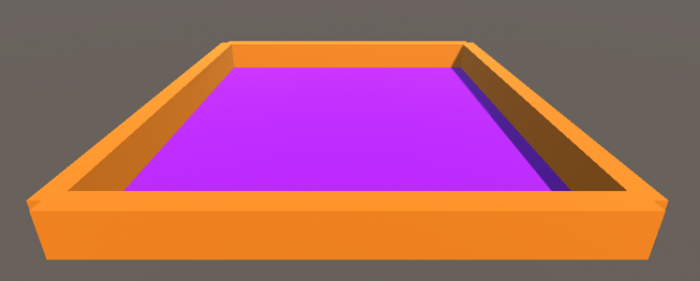
The objective of this section is to get you familiar with the basics of C# programming in unity and the different awesome components (e.g. physics) offered by Unity. By the end of this section, you will be able to create a simple “Roll the ball” game as shown below:
Video: Roll the ball game (00:16) This video is not narrated.
The objective of the game is to roll a ball inside a box and collect all the available coins. The coins should simulate a rotation animation, capturing the attention of the player. Each time the ball hits a coin one point should be awarded to the player, a “cashier” sound effect played, and then that coin should disappear from the scene (i.e. collected).
The following steps will help you to first conceptualize what needs to be implemented and how it should be done, and second, guide you on how to utilize the Unity3D game engine to realize the needed game objects, mechanics, and functionalities.
- Close your unity editor and open the Unity Hub. Create a new project (you should already know the steps from the previous sections). Name your project “Roll the ball” and make sure the template is set to “3D”.
-
Before beginning the programming of the game behaviors described above, we need to set up the play area (i.e. the box) in which we will be moving the ball. To achieve this, we will use the default empty scene that comes with every new unity project. The scene should be already open and ready. To add the floor, in the Unity editor, go to the GameObject menu on top, then 3D Object -> Plane. This will add a plane to the scene. Make sure the Position and Rotation Parameters of the Transform component in the Inspector menu (Red box in the figure below) are all set to zero:
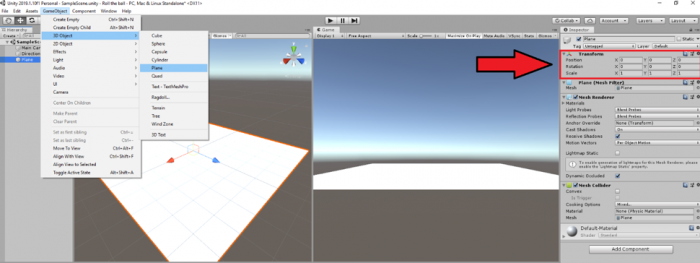 Credit: Unity [13]
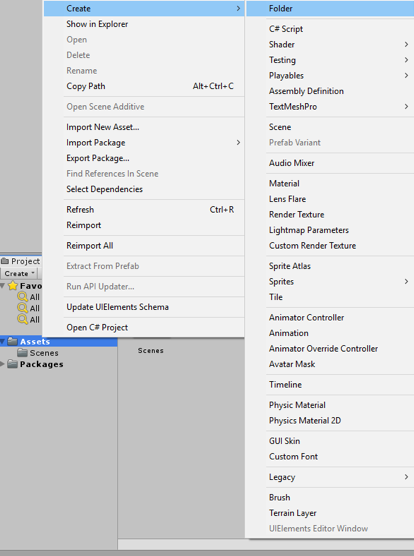
Next, we need to add some color to our plane GameObject. To do this, in the project folder structure, right click on “Assets” and go to Create -> Folder. Rename this folder to “Materials”.
 Credit: Unity [13]
Now right-click on the newly created materials folder and go to Create -> Material. Rename this material to “PlaneMat”.
 Credit: Unity [13]
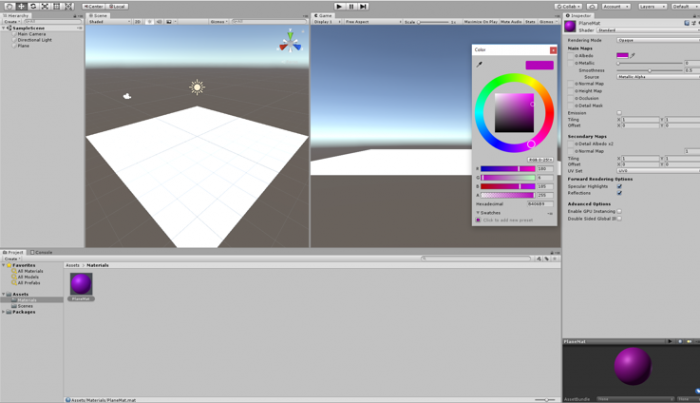
Select the newly created “PlaneMat” and change its color from the Inspector panel on the right by clicking on the color picker next to the “Albedo”. Select a color of your liking.
 Credit: Unity [13]
Drag the “PlaneMat” onto the Plane GameObject in the scene. The Plane should now have color.
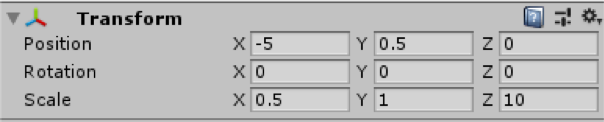
Next, we need to add four walls to the sides of the Plane so the Ball wouldn’t fall off. To do this, go to the GameObject menu on top, then 3D Object -> Cube. While the newly added Cube game object is selected set its transform parameters in the Inspector menu as depicted below:
 Credit: Unity [13]
Doing so will result in a wall placed on the right side of the plane. To have the proper view of the play area when running the scene or inspecting the scene output in the “Game” tab, set the position and rotation parameters of the “Main Camera” game object as shown below:
 Credit: Unity [13]
Create a new material with a color of your choice inside the materials folder and name it “WallMat”. Drag this material onto the Cube game object that acts as the wall.
To add more meaning to our scene, rename the Plane and Cube game object to “Floor” and “Wall”, by right clicking on each and then selecting “Rename”.
Select the “Wall” game object, hold down the Ctrl button and press D (you can also right click on the wall gameobject and click on duplicate). if done correctly your “Wall” object should be duplicated and labeled “Wall (1)”. Change the X value of the position parameter of “Wall (1)” from -5 to 5. Using this simple process, a new wall is added to the left side of the plane.
Repeat the same procedure to add walls to the up and down sides of the planer. Simply duplicate the “Wall” object twice more and change its parameters as shown below:
 Credit: Unity [13]
At this stage, we should have the play area ready as this:
 Credit: Unity [13]
Video: Roll the ball 1: A Summary of what we have done so far (Step 2) (03:19) This video is not narrated.
-
Next, we need to add a ball to our scene and make it controlled by the player and roll around the play area. To add a ball to the scene, go to GameObject -> 3D Object -> Sphere. Change the name of this game object to “Ball”. Set its transform parameters as shown below. And add a material (Create “BallMat”) with a color to it.
 Credit: Unity [13]
If we play (
 ) the scene, you will realize that the ball will float in the air instead of dropping on the plane. The reason for this is that the ball game object does not have any physics attached to it yet. To fix this, select the ball game object, and in the Inspector panel, click on “add component”, search for “Rigidbody” and hit enter.
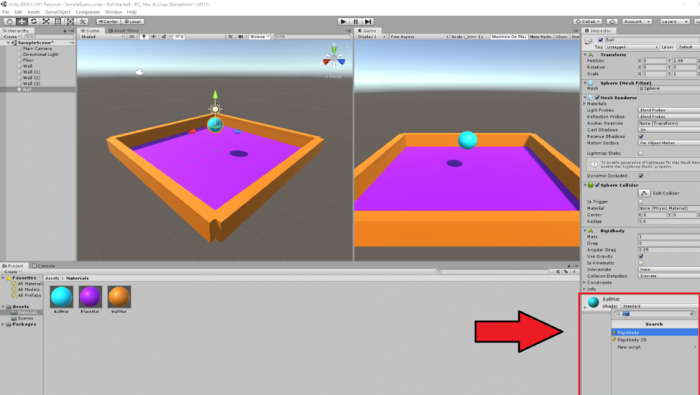 Credit: Unity [13]
Doing so will add a Rigidbody component to the ball game object. You may notice that the “use gravity” parameter of this component is checked by default, which will add gravity to this game object, and therefore it will drop onto the plane. Press play and see the result.
-
Rolling the ball: To enable the player to control the movement of the ball, we will use the arrow keys (the up, down, left, and right keys) on the keyboard. The idea is that by pressing the up arrow key we will make the ball roll forward, the down arrow key, backward, and the left and right arrow keys, to the sides. To achieve this, we will need to do a little bit of C# programming using the physics engine of Unity.
Create a new folder in the project panel called “Scripts”. Right-click on this folder, select Create -> C# Script. Rename this script to “BallMovement” (Make sure you use the same exact spelling for the script name -case sensitive- if you are planning to copy the source code!). Drag this script onto the Ball game object. Double click on the script to open it in Visual Studio (this could take a while, and you might be asked to log in. You can either create an account or explore different options provided to you). Our simple ball movement script should look like this (Please read the comments in the code for further explanation). Either type or copy (make sure the name of the class i.e. “BallMovement” is spelled exactly as you have name named the script file) the following code into your script (note, the lines in green are comments are not executed by the engine, they are just extra explanation for you to understand the logic behind the code. Therefore, if you decide to type the following source code into your script, you do not need to write the lines in green):
using System.Collections; using System.Collections.Generic; using UnityEngine; public class BallMovement : MonoBehaviour { // we need to define a variable that controls for the speed with which the ball rolls // the declaration of variables is done here // the type of the variable is float and its label Speed. The float type means that the value of Speed can be with precision points e.g. 15.5 public float Speed; // FixedUpdate is called several times per frame which will create the illusion of smooth movement void FixedUpdate() { // we need to take the input from the arrow keys pressed by the player. By default in unity, the left and right arrow keys are labeled as "Horizontal" and the up and down arrow keys as "Vertical" // we will define two variables where the value of each will be set "several times per frame" if the player presses the HorizontalMovement (i.e. the left or right key) and/or the VerticalMovement (i.e. the up or down key) float HorizontalMovement = Input.GetAxis("Horizontal"); float VerticalMovement = Input.GetAxis("Vertical"); // since we are dealing with three dimensional space, we will need to define a 3D vector based on which the ball should move. As such, we define a Vector3 called MoveBall that takes three parameters of X,Y,Z // movement on the X axis will be our HorizontalMovement (i.e. the left or right key) and on the Z axis the VerticalMovement (i.e. the up or down key). As we do not want to move the ball in the Y axis in the 3D space (i.e. up and down in the 3D space), the Y value will be set to 0 Vector3 MoveBall = new Vector3(HorizontalMovement,0,VerticalMovement); //lastly, we will need to access the physics component of our ball game object (i.e. the Rigidbody) and add a force to it based on the values of the vector we just defined. We will multiple this force value with our Speed variable to be able to control the Speed of the force as we wish. gameObject.transform.GetComponent
<Rigidbody>().AddForce(MoveBall * Speed); } } Once you are done populating your script with the source code above, make sure you hit save. It is absolutely important to remember that every time we modify a script, we save it so that Unity updates the editor based on the changes we have made.
 Credit: Unity [13]
If we go back to unity and select the ball game object, we will see that in the inspector panel under the “Ball Movement” script, there is now a “Speed” variable that we can set. Change its value to 25 and hit play. Use the arrow keys to roll the ball inside the play area.
Video: Roll the ball 2: A Summary of what we have learned so far (Steps 3 and 4) (02:11) This video is not narrated.
-
Adding coins to the scene: download the unity package file roll the ball assets [14]. Double click on this file, and it will open an “Import Unity Package” window inside unity. Click on import. Doing this will add two new folders in your assets hierarchy. One is called “Coin” which contains the model we will be using for the collectibles in our game. The other is called “Sounds” which will be covered in the next steps.
Go to the “Coin” Folder and select the Coin model. Drag this model into your scene and place it somewhere inside the play area. Change its transform parameters as follows:
 Credit: Unity [13]
We will now add a rotation effect to this coin to catch the attention of the player. To do this, create a new script inside the “Scripts” Folder called “CoinRotation”. Drag this script onto the coin game object. Double click on the script to open it in visual studio. Our simple coin rotation script will look like this (Please read the comments in the code for further explanation):
using System.Collections;
using System.Collections.Generic;
using UnityEngine;

public class CoinRotation : MonoBehaviour
{
    // we need to define a variable that controls for the speed with which the coin rotates
    public float RotationSpeed;


    void FixedUpdate()
    {
        // We need to instruct this object to constantly rotate around its own Y axis (i.e. up)
        // this is done by accessing the transform component of this gameobject and using the built-in RotateAround unity function
        // this function takes three parameters. first one indicates the point in the 3D space where the rotation should happen. Since we want the coin to rotate around itself, we will pass the position of the coin itself as this parameter
        // the second parameter indicates around which axis should the game object rotate. we will set this to the up axis so the coin rotates around the Y
        // the third parameter indicates the speed with which the coin should rotate. for this we will use our RotationSpeed variable
        gameObject.transform.RotateAround(gameObject.transform.position, transform.up, RotationSpeed);

    }
}
If we go back to unity and select the coin game object, we will see that that in the inspector panel under the “Coin Rotation” script, there is now a “Rotation Speed” variable that we can set. Change its value to 15 and hit play. The coin should be continuously rotating around its Y-axis.
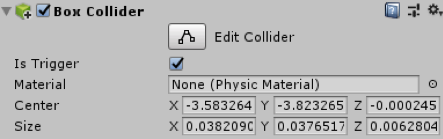
Use the arrow keys to roll the ball inside the play area and hit the coin. You will notice that the ball will go right through the coin. The reason for this is that there is no collision happening between these two game objects. The ball game object has a Sphere collider attached to it by default, but the coin game object does not have a collider. Select the coin game object, in the Inspector panel select add component, search for “Box collider”, and hit enter.
Play the scene and try to hit the coin with the ball again. You will notice that this time, the two objects will collide. We would need to have colliders on both objects to be able to determine when they “hit” each other. We need this to be able to collect the coins (i.e. remove the coin from the scene when the ball hits it). You may have noticed that during the collision, the coin will momentarily block the movement of the ball until it slides to either side of the coin and keeps rolling based on the force behind it. We do not want the player to experience this effect. In contrast, we want the game to be able to detect exactly when the two objects are colliding, but we do not want them to block each other in any way. The collision system of Unity can help us in achieving this goal using “Trigger”. If you select the coin game object, you will notice that under the “Box Collider” component that we just added, there is a parameter called “Is Trigger”. Enable this parameter by clicking on the CheckBox next to it. If we hit play, we can see that although we have colliders attached to both objects, the ball will not be blocked by the coin anymore.
 Credit: Unity [13]
 -
Coin collection: create a new script called “CoinCollection” and attach it to the Coin game object. Open the script in visual studio and modify the code based on the instructions below:
using System.Collections;
using System.Collections.Generic;
using UnityEngine;

public class CoinCollection : MonoBehaviour
{

    // this is the default unity function that will be called whenever two objects collide and one has the Trigger parameter enabled
    // the argument "other" refers to the object that hits the game object this script is attached to.
    private void OnTriggerEnter(Collider other)
    {
        // In this case the we want to check if the "other" is the "Ball"
       // Make sure your ball gameobject is named “Ball”, otherwise you will receive an error!
        if (other.name == "Ball")
        {
            // if this condition is correct and indeed the Ball game object has hit this game object where the script is attached (i.e. the coin), we will remove this game object
            Destroy(this.gameObject);
        }
    }
}
Duplicate the coin game object several times and spread the coins across the play area. Play the scene and hit the coins. You will see that as soon as the ball hits a coin, that particular coin will be “destroyed”.
Video: Roll the ball 3: A summary of what we have learned so far (Steps 5 and 6) (03:41) This video is not narrated.
-
Point system: Before destroying a coin upon collision with the ball, we want to reward the player with a point for managing to collect it. To implement this functionality, create an empty gameobject by going to GameObject -> “Create Empty”. Rename this empty game object to “Point System”. Create new script called “PointSystem” and attach it to the “Point System” game object. Open the script and modify the code based on the instructions below:
using System.Collections;
using System.Collections.Generic;
using UnityEngine;

public class PointSystem : MonoBehaviour
{
    // we need to have a variable that holds the value of the points we aggregate
    public int Points;

    // we need to defined a GUIStyle profile for our graphical user interface (GUI) that shows the value of points to change its font size, shape, etc.
    public GUIStyle PointStyle;

    // this is the default unity graphical user interface (GUI) function. It will render GUI elements on the screen on a specific 2D coordinate
    private void OnGUI()
    {
        // a GUI label to show the value of the aggregated points, place at the X=10, Y=10 coordinates, with width and height of 100, the next argument is the content that the label shows which is in this case
        // a numerical value. we need to convert the numerical value to a string (text) to be able to show it on the label. The last argument indicates which GUIStyle profile should be used for this label
        GUI.Label(new Rect(10,10,100,100),Points.ToString(),PointStyle);
    }
}
The script described above is responsible for holding the value of the points the player aggregates and visualizing it on the screen. To increase the points however, we will add a line to the script responsible for detecting when the ball hits a coin. For this go back to the “CoinCollection” script and modify it based on the instructions below:
using System.Collections; using System.Collections.Generic; using UnityEngine; public class CoinCollection : MonoBehaviour { // this is the default unity function that will called whenever two objects collide and one has the Trigger parameter enabled // the argument "other" refers to the object that hits the game object this script is attached to. private void OnTriggerEnter(Collider other) { // In this case the we want to check if the "other" is the "Ball" if (other.name == "Ball") { //if this condition is correct and indeed the Ball game object has hit us, access the Point System game object, then the PointSystem script attached to it, and increase the Points variable by 1 GameObject.Find("Point System").GetComponent<PointSystem>
().Points += 1; // we will remove this game object where the script is attached to (i.e. the coin) Destroy(this.gameObject); } } } Next, select the “Point System” game object. On the inspector panel on the right, in the “PointSystem” Script attached to it expand the “Point Style” GUIStyle and change it as instructed below:
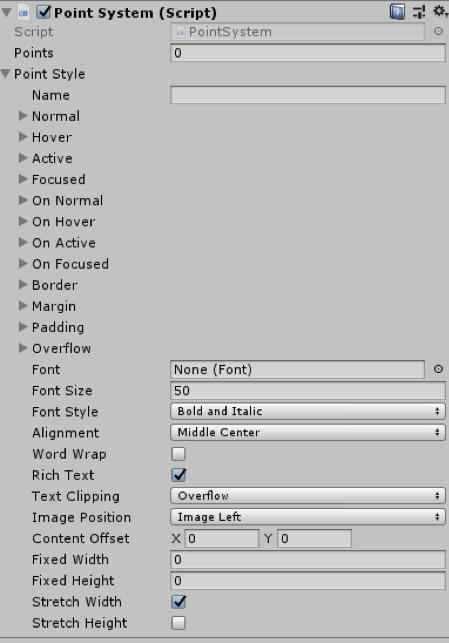 Credit: Unity [13]
Press play and start aggregating points!
-
Collection sound: another feature we need to add to our game is a sound effect. We want to play a “cashier” sound effect each time the ball hits a coin. To achieve this. Create a new empty game object and rename to “Sound Management”. Select this newly created game object and click on “Add Component”, search for “Audio Source” and hit enter.
Navigate to the “Sounds” folder in your project hierarchy and drag the “CashierSound” clip to the “AudioClip” field in the “AudioSource” component we just added to our audio management game object. Uncheck the “Play On Awake” parameter of the “AudioSource” component so the sound clip does not play as soon as we start the scene.
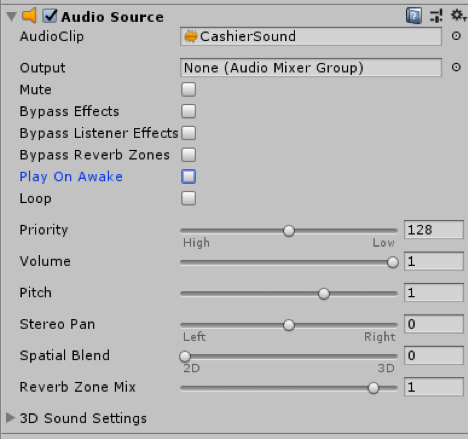 Credit: Unity [13]
Next, we need to instruct the game to play the audio clip whenever we collect a coin. To achieve this, modify the “CoinCollection” script based on the instructions below:
using System.Collections; using System.Collections.Generic; using UnityEngine; public class CoinCollection : MonoBehaviour { // this is the default unity function that will called whenever two objects collide and one has the Trigger parameter enabled // the argument "other" refers to the object that hits the game object this script is attached to. private void OnTriggerEnter(Collider other) { // In this case the we want to check if the "other" is the "Ball" if (other.name == "Ball") { //if this condition is correct and indeed the Ball game object has hit us, access the Point System game object, then the PointSystem script attached to it, and increase the Points variable by 1 GameObject.Find("Point System").GetComponent
<PointSystem>().Points += 1; // access the audio management game object, then the AudioSource component, and play GameObject.Find("Sound Management").GetComponent <AudioSource>().Play(); // we will remove this game object where the script is attached to (i.e. the coin) Destroy(this.gameObject); } } } Video: Roll the ball 4: A summary of what we have learned so far (steps 7 and 8) (03:13)
Hit play and enjoy your creation!
Note
It is NOT the goal of this course to teach you C# programming. However, without basic knowledge of C# you will not be able to create a rich virtual experience. The provided scripts to you in this exercise are fully commented for your convenience. Please take the time to study them, as they will prove to be rather useful in the next session.
Tasks and Deliverables
Tasks and Deliverables
Assignment
The homework assignment for this lesson is to report on what you have done in this lecture. The assignment has two tasks and deliverables with different submission deadlines, all in week 8, as detailed below. Successful delivery of the two tasks is sufficient to earn the full mark on this assignment. However, for efforts that go "above & beyond" by improving the roll-the-ball game, e.g. create a more complex play area -like a maze- instead of the box, and/or make the main camera follow the movement of the ball, you could be awarded one point if you fall short on any of the other criteria.
To help with the last suggested extra functionality, use the following script and attach it to the main camera:
using System.Collections;
using System.Collections.Generic;
using UnityEngine;

public class FollowBall : MonoBehaviour
{
    // reference to the ball game object
    public GameObject Ball;

    // a vector3 to hold the distance between the camera and the ball
    public Vector3 Distance;

    // Start is called once before the first frame update
    void Start()
    {
        // assign the ball game object
        Ball = GameObject.Find("Ball");

        //calculate the distance between the camera and the ball at the beginning of the game
        Distance = gameObject.transform.position - Ball.transform.position;
    }
    // This called after the Update finishes
    void LateUpdate()
    {
        // after each frame set the camera position, to the position of the ball plus the original distance between the camera and the ball
// replace the ??? with your solution
        gameObject.transform.position = ???;
    }
}
Task 1: Find and Review Unity 3D/VR Application
Search the web for a 3D (or VR) application/project that has been built with the help of Unity. The only restriction is that it is not one of the projects linked in the list above and not a computer game. Then write a 1-page review describing the application/project itself and what you could figure out how Unity has been used in the project. Reflect on the reasons why the developers have chosen Unity for their project. Make sure you include a link to the project's web page in your report.
Deliverable 1: Submit your review report to the appropriate Lesson 7 Assignment.
Grading Rubric Unit 3D/VR Application Review
| Criteria | Full Credit | Half Credit | No Credit | Possible Points |
|---|---|---|---|---|
| URL is provided, the application/project uses Unity, is not already listed on this page, and is not a game. | 2 pts | 1 pts | 0 pts | 2 pts |
| The report clearly describes the purpose of the application/project and the application itself. | 3 pts | 1.5 pts | 0 pts | 3 pts |
| The report contains thoughtful reflections on the reasons why Unity has been chosen by the developers. | 3 pts | 1.5 pts | 0 pt | 3 pts |
| The report is of the correct length, grammatically correct, typo-free, and cited where necessary. | 2 pts | 1 pts | 0 pts | 2 pt |
| Total Points: 10 |
Task 2: Build a Simple “Roll-the-ball” Game
If you follow the detailed instructions provided in this lecture, you should be able to have a fully working roll-the-ball game.
Deliverable 2: Create a unity package of your game and submit it to the appropriate Lesson 7 Assignment.
You can do this by simply going to the Assets in the top menu and then selecting “Export Package”.
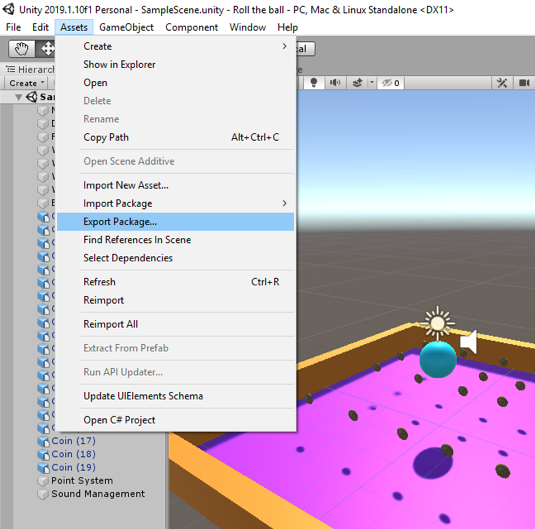
Make sure all the folders and files of your project are checked and included in the package you export (you can test this and import your package in a new Unity project to see if it runs).

If you choose to implement the functionality of the main camera to follow the ball movement, please explain your solution as a comment in your script. You can add comments (texts in green) in C# by using “//”.
Helpful advice:
We highly recommend that, while working on the different tasks for this assignment, you frequently create backup copies of your Unity project folder so that you can go back to a previous version of your project if something should go wrong.
Grading Rubric for Roll-the-Ball game
| Criteria | Full Credit | Half Credit | No Credit | Possible Points |
|---|---|---|---|---|
| Your game runs smoothly and as intended without any errors or strange behavior | 6 pts | 3 pts | 0 pt | 6 pts |
| Your project is complete and has all the required functionalities (coin rotation, collection, and sound effect). | 3 pts | 1.5 pts | 0 pt | 3 pts |
| Your Unity package has a proper folder structure, and all the files have meaningful names like it was done in the instructions | 1 pt | .5 pts | 0 pts | 1 pt |
| Total Points: 10 |
Summary and Tasks Reminder
Summary and Tasks Reminder
In this lesson, you learned about the Unity3D game engine and the role it can play in creating 3D and VR applications. You should now be familiar with the interface of the Unity editor and the main concepts of Unity and be able to create simple projects and scenes. In the next lesson, we will explore other features of Unity for building 3D applications, including adding an avatar to a scene, creating a camera animation, importing resources from the Unity Asset Store, and creating a 360° movie that can be uploaded to YouTube and be watched in 3D on a mobile phone via the Google Cardboard.
Reminder - Complete all of the Lesson 7 tasks!
You have reached the end of Lesson 7! Double-check the to-do list on the Lesson 7 Overview page to make sure you have completed all of the activities listed there before you begin Lesson 8.