Lesson 8: Unity II
Overview
Overview
This will be another practical lesson with several hands-on walkthroughs to explore other features of Unity that are useful for building 3D applications. This includes adding an avatar to a scene such that the user can walk in an environment around buildings; and creating a camera animation to generate a video with a pre-programmed camera flight over the scene. We will learn to import resources from SketchUp, the Unity Asset Store, and to create a 360° movie that can be uploaded to YouTube and then watched in 3D on a mobile phone via the Google Cardboard.
Learning Outcomes
By the end of this lesson, you should be able to:
- Import models from SketchUp into Unity
- Create camera flights and use the Unity Animation View
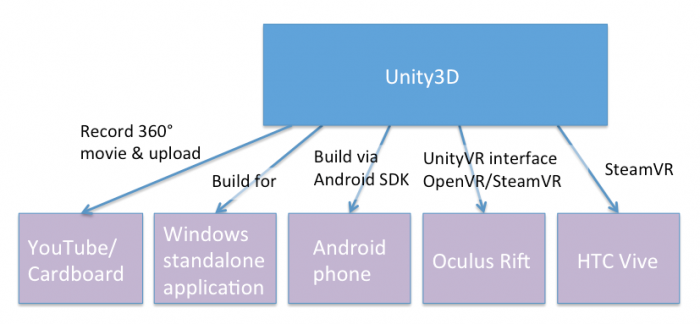
- Explain different ways to create VR applications with Unity
- Import assets from the Unity Asset Store and add them to a scene
- Create a 360° video in Unity viewable with the Google Cardboard
Lesson Roadmap
| To Read |
|
|---|---|
| To Do |
|
Questions?
If you have any questions, please post them to our "General and Technical Questions" discussion (not e-mail). I will check that discussion forum daily to respond. While you are there, feel free to post your own responses if you, too, are able to help out a classmate.
3D Applications in Unity
3D Applications in Unity
In Lesson 2, we introduced 3D application building software like Unity as part of a general 3D/VR application building workflow. The main role of 3D application building software can be seen in providing the tools to combine different 3D models into a single application, to add dynamics (and, as a result, making the model more realistic), and to design ways for a user to interact with the 3D environment. We also learned that 3D application building software typically provides support to build stand-alone applications for different target platforms including common desktop operating systems, different mobile platforms, and also different VR devices.
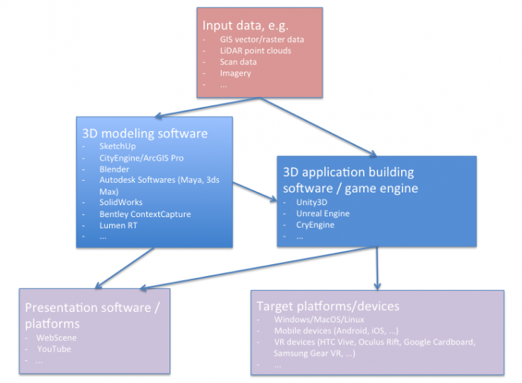
A schematic diagram outlines the following information (in summary):
-
Input data (in a variety of formats) imported into either a 3D modeling software or a 3D application building software such as a game engine
-
In 3D modeling software, 3D models are created either manually or automatically based on computational methods
-
The resulting models could be either directly used for visualization (i.e. on the web) or imported into 3D application building software such as Unity3D for more elaborate functionalities
-
The application made from game engines (e.g. Unity 3D) can be deployed on both web and a variety of platforms including VR headsets
In the previous lesson, you already use some of the tools available in Unity for adding dynamics and interaction possibilities to a 3D scene in the form of giving the user control over the movement of gameobjects, animating gameobjects via scripting, collision detection, basic graphical user interface, and scripting more advanced behaviors, e.g. collecting coins and awarding points. As you have already experienced, adding behavior to your gameobjects is done either through standard unity components (e.g. rigidbody, colliders, etc.) or through scripting.
In this lesson, you will gain more practical experience with other tools available in Unity. But first, let's start the lesson with a brief overview of general tools utilized by Unity for 3D application building. As we go through this first part of the lesson, you will begin to realize that you have already used some of these tools in the previous lesson! We roughly divided the following list into ways to make a scene dynamic and ways to add interactions. However, this is a very rough distinction with certain aspects or tools contributing to both groups. In particular, scripting can be involved in all of these aspects and can be seen as a general-purpose tool capable of extending Unity in almost unlimited ways (e.g. in the previous lesson we used scripting to both animate our coins by constantly rotating them, as well as collecting them upon collision with the ball).
Tools to make a scene dynamic:
-
Animations: Animations [1] obviously are one of the main tools to make a scene dynamic. We will talk about animations quite a bit in this lesson and you will create your own animation clip to realize a camera flight over a scene. Here are a few examples of animations that can make a scene more realistic and dynamic:
- animations of otherwise static objects to make them appear more realistic, e.g. a plant or flag moving slightly as if affected by wind, opening and closing animations of a door
- animations to simulate time of day: This can largely be accomplished by using animation to move a Directional Light object along a pre-programmed trajectory to simulate the movement of the sun
- animation to move the main camera along a pre-programmed trajectory (see the third walkthrough of this lesson)
- animations for movement of dynamic objects populating the scene, e.g. humans or cars moving through the scene in different ways (walking vs. running) and along different trajectories
- State machines: Many objects in a dynamic 3D environment can always be in one of several possible states. For instance, a traffic light may be in the states red, yellow, green; a car may be either parked, standing still with engine running, or driving; and an artificial humanoid avatar in the scene can have many possible states associated with such as sitting, standing, walking, running, reaching, etc. The transition between two possible states of a GameObject can be triggered by events. For instance, a human avatar can be programmed to switch from the "sitting" state to the "standing" state when another humanoid avatar enters the same room. State machines [2] are the Unity tool for realizing this idea and are often used to provide acting agents with some behavior, potentially involving AI methods to make the behavior appear realistic. Often, each state in the state machine of a GameObject is associated with a particular animation.
- Particle systems: While animations allow for adding dynamics to solid objects modeled as 3D meshes, there are visible effects in a dynamic environment that do not lend themselves to be modeled and handled in this way. Examples are smoke and flames, liquids, clouds, rain, and snow, etc. Particle systems [3] are the most common approach to model these things and can be easily created in Unity. A particle system consists of several, up to a large number of particles, which are simple images or meshes, that are moved and displayed together, for instance, to form the impression of smoke. A particle system has many parameters to control the properties of the particles, their movement and dynamics, their lifetime, etc.
- Physics: Physics is an important part of a really dynamic scene and needed to simulate the behavior of objects under gravity, collisions, and other forces. Unity's physics engine [4] is capable of simulating the behavior of solid objects under these forces. You have already used some parameters of the physics engine in the previous lesson including rigidbody and collider.
- Sound: Audio is another important input mode to make a 3D scene appear more realistic and increase its immersiveness. Sometimes you may also just want to add some nice music in the background of your application or add some commentary that is played to explain something in the scene or give instructions to the user. Unity's audio support [5] is essentially based on the idea of attaching AudioListener and AudioSource components to GameObjects in the scene. The AudioListener is typically attached to the main camera. An AudioSource attached to an object can be set up so that the played audio track gets louder when the camera approaches that object. Unity supports real 3D spatial sound which also allows the user to tell which direction a sound is coming from. You have already used an example of the AudioSource in the previous lesson for coin collection.
Tools to add interactions:
- User input: We already saw how keyboard input can be used to control the movement of an object (the ball in our previous lesson) in the scene based on some scripting and manipulation of the transformation parameters of an object. Similarly, user input can be used to interact with the objects in the scene in some other way such as opening doors, pushing/pulling some other object, pressing a button, etc.Unity's Input Manager [6] can be used to configure the input devices for a project. We will see the use of mouse as in input controller in the next lesson.
- GUI: 3D applications still make use of classical 2D graphical user interface (GUI) elements to display information to the user, provide selection choices, or collect other user input. For instance, a GUI menu could be used to allow the user to immediately jump to one of several pre-defined locations in the nice or a dialog box can be used to allow the user to enter input values for important variables like movement speed. However, Unity's UI system [7] is a bit out of the scope of this introductory course. The Unity web page [8] contains a lot of video tutorials explaining the different UI elements if you are interested in this aspect. We have already experienced creating a very simple GUI label that holds the value of the “points” awarded to a player in the previous lesson. In addition, here is a very short video demonstrating a simple Unity UI for triggering different animation states of a face, connecting back to the things we discussed above, regarding animations and state machines:Overview of An Interactive Interface Demo in Unity [9]. The Unity Assets Store contains thousand of assets related to creating menus and GUI in general.
- Complex 3D/VR interactions: IIn particular with the advent of special VR controllers to complement consumer-level head-mounted displays, new ways to interact with objects in a 3D or VR setting are conceived every day. Modern VR controllers, such as the HTC Vive Controller [10], not only combine buttons, trackpads, and triggers that allow for triggering interactions by certain clicks, but the fact that the position and orientation of the controllers in the room are tracked allows for completely new interactions by touching or pointing at objects in the scene, or by performing complex gestures with the controllers, e.g. for moving, rotating, or scaling other objects, teleporting in the scene, or measuring distances or volumes. Template scripts for many of these interactions are already publicly available. Devising and implementing completely new ways to interact with objects in the scene typically requires quite a bit coding though.
Since this is a Geography/GIS class, we also want to briefly mention that support for importing GIS data into 3D modeling and application building software to employ it as part of 3D or VR application is slowly increasing. The image below shows a world map GameObject consisting of meshes for all countries in the Unity editor. The meshes were created from an ESRI shapefile using BlenderGIS, an add-on for importing/exporting GIS data into Blender. Then the meshes were exported and imported into Unity as an Autodesk .fbx file.
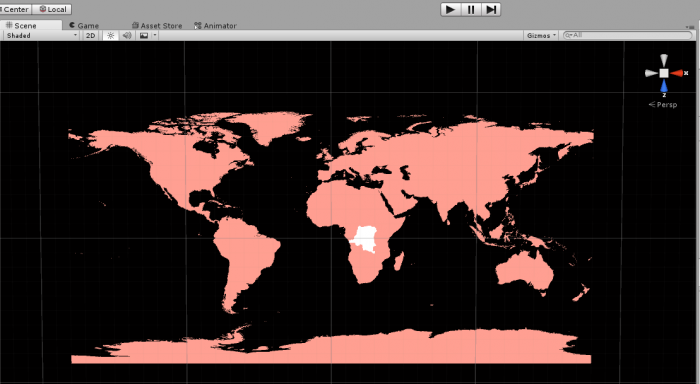
Recently, Mapbox announced the Mapbox Unity SDK [11], providing direct access to Mapbox hosted GIS data and Mapbox APIs within Unity. We believe that more initiatives like this can be expected for the near future, partially driven by the huge potential that current developments in VR and AR technology offer to GIS software developers.
Walkthrough: From SketchUp Model to Unity
Walkthrough: From SketchUp Model to Unity
In this walkthrough, we will see how we can import a 3D model from a SketchUp into Unity. Although the Unity Asset Store contains a large repository of free 3D models that you can use in your projects, depending on the requirements, it might be needed to import custom models into Unity. As you have already gained some experience in modeling 3D objects in SketchUp, it will be useful to see how you can import your model directly into Unity and add behaviors to it. In this walkthrough, we will import a SketchUp model of the “Walker” building into Unity, extract its materials and textures, and add it to a scene. Then, we will add a first-person controller prefab from the standard assets of unity which will enable us to walk around our scene.
You should still have the Unity project “MyFirstUnityProject” from the beginning of the previous lesson. Open your Unity Hub and open the “MyFirstUnityProject” (if you do not have this project anymore, follow the instructions from the previous lesson on how to create it. Make sure you also import the first package you used in the previous lesson – download here [12]). We will use this project to perform this walkthrough. Download the following Walker Laboratory [13] SketchUp file and once the download is completed, navigate to the location where it is downloaded (by default it should be in your User\[your username]\Downloads).
In the Unity editor, create a new folder in your project folder structure and rename it to “Walker Building”. Drag and drop your downloaded SketchUp file into this folder. Create a new scene in the same folder, by right-clicking on the folder from the folder structure panel -> create -> Scene. Name this scene “WalkerScene”. Open this scene and drag your WalkerLabaratory SketchUp model into the scene. Reset its position and rotation values to zero. Change the position of the Main Camera in the scene so the building is within its view. Change the X rotation of the directional light to adjust the lighting/show of your scene.
You may have noticed that the Building object we have imported looks rather dull and is missing lots of textures and materials. To fix this problem, we need to extract all the materials and textures from the prefab of the model so that Unity knows how to map them. Select the prefab of the model you have imported into your folder. You can see that in the inspector menu it is detected that this is a SketchUp model, but all the materials for the individual components of this model are missing (labeled as none).
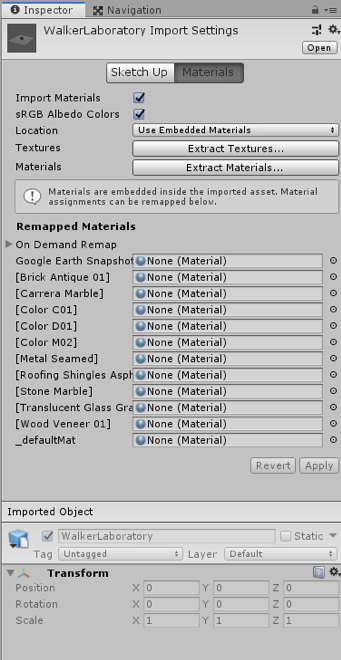
To fix this, click on the “Extract Textures …” button in the inspector panel. Create a new folder in the pop-up window and rename it to “Textures”, and then click on “Select Folder”. Do the same for Materials by clicking on the “Extract Materials …” and creating a new folder called “materials”. Once done, the model should have all the materials and textures added to it.
Unity SketchUp (01:39) This video is not narrated.
To add a first-person controller, we will use the default FPSController prefab on unity. This is the same prefab that you have used in the first part of the previous lesson. Navigate to the “Standard Assets” folder -> “Characters” -> “FirstPersonCharacter” -> “Prefabs”. Drag and drop the FPSController prefab into your scene. Place the FPSController somewhere on the plane (you can start with X=0 and Z=0 for position and then move the FPSController along these axes) and make sure the Y value of its position parameter is set to 1. Rotate the FPSController GameObject so it faces the building. If you play the scene now, you will notice that the FPSController will fall through the plane. This is because we have not yet attached colliders to our objects. The FPSController prefab already has a collider so all we need to do is to add colliders to the plane and all the children of the Walker GameObject.
To achieve this, you have two options. You should either select all the child objects of the building prefab that has a “Mesh renderer” component attached to it and add a “Mesh collider” to that object manually. Since these objects have meshes, the physics engine of Unity will use the shape of the mesh to create a collider with the same shape around that object. Or you can select the Walker prefab from your project folder and check the “Generate Colliders” parameter in the inspector menu under SketchUp option, and then press “Apply”. Press play, and you should be able to navigate on this plane using the WASD keys on your keyboard and look around using your mouse.
Unity SketchUp 2: 01:22 This video is not narrated.
Once you are done experimenting with your new creation, disable the FPSController GameObject by clicking on it once, and then unchecking it from the inspector panel.

In the next walkthrough, we will cover animating a camera and for this, we need to use the static Main Camera in our scene.
Animations and State Change in Unity
Animations and State Change in Unity
Animations are one of the main methods to bring some life into a 3D scene in Unity and make it dynamic. Objects in the scene may be permanently going through the same looped animation (think of the leaves of trees moving in the wind) or they may be in a particular animation state that can change, potentially triggered by some external event (think of a human avatar that can switch from a walking animation to a running animation and that may have many other animations associated with).
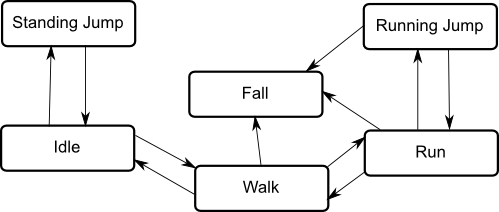
The theoretical concept behind this idea is the notion of a State Machine: Each GameObject is always in one of a pre-defined set of states (state for walking, state for running, etc.), potentially associated with a particular animation. The transition from one state to another is triggered by some event which, for instance, can be some user input, a collision with another object, or simply a certain amount of time passed. The states with possible transitions between them form the object's state graph as shown in the image below. The state graph together with a pointer to the object's current state when the project is running constitute the object's state machine.
In this course, we will use animations only to animate the main camera to create a camera flight over the scene. Other uses for animations for 3D/VR applications could be making objects like plants more realistic, creating movable objects like doors, or populating the environments with dynamic entities like people or cars. Our camera flight will only need a single animation and, hence, state. So we won't have to deal with complex state graphs and the transitions between states. Nevertheless, please watch at least the first 90 seconds of the following video to get a bit of an understanding of the Unity's Animator component and controller and what happens under the surface when working with Animation State Machine. Don't worry if some of the details don't get completely clear.
The Animator Component (03:45)
In order to animate the properties of game objects in Unity we use the Animator Component. Animator components have a number of properties which may differ depending on what you are animating. For example, a 3D humanoid character will require different settings than a 2D sprite. Here we have a scene with a model in it. The model has an animator component attached. The first property of the animator component stores a reference to an animator controller asset. Animator controllers are Unity generated assets that contain one or more state machines which determine which animation is being played while the scene is running. These state machines can be on multiple layers and use parameters of various types. To affect when they transition between states and blend. For example you can set the parameters of an animator controller from your scripts to tell it if the character is running, jumping or shooting a gun. It will then play and blend the animation automatically. The avatar is an asset that Unity creates when importing a 3D humanoid. It contains a definition of the skeletal rig the character has. When adding a character of this type to your scene the avatar field will automatically be filled in with an asset created for that character. Try to think of the avatar as the glue that binds the model to be animated to the animator. For generic objects without skeletal rigging an avatar is not required. The Apply Root Motion field determines whether the animation can affect the transform of the game object and is generally used with 3D humanoids. Root Motion is the core movement within an animation clip. For example imagine the difference between an animation of a character running on the spot verses one that is animated running a few paces forward. In the latter example we can use the motion of the character moving forward to drive the character around in our game. Looping that clip to give us realistic continuous motion. However, if you simply have animations that run on the spot you would uncheck Apply Root Motion and instead move the character via script. It is also possible to override this property entirely. This is done by creating a script with a call to the onAnimatorMove function and attaching it to your game object. See the documentation link below for more information on this. Animate Physics can be either checked or unchecked. When it is checked it means that the animations will be executed in time with the physics engine. Generally this is advised if what ever you are animating has a rigidbody. The Culling Mode of an animator effects whether or not the animations are being played while they're not being rendered. Always Animate means that the animations will play even while not being rendered. Based On Renderers means that the animation will only play while being rendered. Meaning that when the character is obscured from view animation will cease to save performance. With either option the root motion is applied as it would normally. That is if a character was being made to walk with root motion applied then they would continue to move even while not being rendered so that the character would end up in the correct place when they became visible again. Subtitles by the Amara.org community
The main tool for creating an animation in Unity is the Animation View. It's a very powerful but also slightly complex tool so that we will only get to know its basic features here. For details, please see the documentation available here [14]. The Animation View is for creating and editing animation clips as well as previewing them. Please watch the following short video to familiarize yourself with the idea of creating a camera animation clip in Unity using the Animation View. You do not have to try out what is shown in the video yourself; we will be doing this in the walkthrough in the next section (the walkthrough will slightly deviate from what is shown in the video though).
The Animation View (06:20)
The animation view allows you to create and modify animation clips directly inside Unity. It is designed to act as a powerful and straightforward alternative to external 3D animation programmes. For instance, if we wanted to have a camera fly around a scene to give a player an overview of a level we can create that animation for it in Unity. Here we have a scene with a camera in the corner. We would like to create an animation for that camera which will allow it to move from one side of the scene to the other. Since we want to make an animation for the camera we will want to ensure that it is selected in the Hierarchy view. We can then open the Animation view by clicking Window - Animation. Like any other view this is moveable resizable and dockable. There are many different buttons and options visible when you first open the Animation view. First and foremost is the animation drop-down. Here is where we can select our different animations to edit. Since we don't currently have any animations this drop-down is blank except for the ability to create a new animation. When you create a new animation you will be prompted for a name and a location to save the animation file. We will create an animation called CameraFlyThu and place it in the Animations folder. The Add Curve button allows us to choose which components of our object, or any child objects, we wish to modify with our animation. Each component can be expanded to view more options. To add a curve click the + sign next to the item you wish to add. Since we want our camera to fly around the scene we will add the transform's position and rotation. The timeline is where you will be able to establish the timing of your animation. The timeline is measured in frames and seconds. The red scrubber allows you to choose what frame you wish to modify. Next is the Record and Play buttons. When the record button is pressed changes made to the chosen object in the Scene view will be added automatically to the animation at the currently selected frame. The play button will allow you to preview your animation. The left and right arrows allow you to navigate through the keyframes of the animation. Next are the buttons which allow you to add keyframes and events to the currently selected frame. The Sample property determines how many frames make up one second of animation. Reducing this number makes our animations slower. At the bottom are two buttons that allow you to transition between dope sheet mode, which we are currently on, and curve view mode. With the record button pressed it can be very easy to rough out the animation that we want. Simply select the frame we want to modify and rotation in the scene view. and then set the desired camera position You will notice that a keyframe has been added to the timeline with the appropriate values. Properties that are currently being animated are highlighted in red in the Inspector. We can continue doing this for the various phases of our fly through animation. To preview the animation click the play icon next to the record icon in the animator view. If we were satisfied with our animation we could be done now. If we wanted to fine tune our animation however we would want to look at the curves mode. To enter the curves mode select the Curves button at the bottom of the animation view. Here we can see the various curves of our animation by selecting the corresponding component on the left. Again we can select a frame using the red red scrubber on the timeline. To modify a value on a curve click and drag a keyframe to the new desired value. To create a new keyframe click the Create Keyframe button, or double click on the curve. Right-clicking on a keyframe will pull up some of it's options. the most notable of these options is the ability to choose Free Smooth. This will create two handles are the keyframe which you can use to smooth the curve to your liking. Another way to control our curves is to choose the Broken option. This allows you to control each side of the keyframe indecently. In this example we will want to add a little variance to the exposition of the transform. Doing so will give us more of a weightless feel to our animation. Again we can do so by creating keyframes on the exposition curve and changing our values manually. The animations created in Unity have the same Inspector settings as animations made in external programmes. We can see these by selecting our clip in the Project view. Since we want our camera to fly across the screen only once, we best uncheck are Loop Time property. It is interesting to note that an animator is in charge of animation playback for generic objects the same as it is for humanoids. Unity has automatically added the animator to our camera and created an animator controller, a state machine and added it to this component The clip we just created is added to the state machine as the default clip that would be played at runtime. This means we can go on to record other clips and use the animator to decide when to play them. In this manner, once our animation clip is completed we can run our scene to see it in action. Subtitles by the Amara.org community
The Unity web page [15] has more videos related to animations available, dealing for instance with importing animations created in other software, creating animations for a humanoid avatar, etc. You won't need to know about these more advanced topics for this course, but if this a topic of interest to you, feel free to check these out.
Walkthrough: Creating a Camera Animation
Introduction
Walkthrough: Creating a Camera Animation
Introduction
In this walkthrough, we are going to program a camera flight over the Walker building using Unity's animation functionality similar to what you saw in the video from the previous section. Have the Walker Scene open. For your assignment, you will create this animation for the campus [12] with more buildings. (The building used in these instructions is the Walker building but you might see the name of Old Main in the hierarchy. That's just not using the right name. Hope it wont confuse you).
Initial Placement of the Main Camera
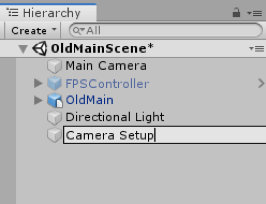
We should only have one active camera called “Main Camera” in the Scene. We will make the Main Camera to be the child of a general container object called “Camera Setups”. The animation for the camera flight will be defined for the parent object (Camera Setups) and applied to all its child entities. So use “GameObject -> Create Empty” to place the container GameObject in the scene. Change the name from “GameObject” to “Camera Setups”. (The image belongs to the scene with Old Main. In your Scene with the Walker building, you don't have the FPS Controller)
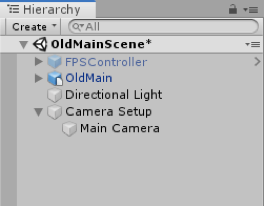
Finally, drag the “Main Camera” object onto “Camera Setups” so that it becomes a child of it. This is how things should now look in the Hierarchy Window:
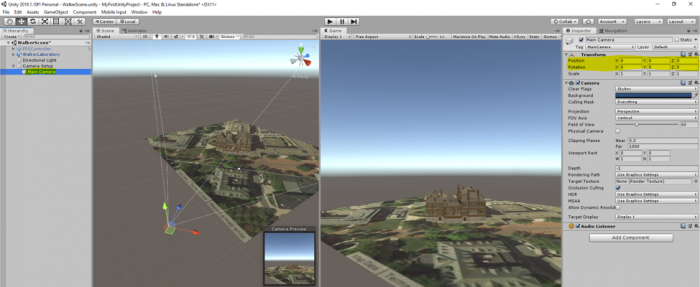
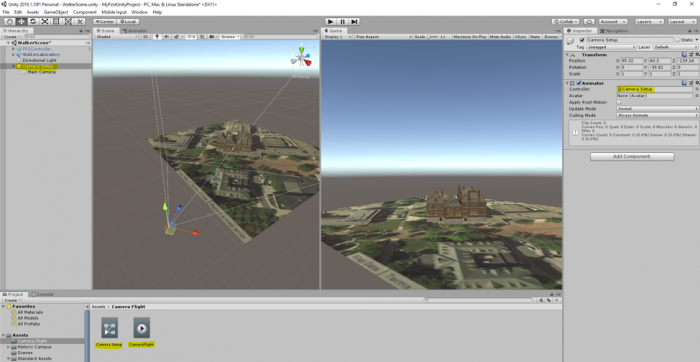
Now we have to place the camera in a good starting position for our camera flight. We want the camera flight to start a little bit away from the Walker building, and then move towards it before transitioning into an orbit around the building. So move the Scene view to a perspective similar to that shown in the screenshot below. First, set the position of both the parent object “Camera Setup” and its child object “Main Camera” to 0,0,0. Then manipulate the location and rotation of only the parent object “Camera Setup” to move both objects at the same time to a location you desire. If you did everything correctly, the Main Camera Position and Rotation values will all still be zero as in the screenshot below because they are measured relative to the parent object.
Creating the Camera Animation
Creating the Camera Animation
Now we are going to create the camera flight path. First, we are going to create a new Animation entity for the camera flight in our project Assets and link it to our Camera Setup object. Then we are going to set intermediate positions for the camera along the desired flight path. Unity will automatically interpolate between these positions so that we get a smooth flight path.
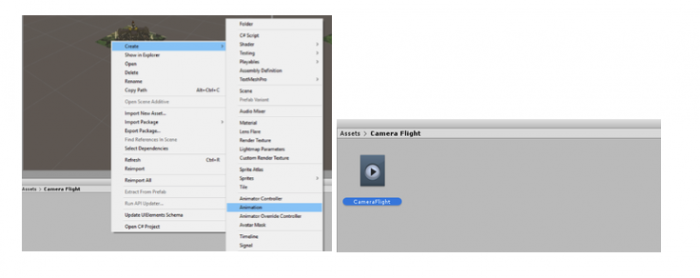
Create a new folder called “Camera Animation” under the Assets folder. Open this folder, right-click on an empty space within the folder, select Create -> Animation. This creates a new animation clip entity. Let's call it “CameraFlight”.
Connect the CameraFlight animation to our Camera Setup object by selecting Camera Setup in the Hierarchy Window and then dragging the CameraFlight animation from the Assets Window to the free area with the “Add Component” button in the Inspector Window (you have seen examples of adding elements and components to GameObjects using this method in previous videos). After doing so, the Inspector Window should show the newly attached Animator component as in the screenshot below. In addition, a new Animator object called "Camera Setup.controller" will automatically appear in the Assets window.
During the next steps, make sure that "Camera Setup" remains selected in the Hierarchy Window. Go to "Window -> Animation -> Animation” in the menu bar to open the Animation Window which is the main tool for creating an animation.
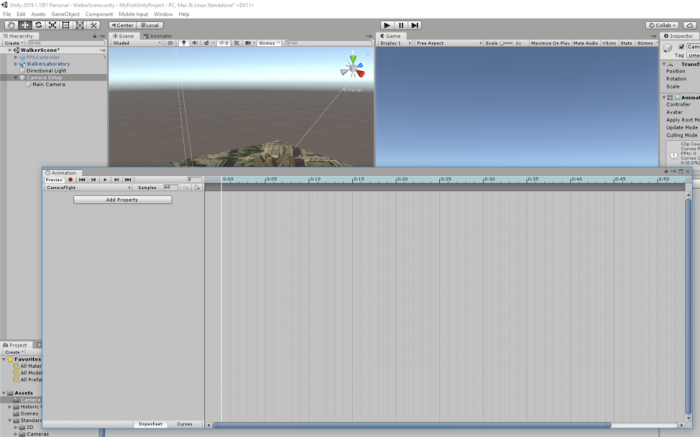
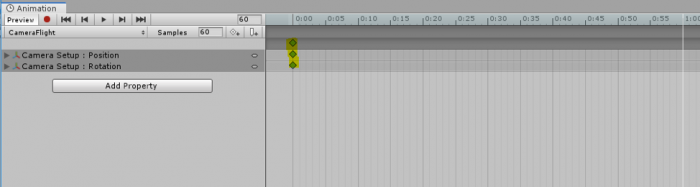
Let us first make a few adjustments to the Animation Window to make things easier. At the top right, you can see the timeline for the animation. 1:00 means one second into the animation. You need to have the mouse cursor in the lower right part of the window and then turn the mouse wheel to adjust the timeline. Our animation should probably be around 1 minute long. So set it up so that the timeline goes until at least 60:00 seconds (= 1 minute). It is a good idea to make the Animation Window as wide as possible.
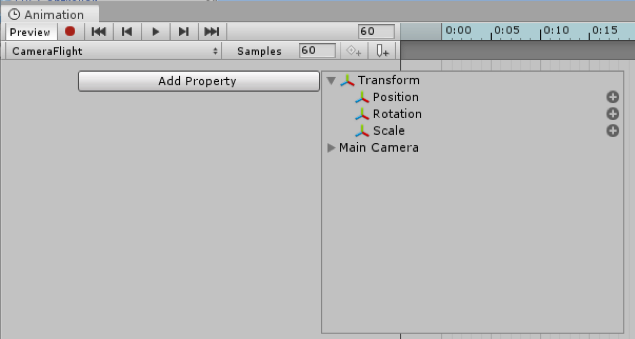
Now let’s clearly specify which properties we want to animate in our animation, namely the position and rotation values of our Camera Setup object. You will have to use the "Add Property" button twice to add the Position and Rotation, respectively. Press “Add Property”, then unfold the “Transform” entry, and use the + button to add Position and after that Rotation to the list. The result should look like in the second image below:

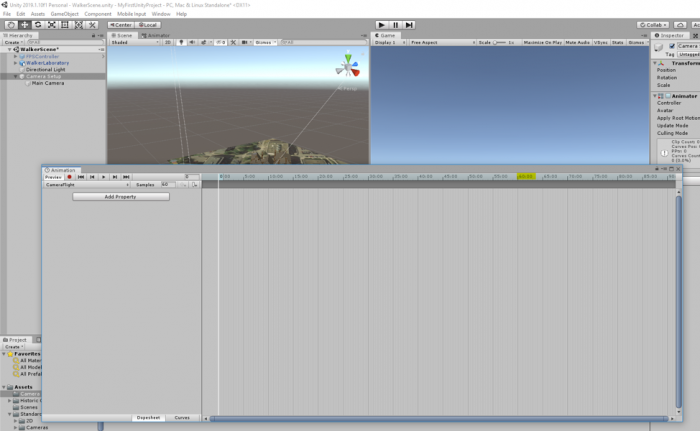
The diamond symbols below the timeline are the keyframes, which we will use to define intermediate positions and orientations for the camera along the flight path. As you can see, Unity has automatically created two keyframes, a start frame at 0:00 and another one at 1:00. You can select a keyframe by clicking on the upper diamond (the one that is in the darker gray bar, the selected keyframe is shown in blue) and you can drag it to the left or right to change the time when it will occur. You can delete a key frame by right-clicking the diamond and then selecting "Delete Keys". That's what we want to do here so that we end up with only the start keyframe like in the figure below:
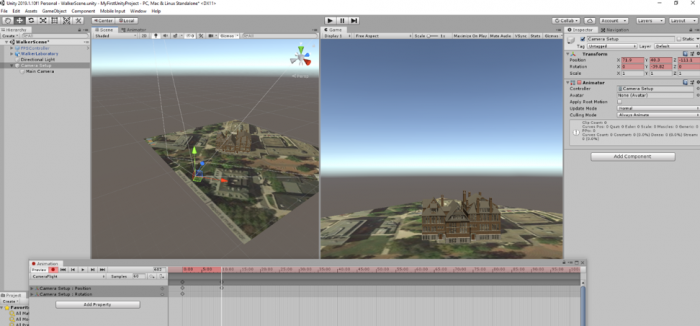
The red record button on the top left determines whether changes will be recorded for the position in the animation where the vertical white bar is located which will result in a new keyframe being added at that position. When record is on, the position and rotation properties of the Camera Setup will turn red. Do a left-click at 10:00 in the timeline to move the white vertical bar to that position.

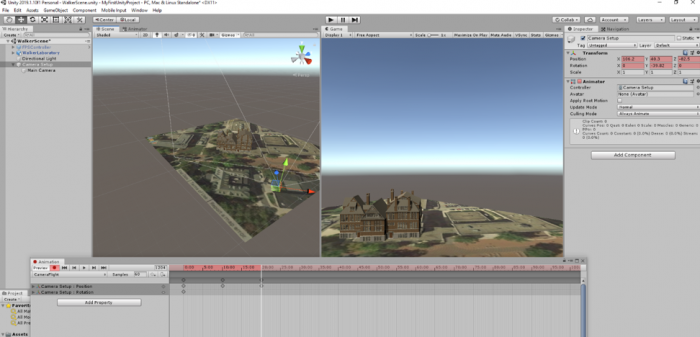
Now let's create a second keyframe at 10:00 and record it. Press on the record button (the red circle in the animation window) and then use the move or rotate tools to change the position and rotation of the Camera Setup GameObject in the scene. Note that all the changes you are making to the position and rotation of the camera will happen in 10 seconds, as this is the limit we have specified for this frame. Once you are happy with the changes, stop the recording.
Repeat the same process to add another keyframe every 10 seconds and make another recording.
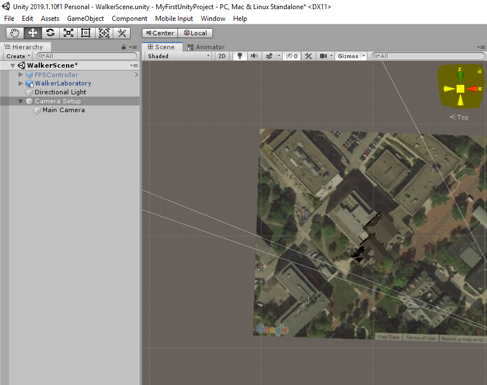
You can use the perspective gizmo at the top right of the Scene Window to quickly switch between the top-down and side view of the view, which can be very helpful here.
You can now click the Play button  in the Animation window (not the main Play button at the top!) and Unity will now show you the animation between the first and second keyframe in the Game Window. Press the button again to stop the animation.
Before continuing, make again sure that you have Camera Setup selected in the Hierarchy and that recording in the Animation window is turned on (record button with a red dot is highlighted).
Now continue with this to build a camera animation of 60 seconds with 7 keyframes in total, one every 10 seconds. For each of the keyframes move the view to the next corner of Old Main. The last keyframe at 60:00 should be roughly identical to the very first one, meaning you should move "Camera Setup" away from the building again.
The final animation should look similar to the one in this 360° video [16] (producing such a 360° video from the animation is described later in this lesson). Creating such animation can be a bit tricky at first but you will get used to it quickly. Don't worry if the orbit around the building isn't perfect. This is ok because we are only using very few intermediate keyframes here. You can try to improve on this in your homework assignment. If something goes completely wrong, you can always delete the last few keyframes using "right-click -> Delete Keys". Here are a few additional hints that you may find helpful:
- Don’t forget to save your project after each successful step and remember that you can take steps back using CTRL+Z. It's also recommended to make backup copies of the entire project folder after each major step. This allows for going back to an earlier version if something goes completely wrong.
- Also, remember that you can shift keyframes back and forth in time by dragging them along the dark gray bar.
- If you just want to preview parts of your animation instead of everything from beginning to end, you can place the white vertical bar by clicking into the timeline and then the preview with will start at that position.
- If the camera gets very close to the building and the front side polygons of the building are getting clipped, you can try to fix this by setting the "Clipping Planes -> Near" property of the "Main Camera" object (child of "Camera Setup") from 0.3 to 0.01 in the Inspector Window.
Camera Flight Complete (05:27) (A complete instruction video of what we just did) This video is not narrated.
Running the Project
Running the Project
Once you are done with your animation, you can close the Animation window, maximize the Game Window, and look at your camera flight in full size. Just press the main Play button at the top or CTRL+P.
Check out whether you are happy with your camera flight as it appears in the Game Window. If not, you can revisit it by selecting Camera Setups and opening the Animation window again under “Windows -> Animation”.
You can now go ahead and build a stand-alone Windows application as explained in Lesson 7. Our next goal will be a little different. We want to be able to see the camera flight in 3D and be able to actually look around. One option would be to turn this project into a VR application, for instance for the Oculus Rift or HTC Vive. But since most likely not many of us have access to an expensive VR device, what we are going to do instead is to use the Google Cardboard for our “VR application”. The approach we are taking for this is to record a 360° movie of our animation, make it available on YouTube, and use YouTube’s Cardboard support available on most smartphones to turn the video into a VR application.
Unity-based VR Applications for Mobile Devices
Unity-based VR Applications for Mobile Devices
You already learned about building stand-alone 3D applications for Windows with Unity. Creating stand-alone software that allows for experiencing the application in real 3D with the help of a VR head-mounted display connected to the Windows computer is not much different. While you probably won't be able to try this out yourself (unless you own a device such as the Oculus Rift or HTC Vive), Unity VR Overview [17] provides a good overview on VR support in Unity and building VR stand-alone applications. Additional information can be found at Unity Learn [18].
Similarly, you can build stand-alone applications for mobile platforms such as Android or iOS and even have the built app directly pushed to your mobile device. This requires additional software to be installed on your computer, such as the Android SDK if you are building for an Android phone or tablet. However, despite a lot of progress in hardware and, in particular, graphics performance on modern mobile devices, smoothly rendering 3D scenes in high quality on a mobile phone, for instance, can still be problematic. This is particularly true if the scene needs to be rendered for the left and right eye separately to support a VR device like the Google Cardboard. We will, therefore, take a different approach in the following walkthrough and instead use Unity to produce a 360° video that can be shared, for instance via YouTube, and then be experienced in real 3D on pretty much any(!) smartphone with the Google Cardboard. While this approach is limited in that no interaction between the user and the objects in the scene is possible, advantages of the approach in addition to being less dependent on high-performance hardware are that we do not need to produce different builds for different mobile platforms and no additional software needs to be installed. If you, however, are interested in exploring how to build stand-alone (VR) applications for Android devices, the Android environment setup instructions [19] and the video below are good starting points.
Video: Live Training 10 Mar 2014 - Mobile Development (1:08:46)
Hello everybody and welcome to another one of our live trainings on Unity. My name is Mike Geig and today we will be talking about mobile development. If you are on our Facebook page, then you've seen a version of this picture before. But I decided to spruce it up with an American flag cape because, what can I say, I'm a patriot. So today we are going to be talking about mobile development and we are going to be basically targeting kind of how we start, right. You're going to notice that a lot of a lot of programming for games for mobile is is pretty much exactly the same for for web or for desktop. So I don't really need to get into a lot of depth there because really not a lot of depth is needed. When you're thinking about mobile platforms there's really only two things you need to keep in mind that's different from say desktop or anything else, and that is A) How are you going to control the game? because input is very limited on mobile device and B) What kind of screen real estate are your going to have and what kind of hardware power are you going to have? because you know we will know that mobile devices can't run as intensive games as anything else. We've got a lot of people participating in chat today so obviously I'll be moving along with the lesson and trying to keep up trying to keep up with the chat. So if you hear me pausing for bit it's because I'm reading chat and trying to answer your questions. I haven't said it in a while but, you know, if you have questions during the lessons obviously post your questions in chat and you know I'll try to answer them. Okay so yes I hope you all enjoy my my my super-awesome picture there, okay. So someone had mentioned before something about data persistence. That was last week. This week is mobile development. I changed the title but some people are still seeing it say data persistence. So today is mobile. Yeah, so so there you go.
Okay so before we begin, like always, if you have any questions, comments, concerns, anything like that, you can follow us on Twitter @unity3d @mikegeig, which is me, @willgoldstone and @theantranch. We love talking to you on Twitter and yeah so if you're here, you have any questions, or just want to talk, twitter, twitter it up. For those of you who watched last week, I was in London on a mac and trying to figure that whole thing out. Today I am back in my house and so I'm back on my computer, windows, which I'm much more familiar with and I have my mechanical keyboard. So I know some of you last week we're really missing the mechanical keyboard, this week its back so if you don't like the mechanical keyboard, sorry, its back. But yeah. Oh someone asked in chat if I work for Unity. I do in fact work for Unity. I am a screencaster/trainer for Unity. So, hello.
Okay, so let's let's start talking. So the first thing we're going to do, when when when doing any mobile development in Unity, is we need to set up our mobile development environment. By default, Unity integrates with the SDKs for whatever mobile device we want, but we have to actually have those. So some of the steps obviously I'm not going to talk about right now, is that you need to download the SDK. So if you're using Android, you need to download the Android SDK. And the documentation on Android is on Android's website on how to do that. You download and install the Android SDK and update it and do all that stuff. And if you're on iOS, you need to download Xcode and all the the apple goodness stuff, alright. So those two things have absolutely nothing to do with Unity so I'm not really going to talk about them, but they have to be done.
Let's see here question, Can you use the Android Nexus 7? Absolutely, yeah you can pretty much do a lot of Android and iOS and and whatnot. And there are some limitations as to which stuff Unity will run on. but for the most part we cover pretty much all devices or most devices, and more and more every day. So assuming we've already downloaded and installed Android or iOS, we need to basically tell unity about it. Now with iOS, Unity is automatically going to know about it. So you just download your Xcode, you know you set that all up in Unity, we'll know where it is because it is always in the same spot. You will need an iOS developers license. I'm not an iOS developer at al. I don't own a Mac. But I believe it's a hundred dollar license fee through them, though I'm not entirely certain. And you need to log into that service before you can do iOS dev. The Android SDK is free, though it's it's it's a little complicated to get set up, so obviously consult the documentation because it's so it's a little bit different. Now Android, since you can install the Android SDK pretty much anywhere, will not automatically be recognized by Unity, so you need to tell Unity where it is. And to do that, you're just going to come into edit, and then Preferences, and click this external tools option. Right here you're going to see Android SDK location and you just need to tell it where you saved that information. And from then on out it will it will say, hey ok so we know where your SDK is, and all that is working fine.
Ooh, chats crazy. Will I be at GDC? I will, in fact, be at GDC, so if you're going to GDC message me, we'll hang out. Let's see here. Some people are talking about my mechanical keyboard, okay Are you going to cover using different quality assets like images for a 2-d game? We'll talk a little bit about resolutions and images near the end of this um let's see here let's see here I know I mean someone says let him get started I hope I'm getting just destroyed by questions right now maybe we'll do a second mobile session that's just QA because you all seem to have a lot of questions let's see here oh we're going to avoid platform specifics today we're not going to talk about plots platform specifics just to do can you use the free version of unity or do you need the iOS android windows add-ons I believe there's a free version of the iOS Android add-ons there's like a free version of foreign dollar version and then like the more expensive pro version I think man it's been forever since I looked at licensing you have to go to unity site and check it out I honestly cannot remember to see I wouldn't yeah it so someone said to do Android 2.2 a great two point three in greater which is which is right let's see here okay so yes a lot of basic questions what is an SDK is one of the questions that just popped up in an SDK is a software development kit it's basically a whole bunch of ways for us to interface with some hardware or something else right so an Android SDK allows us to write applications for Android but anyway okay so at this point we're going to pretend like we've installed Xcode or we've downloaded Android and that's all that's all good to go so at that point our our editor is kind of is ready to go but there's a couple more steps that you really want to do the first thing you want to do is come into file and build settings and ensure that you are currently set up for whatever platform you're building for so I'm building for Android you're going to see the things we do today it won't matter if you're on Android or iOS so if you're following along or if you're watching this later in the archive and you want to follow along it really doesn't matter if you're on Android or iOS it's really irrelevant because all the stuff we're going to do works for both and I believe it all works for the Windows Phone 8 as well but I've not personally tested that but I'm pretty sure it's the same so yeah so anyway if you're sailing on PC Mac or Linux standalone you'll just want to select your platform and click this switch platform button you can see that I'm already on the Android platform because I have this little unity icon here which means I'm currently building for Android that's the platform it's currently on and we don't really need to mess with any of these settings right now I've also already added my main scene here but we're not going to really worry about that right now so we need to you know obviously switch to the appropriate platform another thing I want to do I generally always do is I try to set up my my aspect ratio so in this case I'm in 16 by 10 landscape you're going to see they're going to have some different options alright because I switch my platform to mobile so I don't see the standard options that I normally see I see a whole bunch of different options in this case I'm choosing 16 by 10 landscape because my test device happens to be a nexus 10 tablet if you know depending on on what device you're using you'll want to pick an appropriate aspect ratio for that okay um let's see here oh geez alright so a lot of questions in chat craziness um anyway so I'm gonna kind of skip a lot of these questions because I just can't get to them right now I'd really like to get started alright so our editor is in the appropriate build mode in my case it's Android I've set up my game to have the appropriate aspect ratio so now the first thing I want to do is I want to talk about touch input there's basically predominantly two ways to interface with a mobile device and that is a multi-touch screen which most devices nowadays have a multi-touch screen and also a in the accelerometer right and iOS devices also have a gyroscope which functions kind of similar to an accelerometer we're going to ignore the gyroscope for today because we can do pretty much the same stuff with the accelerometer and since Android devices generally don't have a gyroscope it would be something that applies to both so as I said I'm trying to do things that apply to both so I'm skipping the gyroscope but the input device if you're reading unities documentation you need to use mobile documentation is a little bit older it talks about how iOS only allows five touches and Android allows somewhere between two and five and it has been my experience now that both iOS and Android allow well over ten touches or five touches obviously how many touches depends entirely on the device but but that number is a little bit bit bit low so what we can do is we can we can read in whatever is touching the screen and generally our devices are touch capacitive screens which means it has to be something like your hand touching it something that will will conduct a current and so and that's how the device screen knows where are our hands our fingers or whatever our stylus pens or whatever are touching the screen now since our screens are flat we are dealing specifically in screen coordinates right so obviously we don't have an x y&z; axis with our mobile devices as far as touching goes because the screen is basically a flat canvas and so I have this little amazing infographic here that basically talks about how the position works on on mobile screens all right and so basically the lower left-hand corner is zero zero all right is is the origin and basically it goes from zero to the screens height upwards and zero to the screens with right words and so that is that is our screen coordinates now this doesn't matter if we're in landscape mode or portrait mode basically the lower left will always be zero zero and height will always be up in width will always be over so if you're in portrait mode the system updates to the lower left hand corner and if you're if you flip to landscape mode again the system updates so yeah basically wherever we touch the screen it's going to be a 2d coordinate whereas going to have an x and y component and it's going to be some x position comma some Y position yeah someone said in chat don't forget the z axis is towards the user not when we're talking about screen coordinates there is no towards the user because this is flat yeah someone also mentioned that I thought as ears are started at the top left in some instances zero zero is the top left but in this instance on zero zero is the bottom left so that's just that's just how this is handled and so we can like so if we're talking about the GUI system the top left is zero zero but we're talking about mobile touchscreen coordinates and it's the it's the lower left is our zero zero so okay so let's let's talk about touches so basically touches are stored in an array because we can have more than one touch right and so we can't just be like hey what's our one touch we need a collection of touches and we access all of those through the the input class just like we do any other form of input because you know multi-touch screen is also just input so basically what we're what we need to do is we need to access the input class and we need to find this information about our touches we do that all through scripts so what I'm going to do is I'm going to go ahead and just create a script we create a c-sharp script which I'm just going to call touch script oh one more thing I want to talk about today real quick I am using the unity remote application on my Android device so I'm doing that specifically so you guys can see what I'm doing if you think about it normally the best way to get good performance good reliability is to build my my project send it to my android tablet and test it on my android tablet right however you won't be able to see that you're all watching my computer screen and I don't have another camera to show you the contents of my tablet so I have installed the unity remote on my tablet if you and you can find the unity remote from the Android store and from the iOS store it's just called unity remote it's free if you find that you're being charged for it you're getting the wrong one unity remote is free and basically what that's going to allow me to do is it's going to allow me to use by my tablet as an input device into the editor so I can test my mobile application in the editor now the reason I mean that works but it can be a little buggy sometimes it doesn't work and if it forces or imposes specific specific orientations on me and stuff like that so it's not as fluid as just basically deploying to my device and testing it that way so just keep that in mind what I'm doing is I'm using the unity real remote you're more than welcome to do that your new remote is fantastic it allows me to test any editor but what I want to do real testing I deployed in my device alright so just just keep that in mind and yet someone is said in chat it is a bit laggy the unity remote is so now that's effectively what I'm using so you're going to basically see that and so I'm going to go ahead and just put this touch grip on my main camera you can see here I just have a scene this just got a cube a direction light and a main camera so in case you're wondering what I already have in here nothing really I'm gonna go ahead and open this touch script there we go and I'll zoom in the problem is always seeing stuff Oh chats going crazy let's see here that's a lot of language I don't understand because that's not English ah let's see here that's a lot of not English I don't know what anyone's talking about everyone's talking in a different language okay let let's try to limit chat to being specifically about the topic right now and preferably at least for me to be in English unless you don't speak English because well if you don't speak English you're not going to be getting a whole lot of this life session anyway but it's a little distracting so alright so the first thing we want to do is we want to necessarily want to kind of get the touch information and like I said before the touch is stored in an array and that array is called touches so I can access input dot touches and this is an array and I could just be like touch a subzero touch uh someone whatever right so there's this array of touches all right a lot of times I would want to iterate through this array of touches and that's actually what we're going to do here in a second but before we do that I want to talk about an individual touch a touch is a class and so what I want to say is something along the lines of touch I don't know my touch equals and let's say I want to get the very first touch right I just want to put my finger down and get that one finger position directly on the screen I would do inputs not get touch and this will give me back an index member from the array I want zero to give me the first touch I've just been informed that the language people are speaking in chat is Turkish so okay hello I did not know that thanks Christina appreciate it okay and so what this is going to do is this is going to give me back the first touch in the array which I will store is here is my touch from the touch struct and touch is fact is instructed not a class which for our intents and purposes right now really doesn't matter alright so just keep that in mind and so this touch has a lot of a lot of stuff that is very useful to us alright so let's consider I'm just gonna go my touch I'm just going to hit dot and let's look through the things that touch has right so the first things first is Dutch has a touch has a delta position a delta position tells me how much my finger or whatever device is touching the screen has moved since the last time it was looked at since the last update all right Delta time is the amount of time since the last update which most of the time Delta time is the same as time that time unless you're pulling for your input somewhere else right but usually Delta time will be the same as time that time finger ID tells me which finger it is so if I if I put my my index finger down on the screen my finger ID will be 0 if I while holding that on the screen I touch it with another finger my that finger ID will be 1 and so on and so forth so finger ID is the index of the specific touch then we have phase which is what phase that touches in and the phases are begin moving stationary and ended so begin is the first frame of a touch stationary as if the touch isn't moving moved is the the touch did move and in means I pick my finger off the screen and then there's a fifth one called cancelled and cancelled it's only if there's some air and it can't read the input the position is its position on the screen raw position I actually don't know what that is raw position I don't know maybe we'll look at this here in a second how would you use position I've no idea what raw position is so yeah maybe raw position is the screen position without menus and stuff like that so I know in Android it's got that little menu bar at the bottom and so it doesn't count that as part of its position so maybe raw position is without that not entirely certain tab count is how many times you're tapping your finger and it keeps it keeps track of that in case we're doing quick taps and then to string just kind of outputs the class because that's something that's inherited so those are all the pieces of a touch alright and I can just get one touch which we're actually going to look at doing here in a little bit and I can do stuff with that alright uh but for now I don't I don't want to mess around with individual touches what I'm going to do is I want to help put to the screen information about a bunch of touches so once I get here I am just reading through chat now let's see here okay nothing that is really pertinent again please try to keep chat not relevant to relevant to what we're doing here so here's a question how does finger ID work if you put down one finger and then put down another remove the first finger while holding the second one so basically if I put down one finger it's gonna have an ID of zero but put down to the second fingers can have an ID of one if I pick up my first finger my second finger will still have an ID of 1 and zero will be freed up so it's not like it switches or anything that keeps track of the fingers while the fingers are touching right and I'll actually here in just a second we're going to build we're going to build a basically a little demo here that's going to show you exactly how it works and so that's what we're actually let's do that right now and so I don't really care about update right here so what I'm going to do is I'm going to do an ongoing method there's that kind of keyboard for you guys and so what I want to do is I want to iterate through my collection of touches and I want to output some information to the screen about those touches all right so I'm just gonna do a quick foreach loop and I'm gonna say for each touch a touch in input dot touches oops I don't know why I did acceleration input that touches so this will go through all of the touches in this touch array and I'm just going to build a message here so I'm going to do a string message and I'm gonna say message plus equals and so over the base I'm going to do is can can't need some information so ID + touch dot finger ID uh plus this part gets a little long-winded and let me see here let me just copy this because we're basically gonna be doing this a bunch so that's our ID and then we're going to say hey what phase is it on and we'll do touch dot phase and the phase needs to be two string and then we'll say touch dot after phase let's go ahead and do tap count which again will be touched dot dot tap count and then we'll do after tap count let's do say position let's do position X position X and that will be touch dot position X and let's do oops let's do position Y which will be position dot y all right um and then let's do we're going to need to do a little bit of an offset so these don't all overlap each other so I'm going to intim equals touch finger ID and then I'm going to say GUI label and that label will be positioned at new rectangle and the new rectangle is going to be 0 plus 130 times num this will allow us just to offset them across the screen you'll see in a second what this is doing zero 120 and 100 and then message which is the message during we just created alright so what this is going to do is it's going to go through each touch I have on the screen and it's going to output this information to a GUI label this part here the num just allows me to offset so the the first finger will be at 0 the second will be at 130 the third will be at 260 and so on and so forth so we can have them all kind of cross the screen there all right so let's go ahead and save that and let's go back into unity and let me wake my tablet up here and hopefully the the unity remote picks it up the very first time so I'm opening up my unity remote I'm going to hit play the unity remote did pick it up so now I'm going to touch the screen with one finger and I see ID 0 phase the stationary tap count is 1 position X in position Y and as I move this you'll see it flips between stationary moved it's updating obviously much faster than my finger is moving so we supposedly see stationary but we can see exactly where I'm touching or if I pick it up goes away put it down it comes back if I put a second finger down there was our second finger third fourth fifth six seventh women let's try this again oops I lost my my tablet there we go ok so let's try this 1 2 3 4 1 2 3 4 oh it fell out of its case see what I was saying about the the remote kind of being a little weird anyway you get the idea if I would actually deployed this to my device it would be much more accurate but since I'm running it from the Unity remote it can can get a little bit iffy there's well now I kind of lost track cuz it just goes off the screen anyway so I got eight at least so they're real but basically using this I can just see all sorts of information about a bunch of different touches up and basically oh it looks like 9 is the most my device will allow me because down here my console I see out of free touches so that must mean that that after I did eight that was that was it so eight must be the maximum on this particular device because I started getting the error out of three touches so yeah so basically you know this is just a real simple ways that we can see kind of how the different parts changed now watch I'm going to tap my finger and it kind of flashes there let's see if I but it does say tap count to real quick because it means I'd tap my finger twice oh there we go I got up to tap count four so basically I'm to hit hit real fast I got to tap count eight so you can see that we can let allow unity to recognize different tap counts now another thing about the unity documentation if you go read the unity mobile documentation it's going to say that Android does not support tap count and iOS does it didn't a long time ago but now obviously I'm using an Android device and it supports tap count just fine so tap count does work so if you're reading that on there don't think you know that that it doesn't do that anymore um okay so now I see the people are talking about c-sharp versus JavaScript okay apparently no one wants to listen to me and just keep the talk about mobile development but let me see if there's anything that I should be answering in here oh let's see here people are just how many fingers do I have I have ten fingers which is unfortunate that I didn't have ten touches that I can utilize um I oh I put the script just on my camera it doesn't really matter where you put it um it's an ongoing function so it'll run from anywhere oh let's see here now let's see here yeah it's on the camera yeah yes this will be archived all my videos are archived for anyone wondering let's see here alright so okay for those who said that it says stationary all the time it actually flips between stationary move but just really really quickly because remember this this is running well how many frames a second this is run in like 300 frames a second and you don't really know how fast the update method is actually being called but um it runs fast so obviously do something moving that fast my finger doesn't seem like it's moving at all so just keep that in mind okay so that's a real simple just like hey let's output stuff to the screen oh and here's another question just touch class or well touch another class but the question is touch class already in general library or do you need a special input it is already it's part of unity engine so you do not need to call it input or anything like that yeah so okay so now let's let's do something a little bit more interesting I'm going to go ahead and turn that touch script off and let's move this cube with our finger so what I'm going to do is I'm going to create a c-sharp script which I'll just call move script and let's go ahead and just click and drag that onto the cube there we go and let's open it up alright so basically what we want to do is we want to say hey if there is a touch we want to move this cube so let's just come down in here and I'm going to say if input god that's a touch count equals one means there's exactly one touch on the screen so what this means is if I put two fingers on the screen I won't be able to move the cube and if I obviously if I'm not touching the screen I again won't be able to move the cube I have to have exactly one finger on the screen or a stylus or whatever which is one touch read all right so my touch count equals one then what I'm going to do is I'm going to say transform dot translate and what I want to do is I'm going to say input dot touches this time I'm just going to use the array on the next time you're going to see me get a reference to up using touch so got Delta position so basically how much has the the finger changed over the course in frame X and in this case we're going to dampen it a little bit by multiplying it by 0.25 that's just going to make it not go SuperDuper fast and then in the y-direction I'm going to do the same I don't know why that just said space right there in the y-direction I'm going to do inputs and actually I'm just gonna copy this going on your input that touches Delta position Y and then I'm not going to move in the Z Direction 0 in the Z Direction okay obviously I'm stacking this up because otherwise wouldn't fit on the screen because I'm zoomed in so far so basically what we're saying is if we have one touch that what I'm going to do is I'm going to translate this cube by the Delta position of X by how much X is moving all right and that's going to allow us to touch the screen with our finger and move things around so let us come back here to unity and I'm gonna hit play and I'm just going to touch my screen and you can see that I'm able to move the cube around just by touching my my tablet so the cube moves around now you are gonna notice that the the cube does not move exactly with the finger right so my fingers move in a little bit the cube is moving more just because it's it's I'm using a perspective camera it's not a one-to-one ratio so you know the cube is not I'm gonna move in the cube obviously but it's not quite the same alright so what I'm gonna but I mean it works right that's that's specifically what I wanted to show you how to how to do but let's do this let's say I want the cube to move exactly where my fingers touching right like by using some percentage of the screen width or height now that is certainly doable but it's not really doable the way we have it now so what I'm going to do is this is I'm going to this part it's just for aesthetics but I'm going to change my camera to be orthographic okay again that I don't need to do that that's for aesthetics so that it it looks more more pleasing so I'm going to set this to orthographic and then I'm going to modify move script so I'm going to come back into my move script here and in this case we are going to to make some changes so I'm going to go ahead and get rid of this line of code and I'm gonna instead say touch touch equals input get touch I just told you I'd show you the other way so I'm not just referencing it all the time and so what I'm going to do is I'm going to create a float X&Y; and I'm going to set that up to a percentage of the screen width and height based on the position of my touch now I'm just going to do the math here real quick just know that that I determine this ahead of time I determined that the left bound of my screen was negative 7.5 the right bound was positive 7.5 the upper bound was 4.5 in the lower bound was negative 4.5 so I've already calculated this out okay so if you're wondering where I'm getting these numbers I already just move the cube around and figured out where the bounds of my screen were so I'm going to say float x equals negative 7 point 5 plus 15 times touch dot position dot X divided by screen got with okay so basically touch top position dot X divided my screen up with will give me some percentage of the way across the screen my finger is then I multiply that by 15 and then I add it to negative seven point five so that if my touches all the way to the left it'll be zero zero times 15 is zero in a row be at negative seven point five which is my left bound if my fingers all the way to the right this will be 1 1 times 15 is 15 plus negative seven point five will leave me with seven point five which is the right side of my screen so that's effectively what we're doing here and the same was going to go for y so I'm just going to go ahead and copy paste and I'm going to replace X with y I'll change this thing I get four point five I'll change this to nine and I'll change this to touch position dot Y and screen got height okay there we go okay and so that is going to tell me the X&Y; position in this in the game that I that correlates the finger position on the screen all right and so then all I really need to do is I need to set my transform to that so I'm going to say transform got position equals new vector3 and I'll position it at X Y and 0 again we're not using the z-axis Oh chats going crazy today all right let's see here oh by the way yeah so someone mentioned this or I see some people talking about it I'm using the GUI system just to show you guys some stuff don't use the GUI system with mobile devices hopefully we'll have a chance here sometime to talk about efficiencies a little bit and the GUI system as it stands right now that our current GUI system is just not efficient enough for mobile devices so don't use on GUI with mobile devices I only did it to kind of demonstrate that for you guys so you won't want to do that all right and so this is all saved so let's come back to unity and let's see what happens so I'm gonna go I'm gonna have an error what did I forget to do something about a float casting all right around my F's that was a test you all failed you were supposed to point it out some of you might have I haven't been looking at chat all right and so let's see here I'll go ahead and hit play and so now you'll see that I'll touch the screen with my finger and I will move this around all right yeah and if someone pointed out this works for all screen resolutions right specifically because I'm doing position X divided by screened out width so it really doesn't matter what the resolution is this it'll work for anything so yeah um interestingly enough the way I've set this up means I can just tap anywhere and the cube will go to where my finger is touching all right because now it just correlates to where my finger it so I say I want to touch the upper right hand corner just tap the upper right hand corner and there's my cube lower right hand corner or that was a lower left hand corner lower right hand corner upper left hand corner so on and so forth direct middle whatever and so this allows the the cube to move with my with my finger so once the person said here let's see you said that the left bottom corner was zero zero increasing X to the right increasing one at the top how can there be negative numbers if there's no space the left bottom from zero zero because the negative numbers are in my game right look at my game so if I pick my cube my cube is at zero zero right now let me go into 2d if I want to move my cube to the upper left-hand corner you'll see it's at roughly negative point five four point five right to the right so I'm not talking about screen coordinates I'm converting screen coordinates to world coordinates that's what that is anyway okay so that's what's going on there okay so you can see that we can basically use input uh for all sorts of stuff all right so in actually right now someone mentioned that I'm using Delta input I'm not using your Delta position I'm not using Delta position I'm just using position right I don't want the change in position I'm with the actual position so anyway so at this point you can see that we can use these touches for all sorts of stuff I can move stuff around the screen I can select items I can shoot lasers I can you know whatever I want to do so yeah touch the touch input is really cool so now let's take a second let's talk about the accelerometer all right the accelerometer is our second form of input and the accelerometer will basically tell me which direction the tablet is kind of leaning all right and and it's actually really really really simple basically now I have a graphic for it basically we have three coordinates with the accelerometer because the accelerometer tells us the device's physical orientation in real life okay and just like in unity the three axes line up in such that Y is up and down X is left and right and Z is in and out however in this case a positive Z is towards us a negative Z is away from us but in unity positive Z is away from us and negative z is towards us so a lot of times you're going to see us use negative Z to get unity to map to our device all right and so and what we can see is X is up and down Z's in and out or I'm sorry Y is up and down Z's in and out X is left and right and that works regardless of what orientation we're in okay so if I flip my device from portrait to landscape unity will automatically update that stuff okay so we don't really need to worry about the orientation of our devices now that being said let me show you how to choose that stuff so again I'm going to be using the unity remote and the unity remote handles axes a little bit differently it forces an orientation on me or I don't really get to choose because that's just for testing right and so but assuming I'm deploying my device I can choose what orientations I want my device to be in so I can come to edit project settings player and I can look over here and see my Android settings which my Android my iOS settings are actually fairly simple fairly similar but I can see that by default my device will be in landscape left now this obviously only is for when I actually deploy it not for when I am using my accelerometer I can also say hey I want it to be portrait I can make it portrait upside down landscape right right I get to choose what orientation my device is in now if you want the user to be able to use the game play the game in any orientation or specific orientations like say I want to enable portrait mode and landscape left I want them to be able to rotate their phone and play it in different orientations I can choose auto rotation and once I do that I can actually say okay I want to allow portrait I don't want portrait upside down I don't want portrait right but I do want landscape left or I'm sorry Lansing right but I do want landscape left left so I have some choices here where I can I can also hide the status bar and I can do all sorts of stuff but basically you know this comes in play with our accelerometer however again just to emphasize that I am using the unity remote so don't really get a choice right now because the unity Romo is just going to enforce I can change the Union Rose orientation by changing my game orientation in the game view my aspect ratio but otherwise it just kind of fixes in because it's it's just for simple testing um I don't see your man everyone's still talking about the GUI come on guys getting that distracting here trying to trying to see all of the different questions and not questions related to GUI let's see here so when I have multiple sorry China's just going too fast I can't I can't quite read it quickly when I have multiple elements I want to drag how would detect touch on each of them raycasting yeah so the question is you know if you're touching the screen how do you to tell what you're touching on and you can just raycast it's the same as clicking on it right you click and then you should read cast from the camera to your mouth position in this case we can touch and shoot a ray cast from the screen or from the camera into our finger position so that all certainly works all right so anyway okay so more chat about regular stuff let's let's talk come back to talking about accelerometer now so I showed you or just talk real quick about how you know we have we can change our orientations and things like that so let's look at actually creating accelerometer script and so I'm going to create new c-sharp script which I'll just call excel script and basically it's real simple so our accelerometer will go between negative 1 and 1 and all three axes it's just like input dot get axes vertical horizontal rate we're just doing input that acceleration right so it's just a vector 3 that has has this acceleration information it's actually really really simple to use one of the things you're going to notice so I'm just going to tell you right now is that you can really only utilize two of the of the axes at any given time right so you have three axes for your accelerometer but if you think about it I can like say I have my device straight up and down in portrait mode but I can really only utilize the X and the z-axis and you might be thinking what can access the y-axis because gravity is pulling the y-axis down like constantly and so it's just going to be a solid negative one right so it's really hard to utilize all three axes of the accelerometer at any given time because one of those is always going to be pulled by gravity right so what we want is we want to situational gravity's partially pulling on the accelerometers so that we can utilize them but one is always going to be heavily pulled it's really you know hard to orient it orient a device so that doesn't happen but okay so let's talk about actually working with accelerometer here so I'm going to go ahead and just remove this default crud and what I want to do and it's actually really simple is I'm just going to transform this q or translate this cube based on accelerometer so I'm just going to say transform that translate you not transform that transforms that doesn't make any sense transform that translate and how I'm going to translate is I'm going to be I'm going to say I want my cube to move left and right as I tilt my device along the x-axis so basically if I turn it like a steering wheel alright that's me moving it on the x-axis alright because I'm if I'm rotating it about the Z I'm moving it about the X I know that's kind of confusing but just imagine in your head like a steering wheel and if I if I turn if I make a left-hand turn with my steering wheel I'm going to the negative x-axis if I make a right-hand turn going the positive x-axis and so what I want to say is going to say input dot acceleration got X okay and then I'm gonna say x times Delta alright so that doesn't again move really really fast right so that will move me along the x-axis I'm also going to move zero along the y-axis and then I'm going to just pop down a line here and for my z-axis um I can say input dot acceleration Dunsey x time.deltatime oops times that tell the time and this works but if you remember what I said before with the device positive X's towards me but by default unity positive X is away from me so to make this work the way I want I have to make that say negative input that acceleration o dot Z there we go and I have that dot in there or else it will not work okay and so at this point I can just hold hold my device up and when I run this you'll see that the cube will move and actually before I do that I need to put the script on the cube there we go I also need to disable the the touch move script I don't have to disable that but if I accidentally touch the screen while I'm using it that won't do me any favors so okay so now I'm just going to pick up my device here I'm going to kind of balance it let's go ahead and run this and what we see I'm still an orthographic camera ok wait let me come out of orthographic camera back to perspective there we go so let's see here so now I'm going to run it and I'm gonna see I'm going to tilt it and it's going to move this way and I'm going to tilt it it's going to move this way and I'm going to bring it towards I mean it's going to move towards me and I'll push it away from me and it will come away from me and there we go so you can see I'm turning it like a steering wheel in my car just like this and I'm tipping it back and I'm bringing it forward alright so I'm utilizing the accelerometer this is with it straight flat back so this is maximum speed remember it's a bit slower because I'm multiplying it by time that tell the time I could also create like a speed coefficient to make it faster but this is basically me using the accelerometer in the device you should you should see me I mean my basement swinging this thing around like a madman but basically I'm using the accelerometer of the device to move this cube all over the place okay there we go so and we can use that accelerometer information to do all sorts of stuff to remember that it's just input dot acceleration is a vector three that contains values between negative 1 and 1 right so you can do with that anything you want right there's no real limit so moving to cube left and right that's only one possibility and that's only one orientation we can do all sorts of stuff with that information to create all sorts of wacky games add it at its root is just a vector three that contains values of negative 1 to 1 and whatever you can do with that whatever your imagination can do with that you can do with that right so just keep that in mind right there's really no limit on any on any of this I'm showing you this way to do it but that does not necessarily mean this is the only way you can utilize it you know there's obviously a bunch of ways you get one of the questions is how fast is the response speed of the accelerometer it's fast but it's not perfect so what you're going to see is if you don't multiply by time.deltatime it gets a bit twitchy which means it jumps a lot so a lot of times you need to do a little bit of smoothing and by that I mean instead of just directly translating it by the acceleration axes say that hey have they moved more than you know or it or is it greater than say point zero zero one or some like that otherwise it gets a little jittery so you need to apply some smoothing to it but this is how we deal with the raw input right anything else that you kind of have to work on for yourself okay so let me again the temp to read through chat here to see if there's any questions buttons please I'm not entirely certain what you mean buttons by default or by the way if you're using the ongoing method like I said you're the with mobile but if you are you can just touch the screen and it will hit the button right so that just happens automatically so if I were to say I don't know let's let's come back to our touch script here um if I were to say if GUI dot button new rect 0 0 100 100 such I don't know whatever camera dot background color equals when I'll have a month by that way color dot right I don't know if that'll work I just I'm not sure we can do this I don't know just off the top my head but uh again you're really not supposed to use the GUI but but let's pretend so with camera want to turn touch script back on I'm actually going for my cube I'm going to turn off my acceleration script and I'm going to hit play and then I get a touch button in the upper right hand corner right so if I just oh you know it's not going to let me read it because I have this other thing functioning as well but basically you should just be able to touch just like you can click it you should be able to touch it with your finger but so yeah buttons are fairly simple though you should really use the built in GUI system I generally if I'm making something I just make my own yeah let's see here it unity remote is on the App Store so it doesn't come with any version of unity you just go to like say the Android app store the iOS app store just downloaded Oh question can the accelerometer to detect acceleration higher than 1g I don't believe so but you can multiply like I assume your suggest if you like hurl it I don't I don't believe so but I've never tried so it's really I'm not really certain uh let's see here swipe movement please what do you mean by swipe movement I'm not sure what you mean because I showed you how you can swipe your finger on the screen and move a cube is that what you want in it or I'll assume it's not you what you want to keep asking about it let's see here swipe gestures like what kind of gestures uh it would be nice if I could do a video on mobile performance and different screen sizes so yeah I mean basically the reason we have this aspect ratio is so we don't necessarily need to worry about screen sizes now if you're talking about different textures to get the textures right you can always utilize MIT Maps though they're not necessarily fantastic I do know for a fact that you can always tell what the resolution of your game is by saying screened out with and screened out height which will tell you what the resolution of your game is and then you can set your background textures or whatever to the appropriate images so it's really not anything that warrants um an entire video because it's it's actually really you know quite simple to do and so you know maybe maybe we can put together a little demo or whatever about it but but yeah it's actually pretty straightforward I will say this um we have some videos on mobile coming out soon and in there are assignments where we talk about some of the different gestures so we have like a pinch zoom gesture and swipe rotation of a sphere gesture and things like that I think that's what a lot of you guys are asking for and so actually if you wait just a little bit we'll have videos you know well produced videos not just this live stuff specifically on how to make those so that might be rather useful um I don't so again you say player movement and I'm not entirely certain what you mean gestures can mean anything right so so some you were saying player movements have you seen swipe peoples gesture and that's not particularly helpful I'm not entirely certain what I can answer for either can you swipe an object and it mean yeah maintains momentum absolutely so instead of like transformed out translate when you swipe your finger just do an ad for us and just that'll that'll toss it all over the place so yeah you can do that you can use force to move your objects based on the magnitude of the difference of your movement of your finger movement and and just apply force equal to that and you'll get fairly accurate rotation that way let's see here um let's see here okay please don't please don't spam with the same questions - don't don't spam I don't appreciate that because I'm trying to read if you're just taking up the screen with a bunch of the same stuff that doesn't really apply I'm gonna have to ban yeah and I don't want to do that oh let's see here I want to be able to place different nodes via touch click make a path for an object to move so you saw my touch ready to touch the screen it returns an XY position that's the same as clicking so if you develop an algorithm that where you click and instantiate it's an object at that spot right the same applies just to touch instead of a click both are just XY positions one is the mouse top position the other ones touch top position right but the the mathematical algorithm works entirely for 100% the same all right um so yeah so just just keep that in mind right it's not anything magical it's just think of your finger like a mouse only with mobile devices you can have more than one Mouse so anything you can do with with your your mouse you can do with your finger let's see here can you calculate force from swipe movement like acceleration from Delta movement yes you can get the magnitude of the Delta movement and then just basically to add it as much force as you want based off that until you get something that feels about right oh let's see here so let's see what about acceleration for 2d games you use the z axis to or just up and down yeah so if I was doing the acceleration for 2d games I would just map like the z axis to maybe the y axis right remember again it's just a vector3 of negative ones two ones and so yeah you can do whatever you want um question-is Scaleform okay I don't know so I view Scaleform before with unike but I've never used it with unity I can't speak to his performance I've never tried it maybe you try it out I don't really know but like I said if I'm doing a GUI I generally just do my own like I'll create a sprite and just sort of slap that out there maybe a text masher or something along those lines but yeah I mean you kind of just got to figure out a solution that works for you let's see here why do I get different font sizes played on the unity remote when I actually build my game because in your remote just kind of shorthand everything so the unity remote is not a completely accurate depiction of what the game is actually going to be like it's just four simple debugging if you want to be sure what your game was like you have to build it to a device let's see here and is instantiate something we shouldn't use on mobile so with mobile efficiencies are super important however you're going to find that you're not necessarily always CPU bound as you are GPU bound fill rates and over draws and shaders like that really are really where you lose a lot of stuff so in here let me let me actually let me load up a scene and show you so I'm going to go ahead I also have the sample assets here and so I'm just going to go ahead and grab the the particle scene and I don't need to save any of that and so the particle scene is basically this scene here it's in the sample asset so if you don't have the same glass that you can just download the reason I have this scene loaded up is because I want to talk to a little bit about efficiencies and draw calls right so anyway kind of to come back to the question should you not use instantiate if you can object fool you should object pool right hm you can do object pooling that's the best way to go about it but that's not always a possibility right and so sometimes you need to to to you know instantiate and that won't be a problem if you're doing it a lot then then it will be a problem right because you will eventually become memory and CPU bound right but here I'm going to go ahead and just hit play on this it's just going to rotate around but the reason I'm doing this is because first off it recognized that I'm in a mobile platform so loaded up the mobile version of this but I'm gonna click this stats button here and this step set button is going to become like your best friend this is the profiler will become your best friend when building for mobile games alright and so we're going to see how few things but what I'm really interested in my draw calls right here draw calls and I can see that I have depending on bouncing between like 28 and 31 and I can also see how much I'm saving by batching so the general rule of thumb is to sort of pick your target desktop environment maybe I want like an old desktop computer or some like that so I picked that kind of in my head or maybe I have that platform whatever and I build for it and maybe it can run and it has like 600 draw calls that's 600 draw calls that it runs pretty good okay if I want to port to a similar mobile device just drop a 0 so 60 draw calls B or 600 roll calls becomes 60 so I know I can use the equivalent mobile device if I don't go over 60 draw calls right so stuff like that right that that's that's sort of like a rule of thumb for for drawing or for mobile device so I want to keep my draw calls low in this case I'm at 25 which is reasonable right it gives me a long way to get to 60 and I can also see that my tries my verts are down there at 12 K or 12 yeah 12,000 which again is is pretty good and I'm also only using up a little bit of texture memory which is fine you can see there's really nothing here that's textured all that well and so on and so forth right so basically you know this particular one runs very well on a mobile platform it's you know it's because I'm in a mobile mode and then that sort of makes things a little bit easier one moment here all right it's all right I had to do something chat there for a second oh let's see here yeah sorry sorry about chat please try not to spam I certainly appreciate it let's see here and do you need an Apple dev account to test on a device yes that is true so okay so I'm back here in unity someone mentioned how do you actually build for device so if I come to build settings right now and I can see that my scene is in here if I just hit build and run unity will automatically deploy that out to my device so it'll create an apk file but it will also push it in my device so I can actually run it which is actual really nice so I can see it run this will only work if my device is currently plugged in right and and my computer recognizes it but basically you can see all that stuff let's see here I just entered where can i download the files for the training there are no files for the training um so you've got them already congratulations when this is archived you'll be able to watch it again and see yeah let's see here so I'm just trying to read through how about 2d movements how about it I don't know what you mean by how about to movement okay let's see here why do some objects disappear on some devices when you move the camera not out of view frustum it could be calling it could be clipping planes I'm not really sure and it just depends I depends on your your thing um Mike can you make a quick list about what we really should avoid on mobile oh that's a good question okay so basically avoid high amounts of draw calls right those aren't doing me any good avoid a lot of physics intense processing right avoid a lot of instantiate and destroy because that's going to make the garbage collection run basically you're making this to run like a really really efficient PC game right avoid shaders which are not made for mobile devices avoid those like the plague they will kill your frames per second so if there's a shader and it's not the mobile version of that shader I do not use it okay always try to use the mobile versions of shaders because that's what kills you right the main things that kill you our fill rate you've got a big screen right over draw and shaders right so you know avoid shaders that aren't built for mobile always try saw besides what to avoid also try to Atlas as many of your textures as possible um try to have is made that I'm trying to have as many objects use the same material as possible right for each individual texture that's one draw call but if you have all of these different textures in the same texture Alice thus one file right that's one draw call to draw all of them right only when they share a material obviously unity pro allows you to set things up as static which means they can be statically batched by default we're automatically dine are dynamically batching right that's where the the system is like hey these two things are the same most matching together static batching allows me to specifically state that these should be drawn together and thus turning multiple draw calls into a single draw call making things more efficient that is that is your new pro but that's something that's good so static batching occlusion calling again in unity probe it's super important there's no sense in drawing things that don't need drawn right avoid trance many transparent objects as possible so consider that I'm I'm drawing a an opaque object right so unity will render that from the front to the back thus anything that's covered up by the opaque item in the front or doesn't get drawn right because it's front to back and that's we avoid a lot of overdraw however transparent or translucent shaders and textures and materials draw from the back to the front which means you're going to have quite a bit you're going to have a bit of over draw that you could Ness it you could potentially avoid so things like that there are more but that's just a sort of stuff off the top of my head Unity's documentation on optimization and specifically mobile optimization it's actually really good so I highly encourage you to check that out all right so let's see here if you see black textures it probably means you're out do your texture memories out that's possible there's a few different reasons reasons we can see black textures normals aren't correct on a model or whatever but yeah let's see here can you recommend a way to display ads in a mobile app developed developed with unity um yes but now right now that answer will make more sense in the future okay let's see here let's see again can you explain about 2d movement but I really don't know what you mean you'll have to be more specific let's see something about vsync so I'm just trying to try to catch up do you know any good transparent cutout shooter for mobile um actually the sample assets have a bunch of mobile shaders in them so we can see like we have mobile specular there's more weigh me where's my shaders head I got to find them so the sample assets actually have a bunch of stuff in there I just don't know where nope that's not that's just mobile specular they're in here somewhere but basically yeah sample shaders for mobile are are available all over the place you can write your own to just basically keep stuff really simple I don't write shaders right so I'm not really good at that so I can't really give you any specific information there hello let's see here so you don't have to change anything on the camera for mobile games when the 610 aspect ratio on the game tab in your Cameron assets will be correct on all devices no if I leave this at 1610 this stuff will be correct for all 1610 devices so I need to test this right so this is me building my game for a nexus 10 right but let's say I also want to test my game for a Microsoft Surface tablet so I will drop this down to Oh 69 isn't available so I might create 16:9 let's do call this surface oops caps lock surface fixed resolution width is gonna be 16 hi 829 okay boom so we'll put this in 69 echo did not like that whoops hmm that's strange so I bugged out there normally you can just set this to 16:9 I don't know why that didn't work but anyway 3/4 isn't oh it's because I mean Android mode that's right there are no Android things in 16:9 aspect ratio so I would to test this in 69 I go build settings I'd switch this over to Windows 8 I'm not going to do that right now because it takes a second to recompile everything but I switch over to Windows 8 and then I would test it at 69 then I switch over to iOS and tested it 3 4 4 3 and so on and so forth so you get as to the different aspect ratios but if it looks good on all the different aspect ratios chances are you'll be pretty good you might need to do some stuff to scale your texture appropriately but you'll know that the camera will see what you need it to see let's see here I think TD movement is referring to move in on the two axis only something about translated from keyboards and controls well you saw that we already did that when we use the accelerometer we mapped it to two axes we move it to two X and Z if you want to simulate a 2-d game just just map them to X&Y; but nothing else is really different there let's see here sixteen by eight I don't know there aren't as any devices that are sixteen by eight surface is sixteen by nine to do oh yeah so some people are here saying but this bill drop down drop down this ratio doesn't affect the build ratio or I'm sorry resolution it's only for the unity view that's correct it allows us to test and all these different I mean the device is going to have what a resolution that it likes has there's not really anything we can do about that but we want to test it to make sure to look good on all those different devices um there we go how to optimize the screen resolution for different screen sizes like Android have a lot of screen sizes how do you handle it I just told you right basically you build it and you test it against the different ones so in this case well we're in landscape so I'm not going to do portrait so here's three two two landscape here's 1610 landscape and I can see that both looked alright there's a different type of landscape so this just basically allows me to test it against all these different landscapes so this was a little bit crunch so if I didn't like that I might want to modify my camera a little bit or change my view size or whatever but basically you you kind of just need to put in the work right there's not like a simple magic button and you know you got to kind of test it against the different aspect ratios to make sure it looks okay but otherwise you know that's just it's just something going to do all right so at this point we're going to kind of wrap up I'm just going to look through any of the last questions here and then we'll go ahead a pup let's see what is the most optimum way to get an object from the scene as game object defined yeah don't do game object at find you'll see that I've done that a few tutorial but I've always warned you not to do that because it's not good so no game ups are defined you can do basically you can do public variables to click-and-drag that works alright basically you just need to get a reference to it somehow if you're going to do game object defined only in start methods but never during updates or anything like that because that's a terrible way to do it uh let's see here any mobile games made with unity that I would recommend oh there's a ton of them right the years ago they estimated that 54% of all mobile games were made with unity that numbers gone up so you know Temple Run 2 CSR racing republic yeah there's a ton of them so check your site if you go to unity 3d DICOM you can see the games that we sort of showcase and there's a bunch of on there um let's see here other any screens or any scripts ways to define layout depending on screen size yeah remember you can always use screened out with and screen die to determine what the screen size it is and then do whatever you want with that information right it's it's you know it all it all depends entirely upon what it is that you want to do alright so okay I'm going to go ahead and end things here but I think you all kind of got the point so basically mobile devices mobile devices are basically just like really really weak desktops right um that's effectively what they are and instead of a keyboard mouse you've got touch and accelerometer right otherwise you know you kind of already know how to work with it a lot of the stuff that you already do you can do with mobile there are some performance considerations but for the most part it's all fairly basically fairly straightforward I'll hang out here and chat a little bit just to kind of answer any more questions that you have but we'll go ahead and end the video session here thanks again everybody for participating at this time there are no new events on the unity site I've got to get them scheduled and I've just been sort of lazy next week's GDC so I haven't done it yet but we'll post the schedules for some more so yeah so I look forward to seeing you all next time I'll get that all posted and oh well quick here again any questions comments concerns follow us at unity 3d at mic guy which is me that will Goldston at the rant the ant ranch you can also email me my cat unity3d calm and yeah thanks everybody for watching
Walkthrough: Creating a 360° Movie for Google Cardboard
Introduction
Walkthrough: Creating a 360° Movie for Google Cardboard
Introduction
To be able to create a 360° video of the camera flight from the previous walkthrough we need a few things:
- a lot of free space on your hard disk, at least 2GB
- download 360 Video Assets Unity Package [12]
- a software that takes the individual images and then creates a video from them (this will happen outside of Unity)
- a tool that allows you to set the needed meta information in the created movie file as required by YouTube
Let us start by importing the Unity extension for taking 360° snapshots.
Importing 360 Capture Assets and Capturing Images
Importing 360 Capture Assets and Capturing Images
Import the unity package (link in previous page) into your “MyFirstUnityProject” project. When done, a new folder called “360 Capture” will be added to your project folder structure. This folder contains a script and three Render Texture objects (one for each eye and one that merges them together). The script will capture the camera output and renders it on the textures. To set up our scene for capturing, add the script “CreateStereoCubemaps” to the Main Camera object (i.e. child of Camera Setup) by dragging the script onto it.
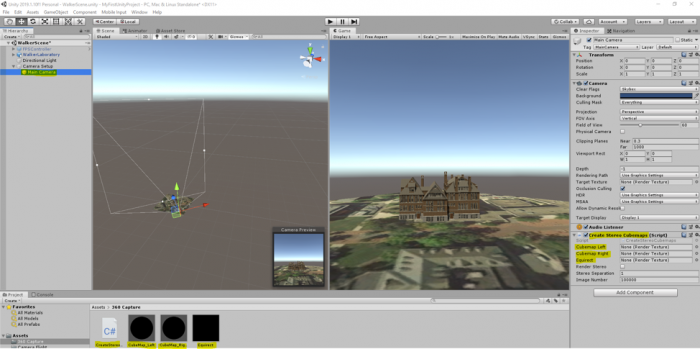
You will notice that in the inspector panel of the Main Camera GameObject there are three empty fields “Cubemap Left”, “Cubemap Right”, and “Equirect”. Will need to populate these fields with our textures in the “360 capture” folder. Drag the corresponding texture to the right place holder in the inspector panel of Main Camera as shown in the figure below:
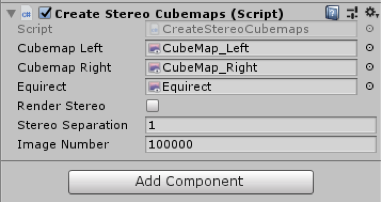
Next, double click on the “CreateStereoCubemaps” script to open it in visual studio. In the start function of this script (as shown in the figure below), you can see that we have instructed Unity to capture 25 frames per second.
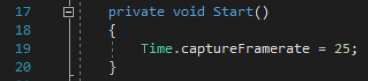
You do not need to study the rest of the script (unless you are interested in doing so), but to give you a general idea, we are capturing 25 monoscopic frames per second of the entire scene and saving each frame as a PNG file somewhere on our drive. Since the address of where the images are to be saved is hard-coded, you need to modify it to point to a location where you want the monoscopic images to be saved. On line 67, we have indicated this address (the orange text between the “ ”) along with a line of comment that tells you how to modify it (make sure you save the file after you have modified the address).

One easy way to update this address is to create a folder somewhere on your hard drive (you will need at least 1.5 GB of free space). Inside the folder click on the address bar on top and copy the address.
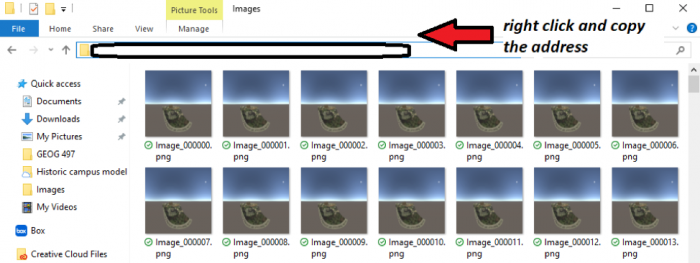
Make sure that the “\” in the address you have copied are replaced with “\\” when you replace it with the orange text in between “”.
Now if you play the scene, depending on the specifications of your computer system, the scene will perform differently. Since we are forcing Unity to capture 25 frames per second, the camera flight animation we’ve just created might not run very smoothly on older computers. If you play your scene now and notice lots of lagging, do NOT be alarmed. Let the camera flight animation finish (it could take a while on slower computers so be patient!), and then stop the scene from playing.
Now if you navigate to the folder, where you have instructed the script to save the PNG files, you will see that it is populated with around 1400-1500 images.
Creating the Video
Creating the Video
We now want to produce an MP4 movie from the individual 360° images. We will use the free command-line tool ffmpeg for this.
You can download a Windows build of the ffmpeg [12].
Extract the downloaded .zip and you get a folder with a bunch of files in it (similar to the image below). Make sure there are not two folders with the same name inside each other. The main executable ffmpeg.exe is located in the bin subfolder. We will directly run this .exe file, no installation is needed.

To be able to use the ffmpeg.exe as a command-line tool, let’s open a command prompt. Click on Windows and search cmd. Open cmd. You need to navigate to the location where you have extracted the content of the zip file. This is a very simple process.
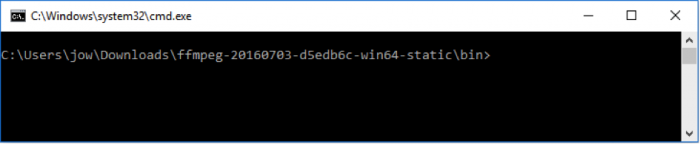
For example, I have extracted the contents of the zip file (i.e., the folder named ffmpeg-20210331-6ef5d8ca86-win64-static) to my desktop. What I need to do is to first open the command prompt. This can be done by clicking on the start button on the windows bar and type "command prompt". By default, the command prompt is at the root location for the current user of the OS (e.g., C:\Users\Pejman>). Now I need to access to the folder we have extracted to the desktop. To do so, you need to type:
cd desktop
and then press enter.
This simple command with navigating the command prompt to the desktop folder of your computer. Using a similar approach, we need to access the "ffmpeg-20210331-6ef5d8ca86-win64-static" folder. Now instead of typing the complete name of this folder which is rather long, you can simply type cd followed by a few letters of the folder name (i.e., ffmpe..) and then press the tab key on your keyboard. This will autocomplete the name based on what can be found on the desktop. The next step is to go to the bin folder using the same method. At the end of this process, you should be at this location within the command prompt:

For more help, please visit Digital Citizen [21].
The command that you need to type in now to have ffmpeg create a movie is given below, but you will have to make some small changes to adapt it to your system: The highlighted part needs to be replaced with the path to your folder where the images are saved. (In case you start by copy & pasting the command from this web page into the command prompt rather than typing it yourself, please check that the double quotes appear as straight double quotes, not curly ones and you also may have to retype hyphens and underscores as well. The safest approach is to type the complete command yourself, or paste it into a notepad and copy it from the notepad.). The last part of the address, namely “Image_%06d.png” is a pointer to the first image in this folder, and the program will then iterate through all the images based on this starting point. You do NOT need to change this last part.
ffmpeg.exe -r 25 -start_number 100000 -i "C:\Users\jow\Documents\UnityProjects\MyFirstUnityProject\LSCaptureFiles\Image_%06d.png" -vcodec libx264 -crf 15 -pix_fmt yuv420p myfirstunityproject.mp4
In the command, we tell ffmpeg that the produced video should use 25 frames per second, where the images are located and the pattern for how they are named, which video codec to use, etc. The final parameter is the name of the output file (myfirstunityproject.mp4) that will be generated. When you execute the modified command (by pressing enter), ffmpeg should start to process the images and create the MP4 video. Remember there are about 1400 frames.
When ffmpeg is done, there should now be a file called myfirstunityproject.mp4 in the bin subfolder of ffmpeg. You can move this file, for instance into your Documents folder.
Now run the video and have a look. If your standard video player is not able to display the video, we recommend that you go to VideoLan [22] to download and install VLC, a great and free video player, and then watch the video with this program.
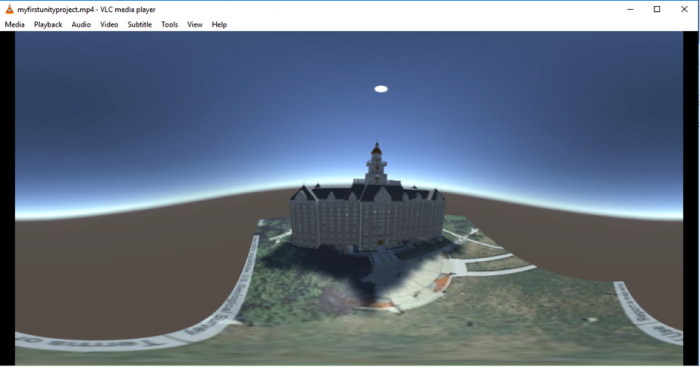
Changing the Movie Metadata
Changing the Movie Metadata
Now that we have the video our goal is to get it uploaded to a private YouTube channel and watch it with the cardboard on our smartphone. However, we first have to use yet another tool to adapt some of the metadata in the movie file so that YouTube will correctly recognize it as a 360° movie. We will follow Google’s Upload 360-degree videos [23] instructions.
- Download the 360 Video Metadata app [24] by clicking on the "360.Video.Metadata.Tool.win.zip".
- The downloaded .zip file contains a single .exe program called "Spatial Media Metadata Injector.exe". Start this program.
- In the dialog window that opens up, click the “Open” button and then navigate to our video file. After this, the name of the file should either appear in blue at the top of the dialog window.
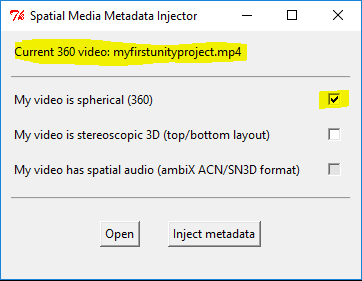 Credit: Google
 - Finally, select the "My video is spherical (360)" option at the top and then use the "Inject metadata" button to save the modified file under a new name. Let’s use “myfirstunityproject360.mp4” as the name. The resulting file is the one that we want to now upload to YouTube.
Uploading the Video to YouTube
Uploading the Video to YouTube
The final steps of this walkthrough will require that you have a YouTube account and channel. That doesn’t mean that the 360° videos produced in this course will be publicly available for everyone. It is possible to use your channel only to share these with particular people, like everyone in this class. If you do not have a YouTube account/channel yet, please follow the Create an account on YouTube [25] instructions to create these.
You should now be on the main page for your YouTube channel. Click on the “Upload” link at the top to upload a new video. Set the field to determine who can watch the movie to “Private” for now. When you later want to share a video with the class, you can instead set this to “Unlisted” and share the link to the video. Unlisted means that everyone with the link can watch the video but it won’t be visible to anyone else as part of search results on YouTube. Now, drag the video file myfirstunityproject360.mp4 from the Window Explorer on to the upload icon. The upload will start immediately. After the upload is completed, YouTube will start processing the file. After this has finished as well, you can click “Done”.
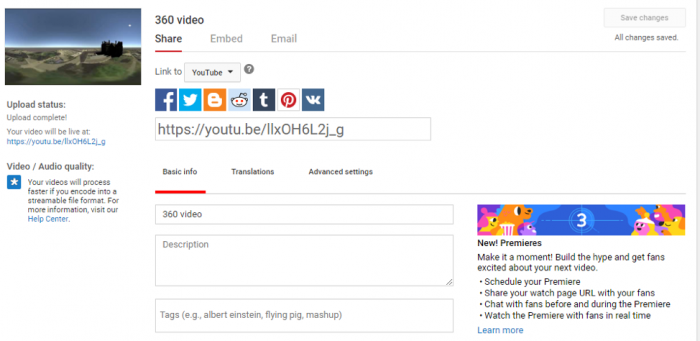
The video should now be listed in the YouTube Studio [26] under the videos tab.
Clicking on it should take you to a page as shown below, where you can play your video, or open its link in a different tab.
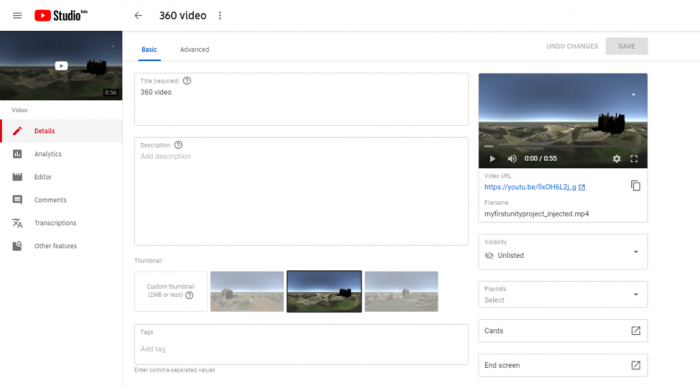
You should now be able to watch this video on YouTube like any other video. You should, in addition, be able to look around during the camera flight either by dragging with the left mouse button pressed or by using the arrows in the top left corner of the video. By clicking the Settings icon at the bottom, you may be able to increase the resolution at which the video is displayed unless it is already displayed at the highest available resolution.
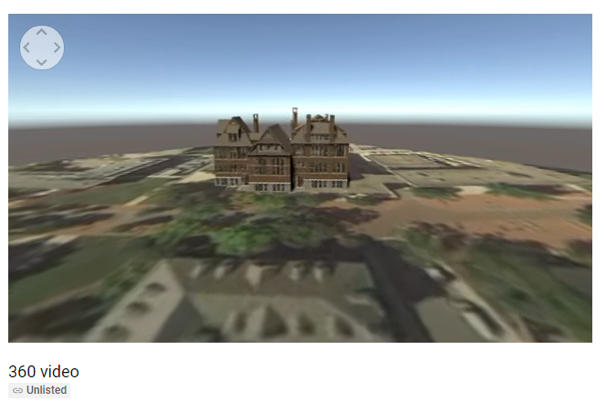
If you play this video on your phone, you will get the option to see it in VR mode when you switch to full screen. If you select that option, you can put your phone in a CardBoard and enjoy your first VR creation.
You can check out other VR videos on YouTube at YouTube Virtual Reality [27].
Note: Make sure your YouTube app is up to date!
Tasks and Deliverables
Tasks and Deliverables
Part 1: Participate in a Discussion
Please reflect on your 3D spatial analysis experience, using ArcGIS Pro; anything you learned or any problems that you faced while doing your assignment as well as anything that you explored on your own and added to your 3D spatial analysis experience.
Part 2: Assignments
The homework assignment for this lesson is to apply the techniques you learned in this lecture to the historic campus scene that you already saw in the previous lesson (it should be already in your “MyFirstUnityProject” project under the “Historic Campus” folder). You are supposed to create a nice camera animation and produce a stand-alone windows application as well as a 360° movie. The video should be uploaded to your YouTube channel and shared together with your Windows application with the rest of the class by posting the links and a short description on the forums. Finally, you are supposed to provide constructive feedback on a video created by one of your classmates and submit a write-up reflecting on this assignment.
The assignment has several tasks and deliverables with different submissions deadlines, all in week 10, as detailed below. Successful delivery of the tasks 1-6 is sufficient to earn 90% on this assignment. The remaining 10% is reserved for efforts that go "above & beyond" by improving the historic campus model, e.g. in ways suggested below, before creating the video and stand-alone Windows application.
Task 1: Create camera animation
For this assignment, you will use the historic campus scene from Lesson 8. We suggest you start with a fresh download of the Unity project: Historic Campus [28]. The campus models have already been imported and placed in a scene (main) and things should look like in the screenshot below when opening the project in Unity. You are now supposed to create a ~1.5min camera flight over the scene using what you learned about animating the camera in this lesson. But before you start with the camera flight, you may want to think about what you want to do for "above & beyond" efforts (see details below) as this may have an effect on the camera trajectory you want to create (e.g. in case you are going to add additional models to the scene).
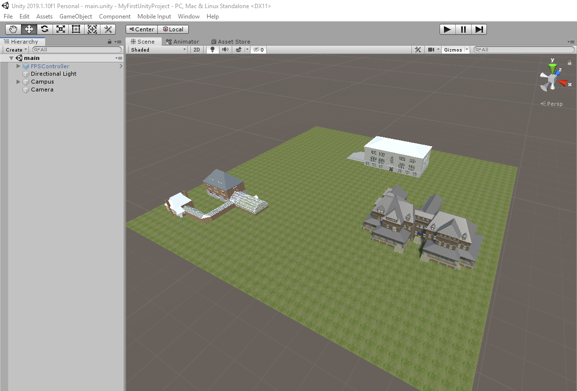
Task 2: Produce a stand-alone Windows application
Produce a stand-alone Windows application showing your camera animation as you learned in this lesson. Please note that if you put in work for above & beyond points, this needs to be done before creating the Windows application so that these efforts are included.
Deliverable 1: Create a .zip file containing all the files and folders of your built.
Upload the application to the PSU Box Comunity Folder [29] and include the link to your application when posting on the Lesson 8 Video Discussion (see Task 4).
Task 3: Produce 360° video
Produce a 360° video showing your camera animation as you learned in this lesson. Don't forget to adapt the meta information before uploading the video to your personal YouTube channel. Please note that if you put in work for above & beyond points that should be visible in the video, this needs to be done before creating the video so that these efforts are included.
Deliverable 2: Upload the 360° video to your YouTube channel and share it via a link. Include the link when posting on the Lesson 8 Video Discussion (see Task 4).
Task 4: Share stand-alone application & video
Deliverable 3: Create a post on the Lesson 8 Video Discussion including the links for your Windows stand-alone application & 360° video. Add a one-paragraph description of what you did to improve the model for above & beyond points, if anything. If your above & beyond efforts are only visible/audible in either the 360° video or the stand-alone application, please make this clear as well.
Task 5: Constructive feedback on other student's video
Watch a video posted by one of your classmates and write down 1-2 paragraphs in which you provide constructive feedback. If possible, please pick a video that has not yet received any feedback. Comment on the technical and aesthetic quality of the video and, if applicable, the extensions made to the model. Make suggestions on how the work can be improved or extended. If the description mentions that some additional effort is only included in the Windows stand-alone application, you can feel free to ignore that part.
Deliverable 4: Post your feedback as a reply to the respective video post on Lesson 8 Video Discussion.
Task 6: Reflection Paper
Create a ~700 words write-up reflecting on what you learned in this assignment, what problems you ran into, if and how you were able to resolve these, etc. Please also include a complete description of things you did for above & beyond efforts. Provide some final assessment of your experience with Unity.
Deliverable 5: Submit your write-up to the Lesson 8 Assignment.
Above & beyond:
This part of the assignment is for allowing you to let your creativity run free to extend or improve the historical campus scene and/or explore some features of Unity development on your own based on one of the many tutorials available on the web. What you do is up to you; the following are just two suggestions for directions in which you can think:
- Add additional models to the historical campus scene: You can extend the scene by adding additional objects. This could be your own building model from Lesson 3, some free assets you find by browsing the Unity Asset Store [30] (view How to use the Asset Store [31] for instructions), or some other free 3D models available on the web. The purpose of this assignment is to demonstrate your Unity skills to us, so realism is not important here. But what you add should generally fit the historic campus scene (additional buildings, other tree or plant models, models of people, etc. but no spaceships, robots, or the likes). If you want to include your own building model but the building is already there, feel free to import it and place your model at a different location in the scene. Please don't go overboard with the number of objects you add; a very few to show that you are able to import models and place them in the scene is all that it takes.
- Add some background music, other sound effects, or commentary: Adding sounds and background music to a scene in Unity is not complicated but you should only try to include this into the Windows stand-alone application with the standard camera object because recording sound won't work with the 360° video recording. The first four minutes of this Beginner Unity Tutorial [32] will give you a basic understanding of what needs to happen: The audio file (.mp3, .wav, etc.) you want to use needs to put into the Assets folder of your project. The main camera object needs to have an AudioListener component and this component needs to activated (checkbox at the top left). Then you can attach an AudioSource component either to the camera itself or any other GameObject in the scene. Attaching it to the camera itself works fine for background music or commentary while attaching it to objects in the scene works best for 3D sound that should get louder when the camera approaches a particular object or location in the scene. Finally, the audio track needs to be dragged from the Assets window onto the AudioClip property of the AudioSource component.
If you are looking for some relaxing background music, you can browse freesound [33]for a suitable track that is freely available. Alternatively, or in addition to using music, you can record your own commentary describing either the scene or what you did for this assignment and have this played during the camera flight. If you experience any problems with adding sound, feel free to help each other out in Lesson 8 Discussion.
Helpful advice:
We highly recommend that, while working on the different tasks for this assignment, you frequently create backup copies of your Unity project folder so that you can go back to a previous version of your project if something should go wrong.
For the camera animation, we recommend using many intermediate keyframes unless the camera is just moving in a straight line. In particular, try to not have a rotation of more than 90° between two successive keyframes in the animation.
| Criteria | Full Credit | Half Credit | No Credit | Possible Points |
|---|---|---|---|---|
| Camera flight has the correct length, is smooth and aesthetically pleasing. | 3 pts | 1.5 pts | 0 pts | 3 pts |
| Windows stand-alone application is shared via Box and shows the camera flight. | 3 pts | 1.5 pts | 0 pts | 3 pts |
| Video is shared via YouTube and shows the camera flight. | 3 pts | 1.5 pts | 0 pts | 3 pts |
| Video has been correctly created and uploaded as a 360° video allowing to look around while the camera is moving over the scene. |
3 pts | 1.5 pts | 0 pts | 3 pts |
| Above & Beyond: The number of points varies depending on how much effort was required (e.g. placing an additional 3rd-party 3D model in the scene will give fewer points than placing a self-made model or adding background music to the scene). | 3 pts | 1.5 pts | 0 pts | 3 pts |
| Total Points: 15 |
| Criteria | Full Credit | Half Credit | No Credit | Possible Points |
|---|---|---|---|---|
| Paper clearly communicates what you learned in this assignment, what problems you ran into, if and how you were able to resolve these, etc. Paper also includes a complete description of things you did for above & beyond efforts and a final assessment of your experience with Unity. | 5 pts | 2.5 pts | 0 pts | 5 pts |
| Write-up is of the correct length and is well and thoughtfully written. | 5 pts | 2.5 pts | 0 pts | 5 pts |
| The document is grammatically correct, typo-free, and cited where necessary. | 2 pts | 1.0 pts | 0 pts | 2 pts |
| Total Points: 12 |
Summary and Tasks Reminder
Summary and Tasks Reminder
In this lesson, you significantly extended your Unity skills by learning how to add a user-controlled avatar and enable colliders for the objects in the scene, and how to create a camera animation with the Animation View. We also spoke about the different ways to create VR experiences for different devices with Unity, including using 360° videos for the Google Cardboard as an efficient option for devices that may not have the hardware performance to run VR applications in real-time. We have now come full circle with regard to the 3D and VR application building workflows we discussed in Lesson 2. We hope that these last two lessons focusing on Unity and the skills you acquired in them will prove to be a helpful complement to your 3D modeling and analysis repertoire.
Reminder - Complete all of the Lesson 8 tasks!
You have reached the end of Lesson 8! Double-check the to-do list on the Lesson 8 Overview page to make sure you have completed all of the activities listed there before you begin Lesson 9.