Walkthrough: Creating a 360° Movie for Google Cardboard
Introduction
Walkthrough: Creating a 360° Movie for Google Cardboard
Introduction
To be able to create a 360° video of the camera flight from the previous walkthrough we need a few things:
- a lot of free space on your hard disk, at least 2GB
- download 360 Video Assets Unity Package [1]
- a software that takes the individual images and then creates a video from them (this will happen outside of Unity)
- a tool that allows you to set the needed meta information in the created movie file as required by YouTube
Let us start by importing the Unity extension for taking 360° snapshots.
Importing 360 Capture Assets and Capturing Images
Importing 360 Capture Assets and Capturing Images
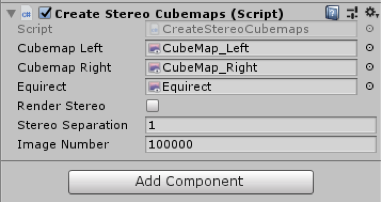
Import the unity package (link in previous page) into your “MyFirstUnityProject” project. When done, a new folder called “360 Capture” will be added to your project folder structure. This folder contains a script and three Render Texture objects (one for each eye and one that merges them together). The script will capture the camera output and renders it on the textures. To set up our scene for capturing, add the script “CreateStereoCubemaps” to the Main Camera object (i.e. child of Camera Setup) by dragging the script onto it.
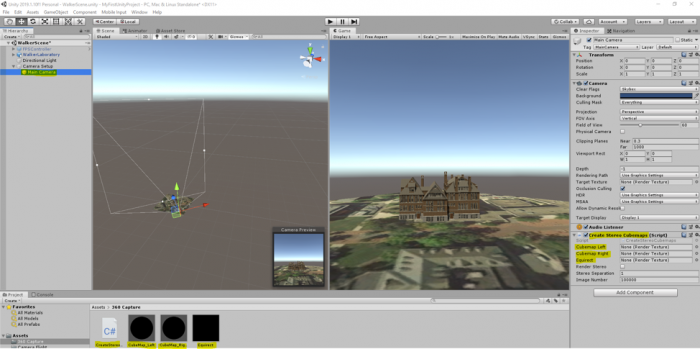
You will notice that in the inspector panel of the Main Camera GameObject there are three empty fields “Cubemap Left”, “Cubemap Right”, and “Equirect”. Will need to populate these fields with our textures in the “360 capture” folder. Drag the corresponding texture to the right place holder in the inspector panel of Main Camera as shown in the figure below:
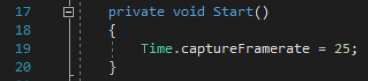
Next, double click on the “CreateStereoCubemaps” script to open it in visual studio. In the start function of this script (as shown in the figure below), you can see that we have instructed Unity to capture 25 frames per second.
You do not need to study the rest of the script (unless you are interested in doing so), but to give you a general idea, we are capturing 25 monoscopic frames per second of the entire scene and saving each frame as a PNG file somewhere on our drive. Since the address of where the images are to be saved is hard-coded, you need to modify it to point to a location where you want the monoscopic images to be saved. On line 67, we have indicated this address (the orange text between the “ ”) along with a line of comment that tells you how to modify it (make sure you save the file after you have modified the address).

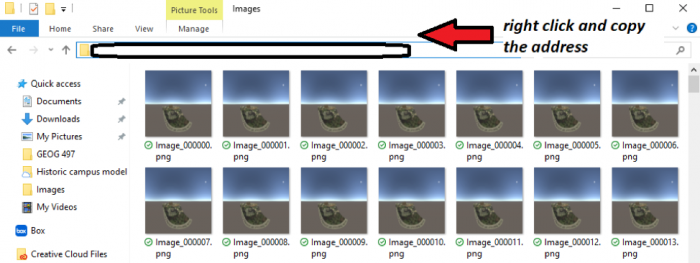
One easy way to update this address is to create a folder somewhere on your hard drive (you will need at least 1.5 GB of free space). Inside the folder click on the address bar on top and copy the address.
Make sure that the “\” in the address you have copied are replaced with “\\” when you replace it with the orange text in between “”.
Now if you play the scene, depending on the specifications of your computer system, the scene will perform differently. Since we are forcing Unity to capture 25 frames per second, the camera flight animation we’ve just created might not run very smoothly on older computers. If you play your scene now and notice lots of lagging, do NOT be alarmed. Let the camera flight animation finish (it could take a while on slower computers so be patient!), and then stop the scene from playing.
Now if you navigate to the folder, where you have instructed the script to save the PNG files, you will see that it is populated with around 1400-1500 images.
Creating the Video
Creating the Video
We now want to produce an MP4 movie from the individual 360° images. We will use the free command-line tool ffmpeg for this.
You can download a Windows build of the ffmpeg [1].
Extract the downloaded .zip and you get a folder with a bunch of files in it (similar to the image below). Make sure there are not two folders with the same name inside each other. The main executable ffmpeg.exe is located in the bin subfolder. We will directly run this .exe file, no installation is needed.

To be able to use the ffmpeg.exe as a command-line tool, let’s open a command prompt. Click on Windows and search cmd. Open cmd. You need to navigate to the location where you have extracted the content of the zip file. This is a very simple process.
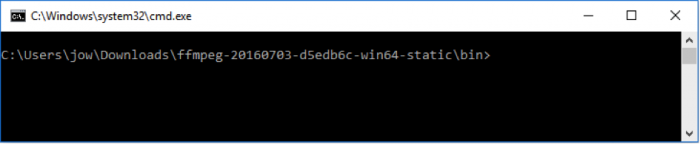
For example, I have extracted the contents of the zip file (i.e., the folder named ffmpeg-20210331-6ef5d8ca86-win64-static) to my desktop. What I need to do is to first open the command prompt. This can be done by clicking on the start button on the windows bar and type "command prompt". By default, the command prompt is at the root location for the current user of the OS (e.g., C:\Users\Pejman>). Now I need to access to the folder we have extracted to the desktop. To do so, you need to type:
cd desktop
and then press enter.
This simple command with navigating the command prompt to the desktop folder of your computer. Using a similar approach, we need to access the "ffmpeg-20210331-6ef5d8ca86-win64-static" folder. Now instead of typing the complete name of this folder which is rather long, you can simply type cd followed by a few letters of the folder name (i.e., ffmpe..) and then press the tab key on your keyboard. This will autocomplete the name based on what can be found on the desktop. The next step is to go to the bin folder using the same method. At the end of this process, you should be at this location within the command prompt:

For more help, please visit Digital Citizen [3].
The command that you need to type in now to have ffmpeg create a movie is given below, but you will have to make some small changes to adapt it to your system: The highlighted part needs to be replaced with the path to your folder where the images are saved. (In case you start by copy & pasting the command from this web page into the command prompt rather than typing it yourself, please check that the double quotes appear as straight double quotes, not curly ones and you also may have to retype hyphens and underscores as well. The safest approach is to type the complete command yourself, or paste it into a notepad and copy it from the notepad.). The last part of the address, namely “Image_%06d.png” is a pointer to the first image in this folder, and the program will then iterate through all the images based on this starting point. You do NOT need to change this last part.
ffmpeg.exe -r 25 -start_number 100000 -i "C:\Users\jow\Documents\UnityProjects\MyFirstUnityProject\LSCaptureFiles\Image_%06d.png" -vcodec libx264 -crf 15 -pix_fmt yuv420p myfirstunityproject.mp4
In the command, we tell ffmpeg that the produced video should use 25 frames per second, where the images are located and the pattern for how they are named, which video codec to use, etc. The final parameter is the name of the output file (myfirstunityproject.mp4) that will be generated. When you execute the modified command (by pressing enter), ffmpeg should start to process the images and create the MP4 video. Remember there are about 1400 frames.
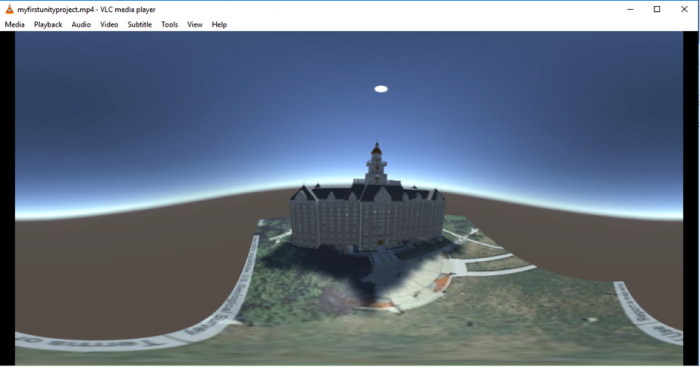
When ffmpeg is done, there should now be a file called myfirstunityproject.mp4 in the bin subfolder of ffmpeg. You can move this file, for instance into your Documents folder.
Now run the video and have a look. If your standard video player is not able to display the video, we recommend that you go to VideoLan [4] to download and install VLC, a great and free video player, and then watch the video with this program.
Changing the Movie Metadata
Changing the Movie Metadata
Now that we have the video our goal is to get it uploaded to a private YouTube channel and watch it with the cardboard on our smartphone. However, we first have to use yet another tool to adapt some of the metadata in the movie file so that YouTube will correctly recognize it as a 360° movie. We will follow Google’s Upload 360-degree videos [5] instructions.
- Download the 360 Video Metadata app [6] by clicking on the "360.Video.Metadata.Tool.win.zip".
- The downloaded .zip file contains a single .exe program called "Spatial Media Metadata Injector.exe". Start this program.
- In the dialog window that opens up, click the “Open” button and then navigate to our video file. After this, the name of the file should either appear in blue at the top of the dialog window.
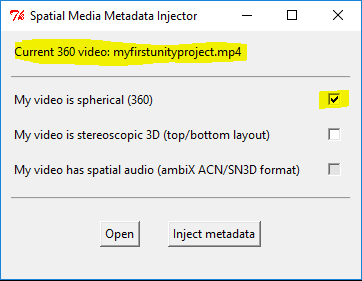 Credit: Google
 - Finally, select the "My video is spherical (360)" option at the top and then use the "Inject metadata" button to save the modified file under a new name. Let’s use “myfirstunityproject360.mp4” as the name. The resulting file is the one that we want to now upload to YouTube.
Uploading the Video to YouTube
Uploading the Video to YouTube
The final steps of this walkthrough will require that you have a YouTube account and channel. That doesn’t mean that the 360° videos produced in this course will be publicly available for everyone. It is possible to use your channel only to share these with particular people, like everyone in this class. If you do not have a YouTube account/channel yet, please follow the Create an account on YouTube [7] instructions to create these.
You should now be on the main page for your YouTube channel. Click on the “Upload” link at the top to upload a new video. Set the field to determine who can watch the movie to “Private” for now. When you later want to share a video with the class, you can instead set this to “Unlisted” and share the link to the video. Unlisted means that everyone with the link can watch the video but it won’t be visible to anyone else as part of search results on YouTube. Now, drag the video file myfirstunityproject360.mp4 from the Window Explorer on to the upload icon. The upload will start immediately. After the upload is completed, YouTube will start processing the file. After this has finished as well, you can click “Done”.
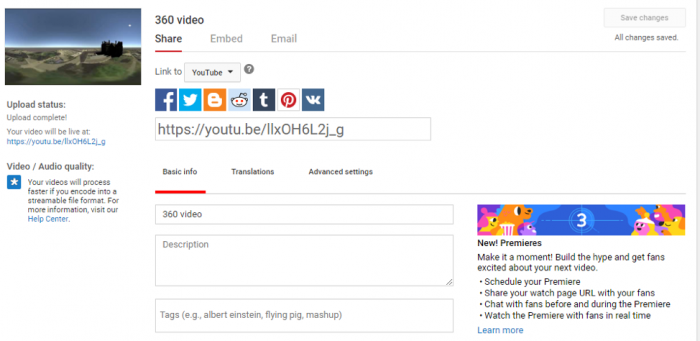
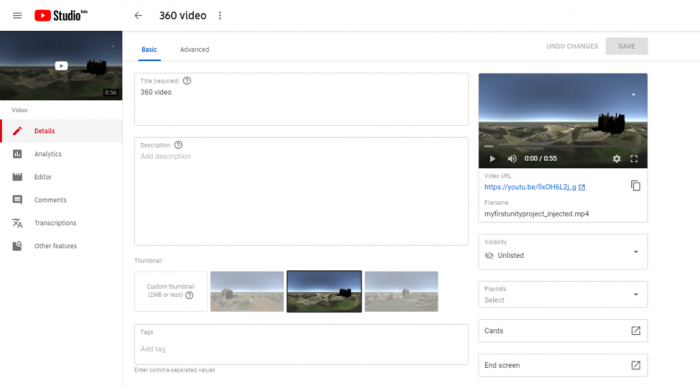
The video should now be listed in the YouTube Studio [8] under the videos tab.
Clicking on it should take you to a page as shown below, where you can play your video, or open its link in a different tab.
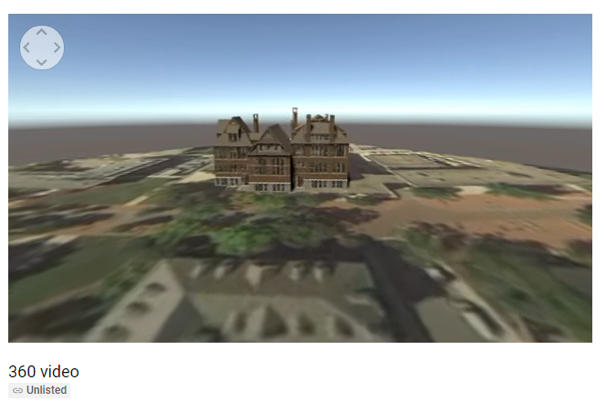
You should now be able to watch this video on YouTube like any other video. You should, in addition, be able to look around during the camera flight either by dragging with the left mouse button pressed or by using the arrows in the top left corner of the video. By clicking the Settings icon at the bottom, you may be able to increase the resolution at which the video is displayed unless it is already displayed at the highest available resolution.
If you play this video on your phone, you will get the option to see it in VR mode when you switch to full screen. If you select that option, you can put your phone in a CardBoard and enjoy your first VR creation.
You can check out other VR videos on YouTube at YouTube Virtual Reality [9].
Note: Make sure your YouTube app is up to date!