Lesson 9: Unity III
Overview
Overview
This will be both a practical and theoretical lesson that shows you a complete Unity project with some advanced functionalities. You will be provided with a simple “City builder” unity game where you can instantiate buildings in a city and animate cars to patrol over a specified path. The objective is not to teach you how to program this game, as it will be outside of the scope of this course, but rather demonstrate to you what is possible to be done in Unity with a few classes and some built-in features of the game engine. Furthermore, we will explore some of the VR specific mechanics that are used in game engines such as Unity for making the experiences more interactive (e.g. different types of locomotion, and interaction with objects).
Learning Outcomes
By the end of this lesson, you should be able to:
- Have an impression of how much effort is needed to create a simple game such as City Builder
- Have a general understanding of some of the advanced features of Unity such as AI (artificial intelligence) and dynamic GameObject instantiation
- explain different locomotion mechanics used in VR to move the player around a scene
- explain different interaction mechanics used in VR to interact with objects
Lesson Roadmap
| To Read |
|
|---|---|
| To Do |
|
Questions?
If you have any questions, please post them to our "General and Technical Questions" discussion (not e-mail). I will check that discussion forum daily to respond. While you are there, feel free to post your own responses if you, too, are able to help out a classmate.
The City Builder Game
The City Builder Game
Introduction
Download the City Builder Unity Package [1]. The package includes all the resources used in the city builder game. This is a very simple game, where the user can select different buildings from a menu and place them in specific locations in a city (only some areas allow for placing a building) using their mouse. When selecting a building to be placed in the city, its base will change color. The red color indicates that the current location of the building is illegal (and therefore it cannot be placed there), whereas the blue color indicates a legal location. The color of the base will continuously change as the user moves the building in the city to find a location to place it. Once the building is in a legal location, the user can click down on the mouse (left click) to place the building in the city. If the user clicks on an already placed building, the base of the building will become purple, indicating that it has been selected. Once selected, buildings can be removed from the city by pressing the “D” button. Moreover, the user can move the camera along the X and Z axes using the arrow keys on the keyboard (left, right, up, and down keys). This will help the user navigate the environment when placing buildings. Lastly, there is a car that patrols a street over a specified path. A quick video of this game can be seen below:
Video: City Builder Demo (00:54) This video is not narrated.
Import this package into a new Unity project. Once the import is done, navigate to the folder “City Builder”, and open the scene with the same name “City builder”. Make sure your “maximize on play” option in your game window is enabled, and then play the scene.

When the scene is playing, you can see a blue car patrolling over a specified path. You can use the arrow keys on your keyboard (left, right, up, down keys) to move the camera along the X and Z axes. If you click on the buttons of the menu on the left side of the screen, you can select different buildings to place in the city. Select a building, move it over a legal position and left click with your mouse to place it down. Place a few more buildings in the city. Click on a building that is already in the city. You will notice that its based will change color to purple. Press the “D” button on your keyboard to delete this building.
Setting up the City Builder from Scratch
Setting up the City Builder from Scratch
To give you an idea of how such a scene can be set up, we will go through a series of steps to recreate the City Builder scene. All the resources you need are already inside the “City Builder” folder.
- Create a new scene in the City Builder folder, and name it “My City Builder”
- Navigate to the “Prefabs” sub-folder and drag the “Plane” prefab into the scene. Reset its position to (64,-0.2,0) and change its scale to (50,1,50). Notice that the plane object already has a Box Collider attached to it.
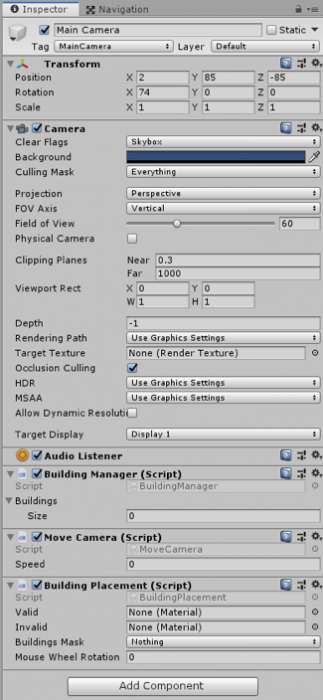
- Select the Main Camera GameObject and set its position to (65,85,-85) and orientation to (74,0,0)
- Drag the “Roads” prefab onto the scene and set its position to (42,1.1,-17). This is a rather detailed object, with many child objects under it. If you expand this GameObject and examine its children, you will notice that some of them have the tag “Street”, and some of them do not. We use these tags later when we want to decide whether the building, we want to add to the city is being placed on the street or not. More precisely, if the building object that is following our mouse pointer collides with another object with either the tag “Street” or “Building” it is considered an illegal location.
 Credit: ChoroPhronesis [2]
 - Drag the “Car” Prefab onto the scene and set its position to (59.5,0,-1.2). If you look at the inspector panel of the car GameObject you have just added to your scene, you will notice that it has a script attached to it called “Car AI”. This script utilizes the AI engine of Unity which implements a path finding algorithm, so the car moves through several “Patrol points”. These points are not assigned yet, but we will do them shortly. Apart from this script, the Car object also has a component called “Nav Mesh Agent”. This is a native unity component as part of its AI engine that marks a GameObject as a navigatable agent. Since we want the car to act as such an agent, we need to have this component added it. There are many parameters that you can set for the Nav Mesh Agent including the movement and turn speed, acceleration, obstacle avoidance, etc. for more information watch NavMesh Agent - Unity Official Tutorials [3].
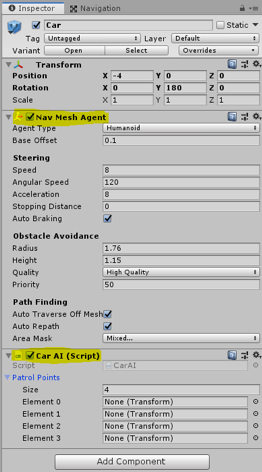 Credit: ChoroPhronesis [2]
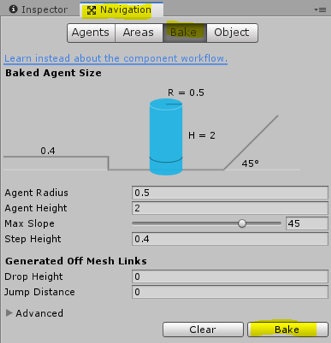
 - Before adding the patrol Points to the Car AI script, we must tell unity which parts of our scene are “walkable” by the Nav Mesh Agent. To do this, go to the “Window” menu on top of the Unity editor, Select AI -> Navigation.
-
A new panel called Navigation will be opened on the right side of the editor. Select the “Bake” tab on this panel and click on the Bake button.
 Credit: ChoroPhronesis [2]
After a few seconds your scene should look like this:
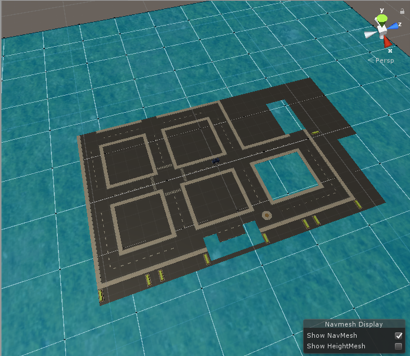 Credit: ChoroPhronesis [2]
 -
Navigate to the Prefabs folder again and drag the “Waypoints” prefab onto the scene, and set its position to (62.5,0,-70.2). This GameObject has four children, where each act as a patrol point for our Car AI script. You can inspect the position of each these points in the scene. Now, if we select our Car GameObject again, and look at its properties in the inspector menu, we can add patrol points to the Car AI script. Simply drag each waypoint (children of the WayPoint object named Waypoint 1 to 4) to each element (0 to 3) place in the Car AI script.
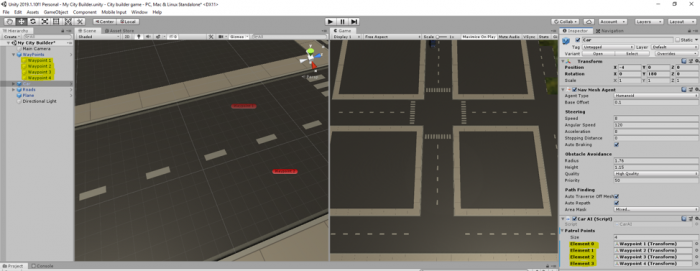 Credit: ChoroPhronesis [2]
 - Hit play, and you should have your car move from one Patrol Point to the next over a loop. As an exercise (not evaluated), change the placement of the Waypoints in the scene so the car goes around a block.
-
Inside the City Builder folder, navigate to the “Scripts” subfolder. Drag the “BuildingManager”, “BuildingPlacement”, and “MoveCamera” scripts onto the Main Camera GameObject in your scene.
 Credit: ChoroPhronesis [2]
 -
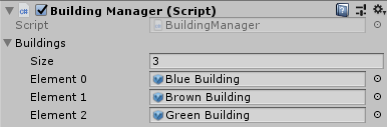
Most of our functionalities are covered by these three scripts, so we will briefly go over them. The “Building Manager” script takes care of generating the menu on the left side of the screen and adding buttons to it to the number of buildings we want to have in our menu. You can see that this script has a property called “Buildings” in the editor. If you expand this option, you will see a placeholder for “Size”. Change this value to 3. This means that we want our menu to hold three buttons each representing a different building, so we can select them and place them in the city. When you change the value to 3, you will notice that three new empty placeholders are shown. Go to the Prefabs subfolder again, and drag the Blue, Brown, and Green building prefabs to each of those placeholders.
 Credit: ChoroPhronesis [2]
Now to the number of buildings we have added to this list, we will have buttons with the same name as the building prefabs generated for us. Clicking on each button will inform the “Building Placement” Script, which building to generate and attach to the mouse pointer. For more detail, please examine the fully commented script of “Building Manager”.
-
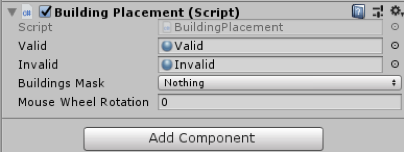
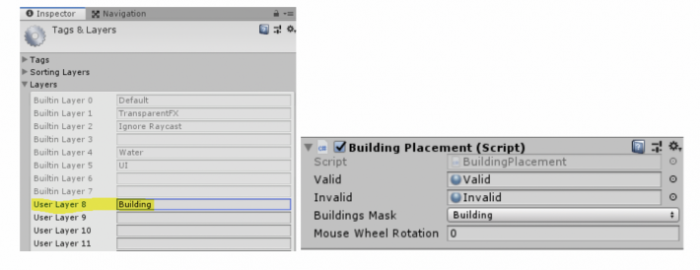
Next, we will examine the “Building Placement” script. There are three properties for this script in the editor that we need to change. First, we need to add different materials for the “base” of the buildings to indicate illegal and legal positions of the building by means of color. Navigate to the “Materials” subfolder and drag the “Valid” material to its corresponding placeholder in the inspector panel. Do the same for the “Invalid”. Once the “Building Manager” script informs the “Building Placement” script which building is requested to be generated, the “Building Placement” script will instantiate (create a copy on the fly) that building and will attach it to the position of the mouse pointer. Furthermore, it will use the valid and invalid materials we’ve just added to the component, so it can change the color of the base of the buildings to red when they collide with buildings and streets (i.e. invalid), or otherwise blue (i.e. valid).
 Credit: ChoroPhronesis [2]
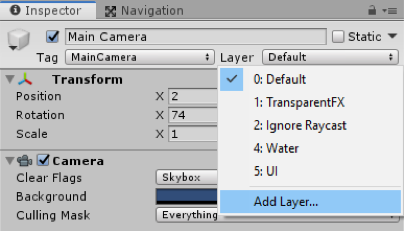
The “Building Placement” script is also monitoring the clicking of the mouse by the user. If there is a building attached to the mouse pointer and the position is legal and the user clicks on the mouse, it will place the building on that exact location and will disable its base (so it looks realistic when placed in the city). Notwithstanding, we also want the user to be able to click on a building that is already placed in the city so they can remove it. This means that our “Building Placement” implements a second check condition to see if no building is attached to the mouse pointer at the moment when the user clicks on the left mouse button. If that is the case, it also checks whether what the user has clicked on is actually a building or not. For this check, our script uses the “Building Mask” property, as shown in the editor. All the building prefabs we have added to the “Building Manager” script already belong to the “Building” layer. All we need to do is tell unity which layer to look for when the user clicks on objects in the city. As such, we need to create a new layer and set that as our Buildings Mask. For this, click on the “Layer” dropdown menu on top of this panel, and select “Add Layer”.
 Credit: ChoroPhronesis [2]
Create a new layer called “Building” and set the Building Mask to that layer (this layer should already exist in your layer list, if not, create it).
 Credit: ChoroPhronesis [2]
 -
The last property we need to set in the unity editor is related to the “Move Camera” script. We need to indicate a speed value for the movement of the camera, so we can move it using the arrow keys. Set this value to 15.
 Credit: ChoroPhronesis [2]
 -
That is all you needed to do in order to set up a fully working City Builder scene with the assets that were provided to you. Press play and enjoy your creation. You should be able to move the camera around, place buildings in designated areas of the city and remove them. You may notice that we have not covered which script handles the color changing of the base of buildings when they are selected, as well as the function for deleting them. This is because, each of the building prefabs we added to the “Building Management” script has a script called “PlacableBuilding” that takes care of these functions, and we do not need to set anything up for them to work. However, in short, once a building that is already placed in the city is clicked on, the “Building Placement” script detects which exact building was clicked and triggers the “PlacableBuilding” script attached to it. This script will then change the base color of that building to purple, and if the user presses the “D” key, it will remove that building from the scene.
You can also watch this complete video tutorial on how to assemble this scene.
Video: CityBuilder Instructions (6:39) This video is not narrated.
Note: Although we did not directly go over the scripts line by line, I strongly recommend that you look at the scripts inside the “Scripts” subfolder to have a better understanding of how some of these functions are implemented in C#. All the scripts are fully commented for your convenience.
Common Mechanics Used in VR Development
Common Mechanics Used in VR Development
Most of the mechanics used in desktop experiences can also be used in VR. However, not all of them are best choices for VR experiences. Two of the most prominent examples are locomotion and interaction mechanics. In this section, we will briefly explore the different locomotion and interaction mechanics that are designed specifically for VR experience.
Locomotion in VR
Locomotion can be defined as the ability to move from one place to another. There are many ways in which locomotion can be implemented in games and other virtual experiences. Depending on the employed camera perspective and movement mechanics, the users can move their viewpoint within the virtual space in different ways. Obviously, there are fundamental differences in locomotion possibilities when comparing 2D, 2.5D, and 3D experiences. Even within the category of 3D experiences, locomotion can take many different forms. To give you a very general comparison, consider the following:
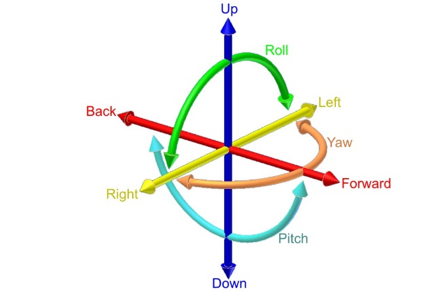
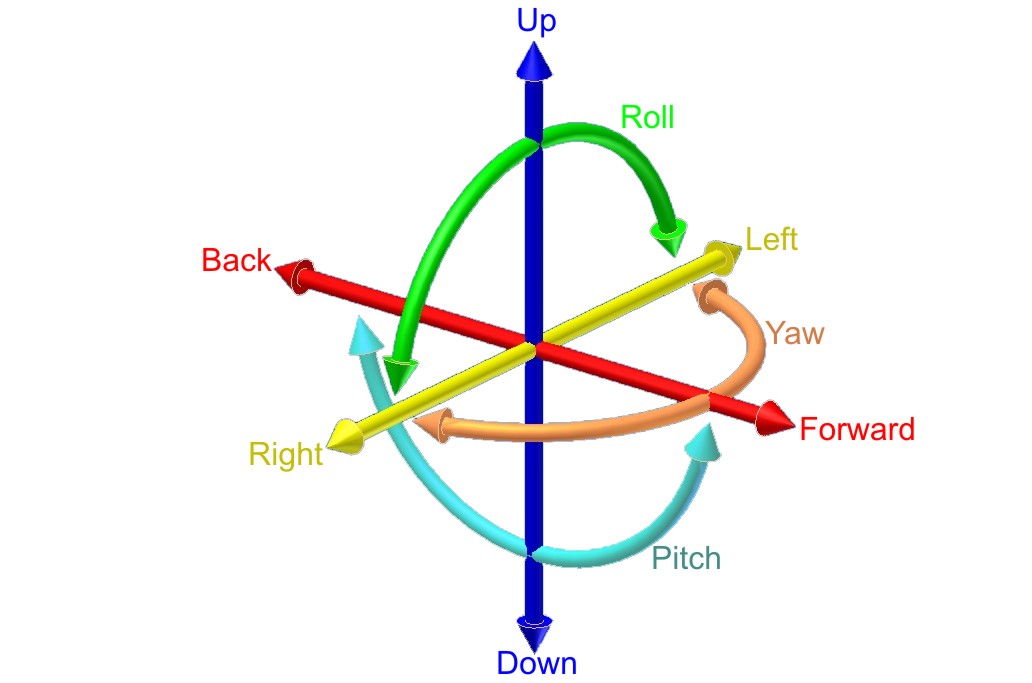
Locomotion in 2D games is limited to the confines of the 2D space (X and Y axes). The camera used in 2D games employs an orthogonal projection. Therefore, the game space is seen as “flat”. In these experiences, users can move a character using mechanics such as “point and click” (as is the case in the most 2D real-time strategy games) or using keystrokes on a keyboard or other types of controllers. The movements of the orthogonal camera in these experiences is also limited to the confines of the 2D space. Consequently, the users will not experience the illusion of perceiving the game through the eyes of the character (e.g. Cuphead [4], Super Mario Bros, [5] etc.). Evidently, the same type of locomotion can be employed in the 3D space as well. For instance, in the City Builder game, we have seen in this lesson, the camera uses a perspective projection. However, the locomotion of the user is limited to the two axes of X and Z. The three-dimensional perspective of the camera (viewpoint of the user), however, creates an illusion of depth and a feeling of existing “in the sky”. In more sophisticated 3D games, such as First-person shooters (FPS [6]) where it is desired that the players experience the game through the eyes of their character, the feeling of movement is entirely different. We stress the word “feeling” since the logic behind translating (moving) an object within a 2D space compared to a 3D space from one point to another is not that different. However, the differences in the resulting feeling of camera movements are vast (unattached distant orthogonal vs. perspective projection through the eyes of the character). In many modern games (not necessarily shooters) with a first-person camera perspective, the players can be given six degrees of freedom for movement and rotation.
Video: Making an FPS Game with Unity using the Asset Store (3:32)
In this video, we've created a first-person shooter game in unity by using content from the unity asset store. Our goal in this video is to show the assets from the unity asset store that we've used to build this game from the ground up. The assets used in this project are all available on the unity asset store with links in the description below. Let's take a look at our first-person shooter game and see what assets are used to create it. This is a first-person game where you are armed with a single pistol and must fight the evil robots around the environment. The enemy robots are fully textured and animated and react to being damaged by the player. The environment is filled with dynamic physics props and reacts to being pushed around or shot by the player. The first-person controller functionality is provided by the ultimate first-person shooter package. We move around with the WASD keys and click the left mouse button to shoot. The UFPS package provides our game with the player movement controls and a shootable and reloadable pistol. The environment in our game is provided by the snaps prototype pack. The snaps prototype asset pack is a set of themed 3d models built using pro builder. We have set up various levels using the walls, ceilings, and floors included in the snaps asset. We then use Unity's built-in enlightened light mapper to add both precomputed and baked global illumination for additional shadowing. The props in our game are also provided by the snaps prototype pack. We've attached both the rigidbody and a mesh Collider, set to convex, to each dynamic prop, which allows the player and the enemy robots to crash through the environment in a dynamic way. Lastly, our environment is topped off with a skybox from the all-sky asset. The skybox is a nice background in our level for the player to see off in the distance and outside the windows. In addition, unity standard lighting system and built-in light mapper use the scene skybox for additional detail and more even lighting on our meshes. We've used the robot warriors asset for a robot enemies. The robot warriors asset comes with three fully textured, rigged, and animated robots. We've set up two robot enemies using the models and animations from robot warriors. To integrate our enemy robots into our game, we've hooked it up to the damage system in the UFPS so that the robot enemies take damage when we fire our pistol at them and die once they take enough damage. We've use Unity's standard built-in nav mesh agent component to allow our robot enemies to walk around the map without hitting the walls of the level. We have also used the volumetric lighting solution Aura2, to provide atmosphere. Volumetric lighting can help us simulate an environment in which light shafts can be seen. By using Aura2's volumetric lighting system, we were able to attach a red spotlight to each robots eye, giving them a menacing red cone of light wherever they look. Finally, we've used Unity's post-processing stack to provide color grading, tone mapping, bloom, and anti-aliasing over the final image. This brings our final render together visually. As you can see, by using assets from the Unity asset store, we can quickly create an environment, integrate believable characters, and also implement gameplay functionality. All of the assets shown are available now on the unity asset store. To learn more click the link in the description below. Thanks for watching.
The FPS Controller we used in the previous lessons is an example of providing such freedom (except for rotation along the Z-axis). The mechanics for the movement in such games, however, are almost all the time through a smooth transition from one point to another. For instance, in the two different locomotion mechanics we used in this course (FPS Controller, and camera movement) you have seen that we gradually increase or decrease the Position and Rotation properties of the Transform component attached to GameObjects. This gradual change of values over time (for as long as we hold down a button for instance) creates the illusion of smoothly moving from one point to another.
As was previously mentioned, there are many ways in which locomotion can be realized in virtual environments, depending on the type and genre of the experience, and the projection of the used camera. Explaining all the different varieties would be outside the scope of this course. Therefore, we will focus on the one that is most applicable in VR.
The experience of Virtual Reality closely resembles a first-person perspective. This is the most effective way of using VR to create an immersive feeling of perceiving a virtual world from a viewpoint natural to us. It does not come as a surprise that in the early days of mainstream VR development, many employed the same locomotion techniques used in conventional first-person desktop experiences in VR. Although we can most definitely use locomotion mechanics such as “smooth transition” in VR, the resulting user-experiences will not be the same. As a matter of fact, doing so will cause a well-known negative effect associated with feelings such as disorientation, eyestrain, dizziness, and even nausea, generally referred to as simulator sickness.
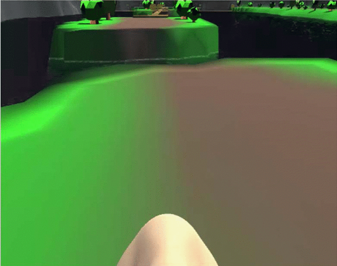
According to Wienrich et al. “Motion sickness usually occurs when a person feels movement but does not necessarily see it. In contrast, simulator sickness can occur without any actual movement of the subject” [1]. One way to interpret this is that simulator sickness is a form of physical-psychological paradox that people experience when they see themselves move in a virtual environment (in this case through VR HMDs) but do not physically feel it. The most widely accepted theory as to why this happens is the “sensory conflict theory” [2]. There are, however, several other theories that try to model or predict simulator sickness (e.g. the poison theory [3], the model of negative reinforcement [4], [5], the eye movement theory [4-5], and the and the postural instability theory [6]). Simulator sickness in VR is more severe in cases where the users must locomote, particularly using smooth transition, over a long distance. As such, different approaches have been researched to reduce this negative experience. One approach suggested by [1] is to include a virtual nose in the experience so the users would have a “rest frame” (a static point that does not move) when they put on the HMD.
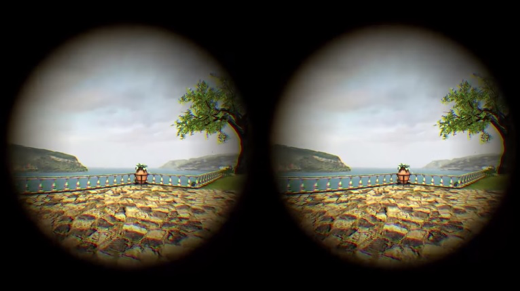
Other approaches such as dynamic field of view (FOV) reduction when moving or rotating have also shown to be an effective way to reduce simulator sickness.
In addition to these approaches, novel and tailored mechanics for implementing locomotion, specifically in VR, have also been proposed. Here we will list some of the most popular ones:
- Physical movement: In the earlier version of VR HMDs, no external sensors were used for tracking the position of the users. As such, physically moving around a room and experiencing translation (movement) inside the virtual environment was not easily achievable (in few examples other forms of sensors such as Microsoft Kinect were used for this purpose to some extent). In the newer models of HMDs however, external sensors were added to resolve this shortcoming by providing room-scaled tracking. For instance, Oculus Rift, and HTC Vive both have sensors that can track the position of the user within a specific boundary in a physical space. This allows the users to freely and naturally walk around (as well as rotate, sit, and jump) within that boundary and experience the movement of their perspective in VR. As we have already seen in Lesson 1, the latest generations of HMDs such as Oculus Quest employ the inside out tracking technology which eliminates the need for external sensors. Using these HMDs, the users are not bound to a specified physical confine, and they can freely move around in a much larger physical space. This method of locomotion is the most natural one we can use in VR.
Video: Oculus Insight VR Positional Tracking System (Sep 2018) (02:39)
Over the last three years, the Occulus team has built revolutionary inside-out tracking technology. That's what we call Oculus insight. Insight uses four ultra wide-angle sensors and advanced computer vision algorithms to track your exact position in real-time without any external sensors. It's thanks to this technology that you can move around freely, fluidly, and fast. It's really cool. Now let's take a look at how insight works. First of all, it uses the four wide-angle sensors on the headset to look for edges, corners, and pretty much any distinct feature in the environment. It then builds a three-dimensional map that looks like a sparse point cloud. These are the green and blue dots that you see here. The system combines this map with gyroscope and accelerometer input and generates a very precise estimate of your head position every millisecond. Insight is a very flexible and robust system. It relies on all the different features in the environment for tracking. So floors and ceiling, walls, rugs, art on the wall, window fixtures, curtains, you name it, and even furniture. Now, this flexibility is important particularly in more challenging environments, like for example, a room with a super shiny floor or with bare white walls with no texture, with nothing on them. And we've tested Oculus Insight in hundreds of different home spaces and we're gonna continue to do that to fine-tune it over time. Now many of you have built room-scale experiences for Oculus Rift. Oculus Insight goes beyond room-scale and it works in much larger spaces without any external sensors. Oculus Insight also powers the Guardian system in Oculus Quest. Just like on Rift, Guardian is what helps keep you safer while you're in VR. And Oculus Insight supports multi-room guardian, so, I love this guy, so you can easily take your headset to different parts of your home, your friend's home, or your office, and it will remember the Guardian setup for each of those spaces.
- Teleportation: teleportation is still considered the most popular locomotion system in VR (although this may change soon due to the emergence of inside out tracking technology). It allows users to jump (teleport) from one location to another inside a virtual environment. There are different types of teleportation as well. The most basic form is instant teleportation where the perspective of the user is jumped from one location to another instantaneously when they point to a location and click on their controller.
Other forms of teleportation include adding effects when moving the user’s perspective from one location to another (e.g. fading, sounds, seeing a project of the avatar move, etc.), or providing a preview of the destination point before actually teleporting to that location:
Another interesting and yet different example of teleportation is the “thrown object teleported”, where instead of pointing at a specific location, the user throws an object (using natural gestures for grabbing and throwing objects in VR as we will discuss in the next section) and then teleport to the location where the object rests.
- Arm swing: this is a semi-natural way to locomote in VR. Users must swing their arms while holding the controllers, and the swinging gesture will translate their perspective in the virtual environment. The general implementation of this mechanic is in such a way that the faster users swing their arms, the fast their viewing perspective moves in the virtual environment. This is a rather useful locomotion mechanic when the users are required to travel a relatively long distance, and you do not want them to miss anything along the way by jumping from point to point.
- Grabbing and locomoting: Imagine a rock-climbing experience in VR, where the user must climb a surface. An arm swing gesture is probably not the best locomotion mechanic in this case to translate the perspective of the user along the Y-axis (as the user climbs up). By colliding with and grabbing GameObjects such as rocks however, the user can locomote on the X, Y, or Z axes in a more natural way. This locomotion mechanic is used in many different VR experiences for climbing ladders, using zip-lines, etc.
- Dragging: this is a particularly interesting and useful locomotion technique, specifically for situations where the user a top-down (overview) perspective of the virtual environment. Consider a virtual experience where the size of the user is disproportionate to the environment (i.e. they are a giant) and they need to navigate over a large terrain. One way to implement locomotion in such a scenario is to enable users to grab the “world” and drag their perspective along the X or Z axes.
There are many other locomotion mechanics for VR (e.g. mixing teleportation and smooth movement, run in-place locomotion, re-orientation of the world and teleportation together, etc.) that we did not cover in this section. However, the most popular and widely used ones were briefly mentioned.
References
[1] C. Wienrich, CK. Weidner, C. Schatto, D. Obremski, JH. Israel. A Virtual Nose as a Rest-Frame-The Impact on Simulator Sickness and Game Experience. 2018, pp. 1-8
[2] J. T. Reason, I. J. Brand, Motion sickness, London: Academic, 1975.
[3] M. Treisman, Motion Sickness: An Evolutionary Hypothesis” Science, vol. 197, pp. 493-495, 1977.
[4] B. Lewis-Evans, Simulation Sickness and VR-What is it and what can developers and players do to reduce it?
[5] J. J. La Viola, "A Discussion of Cybersickness in Virtual Environments", ACM SIGCHI Bulletin, vol. 32, no. 1, pp. 47-56, 2000.
[6] G. E. Riccio, T. A. Stoffregen, "An ecological theory of motion sickness and postural instability", Ecological Psychology, vol. 3, pp. 195-240, 1991.
Interaction in VR
Interaction in VR
Interactions with GameObjects in non-VR environments are limited to conventional modalities and their affordances. In desktop experiences, for instance, interactions are limited to pointing at objects and graphical user interface element. In certain gaming consoles, however, such as Nintendo Wii [18] and Xbox Kinect, users can perform natural gestures to interact with objects in a game or to perform actions.
Interaction with GameObjects in VR can be considerably more natural compared to desktop experiences. The immersive nature of VR HDMs combined with the possibility of locomotion in a natural point of view affords a much closer interaction experience to real-life compared to any other gaming console or desktop. Thanks to the power of sensors and controller data in VR headsets, we can constantly track the position, orientation, and intensity of hand movements in VR. As such, users can use natural gestures for interaction with different types of objects while perceiving them from a natural viewpoint.
Users can interact with objects by reaching out and grabbing them when they are in their proximity, or they can grab them from distance using a pointer. Once an object is grabbed, users can use the physics properties to place them somewhere in the virtual environment, throw them, and even change their scale and rotation.
Video: Natural Virtual Hand Interaction with Puzzle Cube in VR (1:13) This video is not narrated.
An example of grabbing an object from distance using pointers:
More natural forms of interaction in VR are via gestures. For instance, users can spin a wheel using a circular gesture or pull down a lever using a pull gesture. The popular VR archery game is a prime example of using natural gestures to interact with game objects.
Similar to the bow and arrow, some objects such as a fire extinguisher are used by two hands in real-life. The same principle could be applied in VR, where the user grabs the capsule with one hand and the hose with another. An overview of some of these interaction mechanics is demonstrated in the videos below from one of the most popular VR plugins for Unity called VRTK.
Video: [Basics] Grab attach mechanics (5:57)
[Music]
Hello and welcome to another VRTK tutorial. In today's tutorial, we're going to be covering the different grab attach mechanics. So to do that, I'm just going to jump into scene 21, which is 0:21 control out grabbing object with joints. And this scene already shows us the different grab attach mechanics that are on offer. And the grab attach mechanics can be seen in script, interactions, grab attach mechanics. And these are the different types. And if we click on one of these, you'll see, for instance, on here we've got the spring joint grab attach. We'll see that in action in a moment. On the red cube, we've got the fixed joint grab attach. And on the green cube, we've got the track object grab attach. If we move over to this wheel, if we look at the wheel on here, we've got the rotator track grab attach. And if we look at the gun down here, this one has got the child of controller grab attach. So the main difference between the grab attaches is they all slightly attach the object to the controller in different ways or by doing different things. So the fixed joint and the spring joint both use a joint to fix it to the controller. And this can be very useful, for instance, if you pick up a fixed joint object it holds very close to the controller, but if you bang it against something, the joint will break and it will automatically drop out your hand, which can be quite useful if you're going for that level of realism that if you bang your hand against the wall, you may drop the gun or something like that. Obviously a spring joint can give you the feeling that something is not quite being tracked directly with you, so it's always kind of springing away. And you can change all the springs settings within Unity to set that up however you want. And then the track object, it actually uses the velocities of the controller. So to move that object to follow the controller around and this can be very useful as well that it can then also interact with other rigid bodies in the scene, rather than just disconnect like the fixed joints or the spring joint does. We've also got the rotator track and this works by checking out the rotations of the controller and then rotating things accordingly. So it works really well for wheels and doors and the hinges of that sort. Then we've got the, on the gun, if I just select that, we've got the child of controller, which literally takes the object and sets it as a child of the controller that you're holding. And that gives you really, really good accuracy in tracking. It does have some downsides, which it doesn't interact brilliantly with other game objects. You can also pass it through other colliders. But that can be very useful as well that if you don't want the physics to go crazy, if you accidentally stick your gun into a door, into a wall, using the child of controller will solve all that for you. We can also add multiple grab attach mechanical objects as well. So if we look at this fire extinguisher here, we've got a track object on the actual body, so when we pick this track its object there. And then if we look at the hose on the sprayer, this is also got a tracked object so we can grab this with one controller and then we can grab this with the other controller. And these are just connected with a simple spring joint to give it like a chain look. And so we'll jump into the see now and we'll see how each of these different tracked objects looks as you're grabbing something.
So we're in the scene and as I said the blue cube uses the spring joints. So if we pick that up you can see it kind of dangles underneath and it's got a spring affect to it from the controller. And we can swap it between the two and it has kind of this pendulum style effect. We can drop that down. The red cube uses a fixed joint so that's very good tracking to the controller, it holds it quite nicely. And also if you bang it into things, you don't have to release the grab, it will automatically release. So if you was to walk into there and bang it, it just drops onto the floor. The track object uses the velocities to make sure the rigid bodies track accordingly. It's a little bit more wobbly than a fixed joint, but it's very good for things like this. If I drag it into here, it won't actually disconnect from me and we can kind of get it to move around objects with us. This is very useful if you're dealing with rigid bodies but it can also give this untoward effect of things disconnecting from the controller. We've also got the rotator track which is extremely useful for hinge joints like on this wheel. So as we grab this we can move this and it kind of tracks where the controller is to make it look like we're spinning a wheel or moving a vowel around. And then on the gun over here we've got the child of controller. So if we pick this up you can see it doesn't actually interfere with these colliders because I don't have a rigid body on these ones. With a rigid body will still move them around, but we could put this into a wall or a floor and it wouldn't actually affect anything. And also on here we've got other nested interactions, so these have got grabs on the side, so we should be able to put our controller down there and pull this back and have a grab on there. And, as I said, the same for this fire extinguisher. If we pick this up, we can also reach out and grab this other partner and then when we do something with this controller, this other controller is doing the action. So that's the simple explanation into the different grab types. There's not one that fits all scenarios, so it's always good to pick and choose which one that you feel works best for you in your scenario. I hope that's been helpful. If it has, please leave some comments, leave some likes and think about subscribing to the channel. Thanks for watching and bye for now.
[Music]
Video: Unity VRTK v3 ( VR Development ) Testing Interactables Demo Scene (10:34) This video is not narrated.
In the videos posted above, you can see that users can naturally interact with different types of objects, by sitting down and pulling out a drawer, flipping switches, etc. The same principle can be applied to graphical user interface (GUI) objects. Users can use natural gestures to collide with different GUI objects such as buttons to interact with them, or they can use pointers to point at a specific GUI element. Users can grab a selector on a slider and move their hand to the left or right to decrease/increase a value, or they can move a text element in the scene.
As the inspiration of different interaction mechanics for your assignment, you can watch the following video:
Video: Top 10 PC VR Games
Believe it or not, we're halfway through 2019. So here's a long-overdue update to my top ten PC VR games, the best as of June 2019.
VTOL is a detailed and complex flight simulator and not a casual arcadie flight game. For example, to take off from the ground, it takes all of these steps. So it feels very realistic in that regard and you'll definitely need to take your time and the training missions to get comfortable with everything. There's runway and vertical takeoff and landing. Some missions only allow a specific takeoff or landing. For example, mission 2 requires a vertical landing on a rooftop. And speaking of missions, the current state of the game has a handful of story campaign missions for the VTOL aircraft, as well as a free-flying mode. If it's a combat mission, then you need to choose your loadout for the aircraft, all within your allotted budget for that mission. [Music] Everything is done with the motion controllers, which I think is awesome. As such, you can customize the height of your chair and the main controls on either side of you so you can comfortably reach everything. On top of that, you can choose the optional fighter jet aircraft which gives you a whole new way to play and another set of missions. And thanks to the level editor, there's a bunch of community-made content like additional campaigns and custom missions to play. This game is constantly being updated. It's an early access game that always stays fresh with new updates. So even though it's already a great flight simulator, it's exciting to know that even more is on the way. In the gameplay footage here you can see my dad playing because he loves realistic flight simulators. After he got comfortable with all the training, he was in heaven and completely fell in love with this game. So if you enjoy realistic flight simulators as well then I highly recommend it. The price is $30.
Pixel Ripped 1989 begins with you living inside a Game-Boy-like world, playing a game on a TV. But after disaster strikes you'll then switch characters to become a young student playing on their game system, controlling the character that you previously were. And it's in this state that you'll spend the vast majority of the game. You need to play your portable game system while juggling responsibilities in the real world, like keeping your teacher distracted so you can keep playing the game without getting in trouble. The retro game that you're playing is a simple platformer, but needing to keep the teacher distracted, means you have to keep switching your attention constantly between the retro game and the classroom. [Music] Later things become more mixed and intense as the video game world invades the real world, like here, where you need to stop the bad guys from abducting your friends. Or here, where you play a vertical level attempting to hit TNT to attack the school headmaster. The default control scheme is with motion controllers, so you feel like you're actually holding a game system. But you can disable the tracking for motion controllers or ditch them entirely and play with a gamepad. It took me two and a half hours to beat it and I had a great time. I bought this during the Steam winter sale and I'm glad I did. Even though it's a little short, it's incredibly unique and it satisfied all kinds of retro gaming nostalgia for me. The regular price is $25 [Music]
Star Shelter is a solo space survival simulator. Your spaceship has undergone massive damage and you need to repair the ship, salvage supplies, and avoid a multitude of dangers to stay alive. And since you're in space everything is in zero gravity. You propel yourself by grabbing onto surfaces and pushing or with your oxygen thrusters. Oxygen and energy will be our two primary concerns, although there are many more things to stay on top of. You refill oxygen with blue canisters and energy with orange canisters. Inject those into your suit for supply on the go or return to your main ship for transfer to your suit. You repair your ship and salvage materials all with your magic finger. After you salvage things, you'll build up your inventory of raw materials. You'll need those raw materials to engineer new items that you'll need or even expand your ship. One of the things I enjoyed most was boarding nearby abandoned ships to see what I could salvage. Sometimes you'll need to hack a keypad to gain entry and you'll often find new dangers inside, like gun turrets or radiation. For long-term survival, you'll need to grow plants to generate oxygen and food. All in all, I think it's an impressive and addicting space survival game. And if things get too intense, you can play in creative mode, which has no dangers, and you can build anything you want. You'll get at least five hours of play to beat the game and the environments are randomly generated whenever you start a new game, so there's lots of replayability. For the regular price of $15, you get a lot of bang for your buck.
A voice from the game: A space ship has been damaged, oxygen is leaking.
I've very recently reviewed Final Assault, so a lot of this footage will probably be familiar to you. But be that as it may, it still deserves to be in the top ten because it's my new favorite strategy game in VR. It's a 1 vs 1 realtime strategy game. There's no building of structures. Each player is granted one command center that makes all of the units. And the first player to have their defense towers breached and command center destroyed loses the game. But even though there's no structures to be built, there's still lots of managing and strategy to be found in the combat itself. One of the first things I noticed about the game, is that you actually do command individual units, which I found incredibly rare in VR strategy games. Your command center steadily deploys a bare minimum of troops that march toward the enemy base, but you obviously need more than that. So, on one hand, you have a menu of units at your disposal with the simple units on the bottom and the advanced two units on the top. And to get access to the advanced units, you need to unlock those tiers with some cash. Grab a unit and then decide where in the battlefield they should start out. You can then order the unit to move around or attack a specific enemy. And the combat mechanics feature the usual rock-paper-scissors dynamic. Planes are best against infantry, rockets are best against tanks, etc. One of the most fun elements are the airplanes. It reminded me of the old Final Approach game where you can trace out exactly where they should fly. And if you trace a path on the ground that's where the planes will strafe attack. There's multiple generals to choose from, each with unique units and abilities. There is both single-player campaigns and a multiplayer. Like I said before, it's my new favorite strategy game. It's incredibly well put together with a fun light-hearted atmosphere and engaging strategy. The price is $30 and if you're an RTS fan then it's totally worth it [Music]
Transpose is a mind-bending game which records your actions so you can use loop two duplicates of yourself to solve puzzles. The goal is to get special cubes into their bases. But of course, the execution is much trickier than it sounds. Whenever you begin a level, all of your actions are recorded. After you're done with your actions, you then choose to discard or keep everything you've done. After choosing that, you then begin the level anew and your actions are recorded again. If you choose to keep the previous recording, you'll see it played out and all the actions you did will still occur. The previous recordings are called echoes. Early on, you're limited to just a few echos, but eventually, you'll be using up to eight echoes at once. Later in the game, gravity will become relative to each echo, and the physics of transferring cubes between different gravity directions adds a new challenge. I found the overall design of the game creative and refreshing, but especially with interfaces on your arms. On your left arm, you use a slider to fast-forward time, which makes waiting for echoes less tedious. On your right arm, each echo is represented by a ring. Highlighting a ring will show where that echo is and pulling a ring will destroy that echo. There's sliding movement and teleporting. Teleporting is required to cross gaps in almost every level. Based on my progress, I estimate eight hours of playtime. Personally, I had a blast playing this. And even though Transpose is number six in my overall top ten, it's my number one favorite puzzle game. The regular price is $20 [Music]
Multiplayer-only military shooters really aren't my cup of tea, but Zero Caliber really shines because it features a single-player story campaign. And, for me, that makes it stand out among the sea of VR shooters out there. The campaign is a series of progressively unlocked levels that tell the story of your fight against a worldwide terrorist organization. Each level has multiple goals to accomplish and sometimes your goals will change depending on how the story unfolds. Like here, when your team comes across a group of civilians, and you need to defend the civilians against an attack before you can continue on your original mission. The gun assembly, handling, and reloading are realistic. But the combat itself is arcadie action. For example, you have unlimited ammo. Whichever gun you're holding, your vest ammo will supply endless ammo for that gun. Switch to a different gun and your vest then supplies that ammo. If you get hit, you'll quickly heal up if you can avoid getting hit again. [Music] There's also some obstacle course elements, like needing to climb a tower to activate a radio signal. In the campaign, if you get killed, you can respawn from the previous checkpoint instead of starting the level all over again. At the beginning of every mission, there's a handful of weapons to grab, but after completing missions you'll earn cash which you can spend in the armory to choose something specific you'd like to bring with you to the mission. As an added bonus, you can also play the campaign levels in co-op multiplayer. When I originally played this I beat the campaign in three hours, but more levels have been added since then. The regular price is $25.
In Subnautica, you're super cool spaceship fails and crash lands on a water planet. But luckily for you, it's a very beautiful and lush water planet, so you need to get diving to find resources and do whatever you can to survive. There are different survival modes to choose from, so if you want the game to be a little easier without worrying about going hungry or thirsty, you can choose that. One of the most important things in the game is the fabricator. That's where all of the scavenging and harvesting is paid off by turning raw materials into resources, and resources into equipment, tools, and gear. Just about anything you find in the water can be used in some way, so just explore and grab whatever you can. There's virtually no tutorial at the beginning. This is a game that doesn't hold your hand and rewards you for having initiative. At first, it's a little frustrating how little air you have, you have to constantly go back up to the surface for air. But after creating air tanks and equipping fins for speed, it's a lot more enjoyable. One of the most important things to make is the scanner, which will allow you to collect data and quickly get more blueprints to create new gear after scanning wreckage. The graphics are amazing. It's beautiful and truly immersive. I really got hooked on the gameplay. Wanting to create just one more tool or piece of gear is addicting. I found it hard to stop playing. Since this is a VR port of a flat-screen game, that comes with the advantage of being a huge game with tons to do and see. I've barely scratched the surface and you can eventually build underwater craft and habitats. The downside is that there's no motion controller support, which is a bummer because that would make this game so much more immersive if you could use your hands. If you don't mind the lack of motion controller support, then this is an engaging survival experience with a huge amount of gameplay. The price is $25.
Blade and Sorcery is an interesting one because ironically, it isn't one of my personal favorites. I'll explain why in a minute. But this game has single-handedly changed the landscape of VR melee combat forever. This game is pure melee violence. It's all about arena combat, which normally does sound shallow and a little boring, but the sheer realism of the melee mechanics make it exceptional. All of the movement and contact with the enemy is legit. The blocking, swinging and striking feels true in a way I haven't really felt before. During combat, you can activate slow motion, which is really nice when you get overwhelmed with multiple enemies. It's tempting to compare this to Gorn, but I think there's two key differences, one being that you can cast magic in this game. The other key difference is the more realistic design of the enemy. In Gorn, it feels like you're killing stuffed cartoons, but here the enemy feels more realistic. Now I normally don't mind violence in video games, but this felt so realistic that I have to admit, it gave me some pause. Like wondering at what point does this crossover from a game to a simulator. I do enjoy fantasy violence, but I don't enjoy the feeling of actually killing another human being. This feels too real for me. The irony that I am including it in my top 10 isn't lost on me though. I'm including it because the combat mechanics are so good that it sets a whole new bar for VR combat moving forward. For that reason, I'm especially excited for the upcoming Boneworks game because that will also have advanced melee mechanics, but in a more pretend fantasy way. [Music]
In my opinion, Tin Hearts is the single most underrated VR game out there. It's one of the most beautiful VR games I've ever played, but it has so few reviews on Steam and I never hear anyone else covering it in the VR landscape. It's fundamentally a lemmings game, but I also find it to be a relaxing and meditative experience at the same time. Tiny toy soldiers marched forward and it's up to you to guide their path to the goal. You don't control the toy soldiers directly, you need to change other objects to steer them, starting with just simple blocks to make them turn, but eventually, you'll be manipulating other toys to steer them. And there's some creative contraptions that get involved as well. The levels start small but eventually you'll need to guide the soldiers through large toy shops. Sprinkled throughout you'll get lots of back story via reenactments and spoken letters. You can play seated or standing and for both modes, there's additional height adjustment so you can set it however you like. This game bleeds production quality. The visuals are outstanding and the animation is top-tier, even down to the way they crash on the floor and die. Which brings me to the time control. You can pause, fast-forward and rewind time, even after you've changed their paths. The ambiance is absolutely beautiful. It's a delightful place to dwell in. It's easy to take your time in this game because simply living in these toy shops is half the fun. This is the best lemmings game I've ever played. This early access version of the game I beat in three hours. The price is 20 bucks. [Music]
Windlands 1 was a Zen exploration and item hunting game, with a unique grappling hook traveling mechanic. Windlands 2 keeps the same unique grappling hook movement, but it's now a full-blown story campaign with exciting combat. In a beautiful abstract world, robots have run amok, so it's up to you to destroy them. The various tasks and missions begin by talking to an NPC. After hearing their story, you're given a quest marker so you know where to go. You'll be engaged in both combat missions and fetch quests, but even between combat missions when you're going from point A to point B, you'll have a good time, because simply traveling with the grappling hooks is enjoyable. The combat takes a while to get used to because you have to mentally juggle the grappling hook swinging and archery at the same time. But once you get used to it, it becomes second nature. The controls are completely customizable, so if you don't like the default controls you can make any button do whatever you want. There's both regular enemies and boss battles. The boss battles I found especially fun, swinging around to avoid fire while trying to aim arrows on the boss's weak spots, is super engaging. The later boss fights become massive engagements, giant ships to take down inside vast arenas. It took me about four hours to beat the whole campaign and I really enjoyed this because, Like I said, simply traveling with the grappling hooks is enjoyable and fun, especially with the sound design and music. They really nailed the audio mood of fantasy exploration and travel. [Music] Oh and I forgot to mention, you can play the campaign in single-player or co-op multiplayer. And after you beat the campaign, there are racing modes and hidden collectibles to find as well. Windlands 1 was fun, but it felt like half of a full game. Windlands 2 has nailed it. It's a must-own in your VR library. The price is $30. And if you only buy one game on this list make it this one.
Well, that's it for now. Thanks so much for watching. If you like what you see, please subscribe. See ya. [Music] you [Music]
Tasks and Deliverables
Tasks and Deliverables
Assignment:
The homework assignment for this lesson is to reflect on the City Builder game and think about different VR specific locomotion and interaction mechanics that can be added to it to turn it into a VR experience. You are required to write a proposal on how you think City Builder can be transformed into a VR experience.
Note that you have absolute freedom to change the conceptual design of City Builder for your new design proposal.
Task:
You are free to explore a large amount of content on the web that demos different locomotion and interaction mechanics used in VR games and other VR experiences and select the ones that you think would make City Builder a good VR experience. For each mechanic that you want to include in City Builder, write a short description of that mechanic including a screenshot or a video, why do you think it will be a good fit for City Builder, and if applicable, what existing mechanic it will replace. You are required to propose at least two locomotion mechanics (to not be used simultaneously, but interchangeably), and two interaction mechanics. Feel free to change any aspect of City Builder if you think doing so will enrich users’ experience in VR. For instance, instead of a top-down camera, you can propose to use a first-person camera, or instead of selecting buildings from a GUI menu you can propose that users could grab buildings from a pallet of items they hold in one hand.
Deliverable:
Write a two- to three-page report on your proposed changes to the City Builder.
Due Date:
This assignment is due on Tuesday at 11:59 p.m.
Grading Rubric
| Criteria | Full Credit | Half Credit | No Credit | Possible Points |
|---|---|---|---|---|
| Explanation of two locomotion mechanics to be used in your proposed design and justification as to why they are good choices | 2 pts | 1 pts | 0 pts | 2 pts |
| Explanation of two interaction mechanics to be used in your proposed design and justification as to why they are good choices | 2 pts | 1 pts | 0 pts | 2 pts |
| Write up is well thought out, researched, organized, and clearly communicates why student selected the proposed mechanics | 6 pts | 3 pts | 0 pts | 6 pts |
| Total Points: 10 |
Summary and Tasks Reminder
Summary and Tasks Reminder
In this lesson, you experienced what it takes to create a very simple game in Unity. You used some of the more advanced features of Unity such as AI and experienced setting up a semi-complex scene in the editor. Furthermore, you were provided with some slightly complex C# scripts that made the City Builder game come alive and were explained the interrelations among the scripts. In the second part of the lesson, you were introduced to the most common locomotion and interaction mechanics used in VR development. We hope that this lesson has helped to broaden your knowledge on the design and development of virtual experiences in Unity and the more novel interaction and locomotion mechanics employed in VR experiences these days.
Reminder - Complete the task on Lesson 9!
You have reached the end of Lesson 9! Double-check the to-do list on the Lesson 9 Overview page to make sure you have completed the activity listed there.