Undergrad
Undergrad Syllabus
Syllabus: Undergrad Course
GEOG 497: 3D Modeling and Virtual Reality
Spring 2022
It is essential that you read this entire Syllabus document as well as the material covered in the Course Orientation. Together these serve as our course "contract."
Instructor

Instructor: Mahda M. Bagher, PhD
Office: Remote
Department of Geography, College of Earth and Mineral Sciences, The Pennsylvania State University
- E-mail: mmm6749@psu.edu [1]. Please use the course e-mail system (see the Inbox in Canvas).
- Office Hours: Fridays 12:00 PM-2: 00 PM and by appointment via Zoom
NOTE: I will read and respond to e-mail and discussion forums Frequently.
Class Support Services
Penn State Online [2] offers online tutoring to World Campus students in math, writing, and some business classes. Tutoring and guided study groups for residential students are available through Penn State Learning [3].
Course Overview
Description: 3D Modeling and VR for the Geospatial Sciences is an introductory-level science course that introduces students to emerging topics at the interface of concepts and tools that capture/sense environmental information (e.g., LiDAR) and concepts/tools that allow for immersive access to geospatial information (e.g., HTC Vive). The course offers a high-level perspective on the major challenges and opportunities facing the development of current 3D technologies, differences between classic modeling and procedural rule-based modeling, the development of VR technologies, the role of game engines in the geospatial sciences. Topics that will be covered include an introduction to the 3D Modeling and 3D sensing technologies, 360 degree cameras, VR apps and tools, workflows how to integrate environmental information into VR environments, an introduction to procedural rule modeling, hands-on experience in creating 3D models of Penn State Campus, the creation of a virtual Penn State Campus, accessing and exploring a virtual campus in Unity (game engine), and the export of flyovers to platforms such as YouTube 360.
Prerequisites and concurrent courses: None.
Course Objectives
When students successfully complete this course, they will be prepared to:
- Understand and apply the concepts of 3D modeling and VR, they will be in a position to distinguish concepts such as virtual, mixed, and augmented reality.
- Explain and implement workflows to created 3D content from existing and historic and future environments.
- Use a variety of software solutions for 3D model creation such as SketchUp, CityEngine (theoretical), Unity.
- Understand the emerging possibilities of environmentally sensed information.
- Create 3D models and make them accessible in an interactive way through the use of game engines. Evaluate scenarios for the future of food considering resilience in the context of climate change, human population growth and socio-economic, and cultural factors.
Expectations
On average, most students spend 12-15 hours per week working on course assignments. Your workload may be more or less depending on your study habits.
I have worked hard to make this the most effective and convenient educational experience possible. The Internet may still be a novel learning environment for you, but in one sense it is no different from a traditional college class: how much and how well you learn is ultimately up to you. You will succeed if you are diligent about keeping up with the class schedule and if you take advantage of opportunities to communicate with me as well as with your fellow students.
Specific learning objectives for each lesson and project are detailed within each lesson. The class schedule is published under the Calendar tab in Canvas (the course management system used for this course).
Required Course Materials
Required textbooks: None
Recommended textbooks:
There are numerous books relevant to the course content. Resources are added throughout the course allowing students to follow up on specific topics.
Required materials:
D-scope Pro Google Cardboard Kit with Straps may be purchased online [4].
Online lesson content
All other materials needed for this course are presented online through our course website and in Canvas. In order to access the online materials, you need to have an active Penn State Access Account user ID and password (used to access the online course resources). If you have any questions about obtaining or activating your Penn State Access Account, please contact the World Campus Helpdesk [5].
Assessment: Assignments, Quizzes, and Exams
This course relies on a variety of methods to assess and evaluate student learning, including:
- Practical assignments - Assignments are required for each module that require students to demonstrate their understanding of topics and processes presented in each module.
- Reflective writing assignments - These writing assignments ask students to reflect on various aspects of the topics and technologies presented in the course.
- Participation - Class participation is important. Students will be expected to join the discussions on topics related to the course.
Citation and Reference Style
I personally prefer APA as a citation style but as long as you are complete and consistent you may choose any style.
It is important that your work is submitted in the proper format to the appropriate Canvas Assignment or Discussion Forum and by the designated due date. I strongly advise that you not wait until the last minute to complete these assignments—give yourself time to ask questions, think things over, and chat with others. You will learn more, do better...and be happier!
Due dates for all assignments are posted on the mini-syllabus and course calendar in Canvas.
Grading
| Assignments | Percent of Grade |
|---|---|
| Practical assignments | 60% |
| Reflective writing assignments | 30% |
| Participation | 10% |
| Total | 100% |
I will use the Canvas gradebook to keep track of your grades. You can see your grades in the Grades page of Canvas. Overall course grades will be determined as follows. Percentages refer to the proportion of all possible points earned.
| Letter Grade | Percentages |
|---|---|
| A | 93 - 100 % |
| A- | 90 - 92.9 % |
| B+ | 87 - 89.9 % |
| B | 83 - 86.9 % |
| B- | 80 - 82.9% |
| C+ | 77 - 79.9 % |
| C | 70 - 76.9 % |
| D | 60 - 69.9 % |
| F | < 60 % |
| X |
Unsatisfactory (student did not participate) |
Curve
I am not planning to curve grades.
Late Policy
I do not accept any "late work." In exceptional circumstances, you should contact me. The earlier you contact me to request a late submission, the better. Requests will be considered on a case-by-case basis. Generally, late assignments will be assessed a penalty of at least 25% and will not be accepted more than one week after the original due date.
GEOG 497 Course Schedule
Below you will find a summary of the primary learning activities for this course and the associated time frames. This course is 15 weeks in length, including an orientation. See our Calendar in Canvas for specific lesson time frames and assignment due dates.
Weekly schedule: Lessons open on Mondays. The close date might vary depending on the course difficulty. Initial discussions posts are due on Saturday, with all discussion comments due by Tuesday. All other assignments are due on Sundays. I expect you to participate in the online discussion forums as they count toward your participation grade.
NOTE: See the CANVAS Calendar tab for a full semester calendar of events.
| Date: | Week 1 |
|---|---|
| Topics: |
|
| Readings: |
|
| Assignments: |
|
| Date: | Week 2 |
|---|---|
| Topics: |
|
| Readings: |
|
| Assignments: |
|
| Date: | Week 3 |
|---|---|
| Topics: |
|
| Readings: |
|
| Assignments: |
|
| Date: | Week 4 |
|---|---|
| Topics: |
|
| Readings: |
|
| Assignments: |
|
| Date: | Week 5 |
|---|---|
| Topics: |
|
| Readings: |
|
| Assignments: |
|
| Date: | Week 6 |
|---|---|
| Topics: |
|
| Readings: |
|
| Assignments: |
|
| Date: | Week 7 |
|---|---|
| Topics: |
|
| Readings: |
|
| Assignments: |
|
| Date: | Week 8 |
|---|---|
| Topics: |
|
| Readings: |
|
| Assignments: |
|
| Date: | Week 9 |
|---|---|
| Topics: |
|
| Readings: |
|
| Assignments: |
|
| Date: | Week 10 |
|---|---|
| Topics: |
|
| Readings: |
|
| Assignments: |
|
| Date: | Week 11 |
|---|---|
| Topics: |
|
| Readings: |
|
| Assignments: |
|
| Date: | Week 12 |
|---|---|
| Topics: |
|
| Readings: |
|
| Assignments: |
|
| Date: | Week 13 |
|---|---|
| Topics: |
|
| Readings: |
|
| Assignments: |
|
| Date: | Week 14 |
|---|---|
| Topics: |
|
| Readings: |
|
| Assignments: |
|
| Date: | Week 15 |
|---|---|
| Topics: |
|
| Readings: |
|
| Assignments: |
|
Technical Requirements
For this course, we recommend the minimum technical requirements outlined on the World Campus Technical Requirements [11] page, including the requirements listed for same-time, synchronous communications. If you need technical assistance at any point during the course, please contact the IT Service Desk [12].
Internet Connection
Access to a reliable Internet connection is required for this course. A problem with your Internet access may not be used as an excuse for late, missing, or incomplete coursework. If you experience problems with your Internet connection while working on this course, it is your responsibility to find an alternative Internet access point, such as a public library or Wi-Fi ® hotspot.
Course Policies
Instructor Information - Mahda
Mahda M. Bagher
Mahda is a doctoral candidate in Geography, specializing in GIS and Immersive technologies. She is part of the team at the Center for Immersive Experiences. Her interest is in facilitating embodied learning through designing immersive learning experiences in immersive VR. she is specifically interested in research related to memory and embodied cognition in the field of education. Her main focus has been on embodiment in the context of geospatial data visualization in VR. She also works on procedural modeling, rebuilding historical data, and integrating geospatial data in VR, including LiDAR data, DEM, shapefiles, raster data, and any point clouds. She has received several awards for academic and research achievement in her graduate research, most notably the William and Amy Easterling Outstanding Graduate Research Assistant Award and the Willard Miller Award, 1st place for the Ph.D. proposal. She will be graduating in May 2022.
Lesson 4 Tasks and Deliverables
Tasks and Deliverables
Models
This assignment has three tasks associated with it. The first task will prepare you to complete the other two successfully.
Task 1: Compare the two models of Penn State’s University Park Campus
Explore the models and software websites provided below. Working through the questions will help you prepare for Tasks 2 and 3. By now these models should be familiar to you, but you may want to take some notes to help you organize your thoughts and keep everything straight.
- What are the pros and cons of procedural modeling in comparison to hands-on modeling?
- What are the layers that have been modeled in the procedural model (Model 1)?
- Click on one of the buildings or trees in Model 1. What happens? What types of information you can get from each shape?
- Can you find the name of some tree species in the procedural model (Model 1)?
- What are the differences between hands-on models and procedural models in terms of levels of detail?
Model 1 [13]
Procedural model created at ChoroPhronesis [14] Lab using ESRI CityEngine [15] and CGA Shape Grammar rules. This model is shared with you using CE WebScene. You can turn layers on and off, zoom, rotate and explore the part of campus modeled.
Video: Procedural_2015_Jade1 (00:00)
Note: This interface may take a while to load. Please be patient. To see the full-size interface with additional options click the Model 1 link [13].
Model 2 [16]
Historical campus models (1922) created at ChoroPhronesis [14] Lab using Sketchup. These models are combined in ESRI CityEngine [15] with trees and base map generated using procedural rules. This model is shared with you as a flythrough YouTube video.
Video: Penn State campus in 1922 flythrough (non-360-degree version) (2:01) This video is not narrated.
If you want to see a larger version of the video, click the Model 2 link [16]. [17]
Task 2: Start a discussion
After reviewing the models and taking notes, start a discussion on what you believe the advantages and disadvantages are for each of the approaches. Make sure that you comment on each other's posts to help each other better understand the nuances and details of each one. Remember that participation is part of your final grade, so commenting on multiple peers' posts is highly recommended. Please also make sure to use information from the reading assignment on Shape Grammars.
Post your response to the Lesson 4 Discussion (models) discussion.
Task 3: Write a one-page paper
Once you have posted your response and read through your peers' comments, synthesize your thoughts with the comments and write a one-page paper max about the different approaches.
Submitting your Deliverable
Once you are happy with your paper, upload it to the Lesson 4 Assignment: Reflection Paper.
Grading Rubric
| Criteria | Full Credit | Half Credit | No Credit | Possible Points |
|---|---|---|---|---|
| Clearly names and describes advantages and disadvantages, including time, learning curve, accessibility, applicability, flexibility, etc. | 10 pts | 5 pts | 0 pts | 10 pts |
| Names areas of application that are best suited to each of the approaches | 3 pts | 1.5 pts | 0 pts | 3 pts |
| The document is grammatically correct, typo-free, and cited where necessary | 2 pts | 1 pts | 0 pts | 2 pts |
| Total Points: 15 |
Lesson 5 Overview
Overview
In this module, you will build a 2D map of the University Park campus including buildings, trees, roads, walkways, and a digital elevation model (DEM). You will learn how to convert 2D maps to 3D presentations. Then procedural symbology that we have created for you in CityEngine will be imported and applied to the 3D map to create a realistic scene.
Learning Outcomes
By the end of this lesson, you should be able to:
- Explain options for 3D modeling within Arc GIS Pro
- Understand ArcGIS Pro's integrated 2D–3D environment (Local and Global Scenes)
- Convert a 2D map to a 3D scene
- Explain 3D symbology
- Extrude features to 3D symbology
- Find an example of a 3D CityEngine/ArcGIS Pro model: campus model
- Compare procedural modeling rules (.cga) vs procedural rule package (*.rpk)
- Create a 3D model of elevation (DEM)
- Create a 3D scene from a 2D building footprints of campus-based on the DEM
- Employ a procedural rule symbology based on the rule package
- Link procedural rule symbology to attributes table
- Distinguish static modeling from procedural modeling
- Restructure the map and represent the 3D scene based on the imported model
Lesson Roadmap
| To Read |
|
|---|---|
| To Do |
|
Questions?
If you have any questions, please post them to our "General and Technical Questions" discussion (not e-mail). I will check that discussion forum daily to respond. While you are there, feel free to post your own responses if you, too, are able to help out a classmate.
Lesson 5 Tasks and Deliverables
Tasks and Deliverables
This Lesson tasks have 4 parts.
Part 1: Participate in a Discussion
Please reflect on your 3D modeling experience, using ArcGIS Pro; anything you learned or any problems that you faced while doing your assignment as well as anything that you explored on your own and added to your 3D modeling experience.
Instructions
Please use Lesson 5 Discussion (Reflection) to post your response to reflect on the options provided above and reply to at least two of your peer's contributions.
Please remember that active participation is part of your grade for the course.
Due Dates
Your post is due Saturday to give your peers time to comment. All comments are due by Tuesday at 11:59 p.m.
Part 2:Assignment: Reflection Paper
Instructions:
Once you have posted your response to the discussion and read through your peers' comments, write a one-page reflection paper on your experience in 3D modeling with the following deliverables as proof that you have completed and understood the process of 3D modeling for Campus.
Due Dates
Your assignment is due on Tuesday at 11:59 p.m.
Submitting Your Deliverables
Please submit your completed paper and deliverables to the Lesson 5 Graded Assignments.
Grading Rubric
| Criteria | Full Credit | Half Credit | No Credit | Possible Points |
|---|---|---|---|---|
| Paper clearly communicates the student's experience developing the 3D model in ArcGIS Pro | 5 pts | 2.5 pts | 0 pts | 5 pts |
| The paper is well thought out, organized, contains evidence that student read and reflected on their peer's comments | 4 pts | 2 pts | 0 pts | 4 pts |
| The document is grammatically correct, typo-free, and cited where necessary | 1 pts | .5 pts | 0 pts | 1 pt |
| Total Points: 10 |
Part 3: Assignment: ArcGIS Pro
If you followed the directions as you were working through this lesson, you should already have most of the last part done.
If you haven't already submitted your deliverable for this part, please do it now. You can paste your screenshots into one file or zip all of the PDFs and upload that. Task 2 will need to be a PDF, so either way, you will have two files to zip.
- Task 1: a screenshot of all layers symbolized for UP Campus (end of Section 2)
- Task 2: print a PDF map of Smoothed_DEM Layer with a legend showing the minimum and maximum elevation (end of Section 3).
Grading Rubric
| Criteria | Full Credit | No Credit | Possible Points |
|---|---|---|---|
| Task 1: Screenshot of all layers symbolized for UP Campus correct and present | 3 pt | 0 pts | 3 pt |
| Task 2: PDF map of Smoothed_DEM Layer with a legend showing the minimum and maximum elevation correct and present | 5 pt | 0 pts | 5 pt |
| Total Points:8 |
Part 4: Assignment: 3D Campus
- Task 3: print a PDF map of your 3D campus with realistic facades and trees or simply create a screenshot (end of Section 5.3)
- Task 4: print a PDF map of your 3D campus with schematic facades and analytical trees or simply create a screenshot (end of Section 5.4)
Grading Rubric Criteria Full Credit No Credit Possible Points Task 3: PDF map of your 3D campus with realistic facades and trees or simply create a screenshot correct and present5 pt 0 pts 5 pt Task 4: PDF map of your 3D campus with schematic facades and analytical trees or simply create a screenshot correct and present 5 pt 0 pts 5 pt Total Points: 10
Lesson 6 Tasks and Deliverables
Tasks and Deliverables
Assignment
This assignment has 4 parts, but if you followed the directions as you were working through this lesson, you should already have most of the first part done.
Part 1: Submit Your Deliverables to Lesson 6 Assignment: 3D Spatial Analysis
If you haven't already submitted your deliverable for this part, please do it now. You need to turn in all four of them to receive full credit. You can paste your screenshots into one file, or zip all of the PDFs and upload that. Make sure you label all of your tasks as shown below.
- Task 1: Screenshot of flooded Old Main (End of Section 1).
- Task 2: Screenshot of Campus with gradual symbology of SunShadow_January1 (End of Section 2.2)
- Task 3: Screenshot of ground shadow surface of Nursing Sciences Building (End of Section 2.3)
- Task 4: Screenshot of attributes of ground shadow surface of Nursing Sciences Building (End of Section 2.3)
Grading Rubric Criteria Full Credit No Credit Possible Points Task 1: Screenshot of flooded Old Main 4 pts 0 pts 4 pts Task 2: Screenshot of Campus with gradual symbology of SunShadow_January1 2 pts 0 pts 2 pts Task 3: Screenshot of ground shadow surface of Nursing Sciences Building 2 pts 0 pts 2 pts Task 4: Screenshot of attributes of ground shadow surface of Nursing Sciences Building 2 pts 0 pts 2 pts Total Points: 10
Part 2: Participate in a Discussion
Please reflect on your 3D spatial analysis experience, using ArcGIS Pro; anything you learned or any problems that you faced while doing your assignment as well as anything that you explored on your own and added to your 3D spatial analysis experience.
Instructions
Please use Lesson 6 Discussion (Reflection) to post your response to reflect on the options provided above and reply to at least two of your peer's contributions.
Please remember that active participation is part of your grade for the course.
Due Dates
Your post is due Saturday to give your peers time to comment. All comments are due by Tuesday at 11:59 p.m.
Part 3: Submit Your Deliverable to Lesson 6 Assignment: Google Earth
Instructions
Upload "UniversityParkCampus_Shadow.kmz" to the Lesson 6 Assignment: Google Earth.
Due Dates
Please upload your assignment by Tuesday at 11:59 p.m.
| Criteria | Full Credit | Half Credit | No Credit | Total |
|---|---|---|---|---|
| The KMZ file has all three shadows | 8 pts | 4 pts | 0 pts | 8 pts |
| Total points: 8 pts |
Part 4: Write a Reflection Paper
Instructions
Once you have posted your response to the discussion and read through your peers' comments, write a one-page paper reflecting on what you learned from working through the lesson and from the interactions with your peers in the Discussion.
Due Dates
Please upload your paper by Tuesday at 11:59 p.m.
Submitting Your Deliverables
Please submit your completed paper to the Lesson 6 Assignment: Reflection Paper.
Paper Grading Rubric
| Criteria | Full Credit | Half Credit | No Credit | Possible Points |
|---|---|---|---|---|
| Paper clearly communicates the student's experience developing the 3D spatial analysis in ArcGIS Pro. | 5 pts | 2.5 pts | 0 pts | 5 pts |
| The paper is well thought out, organized, contains evidence that student read and reflected on their peers' comments. | 3 pts | 1 pts | 0 pts | 3 pts |
| The document is grammatically correct, typo-free, and cited where necessary. | 2 pts | 1 pts | 0 pts | 2 pts |
| Total Points: 10 |
Lesson 7 overview
Overview
In this and the next two lessons, you will be working with the Unity3D game engine, simply referred to as Unity throughout the rest of the course. Unity is a rather complex software system for building 3D (as well as 2D) computer games, and other 3D applications. Hence, we will only be able to scratch the surface of all the things that can be done with Unity in this course. Nevertheless, you will learn quite a few useful skills related to constructing 3D and VR applications in Unity dealing with virtual environments. Furthermore, you will become familiarized with C# programming (the main programming language used in this engine) through a series of exercises that guide you on developing your first interactive experience in a game engine.
This lesson will begin with an overview to acquaint you with the most important concepts and the interface of Unity. It will cover basic project management in Unity, the Project Editor interface, manipulation of a 3D scene, importing 3D models and other assets, and building a stand-alone Windows application from a Unity project. Moreover, you will learn how to create a very simple “roll-the-ball” 3D game using C#, which will prepare you for more advanced interaction mechanics we will be implementing in the next lessons.
Learning Outcomes
By the end of this lesson, you should be able to:
- Explain the role of interaction for 3D/VR projects and the role of game engines for enabling access to 3D models
- Create 3D projects in Unity3D, import 3D models, and understand the basic concepts and interface elements of the Unity editor
- Manipulate scenes and add script components to game objects
- Import custom Unity packages into a unity project
- Develop a basic understanding of the physics engine of Unity (e.g. gravity, collision detection)
- Run projects inside Unity and build stand-alone applications from them
- Have a basic understanding of how to make an experience come “alive” by programming behaviours for game objects
Lesson Roadmap
| To Read |
|
|---|---|
| To Do |
|
Questions?
If you have any questions, please post them to our "General and Technical Questions" discussion (not e-mail). I will check that discussion forum daily to respond. While you are there, feel free to post your own responses if you, too, are able to help out a classmate.
Lesson 7 Tasks and Deliverables
Tasks and Deliverables
Assignment 1:Unity 3D/VR Application Review
Search the web for a 3D (or VR) application/project that has been built with the help of Unity. The only restriction is that it is not one of the projects linked in the list above and not a computer game. Then write a 1-page review describing the application/project itself and what you could figure out how Unity has been used in the project. Reflect on the reasons why the developers have chosen Unity for their project. Make sure you include a link to the project's web page in your report.
| Criteria | Full Credit | Half Credit | No Credit | Possible Points |
|---|---|---|---|---|
| URL is provided, the application/project uses Unity, is not already listed on this page, and is not a game. | 2 pts | 1 pts | 0 pts | 2 pts |
| The report clearly describes the purpose of the application/project and the application itself. | 3 pts | 1.5 pts | 0 pts | 3 pts |
| The report contains thoughtful reflections on the reasons why Unity has been chosen by the developers. | 3 pts | 1.5 pts | 0 pt | 3 pts |
| The report is of the correct length, grammatically correct, typo-free, and cited where necessary. | 2 pts | 1 pts | 0 pts | 2 pt |
| Total Points: 10 |
Assignment 2: Create the walkthrough of the Old Main
To practice Unity project management, scene editing, and project building, we want you to apply the steps from this walkthrough: Using Unity to Build a Stand-Alone Windows Application [18].
Please set up a new Unity project for this assignment. Then follow the steps from the walkthrough to add the building model to the scene, make sure that the lighting source and camera are placed in a reasonable way relative to the building model, and make the camera keyboard controlled. In the end, build a stand-alone Windows application from your project.
Deliverable 1
Three screenshots should be taken in Play(!) mode showing the entire Unity editor window. Each screenshot should show the building from a different perspective. The keyboard control of the camera will allow you to navigate the camera around to achieve this.
Deliverable 2
Uploading the zip file of the Windows stand-alone application you built (consisting of both the .exe file and the ..._Data folder) or a link to the uploaded zip file on clouds such as OneDrive or Dropbox.
| Criteria | Ratings | Pts | ||
|---|---|---|---|---|
|
This criterion is linked to a Learning OutcomeThree screenshots in Play(!) mode showing the building from three different perspectives. |
|
2 pts |
||
|
This criterion is linked to a Learning OutcomeLight source and camera are placed in a reasonable way relative to the building. |
|
2 pts |
||
|
This criterion is linked to a Learning OutcomeExtendedFlycam script for keyboard control has been applied correctly. |
|
2 pts |
||
|
This criterion is linked to a Learning OutcomeWorking Windows stand-alone application. |
|
4 pts |
||
|
Total Points: 10 |
||||
Assignment 3: “Roll-the-ball” Game
The homework assignment for this lesson is to report on what you have done in this lecture. The assignment has two tasks and deliverables with different submission deadlines, all in week 8, as detailed below. Successful delivery of the two tasks is sufficient to earn the full mark on this assignment. However, for efforts that go "above & beyond" by improving the roll-the-ball game, e.g. create a more complex play area -like a maze- instead of the box, and/or make the main camera follow the movement of the ball, you could be awarded one point if you fall short on any of the other criteria.
To help with the last suggested extra functionality, use the following script and attach it to the main camera:
using System.Collections;
using System.Collections.Generic;
using UnityEngine;

public class FollowBall : MonoBehaviour
{
    // reference to the ball game object
    public GameObject Ball;

    // a vector3 to hold the distance between the camera and the ball
    public Vector3 Distance;

    // Start is called once before the first frame update
    void Start()
    {
        // assign the ball game object
        Ball = GameObject.Find("Ball");

        //calculate the distance between the camera and the ball at the beginning of the game
        Distance = gameObject.transform.position - Ball.transform.position;
    }
    // This called after the Update finishes
    void LateUpdate()
    {
        // after each frame set the camera position, to the position of the ball plus the original distance between the camera and the ball
// replace the ??? with your solution
        gameObject.transform.position = ???;
    }
}
If you follow the detailed instructions provided in this lecture, you should be able to have a fully working roll-the-ball game.
Deliverable 1: Create a unity package of your game and submit it to the appropriate Lesson 7 Assignment.
You can do this by simply going to the Assets in the top menu and then selecting “Export Package”.
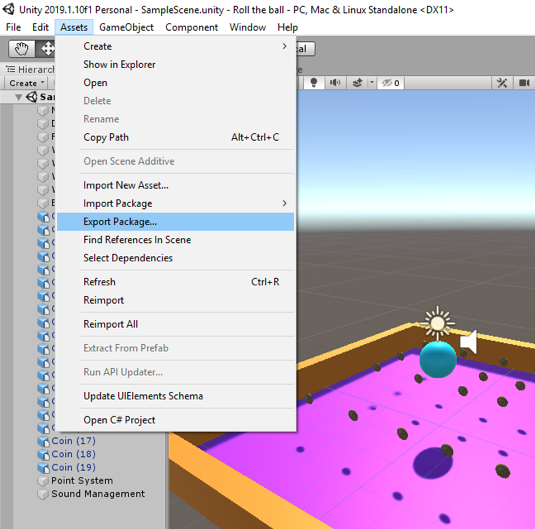
Make sure all the folders and files of your project are checked and included in the package you export (you can test this and import your package in a new Unity project to see if it runs).

If you choose to implement the functionality of the main camera to follow the ball movement, please explain your solution as a comment in your script. You can add comments (texts in green) in C# by using “//”.
Helpful advice:
We highly recommend that, while working on the different tasks for this assignment, you frequently create backup copies of your Unity project folder so that you can go back to a previous version of your project if something should go wrong.
| Criteria | Full Credit | Half Credit | No Credit | Possible Points |
|---|---|---|---|---|
| Your game runs smoothly and as intended without any errors or strange behavior | 6 pts | 3 pts | 0 pt | 6 pts |
| Your project is complete and has all the required functionalities (coin rotation, collection, and sound effect). | 3 pts | 1.5 pts | 0 pt | 3 pts |
| Your Unity package has a proper folder structure, and all the files have meaningful names like it was done in the instructions | 1 pt | .5 pts | 0 pts | 1 pt |
| Total Points: 10 |