Lesson 8.5: Fire in the Hole
Lesson 8.5: Fire in the Hole
Prior to setting off a blast, the blaster would yell, “fire in the hole – fire in the hole – fire in the hole.” This still occurs today, but not as frequently because loud sirens or whistles are often used instead. After the annunciation, whether by voice or siren, the blaster throws the switch or depresses a plunger to set off the blast. Or, in the good days, a third option would have been to strike a match or light a fuse! But what is going on here?
We know that we need an “initiator” to set off an explosive, something like a blasting cap for example. However, we also know that many of the blasting agents in common use today are not cap sensitive, and consequently, we need to use a primer. The cap, or whatever initiator we use, sets off the primer, which then sets off the blasting agent or explosive. Finally, you will recall that there are times when we are concerned that the explosion will not continue due to the length of the explosive column or the use of decking, for example, and in those cases, we add boosters. And in some cases, we will actually have multiple boosters in the hole.
We’ve talked at length about explosives. Now, let’s spend some time with initiators!
8.5.1: Initiation of the Blast
8.5.1: Initiation of the Blast
Initiators contain high explosives that will detonate upon receiving an appropriate “signal.” If the blasting agent is cap-sensitive, then this action will set off the explosion. If it is not cap-sensitive, then the initiator will set off a primer, which will set off the blasting agent. In a typical pattern, there are many holes and each will have an initiator, and all of these holes need to be connected together, and a line must then be run to a safe location where the blaster will “throw the switch.”
Let’s talk about these initiators, their connection back to the blaster, and the method that the blaster uses to start the chain reaction.
Initiators can be classified into three categories. The categories and their primary characteristics are as follows:
- non-electric (75% of market and decreasing):
- immune to stray electricity,
- water is less of a problem than with other types,
- modest cost advantage, i.e., lower cost than other types;
- electronic (20% of market and increasing):
- allows for precise timing and sequencing,
- enhanced site security,
- immune to stray electricity,
- higher first cost and more complicated to use;
- electric (5% of market and decreasing):
- historically offered better control of timing and sequencing over non-electrics,
- simplicity in use,
- lack of site security,
- susceptible to stray electricity.
Non-Electric Initiation
The predominate non-electric system uses shock tube and a non-electric blasting cap. Shock tube is plastic tube with a thin coating of a high explosive (think of a plastic drinking straw in which the inner wall of the straw has a thin coating of high explosive). Specially made plastic block connectors are used to join different lines (shock tubes) together; and, if desired, delays can be inserted at these connector blocks as well. Shock tube is set off with a machine that creates a spark or a mechanical device such as a spring-loaded hammer that strikes a starter resembling the tiny button primer at the base of a shotgun shell. Today, shock tube is used almost exclusively within the non-electric category. I don’t want to unnecessarily confuse the issue, but be aware that the nonelectric blasting caps used with shock tube can contain a pyrotechnic or an electronic time-delay mechanism within them. We’ll discuss blasting caps, both non-electric and electric, shortly.
Detonating cord contains a high explosive, such as PETN. It was used for trunk lines and downlines. Lines can be simply knotted together. It is initiated with a blasting cap (electric or nonelectric). The detonation velocity of PETN is 27,000 fps, and it creates a huge air blast. This is a big problem, and as a result, detonating cord has been largely replaced with shock tube.
There are two other types that no longer used in modern operations, but it's interesting to know what they are in case you read or hear about them. They are safety fuse and igniter cord. Allow me to tell you a bit more about safety fuse.
- Safety Fuse is a thin cloth fiber cord with a black-powder core. It has a uniform burn rate, for instance120 sec/yd. By varying the length, you could vary the time delay. Safety fuse was used to set off dynamite. It was also used in a lot of bad old cowboy movies in which a bad guy tied the good guy to a powder keg, and the powder keg was connected to a very long safety fuse. The bad guy lit the safety fuse and rode away. Since the safety fuse burns so slowly, the viewers got to watch it burn for a few minutes, giving the hero just enough time to swoop in and extinguish the safety fuse before it set off the powder keg!
Electronic Initiation
The popularity of electronic initiation is increasing because this system offers significant performance and safety advantages over other systems.
- Electronic caps consist of an electronic chip, a small capacitor, and a high explosive to detonate a primer or a cap sensitive explosive.
- Each electronic cap has a unique serial number with a bar code.
- Electronic caps are wired into the blasting circuit with insulated copper wire.
- An electronic blasting machine is required, and it communicates digitally with each cap.
- The electronic blasting machine is programmed to send a “fire” signal to each cap, based on the cap's serial number, according to a user-determined firing pattern.
- The wired circuit connecting the electronic caps together and to the blasting machine also carries an analog voltage to charge the capacitor in each cap. Charging of the capacitor begins after the blasting machine has “authorized” the cap to fire. The capacitor provides the energy to detonate the high explosive within the cap assembly. The authorization to each cap is possible because the unique serial number of each cap is known. The blaster can use a tag reader to record the serial number of each cap as each hole is loaded. This data can then be downloaded to the blasting machine.
- The time delay is determined electronically on a chip, and this is known as an electronic delay.
- The more precise timing and sequencing can be used to minimize ground vibration as well as to improve the outcome of the blast…but only if the underlying shot design is correct. The improved blasting performance available with an electronic initiation system will offset the higher initial cost of the caps.
- This system affords the user with a high degree of site security – a cap cannot be set off without a special machine and knowledge of the cap’s serial number.
It should be noted here that there is a type of electronic blasting cap that is made for use with shock tube, and that cap offers the advantage of more precise timing, but it does not offer the other benefits inherent to an electronic ignition system.
Electric Initiation
For decades, electric blasting caps were the only choice if you wanted to control more exactly the time delays. However, their susceptibility to stray electricity (think cell phones, two-way radios, and approaching electrical storms) has led to their rapid decline.
- Electric blasting caps have a bridge wire inside of them, embedded in a high explosive. When current from the blasting machine, or stray electricity, flows in the network of copper wires, the bridge wire melts, igniting a column of powder that controls the delay time, which then sets off a high-explosive base charge. This is known as pyrotechnic ignition. The base charge sets off a cap-sensitive blasting agent or a primer.
- The blasting circuit consists of many wires connected in series and in parallel, e.g., leg wires and trunk wires. A circuit analysis must be performed to ensure that sufficient current will be available to ensure a reliable blast.
The following diagram can be very helpful to solidify your understanding. The two different delay options, i.e., pyrotechnic and electronic, can show up in different initiation systems. That is sometimes confusing when you are learning this for the first time. Thus, it really is helpful to examine this diagram until you understand the operating principles and why they are named the way they are.

Historically, time delays were used to control the orderly movement of material through the free faces, as we have discussed; or to limit the amount of explosive being fired at any one time, which reduces the level of ground vibration. The advent of electronic initiation ushered in a new era in which we could more effectively take advantage of the physics.
Traditionally, time delays were available in 25 ms delays, which is adequate for the purposes that time delays have been used. The p and s vibration waves are shown in this figure for two cases: the first using traditional delays; and the second, using electronic delays that allow timing down to 2 ms. This allows us to create a positive interaction with the shock waves, and this gives us improved fragmentation.

It can be shown that the time delay, T, required between holes in a row is:
where:
T = the time delay between holes in a row, ms
S = distance between holes in a row, ft
Vp = compression or sonic wave velocity, ft/s
The row spacing distance used in the equation is the effective spacing, as shown for three different cases here. Note that the definition of a “row” is based on the firing sequence.

The value for Vp can be estimated from tables or by seeking advice from geophysical consultants. The value for Vp not only depends on the type of rock, but also the rock mass characterization. There are a few different characterization schemes in use, such as the Rock Quality Designation (RQD) or the Rock Mass Rating (RMR), but, in general, they take into account the number and spacing of the joints, the competency of the rock, and other characteristics of the rock mass. If you want a number for Vp so that you play with the equation, use 10,000 fps.
The potential for using electronic initiators to take advantage of the wave interaction is just being realized, and will become more common in the future. You now have knowledge of this, and can choose to take advantage of it in your future work.
Earlier in this lesson, I mentioned the idea of limiting the amount of explosive detonated in a given delay interval to lessen the impact of ground vibration. I’d like to look at that in more detail at this time.
8.5.2: Limiting Ground Vibration - Scaled Distance
8.5.2: Limiting Ground Vibration - Scaled Distance
Humans are very sensitive to vibrations and can perceive extremely low levels; and while this may have been an invaluable survival skill a long time ago, today it creates problems for mining and construction companies wanting to conduct blasting as part of their operations. Please don’t misunderstand me: I am not suggesting that we should blast in a way that causes any property damage. Unfortunately, the difference between the level at which people “feel” vibration and the level at which damage occurs is large. Consequently, when people feel vibration, they assume the worst. They look around the house and see a picture on the wall that is no longer straight. Had to be those vibrations! They look more closely, and they see some fine cracks in the plaster on the wall. Well, that’s it; we’ll have no more of this, they’re going to bring down our house!!! Then the angry phone calls, letters, and confrontations with company officials begin. Sometimes, citizens groups emerge, and usually local and sometimes state officials become involved. Mining companies spend more time and money dealing with this than they should! Oh, and when I say mining companies, I mean YOU. If you go to work in a surface mine, chances are good that in your first few years on the job, you will deal with this. So, what’s a person to do?
I have five recommendations.
- First, and foremost, you have to get the engineering right! You have to design your blasts correctly. We’re going to learn how to ensure that the ground vibration levels from your blast are below levels that could create any damage.
- Second, you have to ensure that the drillers and blasters are executing the blast as you designed it.
- Third, you need to be “smart” about when you blast. Most surface mines that are in close proximity to neighborhoods blast once a week. You’re likely to create fewer problems with the neighbors if you blast late morning or early afternoon on a weekday. Blasting around dinner time is a bad idea, as is shooting a round on the weekend!
- Fourth, you and your company should work to have a genuine and positive relationship with the community, as we discussed way back in Module 1. That will help you to navigate these kinds of issues, and, moreover, you may need to spend some time educating the locals on this topic. In fairness to them, they feel the vibrations and they are worried that you are going to damage their house. If they were structural or mining engineers, they wouldn’t be concerned, but they are not, and they are concerned! Educate and inform!
- Fifth, you should give serious consideration to contracting with a consulting geophysical firm that specializes in blasting vibration. They will help you to set up a seismic monitoring program and provide other guidance. Sometimes, neighbors will file damage claims, or raise regulatory issues; and this will happen even though you are certain that the vibration levels were well below any damage threshold. Obviously, you want to ensure that you are not actually causing a problem, but beyond that, you’ll want to establish a paper trail to document that you’ve been doing it properly, and that you could not have caused the loss that is being claimed. And, that's where a geophysical consultant can be a big help to you. There is a company based here in Pennsylvania known as Geosonics / VibraTech. They provide services internationally and are active with our Department and our chapter of SME. I recommend that you peruse their website to get a better feel for the type of services that mining companies use. Here is the link: GeoSonics/Vibratech [1]
Now, I want to focus on the engineering.
Ground vibration at a remote location is a function of the amount of explosive set off within a short time period (a few ms) and the characteristics of the rock mass between the blast holes and the remote location. You cannot change the local geology, and if you are mining stone, for example, it is a safe bet that the rock in your quarry is solidly coupled with the surrounding community; and as a result, any vibration that you create will travel quite well through that bed of limestone to the surrounding neighborhoods.
You can’t change the rock mass. That leaves the amount of explosive fired in a short time as the parameter that you can control. An explosive works by creating shock waves and gas pressure. The more explosive that you set off, the larger the shock wave, which travels through the coupled rock mass, and causes ground vibration. So, by limiting the amount of explosive set off at any one time, you can limit the shock wave. Within a few thousandths of a second, the shock wave will have dissipated, and then you can set off the next group of holes. Earlier, we talked about using time delays to create and effectively use the free face(s). Now, we’re adding a second reason for using time delays in a blast round -- to limit ground vibration (and also airblast).
We characterize the shock wave by its peak particle velocity (ppv) and the frequency of the wave. Both are important, but most of the attention is given to the peak particle velocity. Rattling of windows and dishes, or cracks in a wall can be related to the peak particle velocity. The design question for us is, how much explosive can we fire at one time without exceeding the threshold ppv value at the nearest structure?
We could model the rock mass and use sophisticated geophysical models to predict the level, and there are a few instances where such an effort would be warranted. For example, if the nearest structure is a building that has a piece of multimillion-dollar lab equipment that is extremely sensitive to low levels of vibration, then, we’re going to call in expert consultants, e.g., Geosonics, to perform the analyses. Fortunately, in most cases, we can use engineering approximations. These are normally very conservative, and after we gain some experience with the pattern, we may be able to increase the amount of explosive per time delay with no adverse impact on neighboring structures.
The U.S. Bureau of Mines developed an approximation method, known as scaled distance, to estimate the amount (weight) of explosive that would produce a certain ppv at a specified distance. Over time, this method has been adopted by state and federal regulatory agencies, and these agencies have regulations that require that ground vibration be limited based on either the scaled distance or the peak particle velocity of the shock wave. Usually, you would use the scaled distance to calculate the amount (weight) of explosive that can be fired without exceeding the statutory limit, which is typically a peak particle velocity of 0.5 in/s.
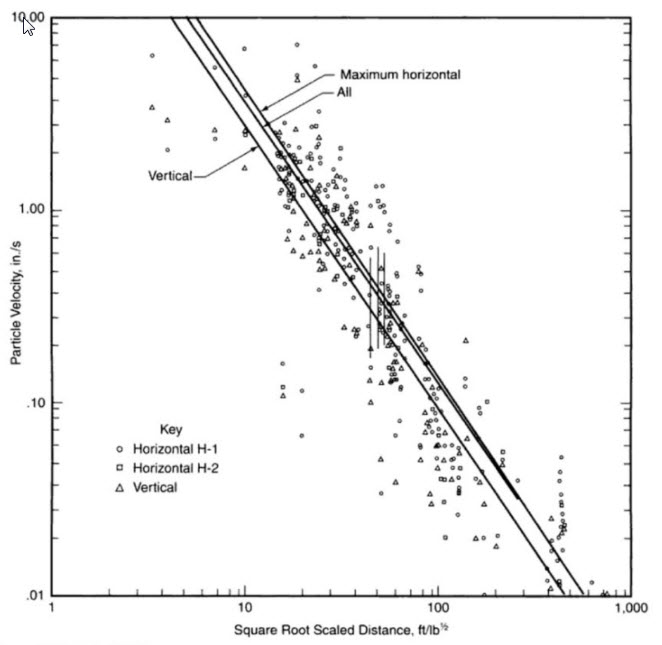
The Bureau of Mines (USBM) conducted hundreds of tests at different surface mines. The sites and surrounding areas were heavily instrumented to record the amplitude and frequency of the vibrations from blasts of varying size. Eventually, they developed a relationship between the peak particle velocity and a quantity they defined as scaled distance.
The scaled distance, S, is a function of the distance to the nearest structure, D, and the charge weight, w, fired within an 8 ms interval.
The units for D and w are ft and lb respectively. The unit for scaled distance, S, is therefore
Rearranging the equation to solve for the charge weight:
If you know the distance to the nearest structure and the scaled distance, you can calculate the charge weight that can be detonated in one delay period without exceeding a particular vibration level. So, let’s look at a plot describing the relationship.
This is a plot of the USBM data points, and each point is defined by the measured peak particle velocity (ppv) and the scaled distance. A good correlation exists as shown. They are actually plotting data from three different geophones, i.e., seismic sensors. The line of interest to us is the one labeled “vertical” because it represents the ground vibration level of interest to us at the structure we are trying to protect.
To continue with our example, let’s say that the nearest structure, which we do not own, is 2500’ from the bench that we are going to blast. The statutory limit for this mine is 0.5 in/s. What is the maximum charge weight per delay period?
Maximum charge weight/delay period:
The computed value for w is the total weight of explosive that can be detonated within a prescribed delay period, which is typically 25ms. Based on the amount of powder in each hole, you can then calculate how many holes can be fired at one time. Suppose, for example, that each hole is 5” in diameter, 45’ deep, and requires 10’ of stemming; and you are using ANFO with a density of . How many holes could you fire at one time, without exceeding the prescribed vibration limit?
The charge weight per foot of hole =
The charge weight per hole =
The maximum number of holes per delay period =
= 9.9 holes.
How accurate is this estimate? We need to understand the assumptions underlying the scaled distance chart. The chart is based on the use of a dry ANFO. If a more energetic blasting agent or explosive is used, the chart will overestimate the amount of powder that can be fired at one time. The USBM field sites were predominantly surface coal mines and some quarries. Depending on the local geology, the chart will overestimate the amount of powder. An overestimation of the amount of powder translates directly to an increase in the ground vibration level, which could put you in violation of state-regulated maximum levels. So, what good is this approximation if it can lead to significant overestimates? Simply, it provides a good starting point for your design. Further, in Pennsylvania for example, the state agency requires you to start with a scaled distance of 90. It is unlikely that you would ever have to worry about an overestimation at that distance!
Our discussion has focused exclusively on ground vibration. A similar approach is used to limit airblast. A different chart is used becuase the relationship between air blast and distance is cubic rather than squared. If we were to use the companion chart for airblast, we could go through an almost identical process to determine how many holes could be fired within a delay period without exceeding the airblast threshold. We’re not going spend any time doing that, but if you have the need at a future time, I am sure you could do that without any problem!
OK, let’s recap the engineering design of the blast round, as described in the recent lessons.
- The design is guided but not fully defined by science. Practical experience is invaluable in optimizing the design. If you don’t have that experience, the people who sell blasting products often have a wealth of practical knowledge and are happy to share it with you. Of course, they will be hoping for your business!
- The design process is iterative. You start out assuming certain parameters and calculating others. You compare the numbers that you are generating with handbook or literature values. Then, you rework some of those initial calculations with modified values, which generates results more aligned with the practical experiences of others. In particular, you will likely start by establishing values for the hole diameter, the burden, spacing, and stemming. Likely, you will locate typical powder factors and burden to spacing ratios in similar applications. You may then “fine-tune” your burden and spacing values, and perhaps reevaluate the diameter of your borehole.
- You will lay out the pattern of the holes based on free-face requirements, and you will assign holes to specific delay intervals.
- If you are blasting in proximity of structures that must be protected, you will assess ground vibration and airblast potential. It is likely that you will then alter your timing to limit the number of holes that fire within a given delay period.
- A reasonable next step would be to drill some holes and evaluate your design, keeping in mind that even if you are completely satisfied with the outcome (highly unlikely), you should be evaluating the outcome of your blasts on a regular basis, day-after-day, week-after-week, and month-after-month!
- We saw earlier in this lesson that you can use the precise timing of electronic delays to further improve fragmentation, and probably with less explosive. If you were going to pursue that in your design, you would then calculate the appropriate delay between holes in the row. Keep in mind that these delays would all occur within the large delay period that is based on managing your free faces and limiting ground vibration or airblast.
- There will be other reasons why you will need to modify your design over time. If you are experiencing fragmentation issues with cap rock, for example, you will utilize a set of design criteria to resolve them. If there is a big mud channel or fault running through your property, it will necessitate serious changes in your design. Those details are well beyond the scope of this course, but with your engineering fundamentals background and the knowledge that you’ve gained here, you’ll be able to handle those problems as they arise.
In the next module, I am going to show you photos taken at mine sites around the country to illustrate many of the basic concepts that you’ve studied in this module.