Making A Script Tool
User input variables that you retrieve through GetParameterAsText() make your script very easy to convert into a tool in ArcGIS. A few people know how to alter Python code, a few more can run a Python script and supply user input variables, but almost all ArcGIS users know how to run a tool. To finish off this lesson, we’ll take the previous script and make it into a tool that can easily be run in ArcGIS.
Before you begin this exercise, I strongly recommend that you scan the ArcGIS help topic Adding a script tool [1]. You likely will not understand all the parts of this topic yet, but it will give you some familiarity with script tools that will be helpful during the exercise.
Sample code for this section is below:
# This script runs the Buffer tool. The user supplies the input
#  and output paths, and the buffer distance.

import arcpy
arcpy.env.overwriteOutput = True

try:
     # Get the input parameters for the Buffer tool
     inPath = arcpy.GetParameterAsText(0)
     outPath = arcpy.GetParameterAsText(1)
     bufferDistance = arcpy.GetParameterAsText(2)

     # Run the Buffer tool
     arcpy.Buffer_analysis(inPath, outPath, bufferDistance)

     # Report a success message
     arcpy.AddMessage("All done!")

except Exception as ex:
     # Report an error messages
     arcpy.AddError(f"Could not complete the buffer {ex}")

     # Report any error messages that the Buffer tool might have generated
     arcpy.AddMessage(arcpy.GetMessages())
Follow these steps to make a script tool:
- Copy the code above into a new PyScripter script and save it as buffer_user_input.py.
- Open an ArcGIS Pro project and display the Catalog window.
- Expand the nodes Toolboxes > Default.tbx or .atbx. Your toolbox may be named differently, such as using the name of the project. For simplicity, we will refer to it as 'Default' for this lesson.
- Right-click on the Default.tbx and click New > Script.
- Fill in the Name and Label properties for your Script tool as shown below, depending on your version of ArcGIS Pro: The first image below shows the interface and the information you have to enter under General in this and the next step if you have a version earlier than version 2.9. The other two images show the interface and information that needs to be entered in this and the next step under General and under Execution if you have version 2.9 (or higher).
 Figure 1.10a Entering information for your script tool if you have a version < 2.9.
 Figure 1.10b Entering information for your script tool if you have a version ≥ 2.9: General tab.
 Figure 1.10c Entering information for your script tool if you have a version ≥ 2.9: Execution tab.
 - For version <2.9, click the folder icon for Script File on the General tab and browse to your buffer_user_input.py file. For version 2.9 (or higher), do the same on the Execution tab; the code from the script file will be shown in the window below.
- All versions: On the left side of the dialog, click on Parameters. You will now enter the parameters needed for this tool to do its job, namely inPath, outPath, and bufferMiles. You will specify the parameters in the same order, except you can give the parameters names that are easier to understand.
- Working in the first row of the table, enter Input Feature Class in the Label column, then Tab out of that cell. Note that the Name column is automatically filled in with the same text, except that the spaces are replaced by spaces.
- Next, click in the Data Type column and choose Feature Class from the subsequent dialog. Here is one of the huge advantages of making a script tool. Instead of accepting any string as input (which could contain an error), your tool will now enforce the requirement that a feature class be used as input. ArcGIS will help you by confirming that the value entered is a path to a valid feature class. It will even supply the users of your tool with a browse button, so they can browse to the feature class.
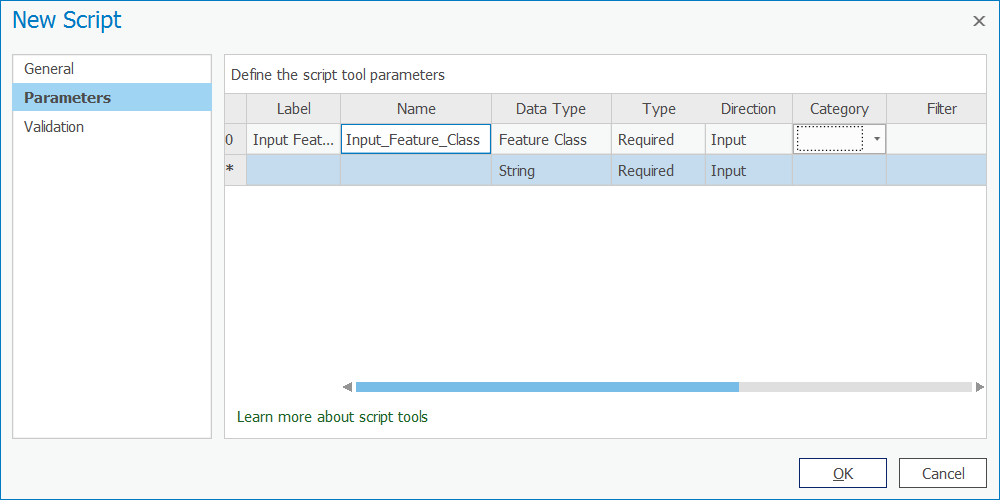 Figure 1.11 Choosing "Feature Class."
 - Just as you did in the previous steps, add a second parameter labeled Output Feature Class. The data type should again be Feature Class.
- For the Output Feature Class parameter, change the Direction property to Output.
- Add a third parameter named Buffer Distance. Choose Linear Unit as the data type. This data type will allow the user of the tool to select both the distance value and the units (for example, miles, kilometers, etc.).
- Set the Buffer Distance parameter's Default property to 5 Miles. (You may need to scroll to the right to see the Default column.) Your dialog should look like what you see below:
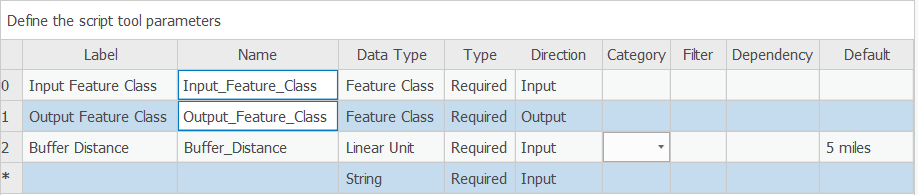 Figure 1.12 Setting the Default property to "5 Miles."
 - Click OK to finish creation of the new script tool and open it by double-clicking it.
- Try out your tool by buffering any feature class on your computer. Notice that once you supply the input feature class, an output feature class path is suggested for you. This is because you specifically set Output Feature Class as an output parameter. Also, when the tool is complete, examine the Details box (visible if you hover your mouse over the tool's "Completed successfully" message) for the custom message "All done!" that you added in your code.
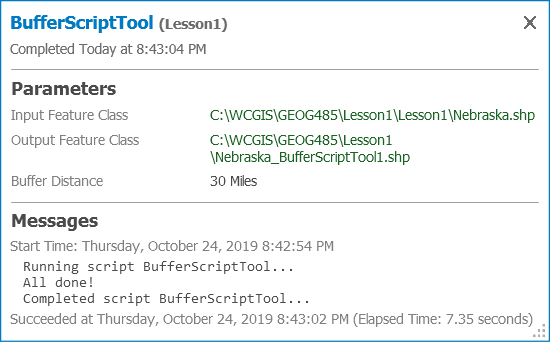 Figure 1.13 The tool is complete.
This is a very simple example, and obviously, you could just run the out-of-the-box Buffer tool with similar results. Normally, when you create a script tool, it will be backed with a script that runs a combination of tools and applies some logic that makes those tools uniquely useful.
There’s another benefit to this example, though. Notice the simplicity of our script tool dialog compared to the main Buffer tool:
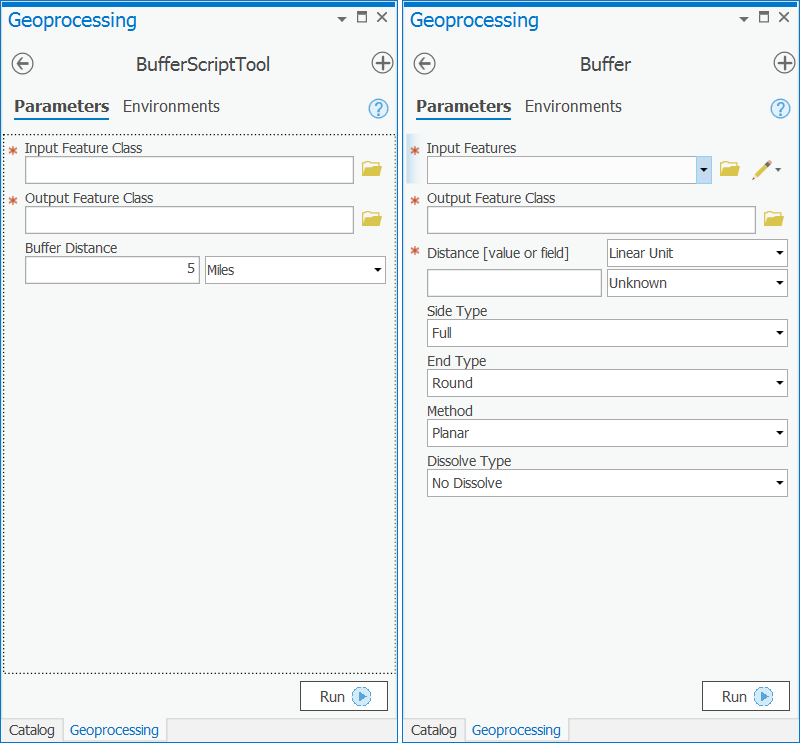
At some point, you may need to design a set of tools for beginning GIS users where only the most necessary parameters are exposed. You may also do this to enforce quality control if you know that some of the parameters must always be set to certain defaults, and you want to avoid the scenario where a beginning user (or a rogue user) might change the required values. A simple script tool is effective for simplifying the tool dialog in this way.
Lesson content developed by Jim Detwiler, Jan Wallgrun and James O’Brien
Adding Tool Validation Code
Now let’s expand on the user friendliness of the tool by using the validator methods to ensure that our cutoff value falls within the minimum and maximum values of our raster (otherwise performing the analysis is a waste of resources).
The purpose of the validation process is to allow us to have some customizable behavior depending on what values we have in our tool parameters. For example, we might want to make sure a value is within a range as in this case (although we could do that within our code as well), or we might want to offer a user different options if they provide a point feature class instead of a polygon feature class, or different options if they select a different type of field (e.g. a string vs. a numeric type).
The Esri help for Tool Validation(link is external) [2] gives a longer list of uses and also explains the difference between internal validation (what Desktop & Pro do for us already) and the validation that we are going to do here which works in concert with that internal validation.
You will notice in the help that Esri specifically tells us not to do what I’m doing in this example – running geoprocessing tools. The reason for this is they generally take a long time to run. In this case, however, we’re using a very simple tool which gets the minimum & maximum raster values and therefore executes very quickly. We wouldn’t want to run an intersection or a buffer operation for example in the ToolValidator, but for something very small and fast such as this value checking, I would argue that it’s ok to break Esri’s rule. You will probably also note that Esri hints that it’s ok to do this by using Describe to get the properties of a feature class and we’re not really doing anything different except we’re getting the properties of a raster.
So how do we do it? Go back to your tool (either in the Toolbox for your Project, Results, or the Recent Tools section of the Geoprocessing sidebar), right click and choose Properties and then Validation.
You will notice that we have a pre-written, Esri-provided class definition here. We will talk about how class definitions look in Python in Lesson 4 but the comments in this code should give you an idea of what the different parts are for. We’ll populate this template with the lines of code that we need. For now, it is sufficient to understand that different methods (initializeParameters(), updateParameters(), etc.) are defined that will be called by the script tool dialog to perform the operations described in the documentation strings following each line starting with def.
Take the code below and use it to overwrite what is in your ToolValidator:
import arcpy
class ToolValidator(object):
"""Class for validating a tool's parameter values and controlling
the behavior of the tool's dialog."""
def __init__(self):
"""Setup arcpy and the list of tool parameters."""
self.params = arcpy.GetParameterInfo()
def initializeParameters(self):
"""Refine the properties of a tool's parameters. This method is
called when the tool is opened."""
def updateParameters(self):
"""Modify the values and properties of parameters before internal
validation is performed. This method is called whenever a parameter
has been changed."""
def updateMessages(self):
"""Modify the messages created by internal validation for each tool
parameter. This method is called after internal validation."""
## Remove any existing messages
self.params[1].clearMessage()
if self.params[1].value is not None:
## Get the raster path/name from the first [0] parameter as text
inRaster1 = self.params[0].valueAsText
## calculate the minimum value of the raster and store in a variable
elevMINResult = arcpy.GetRasterProperties_management(inRaster1, "MINIMUM")
## calculate the maximum value of the raster and store in a variable
elevMAXResult = arcpy.GetRasterProperties_management(inRaster1, "MAXIMUM")
## convert those values to floating points
elevMin = float(elevMINResult.getOutput(0))
elevMax = float(elevMAXResult.getOutput(0))
## calculate a new cutoff value if the original wasn't suitable but only if the user hasn't specified a value.
if self.params[1].value < elevMin or self.params[1].value > elevMax:
cutoffValue = elevMin + ((elevMax-elevMin)/100*90)
self.params[1].value = cutoffValue
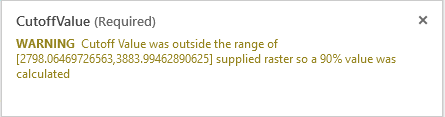
self.params[1].setWarningMessage("Cutoff Value was outside the range of ["+str(elevMin)+","+str(elevMax)+"] supplied raster so a 90% value was calculated")
Our logic here is to take the raster supplied by the user and determine the min and max values so that we can evaluate whether the cutoff value supplied by the user falls within that range. If that is not the case, we're going to do a simple mathematical calculation to find the value 90% of the way between the min and max values and suggest that as a default to the user (by putting it into the parameter). We’ll also display a warning message to the user telling them that the value has been adjusted and why their original value doesn’t work.
As you look over the code, you’ll see that all of the work is being done in the bottom function updateMessages(). This function is called after the updateParameters() and the internal arcpy validation code have been executed. It is mainly intended for modifying the warning or error messages produced by the internal validation code. The reason why we are putting all our validation code here is because we want to produce the warning message and there is no entirely simple way to do this if we already perform the validation and potentially automatic adjustment of the cutoff value in updateParameters() instead. Here is what happens in the updateMessages() function:
We start by cleaning up any previous messages self.params[1].clearMessages() (line 24). Then we check if the user has entered a value into the cutoffValue parameter (self.params[1]) on line 26. If they haven't, we don’t do anything (for efficiency). If the user has entered a value (i.e., the value is not None) then we get the raster name from the first parameter (self.params[0]) and we extract it as text (because we want the content to use as a path) on line 28. Then we’ll call the arcpy GetRasterProperties function twice, once to get the min value (line 30) and again to get the max value (on line 32) of the raster. We’ll then convert those values to floating point numbers (lines 34 & 35).
Once we’ve done that, we do a little bit of checking to see if the value the user supplied is within the range of the raster. If it is not, then we will do some simple math to calculate a value that falls 90% of the way into the range and then update the parameter (self.params[1].value) with the number we calculated (line 40 and 41). Finally, in line 42, we produce the warning message informing the users of the automatic value adjustment.
Now let’s test our Validator. Click OK and return to your script in the Toolbox, Results or Geoprocessing window. Run the script again. Insert the name of the input raster again. If you didn’t make any mistakes entering the code there won’t be a red X by the Input Raster. If you did make a mistake, an error message will be displayed there, showing you the usual arcpy / geoprocessing error message and the line of code that the error is occurring on. If you have to do any debugging, exit the script, return to the Toolbox, right click the script and go back to the Tool Validator and correct the error. Repeat as many times as necessary.
If there were no errors, we should test out our validation by putting a value into our Cutoff Value parameter that we know to be outside the range of our data. If you choose a value < 2798 or > 3884, you should see a yellow warning triangle appear that displays our error message, and you will also note that the value in Cutoff Value has been updated to our 90% value.
We can change the value to one we know works within the range (e.g. 3500), and now the tool should run.
Lesson content developed by Jan Wallgrun and James O’Brien