Programming Course

What is a Programming course?
A Programming course provides the setting for students to gain "hands-on" experience with a programming language.
What are the affordances of this model?
A well-designed programming course can offer students practice with programming and interaction with instructors and other students in a supportive setting that builds community and breeds success.
Things to pay attention to:
One of the best ways to learn coding is to practice a lot! Our courses are designed to allow plenty of practice, guidance, and a chance to discuss issues and questions with the instructor and with other students. The use of a tool called syntax highlighter allows students to see code represented authentically and accurately on the course pages, and the inclusion of the program Datacamp, in some of our courses, gives students the chance to try practice problems at the moment a concept is presented.
We look forward to working with you!
Contact us directly or visit the Dutton Website to learn more!
Introduction to GEOG 485
Welcome to GEOG 485: GIS Programming and Software Development!
GEOG 485 is an introductory programming course developed by experts in the Python coding language. The course focuses on programming as used to automate GIS software to solve problems.
The developers of GEOG 485 designed this course to include lots of practice for students and to provide a communicative learning community so that students could help each other.
The following pages are from a lesson, but the lesson in total is not replicated here. The lesson contains clear objectives, plenty of practice, guidance, and a chance to discuss issues and questions with the instructor and with other students. There is an aligned assessment in the form of a quiz. Notice the use of syntax highlighter, which allows students to see code represented authentically and accurately on the course pages. Also, notice that students are offered a chance for further, extra practice at the end of the lesson.
Lesson 2: Python and programming basics
Overview
This lesson has a relatively large amount of reading from the course materials, the Zandbergen text, and the ArcGIS help. I believe you will get a better understanding of the Python concepts as they are explained and demonstrated from several different perspectives. Whenever the examples use the IPython console, I strongly suggest that you type in the code yourself as you follow the examples. This can take some time, but you'll be amazed at how much more information you retain if you try the examples yourself instead of just reading them.
At the end of the lesson, you'll be required to write a Python script that puts together many of the things you've learned. This will go much faster if you've taken the time to read all the required text and work through the examples.
Lesson 2 covers Python fundamentals (many of which are common to other programming languages) and gives you a chance to practice these in a project. To complete this lesson, you are required to do the following:
- Download the Lesson 2 data and extract it to C:\PSU\Geog485\Lesson2.
- Work through the online sections of the lesson.
- Read the remainder of Zandbergen chapters 4-6 that we didn't cover in Lesson 1 and chapter 7.1 - 7.5, and 7.11 (in the Python 3 version of the book) or 11.1 - 11.5 and 11.11 (in the Python 2 version of the book). In the online lesson pages, I have inserted instructions about when it is most appropriate to read each of these chapters. There is more reading this lesson than in a typical week. If you are new to Python, please plan some extra time to read these chapters. There are also some readings this week from the ArcGIS Help.
- Complete Project 2 and upload its deliverables to the Lesson 2 drop box. The deliverables are listed in the Project 2 description page.
- Complete the Lesson 2 Quiz.
Do items 1 - 3 (including any of the practice exercises you want to attempt) during the first week of the lesson. You will need the second week to concentrate on the project and quiz.
Lesson objectives
By the end of this lesson, you should:
- understand basic Python syntax for conditional statements and program flow control (if-else, comparison operators, for loop, while loop);
- be familiar with more advanced data types (strings, lists), string manipulation, and casting between different types;
- know how to debug code and how to use the debugger;
- be able to program basic scripts that use conditional statements and loops to automate tasks.
Lesson 2 Quiz
Lists
In Lesson 1, you learned about some common data types in Python, such as strings and integers. Sometimes you need a type that can store multiple related values together. Python offers several ways of doing this, and the first one we'll learn about is the list.
Here's a simple example of a list. You can type this in the Spyder IPython console to follow along:
In [1]: suits = ['Spades', 'Clubs', 'Diamonds', 'Hearts']
This list named 'suits' stores four related string values representing the suits in a deck of cards. In many programming languages, storing a group of objects in sequence like this is done with arrays. While the Python list could be thought of as an array, it's a little more flexible than the typical array in other programming languages. This is because you're allowed to put multiple data types into one list.
For example, suppose we wanted to make a list for the card values you could draw. The list might look like this:
In [2]: values = ['Ace', 2, 3, 4, 5, 6, 7, 8, 9, 10, 'Jack', 'Queen', 'King']
Notice that you just mixed string and integer values in the list. Python doesn't care. However, each item in the list still has an index, meaning an integer that denotes each item's place in the list. The list starts with index 0 and for each item in the list, the index increments by one. Try this:
In [3]: print (suits[0])
Spades
In [4]: print (values[12])
King
In the above lines, you just requested the item with index 0 in the suits list and got 'Spades'. Similarly, you requested the item with index 12 in the values list and got 'King'.
It may take some practice initially to remember that your lists start with a 0 index. Testing your scripts can help you avoid off-by-one errors that might result from forgetting that lists are zero-indexed. For example, you might set up a script to draw 100 random cards and print the values. If none of them is an Ace, you've probably stacked the deck against yourself by making the indices begin at 1.
Remember you learned that everything is an object in Python? That applies to lists too. In fact, lists have a lot of useful methods that you can use to change the order of the items, insert items, sort the list, and so on. Try this:
In [5]: suits = ['Spades', 'Clubs', 'Diamonds', 'Hearts']
In [6]: suits.sort()
In [7]: print (suits)
['Clubs', 'Diamonds', 'Hearts', 'Spades']
Notice that the items in the list are now in alphabetical order. The sort() method allowed you to do something in one line of code that would have otherwise taken many lines. Another helpful method like this is reverse(), which allows you to sort a list in reverse alphabetical order:
In [8]: suits.reverse()
In [9]: print (suits)
['Spades', 'Hearts', 'Diamonds', 'Clubs']
Before you attempt to write list-manipulation code, check your textbook or the Python list reference documentation to see if there's an existing method that might simplify your work.
Inserting items and combining lists
What happens when you want to combine two lists? Type this in the Spyder console:
In [10]: listOne = [101,102,103]
In [11]: listTwo = [104,105,106]
In [12]: listThree = listOne + listTwo
In [13]: print (listThree)
[101, 102, 103, 104, 105, 106]
Notice that you did not get [205,207,209]; rather, Python treats the addition as appending listTwo to listOne. Next, try these other ways of adding items to the list:
In [14]: listThree += [107]
In [15]: print (listThree)
[101, 102, 103, 104, 105, 106, 107]
In [16]: listThree.append(108)
In [17]: print (listThree)
[101, 102, 103, 104, 105, 106, 107, 108]
To put an item at the end of the list, you can either add a one-item list (how we added 107 to the list) or use the append() method on the list (how we added 108 to the list). Notice that listThree += [107] is a shortened form of saying listThree = listThree + [107].
If you need to insert some items in the middle of the list, you can use the insert() method:
In [18]: listThree.insert(4, 999)
In [19]: print (listThree)
[101, 102, 103, 104, 999, 105, 106, 107, 108]
Notice that the insert() method above took two parameters. You might have even noticed a tooltip that shows you what the parameters mean.
The first parameter is the index position that the new item will take. This method call inserts 999 between 104 and 105. Now 999 is at index 4.
Getting the length of a list
Sometimes you'll need to find out how many items are in a list, particularly when looping. Here's how you can get the length of a list:
In [20]: myList = [4,9,12,3,56,133,27,3]
In [21]: print (len(myList))
8
Notice that len() gives you the exact number of items in the list. To get the index of the final item, you would need to use len(myList) - 1. Again, this distinction can lead to off-by-one errors if you're not careful.
Other ways to store collections of data
Lists are not the only way to store ordered collections of items in Python; you can also use tuples and dictionaries. Tuples are like lists, but you can't change the objects inside a tuple over time. In some cases, a tuple might actually be a better structure for storing values like the suits in a deck of cards, because this is a fixed list that you wouldn't want your program to change by accident.
Dictionaries differ from lists in that items are not indexed; instead, each item is stored with a key value which can be used to retrieve the item. We'll use dictionaries later in the course, and your reading assignment for this lesson covers dictionary basics. The best way to understand how dictionaries work is to play with some of the textbook examples in the Spyder console (see Zandbergen 6.8).
String Manipulation
You've previously learned how the string variable can contain numbers and letters and represent almost anything. When using Python with ArcGIS, strings can be useful for storing paths to data and printing messages to the user. There are also some geoprocessing tool parameters that you'll need to supply with strings.
Python has some very useful string manipulation abilities. We won't get into all of them in this course, but following are a few techniques that you need to know.
Concatenating strings
To concatenate two strings means to append or add one string on to the end of another. For example, you could concatenate the strings "Python is " and "a scripting language" to make the complete sentence "Python is a scripting language." Since you are adding one string to another, it's intuitive that in Python you can use the + sign to concatenate strings.
You may need to concatenate strings when working with path names. Sometimes it's helpful or required to store one string representing the folder or geodatabase from which you're pulling datasets and a second string representing the dataset itself. You put both together to make a full path.
The following example, modified from one in the ArcGIS Help, demonstrates this concept. Suppose you already have a list of strings representing feature classes that you want to clip. The list is represented by "featureClassList" in this script:
# This script clips all datasets in a folder
import arcpy

inFolder = "c:\\data\\inputShapefiles\\"
resultsFolder = "c:\\data\\results\\"
clipFeature = "c:\\data\\states\\Nebraska.shp"

# List feature classes
arcpy.env.workspace = inFolder
featureClassList = arcpy.ListFeatureClasses()

# Loop through each feature class and clip
for featureClass in featureClassList:

    # Make the output path by concatenating strings
    outputPath = resultsFolder + featureClass
    # Clip the feature class
    arcpy.Clip_analysis(featureClass, clipFeature, outputPath)
String concatenation is occurring in this line: outputPath = resultsFolder + featureClass. In longhand, the output folder "c:\\data\\results\\" is getting the feature class name added on the end. If the feature class name were "Roads.shp" the resulting output string would be "c:\\data\\results\\Roads.shp".
The above example shows that string concatenation can be useful in looping. Constructing the output path by using a set workspace or folder name followed by a feature class name from a list gives much more flexibility than trying to create output path strings for each dataset individually. You may not know how many feature classes are in the list or what their names are. You can get around that if you construct the output paths on the fly through string concatenation.
Casting to a string
Sometimes in programming, you have a variable of one type that needs to be treated as another type. For example, 5 can be represented as a number or as a string. Python can only perform math on 5 if it is treated as a number, and it can only concatenate 5 onto an existing string if it is treated as a string.
Casting is a way of forcing your program to think of a variable as a different type. Create a new script in Spyder, and type or paste the following code:
x = 0
while x < 10:
    print (x)
    x += 1

print ("You ran the loop " + x + " times.")
Now, try to run it. The script attempts to concatenate strings with the variable x to print how many times you ran a loop, but it results in an error: "TypeError: must be str not int." Python doesn't have a problem when you want to print the variable x on its own, but Python cannot mix strings and integer variables in a printed statement. To get the code to work, you have to cast the variable x to a string when you try to print it.
x = 0
while x < 10:
    print (x)
    x += 1

print ("You ran the loop " + str(x) + " times.")
You can force Python to think of x as a string by using str(x). Python has other casting functions such as int() and float() that you can use if you need to go from a string to a number. Use int() for integers and float() for decimals.
Readings
It's time to take a break and do some readings from another source. If you are new to Python scripting, this will help you see the concepts from a second angle.
Finish reading Zandbergen chapters 4 - 6 as detailed below. This can take a few hours, but it will save you hours of time if you make sure you understand this material now.
ArcGIS Pro edition:
- Chapter 4 covers the basics of Python syntax, loops, strings, and other things we just learned. Please read Chapter 4, noting the following:
- You were already assigned 4.1-4.7 in Lesson 1, so you may skip those sections if you have a good handle on those topics.
- You may also skip 4.17-4.18, and 4.26.
- Section 4.25 demonstrates use of the input() function, using the IDLE and PyCharm IDEs. IDEs vary in their implementation of the type() function. In Spyder, the user is expected to enter a value in the Spyder Console.
- Another way of providing input to a script in Spyder is by going to Run > Configuration per file, checking the Command line options box, entering the arguments in the box that appears, then clicking Run. - You've already read most of Chapter 5 on geoprocessing with arcpy. Now please read 5.10 & 5.14.
- Chapter 6 gives some specific instructions about working with ArcGIS datasets, which will be valuable during this week's assigned project. Please read all sections, 6.1-6.7.
ArcMap edition:
- Chapter 4 covers the basics of Python syntax, loops, strings, and other things we just learned. Please read Chapter 4, noting the following:
- You were already assigned 4.1-4.7 in Lesson 1, so you may skip those sections if you have a good handle on those topics.
- Section 4.18 discusses getting user input via the Run Script dialog that appears when running a script in PythonWin. Supplying arguments in Spyder can be done by going to Run > Configuration per file, checking the Command line options box, entering the arguments in the box that appears, then clicking Run.
- Section 4.18 also demonstrates use of the input() function, showing that it causes PythonWin to display a dialog box for the user to input a value. In contrast, Spyder shows no such dialog box; instead, it expects the user to enter a value in the Spyder Console.
- You may also skip 4.20, since we're not using the PythonWin editor discussed in that section. - You've already read most of Chapter 5 on geoprocessing with arcpy. Now please read 5.7 and 5.12, noting the following:
- The discussion of how to access Help documentation in 5.12 does not apply to Pro. However, the documentation pages themselves show essentially the same information. Pro documentation is offered only online. To access the documentation of an arcpy function or tool, you can enter its name in the Search box at the top of the Help system or click on the ? icon that appears in the upper right of every tool dialog when opened in Pro. - Chapter 6 gives some specific instructions about working with ArcGIS datasets, which will be valuable during this week's assigned project. You shouldn't encounter any ArcMap/ArcGIS Pro confusion in this chapter. Please read all sections, 6.1-6.8.
If you still don't feel like you understand the material after reading the above chapters, don't re-read it just yet. Try some coding from the Lesson 2 practice exercises and assignments, then come back and re-read if necessary. If you are really struggling with a particular concept, type the examples in the console. Programming is like a sport in the sense that you cannot learn all about it by reading; at some point, you have to get up and do it.
Troubleshooting and getting help
If you find writing code to be a slow, mystifying, and painstaking process, fraught with all kinds of opportunities to make mistakes, welcome to the world of a programmer! Perhaps to their chagrin, programmers spend the majority of their time hunting down and fixing bugs. Programmers also have to continually expand and adapt their skills to work with new languages and technologies, which requires research, practice, and lots of trial and error.
The best candidates for software engineering jobs are not the ones who list the most languages or acronyms on their resumes. Instead, the most desirable candidates are self-sufficient, meaning they know how to learn new things and find answers to problems on their own. This doesn't mean that they never ask for help; on the contrary, a good programmer knows when to stop banging his or her head against the wall and consult peers or a supervisor for advice. However, most everyday problems can be solved using the help documentation, online code examples, online forums, existing code that works, programming books, and debugging tools in the software.
Suppose you're in a job interview and your prospective employer asks, "What do you do when you run into a 'brick wall' when programming? What sources do you first go to for help?" If you answer, "My supervisor" or "My co-workers," this is a red flag, signifying that you could be a potential time sink to the development team. Although the more difficult problems require group collaboration, a competitive software development team cannot afford to hold an employee's hand through every issue that he or she encounters. From the author's experience, many of the most compelling candidates answer this question, "Google." They know that most programming problems, although vexing, are common and the answer may be at their fingertips in less than 30 seconds through a well-phrased Internet search. With popular online forums such as Stack Exchange providing answers to many common syntax and structuring questions, searching for information online can actually be faster than walking down the hall and asking a co-worker, and it saves everybody time.
In this section of the lesson, you'll learn about places where you can go for help when working with Python and when programming in general. You will have a much easier experience in this course if you remember these resources and use them as you complete your assignments.
Other sources of help
Besides the above approaches, there are many other places you can get help. A few of them are described below. If you're new to programming, just knowing that these resources exist and how to use them can help you feel more confident. Find the ones that you prefer and return to them often. This habit will help you become a self-sufficient programmer and will improve your potential to learn any new programming language or technology.
Drawing on the resources below takes time and effort. Many people don't like combing through computer documentation, and this is understandable. However, you may ultimately save time if you look up the answer for yourself instead of waiting for someone to help you. Even better, you will have learned something new from your own experience, and things you learn this way are much easier to remember in the future.
Sources of help
Search engines
Search engines are useful for both quick answers and obscure problems. Did you forget the syntax for a loop? The quickest remedy may be to Google "for loop python" or "while loop python" and examine one of the many code examples returned. Search engines are extremely useful for diagnosing error messages. Google the error message in quotes, and you can read experiences from others who have had the same issue. If you don't get enough hits, remove the quotes to broaden the search.
One risk you run from online searches is finding irrelevant information. Even more dangerous is using irrelevant information. Research any sample code to make sure it is applicable to the version of Python you're using. Some syntax in Python 3.x, used for scripting in ArcGIS Pro, is different from the Python 2.x used for scripting in ArcMap, for example.
Esri online help
Esri maintains their entire help system online, and you'll find most of their scripting topics in the arcpy section.
Another section, which you should visit repeatedly, is the Tool Reference, which describes every tool in the toolbox and contains Python scripting examples for each. If you're having trouble understanding what parameters go in or out of a tool, or if you're getting an error back from the geoprocessing framework itself, try the Tool Reference before you do a random Internet search. You will have to visit the Tool Reference in order to be successful in some of the course projects and quizzes.
Python online help
The official Python documentation is available online. Some of it gets very detailed and takes the tone of being written by programmers for programmers. The part you'll probably find most helpful is the Python Standard Library reference, which is a good place to learn about Python's modules such as "os", "csv", "math," or "random."
Printed books, including your textbook
Programming books can be very hit or miss. Many books are written for people who have already programmed in other languages. Others proclaim they're aimed at beginners, but the writing or design of the book may be unintuitive or difficult to digest. Before you drop $40 on a book, try to skim through it yourself to see if the writing generally makes sense to you (don't worry about not understanding the code--that will come along as you work through the book).
The course text Python Scripting for ArcGIS is a generally well-written introduction to just what the title says: working with ArcGIS using Python. There are a few other Python+ArcGIS books as well. If you've struggled with the material, or if you want to do a lot of scripting in the future, I may recommend picking up one of these. Your textbook can come in handy if you need to look at a very basic code example, or if you're going to use a certain type of code construct for the first time, and you want to review the basics before you write anything.
A good general Python reference is Learning Python by Mark Lutz. We previously used this text in Geog 485 before there was a book about scripting with ArcGIS. It covers beginning to advanced topics, so don't worry if some parts of it look intimidating.
Esri forums and other online forums
The Esri forums are a place where you can pose your question to other Esri software users, or read about issues other users have encountered that may be similar to yours. There is a Python Esri forum that relates to scripting with ArcGIS, and also a more general Geoprocessing Esri forum you might find useful.
Before you post a question on the Esri forums, do a little research to make sure the question hasn't been answered already, at least recently. I also suggest that you post the question to our class forums first, since your peers are working on the same problems, and you are more likely to find someone who's familiar with your situation and has found a solution.
There are many other online forums that address GIS or programming questions. You'll see them all over the Internet if you perform a Google search on how to do something in Python. Some of these sites are laden with annoying banner ads or require logins, while others are more immediately helpful. Stack Exchange is an example of a well-traveled technical forum, light on ads, that allows readers to promote or demote answers depending on their helpfulness. One of its child sites, GIS Stack Exchange, specifically addresses GIS and cartography issues.
If you do post to online forums, be sure to provide detailed information on the problem and list what you've tried already. Avoid posts such as "Here's some code that's broken and I don't know why" followed by dozens of lines of pasted-in code. State the problem in a general sense and focus on the problem code. Include exact error messages when possible.
People on online forums are generally helpful, but expect a hostile reception if you make them feel like they are doing your academic homework for you. Also, be aware that posting or copying extensive sections of Geog 485 assignment code on the internet is a violation of academic integrity and may result in a penalty applied to your grade (see section on Academic Integrity in the course syllabus).
Class forums
Our course has discussion boards that we recommend you used to consult your peers and instructor about any Python problem that you encounter. I encourage you to check them often and to participate by both asking and answering questions. I request that you make your questions focused and avoid pasting large blocks of code that would rob someone of the benefit of completing the assignment on their own. Short, focused blocks of code that solve a specific question are definitely okay. Code blocks that are not copied directly from your assignment are also okay.
I monitor all discussion boards closely; however, sometimes I may not respond immediately because I want to give you a chance to help each other and work through problems together. If you post a question and wind up solving your own problem, please post again to let us know and include how you managed to solve the problem in case other students run into the same issue.
Consulting the instructor
I am available to help you at any point in the course, and my goal is to respond to any personal message or e-mail within 24 hours on weekdays (notice the obvious problem if you have waited to begin your assignment until 24 hours before it's due!). I am happy to consult with you through e-mail, video conference, or whatever technology is necessary to help you be successful.
I ask that you try some of the many troubleshooting and help resources above before you contact me. If the issue is with your code and I cannot immediately see the problem, the resources we will use to find the answer will be the same that I listed above: the debugger, printing geoprocessing messages, looking for online code examples, etc. If you feel unsure about what you're doing, I'm available to talk through these approaches with you. Also, in cases where you feel that you cannot post a description of the problem without including a lot of code that may give away part of the solution to an assignment, feel free to send your code and problem description directly to me via Canvas mail.
Practice exercises
Before trying to tackle Project 2, you may want to try some simple practice exercises, particularly if the concepts in this lesson were new to you. Remember to choose File > New in Spyder to create a new script (or click the empty page icon). You can name the scripts something like Practice1, Practice2, etc.
Find the spaces in a list of names
Python String objects have an index method that enables you to find a substring within the larger string. For example, if I had a variable defined as name = "James Franklin" and followed that up with the expression name.index("Fr"), it would return the value 6 because the substring "Fr" begins at character 6 in the string held in name. (The first character in a string is at position 0.)
For this practice exercise, start by creating a list of names like the following:
beatles = ["John Lennon", "Paul McCartney", "Ringo Starr", "George Harrison"]
Then write code that will loop through all the items in the list, printing a message like the following:
"There is a space in ________'s name at character ____." where the first blank is filled in with the name currently being processed by the loop and the second blank is filled in with the position of the first space in the name as returned by the index method. (You should obtain values of 4, 4, 5 and 6, respectively, for the items in the list above.)
This is a good example in which it is smart to write and test versions of the script that incrementally build toward the desired result, rather than trying to write the final version in one fell swoop. For example, you might start by setting up a loop and simply printing each name. If you get that to work, give yourself a little pat on the back and then see if you can simply print the positions of the space. Once you get that working, then try plugging the name and space positions into the larger message.
Practice 1 Solution
Convert the names to a "Last, First" format
Build on Exercise 1 by printing each name in the list in the following format:
Last, First
To do this, you'll need to find the position of the space just as before. To extract part of a string, you can specify the start character and the end character in brackets after the string's name, as in the following:
name = "James Franklin"
print (name[6:14])  # prints Franklin
One quirky thing about this syntax is that you need to specify the end character as 1 beyond the one you really want. The final "n" in "Franklin" is really at position 13, but I needed to specify a value of 14.
One handy feature of the syntax is that you may omit the end character index if you want everything after the start character. Thus, name[6:] will return the same string as name[6:14] in this example. Likewise, the start character may be omitted to obtain everything from the beginning of the string to the specified end character.
Practice 2 Solution
Convert scores to letter grades
Write a script that accepts a score from 1-100 as an input parameter, then reports the letter grade for that score. Assign letter grades as follows:
A: 90-100
B: 80-89
C: 70-79
D: 60-69
F: <60
Practice 3 Solution
Create copies of a template shapefile
Imagine that you're again working with the Nebraska precipitation data from Lesson 1 and that you want to create copies of the Precip2008Readings shapefile for the next 4 years after 2008 (e.g., Precip2009Readings, Precip2010Readings, etc.). Essentially, you want to copy the attribute schema of the 2008 shapefile, but not the data points themselves. Those will be added later. The tool for automating this kind of operation is the Create Feature Class tool in the Data Management toolbox. Look up this tool in the Help system and examine its syntax and the example script. Note the optional template parameter, which allows you to specify a feature class whose attribute schema you want to copy. Also note that Esri uses some inconsistent casing with this tool, and you will have to call arcpy.CreateFeatureclass_management() using a lower-case "c" on "class." If you follow the examples in the Geoprocessing Tool Reference help, you will be fine.
To complete this exercise, you should invoke the Create Feature Class tool inside a loop that will cause the tool to be run once for each desired year. The range(...) function can be used to produce the list of years for your loop.
Practice 4 Solution
Clip all feature classes in a geodatabase
The data for this practice exercise consists of two file geodatabases: one for the USA and one for just the state of Iowa. The USA dataset contains miscellaneous feature classes. The Iowa file geodatabase is empty except for an Iowa state boundary feature class.
Your task is to write a script that programmatically clips all the feature classes in the USA geodatabase to the Iowa state boundary. The clipped feature classes should be written to the Iowa geodatabase. Append "Iowa" to the beginning of all the clipped feature class names.
Your script should be flexible enough that it could handle any number of feature classes in the USA geodatabase. For example, if there were 15 feature classes in the USA geodatabase instead of three, your final code should not need to change in any way.
Practice 5 Solution
Project: Batch reprojection tool for vector datasets
Some GIS departments have determined a single, standard projection in which to maintain their source data. The raw datasets, however, can be obtained from third parties in other projections. These datasets then need to be reprojected into the department's standard projection. Batch reprojection, or the reprojection of many datasets at once, is a task well suited to scripting.
In this project, you'll practice Python fundamentals by writing a script that re-projects the vector datasets in a folder. From this script, you will then create a script tool that can easily be shared with others.
The tool you will write should look like the image below. It has two input parameters and no output parameters. The two input parameters are:
- A folder on disk containing vector datasets to be re-projected.
- The path to a vector dataset whose spatial reference will be used in the re-projection. For example, if you want to re-project into NAD 1983 UTM Zone 10, you would browse to some vector dataset already in NAD 1983 UTM Zone 10. This could be one of the datasets in the folder you supplied in the first parameter, or it could exist elsewhere on disk.
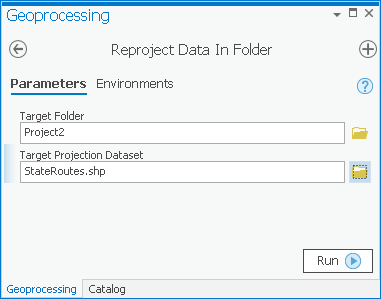 Figure 2.1 The Project 2 tool with two input parameters and no output parameters.Credit: The Python Programming Language
Running the tool causes re-projected datasets to be placed on disk in the target folder.
Requirements
To receive full credit, your script:
- must re-project shapefile vector datasets in the folder to match the target dataset's projection;
- must append "_projected" to the end of each projected dataset name. For example: CityBoundaries_projected.shp;
- must skip projecting any datasets that are already in the target projection;
- must report a geoprocessing message telling which datasets were projected. In this message, the dataset names can be separated by spaces. In the message, do not include datasets that were skipped because they were already in the target projection. This must be a single message, not one message per projected dataset. Notice an example of this type of custom message below in the line "Projected . . . :"
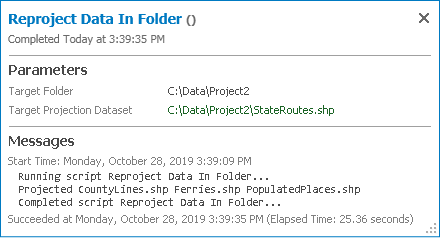 Figure 2.2 Your script must report a geoprocessing message telling which datasets were projected.Credit: The Python Programming Language
 - Must not contain any hard-coded values such as dataset names, path names, or projection names.
- Must be made available as a script tool that can be easily run from ArcGIS Pro by someone with no knowledge of scripting.
Successful completion of the above requirements is sufficient to earn 90% of the credit on this project. The remaining 10% is reserved for "over and above" efforts which could include, but are not limited to, the following:
- Your geoprocessing message of projected datasets contains commas between the dataset names, with no extra "trailing" comma at the end.
- User help is provided for your script tool. This means that when you open the tool dialog and hover the mouse over the "i" icon next to each parameter, help appears in a popup box. The ArcGIS Pro Help can teach you how to do this.
You are not required to handle datum transformations in this script. It is assumed that each dataset in the folder uses the same datum, although the datasets may be in different projections. Handling transformations would cause you to have to add an additional parameter in the Project tool and would make your script more complicated than you would probably like for this assignment.
Sample data
The Lesson 2 data folder contains a set of vector shapefiles for you to work with when completing this project (delete any subfolders in your Lesson 2 data folder—you may have one called PracticeData—before beginning this project). These shapefiles were obtained from the Washington State Department of Transportation GeoData Distribution Catalog, and they represent various geographic features around Washington state. For the purpose of this project, I have put these datasets in various projections. These projections share the same datum (NAD 83) so that you do not have to deal with datum transformations.
The datasets and their original projections are:
- CityBoundaries and StateRoutes - NAD_1983_StatePlane_Washington_South_FIPS_4602
- CountyLines - NAD_1983_UTM_Zone_10N
- Ferries - USA_Contiguous_Lambert_Conformal_Conic
- PopulatedPlaces - GCS_NorthAmerican_1983
Deliverables
Deliverables for this project are as follows:
- the source .py file containing your script;
- the .tbx file containing your script tool;
- a short writeup (about 300 words) describing how you approached the project, how you successfully dealt with any roadblocks, and what you learned along the way. You should include which requirements you met, or failed to meet. If you added some of the "over and above" efforts, please point these out so the grader can look for them.
Tips
The following tips can help improve your possibility of success with this project:
- Do not use the Esri Batch Project tool in this project. In essence, you're required to make your own variation of a batch project tool in this project by running the Project tool inside a loop. Your tool will be easier to use because it's customized to the task at hand.
-
There are a lot of ways to insert "_projected" in the name of a dataset, but you might find it useful to start by temporarily removing ".shp" and adding it back on later. To make your code work for both a shapefile (which has the extension .shp) and a feature class in a geodatabase (which does not have the extension .shp), you can use the following:
rootName = fc if rootName.endswith(".shp"): rootName = rootName.replace(".shp","")In the above code, fc is your feature class name. If it is the name of a shapefile it will include the .shp . The replace function searches for any string ".shp" (the first parameter) in the file name and replaces it with nothing (symbolized in the second parameter by empty quotes ""). So after running this code, variable rootName will contain the name of the feature class name without the ".shp" . Since replace(...) does not change anything if the string given as the first parameter does not occur in fc, the code above can be replaced by just a single line:
rootName = fc.replace(".shp","")You could also potentially chop off the last four characters using something likerootName = fc[:-4]
but hard-coding numbers other than 0 or 1 in your script can make the code less readable for someone else. Seeing a function like replace is a lot easier for someone to interpret than seeing -4 and trying to figure out why that number was chosen. You should therefore use replace(...) in your solution instead.
- To check if a dataset is already in the target projection, you will need to obtain a Spatial Reference object for each dataset (the dataset to be projected and the target dataset). You will then need to compare the spatial reference names of these two datasets. Be sure to compare the Name property of the spatial references; do not compare the spatial reference objects themselves. This is because you can have two spatial reference objects that are different entities (and are thus "not equal"), but have the same name property.
You should end up with a line similar to this:if fcSR.Name != targetSR.Name:
where fcSR is the spatial reference of the feature class to be projected and targetSR is the target spatial reference obtained from the target projection shapefile.
- If you want to show all the messages from each run of the Project tool, add the line: arcpy.AddMessage(arcpy.GetMessages()) immediately after the line where you run the Project tool. Each time the loop runs, it will add the messages from the current run of the Project tool into the results window. It's been my experience that if you wait to add this line until the end of your script, you only get the messages from the last run of the tool, so it's important to put the line inside the loop. Remember that while you are first writing your script, you can use print statements to debug, then switch to arcpy.AddMessage() when you have verified that your script works, and you are ready to make a script tool.
- If, after all your best efforts, you ran out of time and could not meet one of the requirements, comment out the code that is not working (using a # sign at the beginning of each line) and send the code anyway. Then explain in your brief write-up which section is not working and what troubles you encountered. If your commented code shows that you were heading down the right track, you may be awarded partial credit.
Python code samples for students wanting more examples
Practice exercises for Lesson 2