Joining Data From Multiple Tables
One of the essential functions of an RDBMS is the ability to pull together data from multiple tables. In this section, we'll make a join between our PLAYERS and STATS tables to produce output in which the stats are matched up with the players who compiled them.
A. Retrieve data from multiple tables using a join
- Return to Design View and click on the Show Table button (near the middle of the Ribbon).
- In the Show Table dialog, double-click on the PLAYERS table to add it to the query, then Close the Show Table dialog. Create the join by click-holding on the PLAYER_ID field name in one of the tables and dragging to the PLAYER_ID field name in the other table. If you make the wrong join connection, you can right-click on the line and delete the join.
Note:
You'll probably notice the key symbol next to PLAYER_ID in the PLAYERS table and next to PLAYER_ID, YEAR and TEAM in the STATS table. This symbol indicates that the field is part of the table's primary key, a topic we'll discuss more later. For now, it's good to understand that a field need not be a key field to participate in a join, and that while the fields often share the same name (as is the case here), that is not required. What's important is that the fields contain matching values of compatible data types (e.g., a join between a numeric zip code field and a string zip code field will not work because of the mismatch between data types).
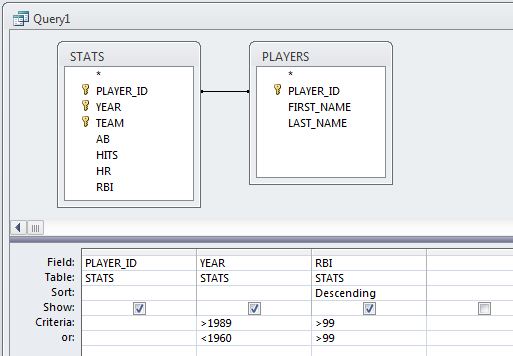
- Modify the query so that it again just selects 100-RBI seasons without any restrictions on the YEAR.
- Double-click on the FIRST_NAME and LAST_NAME fields to add them to the query.
- Test the query. Looking at the output, you may be thinking that the PLAYER_ID value is not really of much use anymore and that the names would be more intuitive on the left side rather than on the right.
- To remove the PLAYER_ID field from the output, return to Design View and click on the thin gray bar above the PLAYER_ID field in the design grid to highlight that field. Press the Delete key on your keyboard to remove that field from the design grid (and the query results).
- To move the name fields, click on the FIRST_NAME field's selection bar in the design grid and drag to the right so that you also select the LAST_NAME field. With both fields selected, click the selection bar and drag them to the left so that they now appear before the YEAR and RBI fields.

- Test the query.
B. Use the Expression Builder to concatenate values from multiple fields
- Return to Design View and right-click on the Field cell of the FIRST_NAME column; on the context menu that appears, click on Build to open the Expression Builder.
You should see the FIRST_NAME field listed in the expression box already. Note the Expression Elements box in the lower left of the dialog, which provides access to the Functions built into Access (e.g., the LCase function for turning a string into all lower-case characters), to the tables and fields in the baseball_stats.accdb database (e.g., STATS), to a list of Constants (e.g., True and False) and to a list of Operators (e.g., +, -, And, Or). All of these elements can be used to produce expressions in either the Field or Criteria rows of the design grid. Note that it's also OK to type the expression directly if you know the correct syntax. Here, we're going to create an expression that will concatenate the FIRST_NAME value with the LAST_NAME value in one column. - First, delete the FIRST_NAME text from the expression box.
- Expand the list of objects in the baseball_stats.accdb database by clicking on the plus sign to its left. Then expand the list of Tables.
- Click on PLAYERS to display its fields in the middle box. Double-click on the FIRST_NAME field to add it to the expression. (Note that the field is added to the expression in a special syntax that includes the name of its parent table. This is done in case there are other tables involved in the query that also have a FIRST_NAME field. If there were, this syntax would ensure that the correct FIRST_NAME field would be utilized.)
- The concatenation character in Access is the ampersand (&). Click in the expression text box after [PLAYERS]![FIRST_NAME] to get a cursor and type:
& ' ' &
So, you type &-space-single quote-space-single quote-space-&. The purpose of this step is to add a space between the FIRST_NAME and LAST_NAME values in the query results. - Double-click on the LAST_NAME field in the field list to add it to the expression.
- Finally, place the cursor at the beginning of the expression and type the following, followed by a space:
PLAYER:
This specifies the column's name in the output. Your expression should now look like this: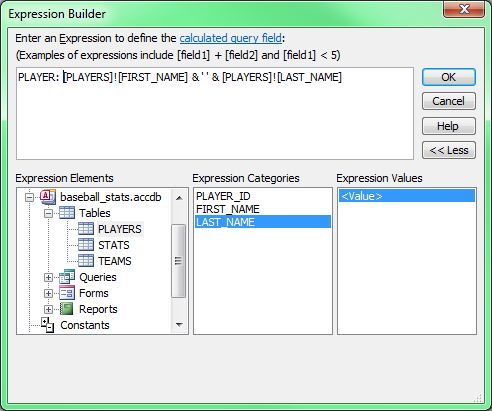 Text Description (click to reveal)
PLAYER: [PLAYERS]![FIRST_NAME] & ’ ’ & [PLAYERS]![LAST_NAME] - When you've finished writing the expression, click OK to dismiss the Expression Builder.
- The LAST_NAME column is now redundant, so remove it from the design grid as described above.
- Run the query and confirm that the name values concatenated properly.
C. Sorting by a field not included in the output
Suppose you wanted to sort this list by the last name, then first name, and then by the number of RBI. This would make it easier to look at each player's best seasons in terms of RBI production.
- In Design View, double-click on LAST_NAME, then FIRST_NAME to add them back to the design grid.
- Choose the Ascending option in the Sort cell for both the LAST_NAME and FIRST_NAME fields.
- Again, these fields are redundant with the addition of the PLAYER expression. Uncheck the Show checkbox for both fields so that they are not included in the query results. Note that the ordering of the Sort fields in the design grid is important. The results are sorted first based on the left-most Sort field, then by the next Sort field, then the next, etc.
- If necessary, click on the thin gray selection bar above the RBI field in the design grid to select that column. Click and drag to the right so that it is moved to the right of the _NAME columns.
- Choose Descending as the Sort option for the RBI field.
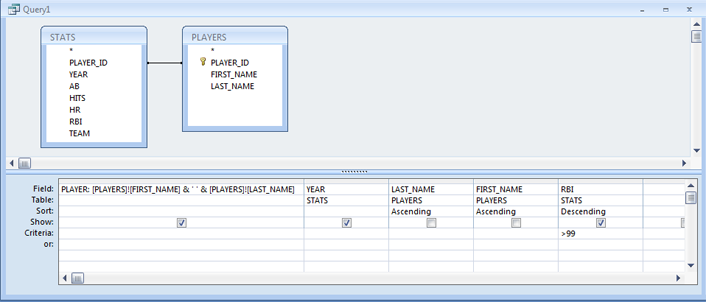
- Run the query and confirm that the records sorted properly. (Hank Aaron should be listed first.)
D. Performing an outer join
If you were to count the number of players being displayed by our query, you'd find that there are 10 (PLAYER_IDs 1 through 10).
- Open the PLAYERS table and note that there is a player (Alex Rodriguez, PLAYER_ID 11) who is not appearing in the query output.
- Now open the STATS table and note that there are records with a PLAYER_ID of 12, but no matching player with that ID in the PLAYERS table. These records aren't included in the query output either.
The unmatched records in these tables aren't appearing in the query output because the join between the tables is an inner join. Inner joins display data only from records that have a match in the join field values.
To display data from the unmatched records, we need to use an outer join.
Close the tables. - Leave Query1 open, as we'll come back to it in a moment. Create a new query (Create > Query Design).
- Add the PLAYERS and STATS tables to the design grid of the new query, and then close the Show Table dialog.
- Create a join between the PLAYER_ID fields.
- Add the PLAYER_ID, FIRST_NAME and LAST_NAME fields from the PLAYERS table to the design grid.
- Add the PLAYER_ID, YEAR and HR fields from the STATS table.
- Choose the Sort Ascending option for the PLAYER_ID field (the one from the STATS table) and the YEAR field.
- Right-click on the line connecting the PLAYER_ID fields and select Join Properties.
Note that join option 1 is currently selected (only include rows where the joined fields from both tables are equal). - Click on the Include ALL records from 'PLAYERS' option, then click OK. Whether this is option 2 or 3 will depend on whether you clicked and dragged from PLAYERS to STATS or from STATS to PLAYERS. In any case, note that the line connecting the key fields is now an arrow pointing from the PLAYERS table to the STATS table.
- Test the query. The query outputs PLAYER_ID 11 (at the top) in addition to 1 through 10. Because there are no matching records for PLAYER_ID 11 in the STATS table, the STATS columns in the output contain NULL values.
- Return to Design View and bring up the Join Properties dialog again. This time choose option 3, so that all records from the STATS table will be shown, then click OK. The arrow connecting the key fields is now reversed, pointing from the right (STATS) table to the left (PLAYERS) table.
- Test the query. If you scroll to the bottom, you'll see that the query outputs the stats for PLAYER_ID 12. This player has no match in the PLAYERS table, so the PLAYERS columns in the output contain NULL values.
- Close Query2 without saving.
E. Performing a cross join
Another type of join that we'll use later when we write spatial queries in PostGIS is the cross join, which produces the Cartesian, or cross, product of the two tables. If one table has 10 records and the other 5, the cross join will output 50 records.
- Create another new query adding the PLAYERS and TEAMS tables to the design grid. You won't see a join line automatically connecting fields in the two tables (they don't share a field in common). This lack of a line connecting the tables is actually what we want, as it will cause a cross join to be performed.
- Add the PLAYER_ID field from the PLAYERS table and the ABBREV field from the TEAMS table to the design grid.
- Test the query. Note that the query outputs 275 records (the product of 11 players and 25 teams). Each record represents a different player/team combination.
- Close Query2 without saving.
The usefulness of this kind of join may not be obvious given this particular example. For a better example, imagine a table of products that includes each product's retail price and a table of states and their sales taxes. Using a cross join between these two tables, you could calculate the sales price of each product in each state.
F. Creating a query with multiple joins
Finally, let's put together a query that joins together data from 3 tables.
- Create another new query adding the PLAYERS, STATS and TEAMS tables to the design grid.
- Create the PLAYER_ID-based join between the PLAYERS and STATS tables.
- Click on the TEAM field in the STATS table and drag over to the ABBREV field in the TEAMS table, (recall that field names do not have to match when creating a join).
- Add the FIRST_NAME and LAST_NAME fields from the PLAYERS table, the YEAR and HR fields from the STATS table and the CITY and NICKNAME fields from the TEAMS table.
- Test the query.
- Close Query2 without saving.
In this way, it is possible to create queries containing several joins. However, in a real database, you are likely to notice a drop in performance as the number of joins increases.
In this section, we saw how to pull together data from two or more related tables, how to concatenate values from two text fields, and how to sort query records based on fields not included in the output. This enabled us to produce a much more user- friendly output than we had at the end of the previous section. In the next section, we'll further explore the power of SELECT queries by compiling career statistics and calculating new statistics on the fly from values stored in the STATS table.