Subtypes
In a situation where we have a lot of similar features, roads for example, that we want to easily assign separate attribute values to and symbolize differently, etc., we can designate them as what are called Subtypes. The alternative for managing such data and information would be to create separate feature classes for, in this example, each type of road. This practice can affect the performance and ease of use of the database.
Subtypes can be created for spatial features in a feature class or for objects (records) in a nonspatial, standalone table. Subtypes can be created based on an existing field, or a new field is created to hold the subtype values.
A subtype is defined by a code and a description. The codes are stored in a field in the attribute table and must be either Short or Long Integer values. Each code value is equated to a descriptive category. Sounds a lot like a coded value domain but, as you will see, they are not the same.
In our exercise example, we will be creating road subtypes from integer values that represent six different road type categories.
Follow this link to download the data for this part of the lesson: Subtypes.zip
The zip archive contains two Esri File Geodatabases:
- SubtypesExercise.gdb
- SubtypesProject.gdb
A. Assigning features to subtypes
We are going to place roads in subtype categories according to the values in an existing field that contains integer values that represent six road type categories.
- Open ArcCatalog.
- Navigate to the SubtypesExercise.gdb geodatabase and take note of the two attribute domains: MaintPeriod and RoadSurface.
- Now look into the Roads feature class that resides in the SubtypesExercise.gdb geodatabase. Investigate the attribute data and the properties of the fields. The data in the RoadType field will be the basis for our subtypes, and we will see how attribute domains are involved, too.
As mentioned above, an existing field containing either Long or Short Integer values can be used as the basis for establishing subtypes. The integer values 1 - 6 in the RoadType field represent the following categories of road. Each will become a subtype within our Roads feature class.- 1 - Primary Hwy
- 2 - Secondary Hwy
- 3 - Light Duty
- 4 - Unimproved
- 5 - 4WD
- 6 - Trail
- Let's use those descriptions to establish our subtypes. Open the Feature Class Properties dialog window for the Roads feature class.
- Select the Subtypes tab. Take a look at the aspects involved in defining subtypes. Note the area of the dialog that allows us to set default values for fields and to specify attribute domains. Such settings will be imposed on our existing features and upon new features that we create, providing a measure of automated data integrity control. There are also a Domains button that allows us to review the attribute domains that exist in our geodatabase. This can come in handy when we want to set default values.
- In the Subtype Field dropdown list, select the RoadType field. Recall that it contains the integer values that will become the codes for our subtypes. Also note that the names of the fields in the feature class and any assigned domains are now visible.
- Let us now proceed to provide the Code values and the corresponding Description values for the subtypes. First, replace the 0 in the Code column with a 1, and then change New Subtype to Primary Hwy. Then, using the list of road types above, continue to supply code and description values in the Subtypes area. You can hit the Apply button at any time along the way to preserve your progress of establishing the settings.
- Notice that, by default, the first subtype listed has become the Default Subtype. Let's change that. Assume that we know that a roads improvement project will be beginning that will result in new Light Duty type roads being created. So, let's change the Default Subtype to Light Duty.
- Now, let's spend some time specifying the behavior of each subtype by modifying the settings for each via the Default Values and Domains area. One at a time, we will select each subtype in the Subtypes list and then specify settings for it in the Default Values and Domains area. In order to highlight one of the subtypes in the list, click on the small gray box at the left end of the row. Clicking anywhere in the row of one of the subtypes will select it but won't highlight it and so makes it harder to remember which one we are interacting with.
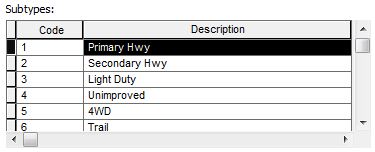 Figure 5.10: The Primary Hwy domain highlighted, by clicking on the small box on the left end of the row..
 - Select the Primary Hwy subtype, then, in the Default Values and Domains area, do three things:
- specify the Default Value for the Surface Type field by typing in concrete
- the MaintPeriod range domain was not assigned to the MaintPeriod field (yes, the domain and the field have the same name), so we can do that now -- click in the Domain cell in the MaintPeriod field row, and choose the MaintPeriod domain
- specify a Default Value of 2 (months) for the MaintPeriod field
- For each subtype, proceed to set a default value for the Surface Type field, assign the MaintPeriod range domain to the MaintPeriod field, and set a default value for the MaintPeriod field. Do so according to the following list. Don't forget that you can hit the Apply button at any time during the process to save your progress.
- Primary Hwy | SurfaceType = concrete | MaintPeriod = 2 (already taken care of above)
- Secondary Hwy | SurfaceType = concrete | MaintPeriod = 2
- Light Duty | SurfaceType = asphalt | MaintPeriod = 6
- Unimproved | SurfaceType = cobblestone | MaintPeriod = 8
- 4WD | SurfaceType = gravel | MaintPeriod = 12
- Trail | SurfaceType = grass | MaintPeriod = 12
The image below shows the dialog window with the Trail subtype chosen.
 Figure 5.11: The Subtypes dialog with the Trail subtype chosen. Then the Default Value and Domain are selected for the Surface Type and MaintPeriod fields.
- When you are finished, hit the OK button to dismiss the dialog window.
Now, we will go into ArcMap and see what the implementation of the subtypes has put at our disposal. - Open ArcMap and add the Roads feature class to the data frame.
One thing that is an implication of having subtypes assigned will be readily apparent. In the table of contents window, you will see that each subtype is listed along with a distinct symbolization. Go ahead and alter the symbol for each road type if you wish.
 Figure 5.12: The Table of Contents pane in ArcMap, showing the subtypes of the Roads feature class.
 - Now, initiate an edit session. In the Create Features window that opens, notice that each subtype has its own editing template. This serves to reinforce that each subtype is a category unto itself.
 Figure 5.13: The Create Features pane, showing that each subtype of the Roads feature class has an editing template.
 - Let's do something we've done before.
Still in an editing session, open the Roads feature class attribute table.
From the Table Options menu, Select All features. - Now, go to the Editor pull down list on the Editor toolbar and Validate Features.
You should discover that there are 4 violations. What are these based on? In each case, the MaintPeriod value is outside the range specified in the range domain assigned to that field. If you do not get a report of four errors, you may have neglected to assign the MaintPeriod domain to the field of the same name up above.
This reporting of attribute value violations can point to potential problems in the existing data, ones that are less apt to occur in the future now that we have exerted some control over the integrity of data that will be newly created in the context of our subtype settings. - While you are still in the editing session with the attribute table still open, create a new road feature:
- Click on one of the Roads subtypes templates in the Create Features window. Doing so will turn your mouse cursor into the Line construction tool, see beneath the Create Features window.
- Digitize a line feature
- Experiment further if you wish. Save your edits if you wish.
- Close ArcMap, saving your map document if you desire.
So instead of creating separate feature classes for the different road types, we put the road line features into subtypes which gave us the ability to specify unique default values for each new feature of a different road type category, and to assign, or not, certain attribute domains to each category.
B. Project - Subtype Creation
As was mentioned above, subtypes can be created for objects (records) in a nonspatial table. In this homework project, that is what you will do.
Investigate the field structure and attribute data in the Encounters table residing in the SubtypesProject.gdb geodatabase. In addition to the OBJECTID field that is automatically created by the GIS, you will find the following five fields: ID, Encounter, Category, EducationLevel, and BloodAlcohol.
The values of 1 and 2 in the Encounter field represent Distant Encounters and Close Encounters respectively.
The descriptions of the values in the Category field are as follows:
- DE-1 - Nocturnal Light
- DE-2 - Daylight Disc
- DE-3 - Radar-visual
- CE-1 - Light/object in Proximity
- CE-2 - Physical Trace
- CE-3 - Occupant
The encounter data descriptions are based on information I took from the UFO Casebook site: http://www.ufocasebook.com/Hynek.html
The values in the EducationLevel field are the number of years of school attended.
The values in the BloodAlcohol field are blood alcohol content measures. (Wikipedia Blood Alcohol Content Page/ http://en.wikipedia.org/wiki/Blood_alcohol_content)
Here is what I want you to do for this project:
- Create an attribute domain for the three Distant Encounter categories (the DE values)
- Create an attribute domain for the three Close Encounter categories (the CE values)
- Create an attribute domain for the education level data
- Create an attribute domain for the blood alcohol content data
- Create subtypes based on the values in the Encounter field and associate the appropriate attribute domains with each
- Based on the data, choose a default subtype (in spite of the small sample size)
- Based on the data, specify default values for the two encounter subtypes (again, in spite of the small sample size)
When finished, zip your SubtypesProject.gdb geodatabase and submit it to the Project 5 Drop Box.
It can be problematic if the result of zipping your file geodatabase results in an archive name like Sloan_SubtypesProject.gdb.zip -- the embedded .gdb needs to be avoided.