Lesson 6: Introduction to the Enterprise Geodatabase
Overview
Overview
Teaching enterprise geodatabase concepts online has historically been a challenge because it's been difficult to provide students with a "playground" to get hands-on experience. Fortunately, today it is much easier to give students hands-on experience with enterprise geodatabases through virtual machines hosted by Amazon. Over the next three weeks, you will use this Amazon cloud-based solution to set up and experiment with your own remote enterprise geodatabase server.
Objectives
At the successful completion of this lesson, students should be able to:
- set up a cloud-based enterprise geodatabase through Amazon's EC2 service;
- explain the concept of an Amazon Machine Image (AMI);
- stop and start their geodatabase instance;
- enable the transfer of files from their local machine to their geodatabase instance;
- describe the role of ArcSDE in allowing ArcGIS products to work with data in an RDBMS;
- list advantages of a multiuser (ArcSDE) geodatabase;
- connect to a SQL Server-based geodatabase through ArcGIS Desktop;
- create database login roles and assign data access privileges to those roles.
Questions?
If you have any questions now or at any point during this week, please feel free to post them to the Lesson 6 Discussion Forum.
Checklist
Checklist
Lesson 6 is one week in length. See the Canvas Calendar for specific due dates. To finish this lesson, you must complete the activities listed below. You may find it useful to print this page out first so that you can follow along with the directions.
- Work through Lesson 6.
- Complete the write-up of your organization's data users described on the last page of the lesson.
- Take Quiz 6.
Create a Cloud-Based Enterprise Geodatabase
Create a Cloud-Based Enterprise Geodatabase
Using the Amazon service mentioned above, Esri makes it possible to set up cloud-based installations of ArcGIS Enterprise, software required for implementing an enterprise geodatabase. Because our Cloud and Server GIS course also guides students through putting together an instance of ArcGIS Enterprise, the instructions below are borrowed from that course. While our focus in this course will be on the enterprise geodatabase that we'll implement on the instance with ArcGIS Enterprise, a side benefit is that you'll also be able to experiment with ArcGIS Enterprise functionality if you like.
A. Prepare to work in the Amazon cloud environment
Go to Amazon Web Services [1] and click on "Create an AWS Account."
If prompted to create a Business or Personal account, choose Personal. Please make careful note of the password you select when setting up your account, you will be needing it. It is characteristic of Amazon Web Services that things work the way they are supposed to, but you don't get a lot of hand-holding. So, if you lose your password, I'm not sure it would be easy to recover it, and you will need to fill out a form with personal information.
Second, you will need to provide payment information, including a credit card number. If you are careful and follow the course instructions about explicitly stopping your instance (virtual machine) when you are not using it, you should be able to complete the coursework while incurring charges of $20-$40. The current step of signing up is free, but you should be aware that you will start being charged immediately upon starting to use AWS services. As part of this step, you'll be asked to select a support plan. The Basic (Free) support is all you need for this class.
Third, there is an identity confirmation step during which you will receive a phone call and enter a code. This ensures you are a human. Amazon does not use the phone number provided here for other purposes.
You can monitor your billing status by clicking your user name at the top-right of the AWS screen and choosing "My Billing Dashboard." On the right side of the billing dashboard, you should see a "Month-to-Date Spend by Service" section, from which you can view details about what you're being charged for in the current month or any other month.
If any of these directions are confusing or inaccurate, please post a question or comment to the Lesson 6 discussion forum.
B. Create a VPC and key pair
In a few moments, we'll see that two of the settings involved in launching a new instance in EC2 are the VPC and key pair. A VPC (Virtual Private Cloud) is sort of your own special space carved out of Amazon's cloud. Instances in a VPC can see each other and your own network fairly easily, but they're not immediately accessible from elsewhere without some extra work on your part. That's a good thing for security.
A key pair is another security measure that will come into play when you log in to your instance for the first time. You will be logging in to your instance as a user named Administrator. The password for the Administrator user will be encrypted by AWS. The procedure for getting that password so that you can log in to your instance involves 1) creating a key pair (one key held by Amazon and another key given to you) in the AWS Management Console, 2) providing the name of that key pair when launching the instance, and 3) using the key pair after the instance has been created to decrypt the password.
Note: If you've taken our Cloud and Server GIS course (GEOG 865), you will have already created a VPC and key pair. You may skip over the steps in this section (or do them again if you like) and pick up with section C below.
- Go to the AWS Management Console [2] and click on VPC (under the Services > Networking & Content Delivery heading).
Creating a VPC is potentially a very technical and complex activity, but it's something most people have to do at first. For that reason, Amazon has made a wizard for setting up a real basic VPC. This will suffice for our purposes.
- Click Create VPC.
- Select the VPC and more option, then under the Name tag auto-generation heading confirm that the Auto-generate box is checked and enter a name tag of geog868. These two settings will automatically name some of the AWS resources that are about to be created.
- Set the Number of Availability Zones to 1. In a real-world implementation, you'd probably want at least two, but one should be fine for our classwork.
- Set the Number of public subnets to 1 and Number of private subnets to 0.
- Leave the other settings at their defaults and click Create VPC.
- After a few moments, AWS should be done doing its thing, and you can click the View VPC button.
When we launch our instance in a few moments, we want it to be assigned a public IP address so that we can connect to it using Windows Remote Desktop. Whether the instance is assigned a public IP address or not depends on whether the subnet we just created allows for that. The default setting is for it to not assign one, but that's something we can change. - Under the Virtual Private Cloud heading in the left-hand pane of the console, click on the Subnets link. You'll see just one subnet listed, unless you've created a VPC/subnet before.
- In any case, you want to right-click on the named subnet and choose Edit subnet settings.
- Check the Enable auto-assign public IPv4 address box and click Save.
With a VPC and subnet created and configured, let's turn our attention to the key pair.
- Go to the EC2 Management Console [3] (click the link to the left or select Services > Compute > EC2) and under the Network & Security heading click on the Key Pairs link in the navigation pane on the left side of the page.
- Click Create Key Pair.
- Give it a Name (e.g., geog868_keypair) and change the file format to .pem. Then click Create.
- Save the .pem file produced by AWS to a folder on your machine where you'll be able to find it later. (It will likely be automatically saved to your Downloads folder. You may want to move it to a location where you're less likely to delete it mistakenly.)
C. Create your own cloud-based instance of ArcGIS Enterprise
Esri provides two ways to deploy ArcGIS in AWS: using Amazon's CloudFormation service and Amazon's AWS Management Console. For our purposes, the AWS Management Console is the best option, so we will lead you through the launching of an instance via that route. However, if you decide to deploy ArcGIS in the cloud as part of your job, you may want to explore the CloudFormation option as well. Instructions for both can be found in Esri's documentation [4] [http://server.arcgis.com/en/server/latest/cloud/amazon/use-aws-management-console-with-arcgis-server.htm]. Note that this link opens the Management Console instructions; instructions for the CloudFormation method can be found through the navigation headings on the left side of the page.
The basic idea behind what we're about to do is that Amazon has made it possible for vendors like Esri to create machine images (configurations of operating system, software, data, etc.) that can serve as blueprints for the making of child instances. Esri has created several of these AMIs (Amazon Machine Images): one that runs ArcGIS Enterprise on the Linux OS Ubuntu with Postgres, one that runs ArcGIS Enterprise on Windows with SQL Server, etc. Third parties (like us) can discover and "subscribe" to these AMIs through the AWS Marketplace.
- Browse to the AWS Marketplace description of the ArcGIS Enterprise 10.9.1 AMI [5] [https://aws.amazon.com/marketplace/pp/prodview-rh32a6tw3ju4a?sr=0-3&ref_=beagle&applicationId=AWSMPContessa].
- In the upper right, click the Continue to Subscribe button. You'll be taken to a page of Esri's Terms and Conditions for using their software on AWS.
- Assuming you accept the terms, click the Continue to Configuration button in the upper right.
You'll be taken to a page where you can make settings in the following categories prior to launching your instance: Delivery Method, Software Version, and Region.
- For Fulfillment option, accept the default option of 64-bit Amazon Machine Image (AMI).
- For Software version, accept the default option of 10.9.1.
- For Region, select US East (N. Virginia).
- Click the Continue to Launch button in the upper right.
On this next page, you can make settings in the following categories: Choose Action, EC2 Instance Type, VPC Settings, Subnet Settings, Security Group Settings, and Key Pair Settings.
- Under Choose Action, select Launch from Website.
- For EC2 Instance Type, select m5.xlarge. This is a lower-cost option for running ArcGIS Enterprise at a reasonable speed for this course. At the time of this writing, it costs about 37 cents per hour to run an m5.xlarge instance of Windows in most regions.
In a real-world implementation, you would probably want to use a higher performing instance. Amazon provides pricing info on the various instance types available through EC2. Pricing info for current generation instance types such as m5 can be found here [6][https://aws.amazon.com/ec2/pricing/on-demand/]. (Scroll down to the On-Demand Pricing section.) - Under VPC (Virtual Private Cloud) Settings, select the VPC you created above (or one that you had created at some other time).
- Under Subnet Settings, accept the default option.
Note: It's not important that you have much understanding of VPCs and subnets for the purpose of this course. However, if you are interested in implementing a real-world cloud solution, it would be smart to read into them further. This overview from Amazon [7] [https://docs.aws.amazon.com/AmazonVPC/latest/UserGuide/VPC_Subnets.html] might be a good starting point.
- Under Security Group, select the Create new based on seller settings option.
- Give your security group a Name and Description, such as geog868_securitygroup and Security rules for my Geog 868 ArcGIS Enterprise instance. Click Save.
- Under Key Pair, you should see the key pair you created in the step above (or one that you had created at some other time).
- Finally, click the Launch button in the lower right.
- On the resulting "Congratulations" page, click on the EC2 Console link. (The terms EC2 Console and AWS Management Console for our purposes refer to the same thing and are used interchangeably.)
On the Console page, you'll be taken to a listing of your Instances. You should see an entry for the instance you just launched. The instance is running (shown under Instance state), but still initializing (shown under Status check).
It should take anywhere from 5-30 minutes for your instance to be ready for use. You'll know it's ready when you see the Status change from Initializing to 2/2 checks. The Status sometimes fails to refresh itself, so you can click the Refresh button (built into the console, not your browser's) every few minutes if you don't see the 2/2 checks status.
Note: If the status check reports a failure (i.e., 0 or 1 passed checks), troubleshooting is often as simple as turning the instance off and on again. Do this by right-clicking on the instance, selecting Stop Instance, waiting until its state changes to Stopped, then right-clicking and selecting Start Instance.
You may have noticed that the instance doesn't have a name. While you wait, you can give it one. - If you hover your mouse over the instance's Name field, you should see a pencil icon appear. Click on this icon to obtain a text box, then enter a suitable name. (Something like geog868 will work.)
Every instance you create has a public-facing address, or Public DNS that can be used to reference the instance from anywhere on the Internet. The challenge is that this address changes every time you stop and then start your instance. To give your machine a more permanent address, you'll set up an Amazon Elastic IP. This is an unchanging address that Amazon allocates to you for your use. You can then associate it with any instance you choose. Every time you stop and start the instance, you'll associate it with this IP address. - Now, in the left-side navigation pane of the Console, under Network & Security, click Elastic IPs.
- Click Allocate New Address, accept all of the default settings in the resulting panel, and click Allocate.
You should see a message in a banner along the top of the page indicating that your request was successful along with the address that was allocated to you, such as 107.20.220.152. You might write down your IP address, but you should be able to easily locate it in the AWS Console when you need to. - As you did with the instance, you may want to assign a name to your new Elastic IP address. Hover your mouse over the Name field and click the pencil icon to assign a name like geog868_elasticip.
- You'll now want to associate the new Elastic IP address with your instance. Performing this step can be initiated by clicking the Associate this Elastic IP address button on the message banner, or by selecting Actions > Associate Elastic IP address.
- Either way, you'll be shown a page with a box for specifying the instance ID. Click in this Instance box, and you should see a list of the instances you've launched. Choose the correct instance and then click the Associate button. You'll now be able to access your instance through a consistent IP address, even after stopping/re-starting it.
There were a lot of steps involved in launching this instance and some of it may have seemed confusing, but the good news is you should not need to go through these steps again. Stopping and re-starting your instance now that it's been created is a much simpler process.
D. Starting and Stopping your Instance via the AWS Management Console
Whether starting or stopping your instance, you'll want to be viewing the Instances page in the AWS Management Console [8].
When you've finished your coursework for the day, you can Stop your instance as follows:
- Right-click on the instance, and select Stop instance.
When you want to Start your instance:
- Right-click on the instance, and select Start instance.
Note: The biggest benefit to having a consistent IP address associated with an ArcGIS Enterprise/Server instance comes when you're using it to develop map/feature/geoprocessing services to be consumed by an app or a third party. A constantly changing IP address would render such services practically unusable. We won't be authoring such services in this course, though you can check out our Cloud & Server GIS course [9] if you're interested in learning how to do that. In this course, the benefit to the Elastic IP will be avoiding the need to locate the instance's new Public DNS address each time you want to re-start it and connect to it through remote desktop. If you'd rather not bother with associating an Elastic IP with your instance, then you're welcome to skip that step and instead look up the instance's new Public DNS and connect through that address.
If you just completed section B above, then your Enterprise Geodatabase instance is currently running, and we're going to work with it in the next section. If you are going to continue on, you don't need to stop your instance now. But be sure to stop it when you're ready to quit working.
E. Logging in to your Enterprise Geodatabase Instance
Now that your site has been created, you can get ready to log in to the instance and start working with your software.
Your instance needs to be running, so if you did Stop it at the end of the previous section, open the AWS Management Console and Start it again.
Recall that when launching the instance, you created a new Security Group using the default Create new based on seller settings option. This set up the instance so that it would accept http and https connections from any IP address. We now want to log in to the instance using the Windows Remote Desktop Connection app, but to do that, we need to add a rule to the security group allowing that sort of traffic.
- Looking at the Instances page in the AWS Management Console, click on your instance to select it. You should see a few tabs of information about your instance appear in the bottom panel. Click on the Security tab.
- Click on the geog868_securitygroup link (or whatever you named your security group) to view the rules associated with it.
- In the lower panel, under the Inbound rules tab, click the Edit inbound rules button.
- Click the Add rule button and in the row added for the new rule, select RDP (Remote Desktop Protocol) from the Type options.
Next, choose My IP from the Source dropdown list and click Save rules.
Important: You've just specified that your instance should accept remote desktop connections from your current IP address, and you'll shortly make your first remote desktop connection. It's possible that your IP address will change over the rest of the term. For example, your Internet service provider might use dynamic IP address assignment. Or you might be working on a laptop in a different location. If that's the case, then you'll need to come back and edit your RDP rule to accept connections from whatever your new IP address happens to be at that time. Alternatively, you could also choose to set the Source to Anywhere - IPv4, which would allow any IP address to attempt an RDP connection, but eliminate the need to update the RDP rule whenever your connecting-from IP address changes. For a low-stakes instance such as the one you're using in this class, you may decide it's worth the risk. (Anyone wanting access to your instance would still need to supply your password. More on that below.)
Now that the instance is ready to accept remote desktop connections, there are two bits of information we'll need to make a connection: the instance's IP address and the password of the Administrator account. -
Copy and Paste your Elastic IP address into a simple text editor like Notepad.
- Return to your list of EC2 Instances in the AWS Management Console, right-click your instance name, select Security > Get Windows Password, then follow the Browse link to get to and open the key pair file that was created when launching the instance. (It's the .pem file.)
The text box will fill with the key pair information. - Click on Decrypt Password. The Password can be seen at the bottom of the window.
Click the Copy button next to the password and paste the decrypted password into the text document where you pasted the IP address.
Hit the Close button. - Now, open the Windows Remote Desktop Connection app on your machine. (If you're working on a Mac, which you're welcome to do for Lessons 6-8, the Microsoft Remote Desktop app should operate much the same as what's described here.)
- In the Remote Desktop Connection dialog, expand the Show Options list > Local Resources tab > More button and ensure that the box for Drives is checked, then click OK. This will permit you to copy data from your machine on to the remote machine (in this case, your Amazon EC2 instance).
- Under the General tab, type or paste the Elastic IP of your instance into the Computer input box.
In the User name input box, type Administrator, then click the Connect button.
In the Do you trust this Remote connection? Window, click Connect again. -
In the Windows Security dialog, log in with the following credentials:
User name: Administrator
Password: the password you decrypted in the AWS Management Console
Click OK. -
You'll probably receive a warning that "the identity of the remote computer cannot be verified." Go ahead and answer Yes, that you want to connect anyway.
You should see the desktop of your remote instance open up.
F. Disabling IE ESC
As a security precaution, it's usually not a good idea to go around browsing the web from your production server machine. To do so is to invite malware intrusions onto one of your most sensitive computers. The operating system on your instance, Windows Server 2016, enforces this by blocking Internet Explorer from accessing most sites. This is called IE Enhanced Security Configuration (ESC). IE ESC gets burdensome when you're using the server solely for development or testing purposes, like we are. To smooth out the workflows in this course, you'll disable IE ESC right now and leave it off for the duration of the course.
- In your remote instance, go to Start > Server Manager.
- Click Local Server.
- Scroll over to the right and find IE Enhanced Security Configuration. Click the On link to access the options for turning it off.
- Select Off for both Users and Administrators and click OK. (Heads-up – the IE Enhanced Security Configuration will still show “On” until you close the Server Manager.)
- Close the Server Manager.
G. Resetting your instance password
Amazon gave you a pretty strong password for this instance, but it's not one you're liable to remember easily. You should change the administrator password to something you'll remember.
- On the remote instance, click Start > Windows Administrative Tools.
- Click on Computer Management.
- Expand Local Users and Groups and click Users.
- In the list of users, right-click Administrator and click Set Password > Proceed. The password rules are fairly stringent; please see them in the image in Figure 6.1, below.
Type and confirm a new password that you can remember. In the future, you can use this password when logging in to your instance.
Close the Computer Management and Administrative Tools windows.
Do NOT close your Remote Connection desktop.
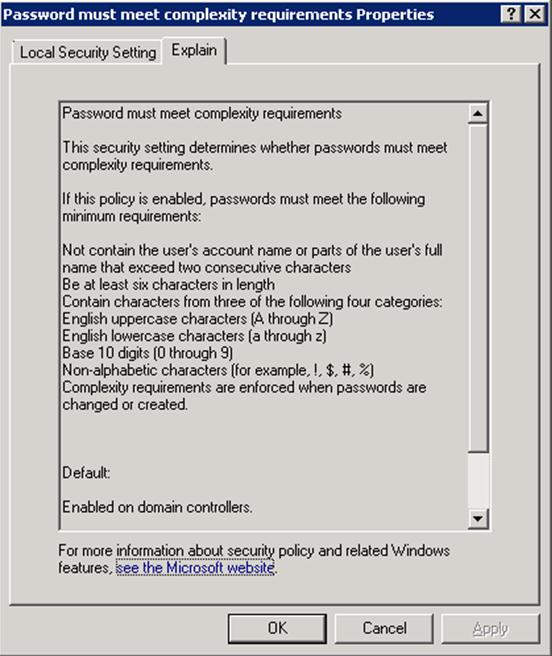
Figure 6.1: Password Security Setting Rules and Restrictions
H. Licensing ArcGIS Server on the Instance
As with the resetting of the instance password, these licensing steps need only be performed once after launching your instance.
- In preparation for completing the software authorization, go into the Lesson 6 module in Canvas and click on the Authorization file for ArcGIS Server link. This file has a .prvc file extension. You can download this authorization file on the instance or on your local machine.
- Run the Software Authorization for ArcGIS Server Authorization app on your instance (found in the ArcGIS folder on the Start menu).
- Select the I have received an authorization file... option, and click Browse. You should see drives from both your instance and your local machine.
- Locate where you stored the .prvc file you downloaded from Canvas, select it, then click Next.
- Select Authorize with Esri now using the Internet, and click Next.
- Accept the filled-in information (for one of the course authors/instructors), and click Next.
- Set Your Organization to Education/Student, Your Industry to Higher Education, Yourself to Student, and click Next.
- The Authorization Number should be filled in. Click Next.
- Authorization numbers may/may not also be filled in for several extensions. We won't need extensions for what we're doing in this class, so just click Next regardless.
- Leave the boxes for other extensions unchecked, and click Next.
- Click Finish.
I. Installing SQL Server Express on the instance
Esri supports the implementation of enterprise geodatabases using a number of relational database management packages (e.g., Oracle, SQL Server, Postgres). To expose you to another RDBMS that's commonly used in the industry, I'm going to ask you to install SQL Server Express. (This is a free, lite version of Microsoft's SQL Server package. For everything we'll do in this class, the two SQL Server packages operate the same.)
- In Canvas, download the SQL Server Express 2017 executable and copy it to your instance.
- Run the executable, choosing the Basic installation type.
After a few minutes, you should see that installation completed successfully. We'll also want to install SQL Server Management Studio, an app that's analogous to pgAdmin from earlier in the course. - Click the Install SSMS button at the bottom of the SQL Server Express installation dialog, which should open a page in your web browser.
- Locate and click on the Free Download for SQL Server Management Studio (SSMS) link.
- Run the SSMS installation executable, clicking Install on the resulting dialog.
With that, we're ready to begin playing with our enterprise geodatabases. First, you'll read a bit about ArcSDE, a technology that enables the ArcGIS products to work with data stored in an RDBMS.
What is ArcSDE?
What is ArcSDE?
ArcSDE is software that enables ArcGIS applications to store, manage and retrieve data in a RDBMS. The “Arc” comes from the ubiquitous naming convention used by Esri for their products. The SDE part stands for Spatial Database Engine.
ArcSDE is sometimes described as middleware, a layer of software that sits between Esri’s ArcGIS products and RDBMS software and manages data exchanges between them. It makes it possible for GIS data users to utilize their data without need for special knowledge of the underlying RDBMS.
As of ArcGIS 10, ArcSDE supports the commercial RDBMS’s Oracle, SQL Server, DB2, and Informix, and the free and open-source PostgreSQL.
In the last lesson, you worked with file geodatabases, a format that Esri recommends for small, single-user projects. Esri often refers to geodatabases stored in an RDBMS and accessed using ArcSDE as multiuser geodatabases because they are better able to support access by more than one user. The advantages of a multiuser geodatabase include:
- better data security through the granting of different levels of access to datasets to different users;
- backup and recovery capabilities;
- versioning which provides the mechanism for multiple users to access and edit data simultaneously;
- archiving which makes it possible to efficiently track changes made to datasets over time.
Esri enables users in the Amazon cloud to run ArcGIS Enterprise on either the Ubuntu operating system or Windows. While there would be some benefit to seeing how Postgres operates as an Esri enterprise geodatabase, we're going to proceed with SQL Server on Windows, as SQL Server is more commonly used in the industry as a geodatabase DBMS. That said, the concepts involved in administering an enterprise geodatabase are similar regardless of the RDBMS used, so what you learn here will be transferrable to other RDBMS’s.
One of the first things you might want to do after launching an enterprise geodatabase is set up login roles and privileges for those roles. That will be the focus of the next section of the lesson.
Adding Users and Data to Your Geodatabase
Adding Users and Data to Your Geodatabase
Logins and users in SQL Server
Before diving into enterprise geodatabase concepts, it's important to understand some basics of working with SQL Server, the DBMS that we'll be using on our Amazon cloud instances. (While we're actually using SQL Server Express, I will refer to the software as simply SQL Server, since the two operate essentially the same for our purposes in this class.) Access to SQL Server itself is granted through logins. A login allows someone to authenticate with SQL Server and answers the question, "Who is connecting?" Access to an individual database (of which there could be several for a given SQL Server instance) is granted through users. Whereas logins are concerned with authentication, user accounts provide authorization to perform different tasks with a database. They answer the question, "What can this person do in the database?" As we'll see, logins must be mapped to database user accounts in order to work with database objects. This blog post [10] provides further information.
Related to logins and users is the concept of roles. A role provides a way to group similar users together so that permissions can be granted more easily. Database administrators can define their own desired roles and make permission changes for those roles as they see fit. SQL Server also comes with a set of fixed server and database roles whose permissions cannot be changed. Among these is the sysadmin role, which, as you might guess, has permissions that grant full control over the server.
Geodatabase ownership
All databases found on a SQL Server instance have a special user called DBO (short for database owner). Any member of the sysadmin fixed server role who uses a database is mapped to the DBO user, and any object created by any member of the sysadmin fixed server role belongs to DBO automatically.
An important consideration when implementing an enterprise geodatabase in SQL Server is who will be the owner of the geodatabase -- the DBO user or the SDE user. While the DBO user is the person who administers the database at the SQL Server level (e.g., creating new users and roles), the SDE user is the person who administers the database within ArcGIS (e.g., updating database statistics and compressing the database). Esri's documentation includes a page that discusses the pros and cons of each [11] [https://pro.arcgis.com/en/pro-app/help/data/geodatabases/manage-sql-server/comparison-geodatabase-owners-sqlserver.htm]. Generally speaking, if the SQL Server database administrator and the geodatabase administrator are the same person, then having the DBO user own the geodatabase is sensible. If, on the other hand, those two roles are filled by different people, then having the SDE user own the geodatabase is probably more advisable. In this course, we're going to work with a DBO-owned geodatabase.
A reminder, if and when you restart your instance of the AMI
In the next section, you will be back working, via your Remote Desktop Connection, on your instance of the Amazon Machine Image (AMI) that holds our enterprise geodatabase, etc.
If you STOP-ed your instance on purpose, or if your Remote Desktop Connection gets interrupted, you will need to re-START your instance via the EC2 Console.
And, if the IP address of the machine you're connecting with has changed since your last connection, remember that you may need to edit the RDP rule to allow connection from your new IP address.
Changing authentication settings
Before we move on to setting up geodatabase users and roles, there are a couple of authentication settings we will change to make our lives a bit easier in this safe learning environment.
The first will be to set up SQL Server to allow mixed-mode authentication. By default, SQL Server only allows authentication through operating system logins. However, it is also possible to authenticate via user names and passwords stored in the database. In a real-world implementation, you may find it advantageous to utilize Windows authentication. But since that involves a bit of extra work on the instances we've just created, we'll go with SQL Server authentication.
The second setting we'll make will be to relax the default password standards on the Windows Server operating system that filter down to SQL Server. This will allow us to avoid the need to create lengthy, complex passwords.
- In your remote desktop window, launch the Microsoft SQL Server Management Studio. You should find it under Start > Microsoft SQL Server Tools.
(You might consider right-clicking on the Management Studio application and selecting Pin to Start and/or Pin to Taskbar for quicker access to it later.) - In the Connect to Server dialog that appears, enter LOCALHOST\SQLEXPRESS as the Server Name and click Connect.
- In the Object Explorer pane on the left side of the window, right-click on the LOCALHOST entry at the top of the tree and select Properties.
- Click on the Security page, then change the Server Authentication option from Windows Authentication mode to SQL Server and Windows Authentication mode. Click OK, and click OK to the note about needing to restart for changes to take effect.
- Right-click on the LOCALHOST server, and choose Restart.
- While the server is restarting, open the Server Manager (found under the Start menu).
- In the upper right of the Server Manager window, select Tools > Local Security Policy.
- Under Account Policies > Password Policy, double-click on Password must meet complexity requirements and choose Disabled. Click OK, and close both the Local Security Policy dialog and the Server Manager.
We'll now be able to authenticate using simple, easy-to-remember passwords. Obviously, in a real-world implementation, you would want to think twice before lessening your database security like this.
Create an Enterprise Geodatabase
Esri's ArcGIS Server/Enterprise AMIs have gone back and forth, sometimes including database software and a pre-configured enterprise geodatabase, sometimes not. This version's AMI does not -- we had to install the RDBMS ourselves -- so let's now create our first database.
- Return to SQL Server Management Studio, and Connect to the local server.
- Right-click on Databases, and select New Database.
- Set the Database name to egdb (short for enterprise geodatabase).
- Click OK to create the database.
At this point, this is an "ordinary" database. We'll next connect to the database in ArcCatalog, then use an Esri tool to turn it into a "geo" database.
Connect to the database as DBO
We'll start our work with the egdb database by connecting to it as the DBO user.
- On your remote connection desktop, open ArcGIS Pro if it's not open already. I suggest selecting Start without a template.
- In the Catalog pane, right-click on Databases, and select New Database Connection.
- Choose SQL Server as the Database Platform if it's not selected already.
Specify LOCALHOST\SQLEXPRESS as the Instance.
For Authentication type, select Operating system authentication. You'll see that there are no User name and Password fields as you would see if you had instead chosen Database authentication. This is because you'll be authenticating based on how you logged in to the current Windows Server session (in this case as the user Administrator who has system administrator privileges in both Windows and SQL Server).
Select egdb as the Database to connect to, and click OK. A new ready-to-be-named connection will appear under the Databases heading. The user making the connection and the geodatabase being connected to are important components of the connection, so I suggest including that information in the connection name. - Name your connection dbo_egdb.sde. The user is dbo and the database is egdb.
The egdb database is empty since you just created it, so you won't see anything listed in it yet.
Convert the database to a geodatabase
- Open the Geoprocessing pane (Analysis > Tools). (It may take a while for this to open the first time.)
- Click the Toolboxes heading, then expand Data Management Tools > Geodatabase Administration, and open the Enable Enterprise Geodatabase tool.
- Set the Input Database Connection parameter by clicking on the Browse button (folder icon) and selecting the dbo_egdb connection you just created.
- Set the Authorization File parameter by navigating to C:\Program Files\ESRI\License10.9\sysgen\keycodes. (Note: If you're unable to browse to this file, see the workaround described in this tech support article [12].)
- Click OK to execute the tool. If the tool executed successfully, the resulting dialog will tell you that it:
Created geodatabase tables and stored procedures.
Finished creating geodatabase schema.
Before adding some data to the geodatabase, let's discuss the importance of users and roles in a geodatabase context and lay out the scenario for the rest of our work in this section.
Users and roles in the geodatabase
Database roles enable the database administrator to improve security by assigning users or groups of users various levels of access to the database tables. Commonly used roles in an enterprise geodatabase include viewer, editor, etc. As the names of these roles imply, one user group might be limited to read-only access to data while another group might be allowed to both read and edit the data. While we're only getting to this topic now, you should keep in mind that similar strategies can also be applied to the kind of Postgres/PostGIS databases we talked about in previous lessons.
For illustration purposes, imagine you work in the U.S. federal government and that you are administering a geodatabase that will host data from a number of different departments: state boundaries from the Census Bureau, major highways from the Department of Transportation, rivers from the Department of the Interior, etc. You want each department to have stewardship over their data and to have just read-only access to other departments' data.
Click here to download to your machine the Lesson 6 data [13]. In the steps below, you will then copy said us_data.zip archive file from your local machine to your remote instance. The Downloads (or Documents) folder on your remote instance is a logical place to paste and unzip the data.
- Go to the taskbar on your remote desktop, and open the File Explorer (via the file-folders icon).
The File Explorer will open to the contents of This PC. In the Devices and drives list, you’ll see the drives that exist on your local computer and the drives that are on your remote instance. - Find the us_data.zip file that you just retrieved, and copy it to the Local Disk Downloads folder.
- Unzip the us_data.zip file that you just uploaded.
There are four Shapefile datasets.
Note that in our enterprise database environment, vector data is stored as feature classes. So, later, the Shapefile datasets that I gave you will be uploaded and converted to feature classes.
One aspect of the data loading/creation process that's worth keeping in mind is that when a feature class or feature dataset is created in the geodatabase, its name in the ArcGIS applications has two parts:
<owner>.<feature class/feature dataset>
Some organizations set up users specifically to handle data loading/data creation so that the owner listed in the two-part name clearly conveys the department that maintains the data. Following on this practice, let's add a user to the database who will control the loading of the Census data.
Add a data loader/creator to the geodatabase
The Create Database User tool is one of several geodatabase administration tools available through the ArcGIS Pro GUI.
- Again on your remote connection desktop, return to the geoprocessing Toolboxes.
- At the same Data Management Tools > Geodatabase Administration path, open the Create Database User tool.
In the Create Database User dialog, set the Input Database Connection field to your dbo_egdb.sde connection.
We're going to use database authentication for this user, so leave the Create Operating System Authentication User box unchecked.
Enter a Database User name of census.
To make this easy to remember, enter the same string (census) for the Database User Password.
Leave the Role field empty. We'll discuss roles shortly, but you should note that if any database roles existed, you would have the option of associating the new user with a role in this dialog.
Click Run to create the new user.
With the new user created, let's add a database connection based on that user's authentication parameters. - As you did earlier, access the New Database Connection dialog.
The Database Platform and Instance should be correctly specified as SQL Server and LOCALHOST\SQLEXPRESS already.
Change the Authentication Type to Database authentication.
Enter the census:census User name and Password combination established above.
You will probably want to leave the Save user name and password box checked for your work here, though this is another setting you'd want to consider carefully in a real-world implementation.
If you entered the name and password properly, you should be able to select egdb from the Database dropdown.
Click OK to create the connection. - Following on the convention suggested earlier, rename the connection to census_egdb.sde.
Loading data
With the census user created, let's work as that user to load the state and city data you downloaded above. Because feature datasets are frequently used to house feature classes, let's create one of those first.
- Right-click on the census_egdb.sde connection, and select New > Feature Dataset.
- The Output Geodatabase parameter should be filled automatically with the census_egdb.sde connection, so leave that setting in place.
- Set the Feature Dataset Name to usa.
- The data you'll be importing are in geographic coordinates, NAD83 datum, so specify that as the Coordinate System for this feature dataset, and click Run.
You should see a new CENSUS.usa feature dataset appear under your connection. - In the Catalog pane, right-click on Folders, select Add Folder Connection, and make a connection to the folder where you copied the data (if the Downloads folder, you'll need to navigate to C:/Users/Administrator/Downloads).
- Now, expand the census_egdb.sde connection, and right-click on the CENSUS.usa feature dataset, and select Import > Feature Class(es).
Setting the Input Features parameter, browse to where you unzipped the us_data shapefiles, and select the us_boundaries and us_cities shapefiles.
Confirm that the Output Geodatabase is set to your CENSUS.usa feature dataset and click Run.
After a few moments, new CENSUS.us_boundaries and CENSUS.us_cities feature classes should appear in the CENSUS.usa feature dataset. - For additional practice, repeat the steps above to create a new transportation user, connect as that user, and load the us_roads shapefile into the geodatabase.
An important point to note about the process we just went through is that users created via the Create Database User tool have the ability to load/create data. It's generally considered a best practice to restrict this ability to a small number of trusted administrators to avoid cluttering the database with unwanted data. We'll now see that following this best practice requires adding lower-permission users through a different process.
Adding data editors/viewers to the geodatabase
Returning to our scenario, the users in the departments are as follows:
| Department | editors | viewers |
|---|---|---|
| Census | Moe | Larry, Curly |
| Transportation | Lisa | Bart, Homer |
| Interior | Stan | Cartman, Kenny |
To add these users, we'll need to return to the SQL Server Management Studio.
- If you closed your Management Studio window earlier, re-open it and connect to LOCALHOST\SQLEXPRESS using Windows Authentication.
- In the Object Explorer, expand the Security folder, then right-click on Logins and select New Login.
- In the Login – New dialog, enter a Login name of Moe.
Select SQL Server Authentication, then a Password of Moe (it's case-sensitive, same as the login name).
Uncheck each of the three checkboxes (Enforce password policy, Enforce password expiration, User must change password at next login). Again, this is a place where you might choose differently in a real-world implementation.
Set the Default database to egdb.
Click OK to create the new login. - If you expand the Logins folder, you should now see a Moe login, along with census and transportation, which were created by the ArcGIS Add User tool earlier.
We'll now associate the new login with the egdb database that you created above. - In the Object Explorer, navigate through the following folders: Databases > egdb > Security > Users. Again, you should see census and transportation here, listed as users in the egdb database.
- Right-click the Users folder and click New User. In the Database User – New dialog:
Enter a User name of Moe.
Enter a matching Login name of Moe. (You could also click the '...' button to the right to browse the list of logins associated with the SQL Server instance.)
Important: Leave the Default schema blank. If you wanted Moe to have the ability to own data in the geodatabase (i.e., to create new feature classes), then you would enter Moe as the default schema. The ArcGIS Create Database User tool makes this setting for the new user, which is why we're not using that tool to create lower-level users like Moe, but instead using SQL Server Management Studio as outlined here. The reasoning behind the different user creation process is found in Esri's documentation [14]:
"Users who own data must also have schemas in the database that have the same name as the user name."
Click OK. Moe should now have access to the egdb database. - Return to ArcGIS Pro and establish a database connection for user Moe following the steps used to create the census_egdb connection earlier.
Note: At this point, you're emulating what a non-administrative user of your database would go through to connect to the geodatabase. Earlier connections and data loading procedures are tasks that you would be more likely to carry out in a database administrator role.
After creating a connection for Moe and opening that connection, you'll find that Moe is not able to see any of the data that's been loaded into the database. We'll look at how to fix that shortly. - Repeat the steps above to add Larry and Curly (and Lisa, Bart, and Homer if you're so inclined) as egdb geodatabase users.
Creating roles
In order for users to have the ability to view and/or edit the data in a geodatabase, the data owner must grant those privileges. That can be done on a user basis (using an ArcGIS tool), but the process can be done more efficiently by assigning users to roles and assigning privileges to the roles. In this section, you'll create a viewer role and an editor role in the egdb database.
One important note on roles: while the privileges must be granted by the data owner (the census and transportation users in our scenario), the roles must be created by someone with sysadmin privileges. That is the DBO user in our implementation.
- Return to the Geoprocessing pane > Toolboxes > Data Management > Geodatabase Administration. Open the Create Role tool.
- In the resulting dialog, set the Input Database Connection parameter to your dbo_egdb.sde connection.
- For Role, enter viewer.
- Confirm that Grant role (and not Revoke role) is selected in the next dropdown.
- In the User Name(s) field, enter a list of the users you created in the section above who were listed as viewers. As it says in the Tool Help panel, the user list should be separated by commas (no spaces).
- Click Run.
- Repeat these steps to create an editor role for the appropriate users.
If you're paying close attention to the scenario, you might be thinking we should have separate editor roles for each of the three data owners, such that Moe can only edit his Census data, Lisa can only edit her Transportation data, and Stan can only edit his Interior data. You're welcome to implement that sort of design if you wish, but for simplicity's sake, feel free to create just a single editor role.
Manage geodatabase privileges
Finally, we'll now work through the data owner connections to assign the proper privileges to go with the roles just created.
- Return to the Geodatabase Administration toolbox and open the Change Privileges tool.
- For the Input Dataset parameter, browse to the CENSUS.usa feature dataset (through either the census or dbo connection).
- The User parameter can be set to either a user or a role. We want to set the viewer role's privileges here, so enter viewer for this parameter.
- For the View parameter, select the Grant view privileges option.
- For the Edit parameter, confirm that the Do not change edit privileges option is selected.
Since you learned about SQL earlier in the course, it should make sense that the View privilege has Select next to it in parentheses and that the Edit privilege has Update/Insert/Delete next to it. - Click Run to apply the changes. This will provide the same level of privileges across all feature classes housed within the usa feature dataset.
- Repeat these steps to assign both View and Edit privileges to the editor role and, if desired, repeat the process for the data owned by the transportation user.
- Now, in a map, test the settings you've made by making database connections through at least Larry and Moe and attempting to perform some edits (such as creating a new state and/or deleting an existing one). For example:
- Larry should be able to view all feature classes, but not edit them.
- Moe should be able to both view and edit all feature classes.
- Neither Larry nor Moe should be able to import or create a new feature class.
(Hint: you make Database Connections via the Catalog pane.)
Note:
- Privileges can be assigned at the feature class level, but only if the feature class is not part of a feature dataset. When dealing with a feature dataset, privileges must be assigned at the dataset level (as outlined above), and they will cascade to each child feature class.
- The Input Dataset parameter supports specifying multiple datasets/feature classes at once.
- It is also possible to right-click on a feature dataset/feature class and select Manage > Privileges.
This concludes the hands-on activities you'll be doing with your geodatabase instance in this lesson. Feel free to do some experimenting with your instance. When done, close the remote desktop connection to your instance, and most importantly, remember to stop your instance through the EC2 Console to avoid racking up unnecessary charges.
Go on to the next page to see this week's graded activity.
With that, we've finished our tutorial on creating a SQL Server geodatabase, adding users, loading some data, and assigning data privileges to the users. You weren't specifically instructed to add the Department of the Interior users and import the us_hydro shapefile, but you're welcome to do so if you're looking for additional practice.
Project 6: Describe the Data Users in Your Organization
Project 6: Describe the Data Users in Your Organization
A. Assignment description
In the Adding Users and Data to Your Geodatabase part of the lesson, it discusses the various 'roles' that people who are involved with an enterprise geodatabase might have.
For Project 6, I'd like you to spend some time reflecting on the data users in your organization. If you already utilize an enterprise geodatabase, tell me a bit about your system, who uses it, through what login roles, and with what privileges. In preparation for this write-up, you may want to talk to your geodatabase administrator if that person is not you.
If your organization isn't using an enterprise geodatabase, tell me a bit about your data workflows and users, and spend some time describing the login roles and privileges you think would best meet your organization's needs if you were to implement one.
It's not necessary for you to divulge the identities of co-workers, but you may find that your write-up flows better if you use at least first names. You can always use fictitious names if you have concerns about identifying people by their real names.
Some of the job responsibilities frequently associated with geodatabase usage that you may want to consider include:
- database administration (at the RDBMS level)
- database administration (at the ArcSDE level)
- database design
- data ownership
- data QA/QC
- data editing
- map production
- GIS analysis
Note: If you feel you're unable to report on a current or former workplace, I will also accept an analysis of any organization that has published information on its enterprise geodatabase implementation. Such reports can be found by doing an online search for GIS + "master plan" or "strategic plan."
B. Deliverables
This project is one week in length. Please refer to the Canvas Calendar for the due date.
- Submit your analysis of your organization in Word or PDF format to Lesson 6. The length of the write-up should be at least one page single-spaced. Your submission will be graded as follows:
- Quality of analysis (the extent to which you demonstrate a thoughtful evaluation): 70 of 100 points
- Quality of write-up (in terms of grammar, spelling, flow): 30 of 100 points
- Complete the Lesson 6 quiz.