Some GIS departments have determined a single, standard projection in which to maintain their source data. The raw datasets, however, can be obtained from third parties in other projections. These datasets then need to be reprojected into the department's standard projection. Batch reprojection, or the reprojection of many datasets at once, is a task well suited to scripting.
In this project, you'll practice Python fundamentals by writing a script that re-projects the vector datasets in a folder. From this script, you will then create a script tool that can easily be shared with others.
The tool you will write should look like the image below. It has two input parameters and no output parameters. The two input parameters are:
- A folder on disk containing vector datasets to be re-projected.
- The path to a vector dataset whose spatial reference will be used in the re-projection. For example, if you want to re-project into NAD 1983 UTM Zone 10, you would browse to some vector dataset already in NAD 1983 UTM Zone 10. This could be one of the datasets in the folder you supplied in the first parameter, or it could exist elsewhere on disk.
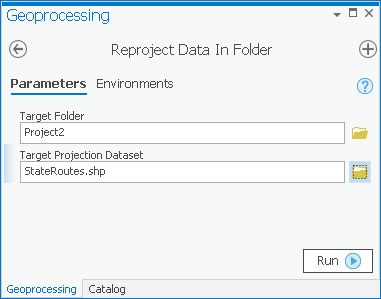 Figure 2.1 The Project 2 tool with two input parameters and no output parameters.
Running the tool causes re-projected datasets to be placed on disk in the target folder.
Requirements
To receive full credit, your script:
- must re-project shapefile vector datasets in the folder to match the target dataset's projection;
- must append "_projected" to the end of each projected dataset name. For example: CityBoundaries_projected.shp;
- must skip projecting any datasets that are already in the target projection;
- must report a geoprocessing message telling which datasets were projected. In this message, the dataset names can be separated by spaces. In the message, do not include datasets that were skipped because they were already in the target projection. This must be a single message, not one message per projected dataset. Notice an example of this type of custom message below in the line "Projected . . . :"
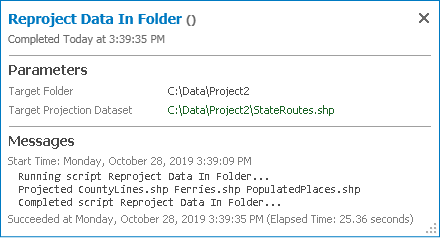 Figure 2.2 Your script must report a geoprocessing message telling which datasets were projected.
 - Must not contain any hard-coded values such as dataset names, path names, or projection names.
- Must be made available as a script tool that can be easily run from ArcGIS Pro by someone with no knowledge of scripting.
Successful completion of the above requirements is sufficient to earn 95% of the credit on this project. The remaining 5% is reserved for "over and above" efforts which could include, but are not limited to, the following:
- Your geoprocessing message of projected datasets contains commas between the dataset names, with no extra "trailing" comma at the end.
- User help is provided for your script tool. This means that when you open the tool dialog and hover the mouse over the "i" icon next to each parameter, help appears in a popup box. The ArcGIS Pro Help can teach you how to do this.
You are not required to handle datum transformations in this script. It is assumed that each dataset in the folder uses the same datum, although the datasets may be in different projections. Handling transformations would cause you to have to add an additional parameter in the Project tool and would make your script more complicated than you would probably like for this assignment.
Sample data
The Lesson 2 data folder contains a set of vector shapefiles for you to work with when completing this project (delete any subfolders in your Lesson 2 data folder—you may have one called PracticeData—before beginning this project). These shapefiles were obtained from the Washington State Department of Transportation GeoData Distribution Catalog, and they represent various geographic features around Washington state. For the purpose of this project, I have put these datasets in various projections. These projections share the same datum (NAD 83) so that you do not have to deal with datum transformations.
The datasets and their original projections are:
- CityBoundaries and StateRoutes - NAD_1983_StatePlane_Washington_South_FIPS_4602
- CountyLines - NAD_1983_UTM_Zone_10N
- Ferries - USA_Contiguous_Lambert_Conformal_Conic
- PopulatedPlaces - GCS_NorthAmerican_1983
Deliverables
Deliverables for this project are as follows:
- the source .py file containing your script;
- a detailed written narrative that explains in plain English what the various lines of your script do. In this document, we will be looking for you to demonstrate that you understand how the code you're submitting works. You may find it useful to emulate the practice exercise solution explanations. Alternatively, you may record a video in which you walk the grader through your solution beginning to end.
- the .atbx file containing your script tool;
- a short writeup (about 300 words) describing how you approached the project, how you successfully dealt with any roadblocks, and what you learned along the way. You should include which requirements you met, or failed to meet. If you added some of the "over and above" efforts, please point these out, so the grader can look for them.
Tips
The following tips can help improve your possibility of success with this project:
- Do not use the Esri Batch Project tool in this project. In essence, you're required to make your own variation of a batch project tool in this project by running the Project tool inside a loop. Your tool will be easier to use because it's customized to the task at hand.
-
There are a lot of ways to insert "_projected" in the name of a dataset, but you might find it useful to start by temporarily removing ".shp" and adding it back on later. To make your code work for both a shapefile (which has the extension .shp) and a feature class in a geodatabase (which does not have the extension .shp), you can use the following:
rootName = fc if rootName.endswith(".shp"): rootName = rootName.replace(".shp","")In the above code, fc is your feature class name. If it is the name of a shapefile it will include the .shp . The replace function searches for any string ".shp" (the first parameter) in the file name and replaces it with nothing (symbolized in the second parameter by empty quotes ""). So after running this code, variable rootName will contain the name of the feature class name without the ".shp" . Since replace(...) does not change anything if the string given as the first parameter does not occur in fc, the code above can be replaced by just a single line:
rootName = fc.replace(".shp","")You could also potentially chop off the last four characters using something likerootName = fc[:-4]
but hard-coding numbers other than 0 or 1 in your script can make the code less readable for someone else. Seeing a function like replace is a lot easier for someone to interpret than seeing -4 and trying to figure out why that number was chosen. You should therefore use replace(...) in your solution instead.
- To check if a dataset is already in the target projection, you will need to obtain a Spatial Reference object for each dataset (the dataset to be projected and the target dataset). You will then need to compare the spatial reference names of these two datasets. Be sure to compare the Name property of the spatial references; do not compare the spatial reference objects themselves. This is because you can have two spatial reference objects that are different entities (and are thus "not equal"), but have the same name property.
You should end up with a line similar to this:if fcSR.Name != targetSR.Name:
where fcSR is the spatial reference of the feature class to be projected and targetSR is the target spatial reference obtained from the target projection shapefile. - If you want to show all the messages from each run of the Project tool, add the line: arcpy.AddMessage(arcpy.GetMessages()) immediately after the line where you run the Project tool. Each time the loop runs, it will add the messages from the current run of the Project tool into the results window. It's been my experience that if you wait to add this line until the end of your script, you only get the messages from the last run of the tool, so it's important to put the line inside the loop. Remember that while you are first writing your script, you can use print statements to debug, then switch to arcpy.AddMessage() when you have verified that your script works, and you are ready to make a script tool.
- If, after all your best efforts, you ran out of time and could not meet one of the requirements, comment out the code that is not working (using a # sign at the beginning of each line) and send the code anyway. Then explain in your brief write-up which section is not working and what troubles you encountered. If your commented code shows that you were heading down the right track, you may be awarded partial credit.
- Remember to remove any debugging code from your script once you're satisfied that it's working properly.