2.5 GUI options for Python
We already mentioned in Section 2.4 [1] that often there exist different options for a GUI library to use for a project in a given programming language. This is also the case for Python. Python includes a GUI package called Tkinter [2] in its standard library. In addition, there exist 3rd party alternatives such as the PyQT [3] and PySide [4] wrappers for the QT library, Kivy [5], Toga [6], wxPython [7], and quite a few more. Have a quick look at the overview table provided at this GUI Programming in Python [8] page to get an idea of what’s out there. In contrast to Tkinter, these 3rd party libraries require the installation of additional packages. This can be seen as a downside since it will make sharing and installation of the developed software a bit more complicated. In addition, there are quite a few other factors that affect the choice for a GUI library for a particular project including:
- For which platforms/operating systems is the library available?
- Does the library draw its own widgets and have its own style or use the operating system's native look & feel?
- How large is the collection of available widgets? Does it provide the more specialized widgets that are needed for the project?
- How easy is the library to use/learn?
- How easy is it to extend the library with our own widgets?
- How active is the development? How good is the available support?
- Is the library completely free to use? What are the license requirements?
In the rest of this section, we will focus on Tkinter and QT with its two Python wrappers PySide and PyQT. We will have quick looks at Tkinter and QT individually, but using the same example of a simple GUI tool to convert miles to kilometers. In the following parts of the lesson, we will then focus solely on writing GUI-based Python programs with PyQT.
2.5.1 Tkinter
As we already mentioned, Tkinter is the standard GUI for Python, but only in the sense that it is a package in the Python standard library, so it is available for all platforms without requiring any additional installation. Its name stands for “Tk interface”. It is certainly possible that you have not heard about Tk and Tcl [9] before but Tk is one of the oldest free and open-source, cross-platform GUI toolkits (written in the Tcl scripting language and initially released in 1991) and has been adopted for building GUIs in many programming languages. Tkinter has been written by Fredrik Lundh and is essentially a set of wrapper classes and functions that use a Tcl interpreter embedded into the Python interpreter to create and manage the Tk GUI widgets.
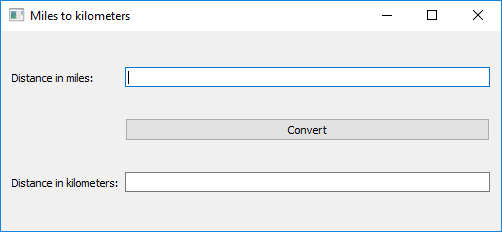
To get an impression of how tkinter is used to build a GUI in Python, let us look at the example of creating a simple miles-to-kilometers conversion tool. The tool is shown in the figure below. It has a single window with five different widgets: two label widgets, two widgets for entering or displaying single lines of text, and a button in the middle. The user can enter a number of miles into the line input field at the top, then press the button, and then the entered number of miles will be converted and displayed as kilometers in the line input field at the bottom.
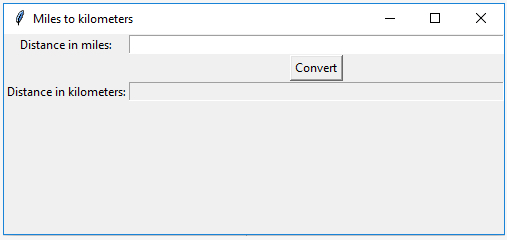
We are using a line input field to display the resulting distance in kilometers just to make things more symmetrical. Since we do not want the user to be able to enter anything into this text field, it has been disabled for input and we could just as easily have used another label widget. The Python code to create this tool with the help of tkinter is shown below and the explanation of the code follows.
from tkinter import Tk, Label, Entry, Button, DISABLED, StringVar

def convert():
    """Takes miles entered, converts them to km, and displays the result"""
    miles = float(entryMiles.get())
    kilometers.set(str(miles * 1.60934))

# create the GUI

rootWindow = Tk() # create main window
rootWindow.title("Miles to kilometers")
rootWindow.geometry('500x200+0+0')
rootWindow.grid_columnconfigure(1, weight = 1)

labelMiles = Label(rootWindow, text='Distance in miles:') # create label for miles field
labelMiles.grid(row=0, column=0)

labelKm = Label(rootWindow, text='Distance in kilometers:') # create label for km field
labelKm.grid(row=2, column=0)

entryMiles = Entry(rootWindow) # create entry field for miles
entryMiles.grid(row=0, column=1, sticky='w,e')

kilometers = StringVar() # create entry field for displaying km
entryKm = Entry(rootWindow, textvariable = kilometers, state=DISABLED)
entryKm.grid(row=2, column=1, sticky='w,e')

convertButton = Button(rootWindow, text='Convert', command = convert) # create button for running conversion
convertButton.grid(row=1, column=1)

# run the event processing loop

rootWindow.mainloop()
Let us ignore the first few lines of Python code for a moment and first look at lines 10 to 29. This is where the GUI of our little program is produced starting with the root window widget in lines 10 to 13. The widget is created by calling the function Tk() defined in tkinter and the created object is stored in variable rootWindow. We then use different methods of the widget to set its title, initial size, and some properties for its grid layout that we are going to use to arrange the child widgets within the content area of the root window.
Next, the label saying “Distance in miles:” is created. The tkinter widget class for labels is called Label and we provide rootWindow as a parameter to Label(…), so that the widget knows what its parent widget is. As mentioned, we will be using a grid layout, namely one with three rows and two columns. We place the created label in the cell in the first row and first column of its parent by calling the grid(…) method with row = 0 and column = 0. We then take the exact same steps to create the other label and place it in the third row of the first column.
In the next steps, the two text input fields are created as widget objects of the tkinter Entry class. An additional parameter sticky=’w,e’ is used for placing these widgets in the grid. This parameter says that the widgets should expand horizontally (west and east) to fill the entire cell. This is required to make the layout fill out the window horizontally and have the text field grow and shrink when the window is resized. Moreover, the Entry widget for displaying the distance in kilometers is set to DISABLED so that the user cannot enter text into it, and it is associated with a variable kilometers of tkinter class StringVar which is needed for us to be able to change the text displayed in the widget from code.
Finally, the button is created as a widget of tkinter class Button. What is new here is what happens with the ‘command’ parameter given to Button(…) in line 28. Here we are saying that if this button is clicked, the function convert() that we are defining at the top of our code should be executed to deal with this event. So this is an example of connecting an event to an event handler function. What happens in convert() is very simple: With the help of the get() method, we get the current text from the Entry widget for the distance in miles, multiply it with a constant to convert it to kilometers, and then use the set() method of the StringVar object in variable kilometers to change the text displayed in the Entry widget to the distance in kilometers associated with that variable.
In the last line of the code, we call the mainloop() method of our root window to start the infinite event processing loop. The program execution will only return from this call when the user closes the root window, in which case the program execution will be terminated.
The only part of the code we haven’t talked about is the first line where we simply import the widget classes and other auxiliary classes from tkinter that we need in our code.
Hopefully, it is clear that this is just a very prototypical implementation of a miles-to-kilometers conversion tool focusing on the GUI. We have neither implemented any sort of checking whether input values are valid nor any sort of error handling. It is therefore very easy to make the tool crash, e.g. by entering something that is not a number into the field for distance in miles. If you haven’t already done so, we suggest you create a Python script with the code from above and try out the tool yourself and see how the layout adapts if you resize the window. Feel free to experiment with making small changes to the code, like adapting the text shown by the labels or adding another button widget to the currently still empty second row of the first column; then make the button call another event handler function you write to, for instance, just print some message to the console.
Don’t worry if some of the details happening here don’t seem entirely clear at the moment. A real introduction to creating GUIs with Python will follow later in this lesson. Here we just wanted to give you a general idea of how the different concepts we discussed in Section 2.4 [1] are realized in tkinter: You saw how different widgets are created, how they were arranged in a grid layout by placing them in different cells of the layout, how to connect an event (button clicked) with a self-defined event handler function (convert()), and how to execute the application by starting the event processing loop (rootWindow.mainloop()). Now let’s move on and talk about QT as an alternative to tkinter and see how this same example would look like when produced with the PyQt instead of tkinter.
2.5.2 QT
We already mentioned a few things about QT in this lesson. It is a widely used cross-platform library written in C++, modern and under very active development. In addition to the GUI functionality, the library provides support for internationalization, Unicode, database and network access, XML and JSON code processing, thread management, and more. That’s why it is also called an application framework, not just a GUI library. QT was originally developed by the company Trolltech and its initial release was in 1995. KDE, one of the early GUIs for the Linux operating system, was based on QT and that triggered a lot of discussion and changes to the license and organization QT was published under. These days, the company developing QT is called The QT Company, a successor of Trolltech, and QT is published in four different editions, including the Community edition that is available under different open source licenses GPL 3.0, LGPL 3.0, and LPGL 2.1 with a special QT exception. QT is very commonly used for both open source and commercial software, and if you have worked with QT in one programming language, it is typically relatively easy to learn to use it in a different language. QT5 was released in 2012 and the current version of QT at the time of this writing is 5.10.
2.5.2.1 PyQt vs. PySide
You may wonder why there exist two different Python wrappers for QT and how different they are? The short answer is that the reason lies mainly in license related issues and that PyQt and PySide are actually very similar, so similar that the code below for a QT based version of the miles-to-kilometers converter works with both PyQt and PySide. For PySide you only have to replace the import line at the beginning.
PyQt is significantly older than PySide and, partially due to that, has a larger community and is usually ahead when it comes to adopting new developments. It is mainly developed by Riverbank Computing Limited and distributed under GPL v3 and a commercial license. Releases follow a regular schedule and the software is generally considered very robust, mature, and well supported.
PySide is developed by Nokia and had its initial release in 2009, in a time when Nokia was the owner of QT. As can be read on the PySide web page [10], PySide has been developed and published in response to a lack of a QT wrapper for Python that has a suitable license for FOSS and proprietary software development. Without going too much into the details of the different license models involved, if you want to develop a commercial application, PyQt requires you to pay fees for a commercial license, while the LGPL license of PySide permits application in commercial projects.
From an educational perspective, it doesn’t really matter whether you use PySide or PyQt. As we already indicated, the programming interfaces have over the recent years converged to be very similar, at least for the basic GUI based applications we are going to develop in this course. However, we have some specific reasons to continue with PyQt that will be listed at the end of the next section. If you are interested to learn more about the differences between PyQt and PySide and when to pick which of the two options, the following blog post could serve as a starting point:
2.5.2.2 Installing PyQt5 from ArcGIS Pro
Since in contrast to tkinter, PyQt5 is not part of the Python standard library, we may need to install the PyQt5 package before we can use it from our code. We are currently using the Python installation that comes with ArcGIS Pro. Therefore, we will use the conda installation manager from within ArcGIS Pro to check whether PyQt5 is installed and if not, install it with all the packages it depends on. This will also automatically install the binary QT5 library that the PyQt5 package is a wrapper for.
Go ahead and open the package manager in Pro (Project -> Python) and check the Installed Packages list to see if "pyqt" is installed. If not, go to Add Packages and install "pyqt"; the process is identical to our installation of spyder back in Lesson 1 [12].
You probably will now have version 5.9.2 or later of pyqt installed. Next, try to run the test code on the next page. If this code gives you an error of...
This application failed to start because it could not find or load the Qt platform plugin "windows".
...then you will need to come back to this page and set the QT_QPA_PLATFORM_PLUGIN_PATH environmental variable to the path of the plugin folder of PyQt5 (as explained in the blog post Developing Python GUI in ArcGIS Pro with PyQt [13]). This can be done with the Windows tool for setting environmental variables by following the instructions below:
- Go to the Windows "Settings" and type “environmental” into the "Find a setting" search field and then pick “Edit the system environment variables”.
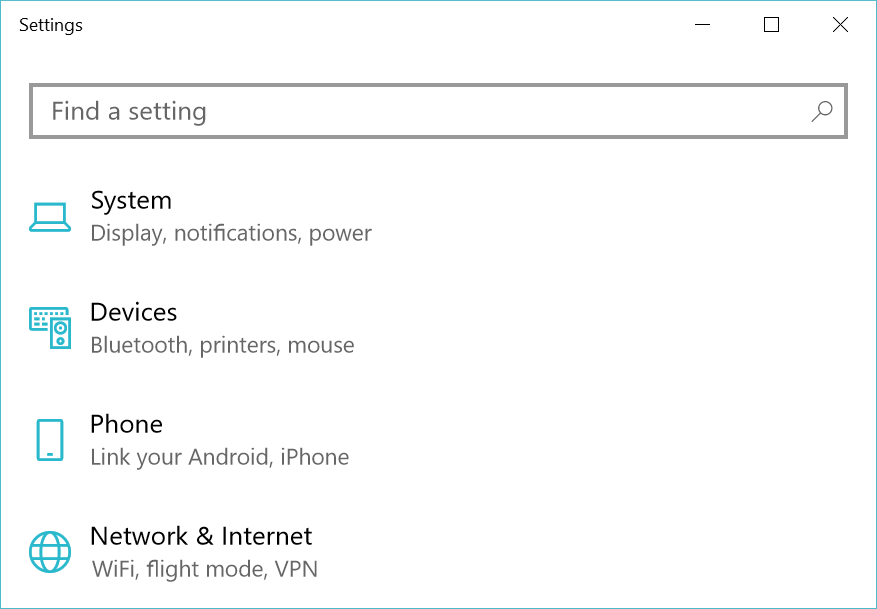 Figure 2.8 Windows "Settings" dialog
 - Click on “Environment variables…” at the bottom.
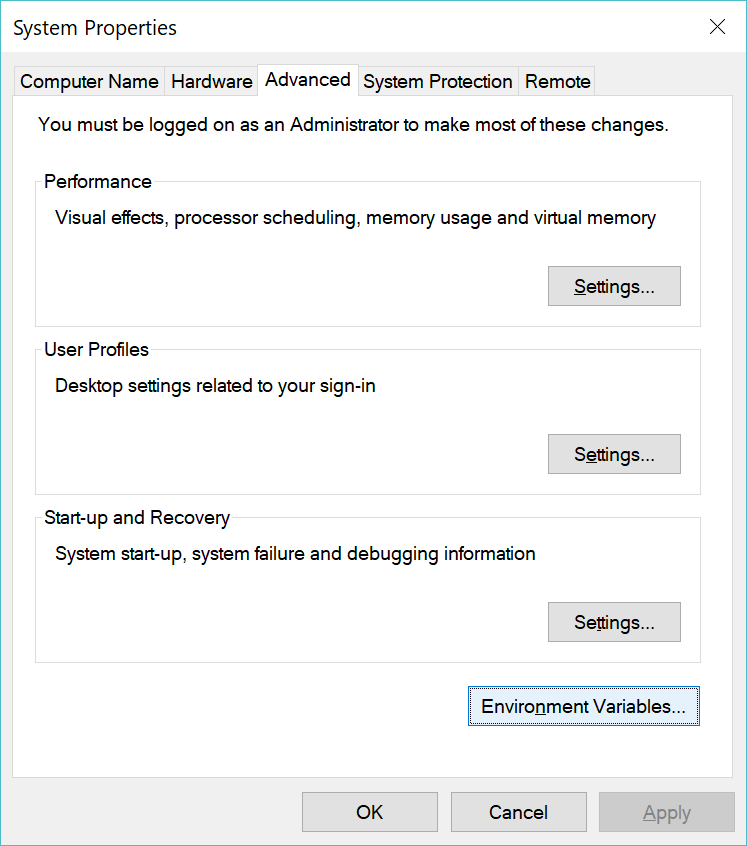 Figure 2.9 System Properties dialog with "Environment Variables..." button at the bottom right
 - Click on "New..." to add the environment variable at the bottom for "System variables".
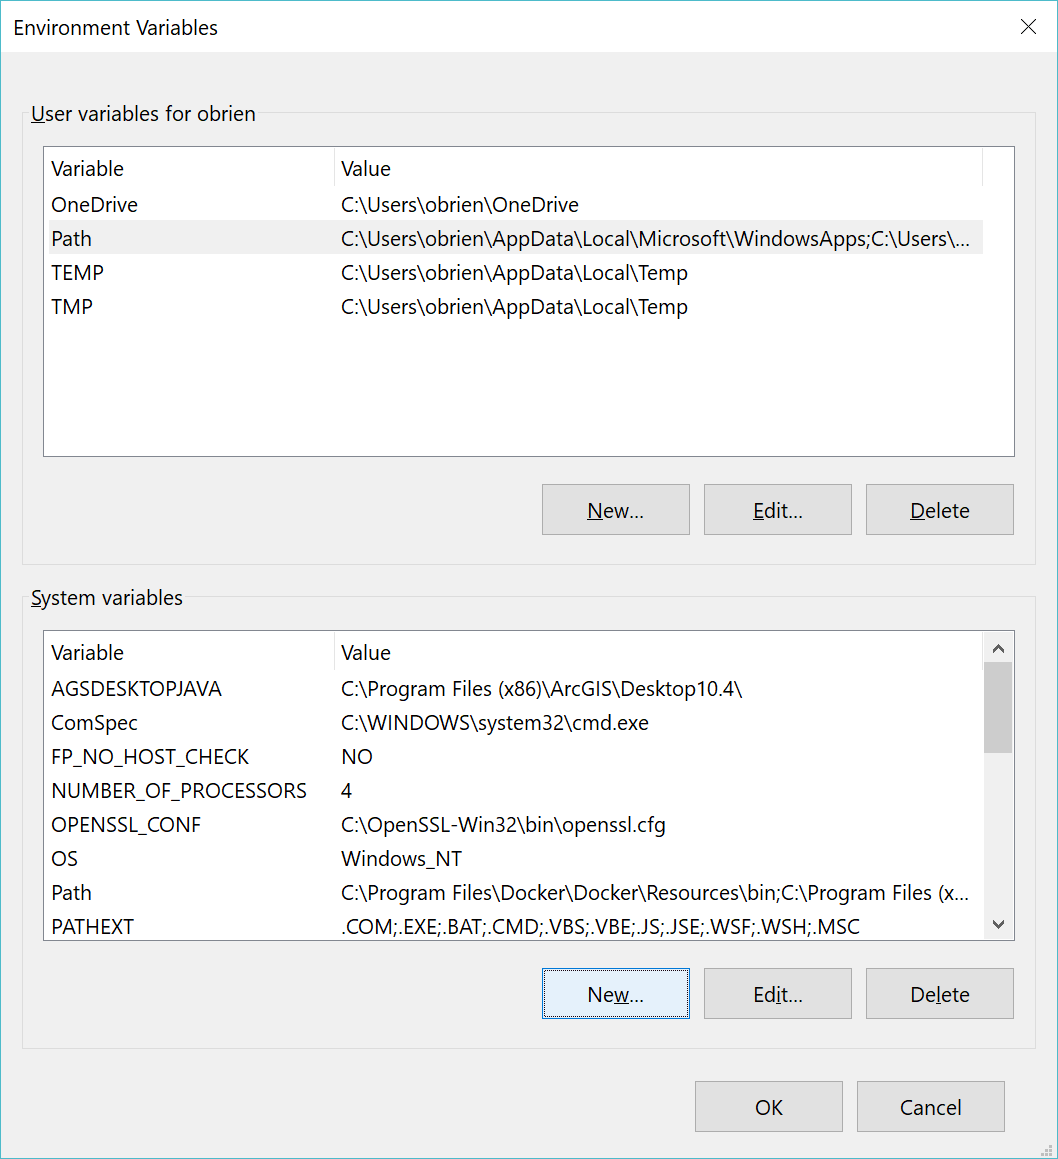 Figure 2.10 Variables dialog with "New..." button at the bottom
 - Fill out the dialog for adding a new variable. If the folder for your cloned ArcGIS Pro Python environment is something like "C:\Users\<username>\AppData\Local\ESRI\conda\envs\arcgispro-py3-clone", then use this to fill out the "Variable value" as shown in the figure below (see Section 1.5 explaining how opening Python Command Prompt will show the default folder). If you are using an older version of Pro and the default Python environment at "C:\Program Files\ArcGIS\Pro\bin\Python\envs\arcgispro-py3", then use this for the Variable value instead. Then press Ok and you are done.
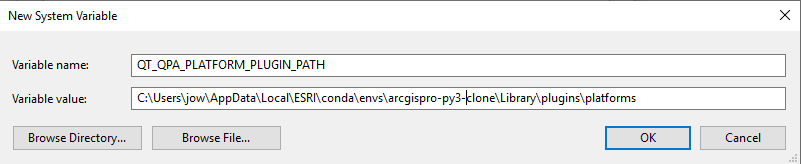 Figure 2.11 System Environment Variables dialog shown with variable name and variable value populated
2.5.2.3 Miles to kilometers with PyQT
Here is how the code for our miles-to-kilometers conversion tool looks when using PyQt5 instead of tkinter. You will see that there are some differences but a lot also looks very similar. We kept the names of the variables the same even though the widgets are named a little differently now. Since you now have PyQt5 installed, you can immediately run the code yourself and check out the resulting GUI. The result should look like the figure below.
Important note: When you run PyQt5 code in Spyder directly (here or in later sections), you may run into the situation that the program won't run anymore when you start it a second time and instead you get the error message "Kernel died, restarting" in the Spyder Python window. This can be resolved by going into the Spyder Preferences and under "Run" select the option "Remove all variables before execution" to make sure that everything from the previous run is completely cleaned up before the script code is executed again.
Source code:
from PyQt5.QtWidgets import QApplication, QWidget, QLabel, QGridLayout, QLineEdit, QPushButton

def convert():
    """Takes miles entered, converts them to km, and displays the result"""
    miles = float(entryMiles.text())
    entryKm.setText(str(miles * 1.60934))

app = QApplication([])

rootWindow = QWidget()
rootWindow.setWindowTitle("Miles to kilometers")
rootWindow.resize(500, 200)

gridLayout = QGridLayout(rootWindow)

labelMiles = QLabel('Distance in miles:')
gridLayout.addWidget(labelMiles, 0, 0)

labelKm = QLabel('Distance in kilometers:')
gridLayout.addWidget(labelKm, 2, 0)

entryMiles = QLineEdit()
gridLayout.addWidget(entryMiles, 0, 1)

entryKm = QLineEdit()
gridLayout.addWidget(entryKm, 2, 1)

convertButton = QPushButton('Convert')
gridLayout.addWidget(convertButton, 1, 1)

convertButton.clicked.connect(convert)

rootWindow.show()

app.exec_()
Let’s look at the main differences between this code and the tkinter based code from Section 2.5.1 [14].
Obviously, we are now importing classes from the module PyQt5.QtWidgets and the widgets are named differently (all starting with ‘Q’).
While with tkinter, we only created one object for the application and root window together and then called its mainloop() method to start the execution of the event processing loop, the application and its main window are two different things in QT. In line 8, we create the application object and then at the very end we call its exec_() method to start the event processing loop. The window is created separately in line 10, and before we call exec_(), we invoke its show() method to make sure it is visible on the screen.
The creation of the widgets looks very similar in both versions. However, with tkinter, we didn’t have to create a grid layout explicitly; it was already available after the main window had been created. With PyQt5, we create the grid layout for the root window explicitly in line 14. To add widgets to the grid layout, we call the addWidget(…) method of the layout providing numbers for the row and column as paramters.
In the tkinter version, we had to set up a special variable to change the content of the entryKm line input field. This is not required with PyQt5. We can simply change the text displayed by the corresponding QLineEdit widget by calling its setText(…) method from the convert() function in line 6.
Finally, connecting the “clicked” event of the button with our convert() event handler function happens as a separate command in line 31 rather than via a parameter when creating the button object. By writing "convertButton.clicked.connect(convert)" we are saying, in QT terminology, that the “clicked” signal of convertButton should be connected to our convert() function.
It seems fair to say that from the perspective of the code, the differences between tkinter and PyQt5 are rather minor with, in some cases, one of them needing a bit more code, and in other cases, the other. However, this is partially due to this example being very simple and not involving more advanced and complex widgets and layouts.
When you tried out both versions of our little tool or just closely compared the two figures above with screenshots of the produced GUIs, you may also have noticed that, in addition to the differences in the code, there are some differences in the produced layout and behavior. We didn’t make use of all available options to make the two versions appear very similarly and it is certainly possible to do so, but our personal impression is that just based on the default look and behavior, the layout produced by PyQt5 is a bit more visually appealing. However, the main reason why we are going to continue with QT5/PyQt5 for the remainder of this lesson are the following:
- QT5 is a modern and widely used cross-platform and cross-language library; knowledge and skills acquired with QT can be applied in languages other than Python.
- QT5 is efficient and smooth because of the compiled core library written in C++.
- QT5 and PyQt5 provide a large collection of available widgets and can be expected to be under active development for the foreseeable future.
- There exists very good tool support for the combination of QT5 and PyQt5
- Finally and very importantly: In lesson 4 we will continue with the GUI development started in this lesson in the context of QGIS 3. QGIS and its interface for plugins have been developed for PyQt5.
As a final note, if you want to run the converter tool code with PySide, you have to replace the import line with the following line:
from PySide2.QtWidgets import QApplication, QWidget, QLabel, QGridLayout, QLineEdit, QPushButton
Of course, you will first have to install the PySide2 package in the ArcGIS Pro package manager to be able to run the code.