Now that we’re all warmed up with some Python revision and a few clues about the changes between Python 2 and 3, we’ll start getting familiar with Python 3 in ArcGIS Pro by exploring how we write code and deploy tools just like we did when we started out in GEOG 485.
We’ll cover the conda environment that ArcGIS Pro uses for Python 3 in more detail in Lesson 2, but for now it might be helpful to think of conda as a box or container that Python 3 and all of its parts sit inside. In order to access Python 3, we’ll need to open the conda box, and to do that we will need a command prompt with administrator privileges.
Installing spyder
Spyder is the easiest IDE to install for Python 3 development as we can install it from ArcGIS Pro. Within Pro, you can navigate to the "Project" menu and then choose "Python" to access the Python package and environment manager of the ArcGIS Pro installation.
Since version 2.3 of ArcGIS Pro, it is not possible to modify the default Python environment anymore (see here for details). If you already have a working Pro + Spyder setup (e.g. from Geog485) and it is at least Pro version 2.7, you can keep using this installation for this class. Else I'd recommend you work with the newest version, so you will first have to create a clone of Pro's default Python environment and make it the active environment of ArcGIS before installing Spyder. In the past, students sometimes had problems with the cloning operation that we were able to solve by running Pro in admin mode.
Therefore, we recommend that before performing the following steps, you exit Pro and restart it in admin mode by doing a right-click -> Run as administrator. Then go back to "Project" -> "Python", click on "Manage Environments", and then click on "Clone Default" in the Manage Environments dialog that opens up. Installing the clone will take some time (you can watch the individual packages being installed within the "Manage Environments" window and you may be prompted to restart ArcGIS Pro to effect your changes); when it's done, the new environment "arcgispro-py3-clone" (or whatever you choose to call it - but we'll be assuming it's called the default name) can be activated by clicking on the button on the left.
Do so and also note down the path where the cloned environment has been installed appearing below the name. It should be something like C:\Users\<username>\AppData\Local\ESRI\conda\envs\arcgispro-py3-clone . Then click the OK button.
Important: The cloned environment will most likely become unusable when you update Pro to a newer main version (e.g. from 2.9 to 3.0 or 3.0 to 3.1). So once you have cloned the environment successfully, please don't update your Pro installation before the end of the class, unless you are willing to do the cloning and spyder installation again. There is a function in V3.x and later of Pro to update your Python installation but it's new functionality so it might not yet always work as expected.
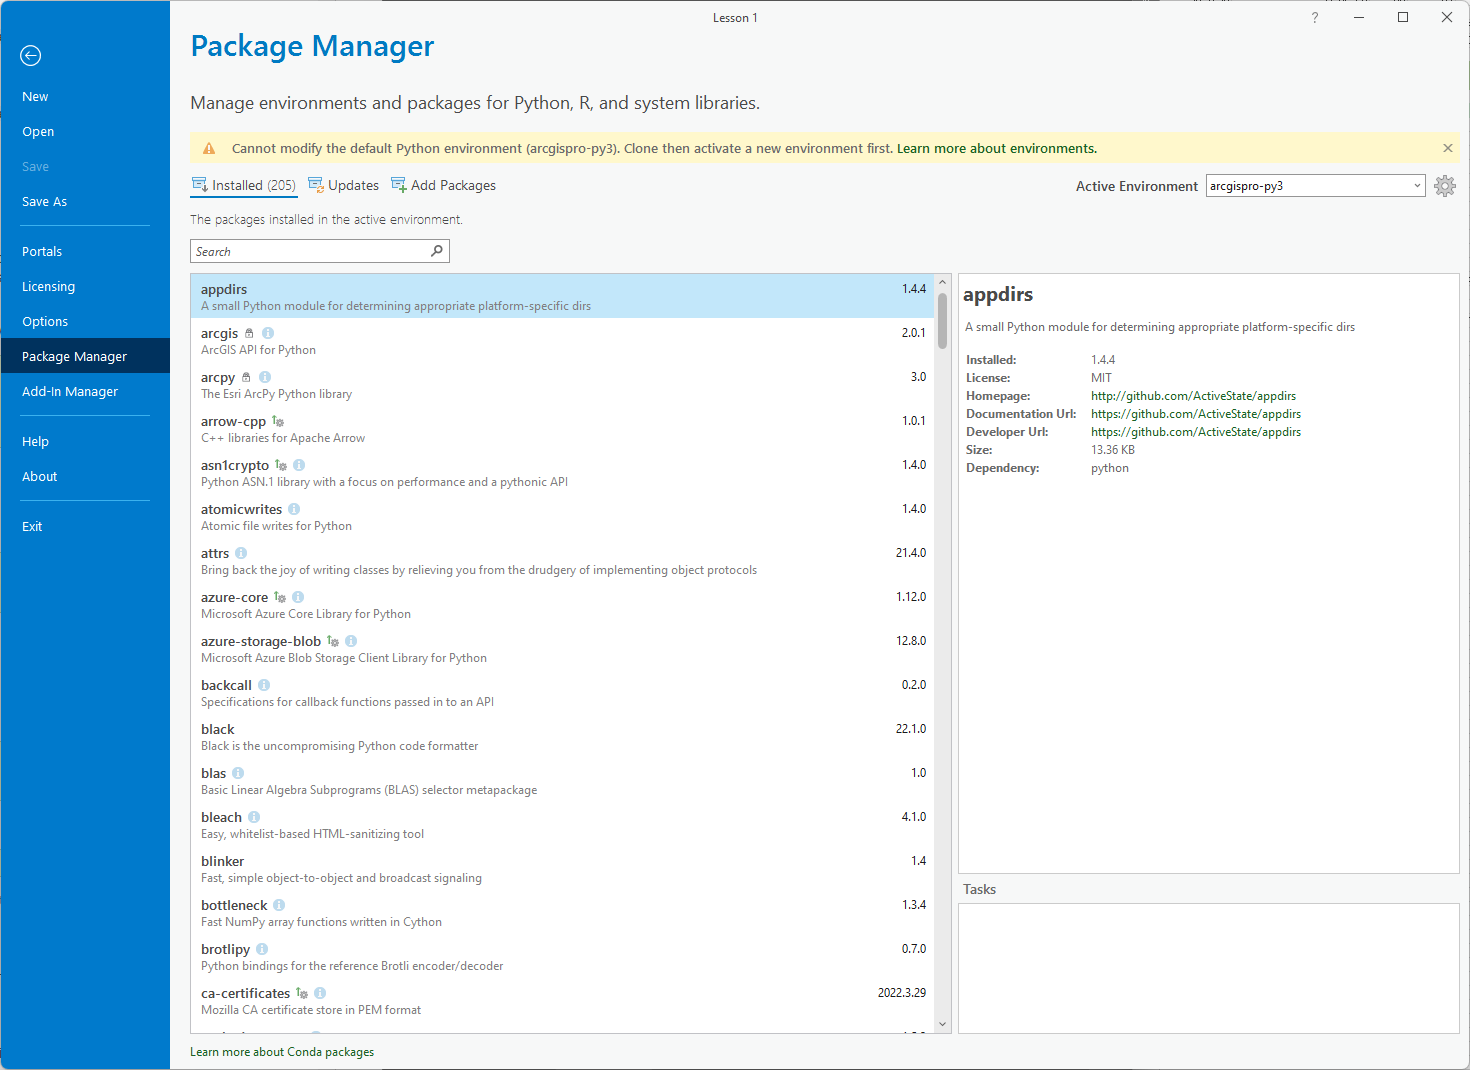
Now back at the package manager, the new Python environment should appear under "Project Environment" as shown in the figure below (but be aware this might take 30+ minutes so you'll need to be patient).
To now install Spyder, select "Add Packages," search for Spyder and click the "Install" button. This might also take around 30+ minutes and it'll be best if you've restarted Pro after creating your new environment and selecting it.
The package manager will show you a list of packages that will have to be installed and ask you to agree to the terms and conditions. After doing that, the installation will start and probably take a while. You may also get get a "User Access Control" window popup asking if you want conda_uac.exe to make changes to your device; it is OK to choose Yes.
Once the installation is finished, it is recommended that you restart ArcGIS Pro (and if you have trouble restart your PC as well it usually helps). If you keep having problems with the installation failing or Spyder simply not showing up in the list of installed pacakges (even after refereshing the list), please try with starting ArcGIS Pro in admin mode (if you are not already running it this way) by doing a right-click -> Run as administrator.
Once Spyder is installed, you might like to create a shortcut to it on your Desktop or Start Menu. In that case, you should be able to find the Spyder executable in the Scripts subfolder of your cloned Python environment, so at C:\Users\<username>\AppData\Local\ESRI\conda\envs\arcgispro-py3-clone\Scripts\spyder.exe where <username> needs to be replaced with your Windows user name. f you don't see the AppData folder, you will have to change the options in the Windows File Explorer to display hidden files and folders. Make sure to use the .exe file called spyder.exe, not the one called spyder3.exe . If you are using an older version of ArcGIS Pro and installed Spyder directly into the default environment, the path will most likely be C:\Program Files\ArcGIS\Pro\bin\Python\envs\arcgispro-py3\Scripts\spyder.exe .
If you are familiar with another IDE, you're welcome to substitute it for Spyder (just verify that it is using Python 3).
When Spyder launches, it may ask you whether you want to update to a newer version. We recommend to NOT try this because the update procedure will most likely not work with the ArcGIS Pro Python environment. Once Spyder is started, it should display a message in the IPython tab similar to:
Python 3.6.2 |Continuum Analytics, Inc.| (default, Jul 20 2017, 12:30:02) [MSC v.1900 64 bit (AMD64)] Type "copyright", "credits" or "license" for more information. IPython 6.3.1 -- An enhanced Interactive Python.
In [1]:
Don’t worry if the version number is different, as long as it starts with a 3. What we’re looking at here is equivalent to the Python interactive window in ArcGIS Desktop, ArcGIS Pro, PythonWin or any of the IDEs you might be familiar with.
We can experiment here by typing "import arcpy" to import arcpy or running some of those print statement examples from earlier.
In [1]: import arcpy
In [2]: print ("Hello World")
Hello world
You might have noticed while typing in that second example a useful function of the IPython interactive window - code completion. This is where the IDE (spyder does it too) is smart enough to recognize that you're entering a function name and it provides you with the information about the parameters that function takes. If you missed it the first time, enter print( in the IPython window and wait for a second (or less) and the print function's parameters will appear. This also works for arcpy functions (or those from any library that you import). Try it out with arcpy.management.CreateFeatureclass(or your favorite arcpy function).
A first arcpy code example
Click the File menu -> New File option to open a blank code editor window that we can use to write our first piece of Python 3 code with the ArcGIS Pro version of arcpy. In the remainder of this lesson, we’re going to look at some simple examples taken from GEOG 485 (because they should be somewhat familiar to most people) which we’ll use to practice modifying code from Python 2 to 3 where needed and working with arcpy under ArcGIS Pro. Later, we’ll use some of these same code examples to migrate from single processor, sequential execution to multiprocessor, parallel execution. Below, we show the "old" Python 2 version of the code followed by the Python 3 version that you can try out in spyder, e.g. by copying the code into an empty editor window and running it from there.
This first example script reports the spatial reference (coordinate system) of a feature class stored in a geodatabase:
# Opens a feature class from a geodatabase and prints the spatial reference

import arcpy

featureClass = "C:/Data/USA/USA.gdb/States"

# Describe the feature class and get its spatial reference
desc = arcpy.Describe(featureClass)
spatialRef = desc.spatialReference

# Print the spatial reference name
print spatialRef.Name
Python 3 / ArcGIS Pro version:
# Opens a feature class from a geodatabase and prints the spatial reference

import arcpy

featureClass = "C:/Data/USA/USA.gdb/States"

# Describe the feature class and get its spatial reference
desc = arcpy.Describe(featureClass)
spatialRef = desc.spatialReference

# Print the spatial reference name
print (spatialRef.Name)
Did you notice the very subtle difference?
First, let us look at all of the things that are the same and refresh our memories of what the code is doing:
- A comment begins the script to explain what’s going to happen.
- Case sensitivity is applied in the code. "import" is all lower-case. So is "print." The module name "arcpy" is always referred to as "arcpy," not "ARCPY" or "Arcpy." Similarly, "Describe" is capitalized in arcpy.Describe.
- The variable names featureClass, desc, and spatialRef that the programmer assigned are short, but intuitive, and use the camelCase format. By looking at the variable name, you can quickly guess what it represents.
- The script creates objects and uses a combination of properties and methods on those objects to get the job done. That’s how object-oriented programming works.
So, what’s different? The only difference is in the last, highlighted line of the script. The print statement from Python 2 is now a function as we described earlier, so it takes parameters and therefore we’re passing print a value, in this case the spatialRef.Name that we want it to print. That's all!
We’re going to look at a couple more examples (also borrowed from GEOG 485) and convert them from Python 2 to 3 if needed as we continue through the lesson. Esri recognized that a lot of existing Python developers would want to migrate from Python 2 to 3 and to smooth the way they developed a tool for ArcGIS Desktop (which they've since ported to Pro) called Analyze Tools for Pro which does just what the name suggests.
To test the example code we just investigated manually, we saved the Python 2 version to a .py file and supplied it as input to the tool. The output we get from this displaying all of the elements which need to be converted as warnings is shown below.
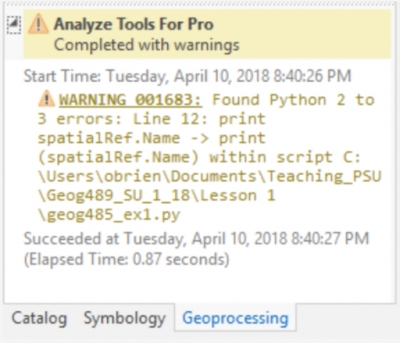
As you can see from the image, we get a warning about the print statement (on line 12) as well as a suggestion of what to change that line to. Those warnings are also written into our output file which will be helpful when we’re trying to modify longer pieces of code (or if you wanted to share the task among many programmers).