Adding Records to a Table
Records may be added to tables in three ways: manually through the table GUI, using an SQL INSERT query to add a single record, and using an INSERT query to add multiple records in bulk.
A. Adding records manually
This method is by far the easiest, but also the most tedious. It is most suitable for populating small tables.
- Double-click on the Labels table in the object list on the left side of the window to open it in Datasheet mode.
- Try entering a value in the Label_ID field. You're not able to because that field was assigned a data type of AutoNumber.
- Tab to the Label_Name field, and enter Capitol. While typing, note the pencil icon in the gray selection box to the left of the record. This indicates that you are editing the record (it may be yellow depending upon the version of Access).
- Hit Tab or Enter. The pencil icon disappears, indicating the edit is complete, and the cursor moves to a new empty record.
- Add more records to your table so that it looks as follows:
Table 2.11: Label ID and Name Label_ID Label_Name 1 Capitol 2 Pye 3 Columbia 4 Track 5 Brunswick 6 Parlorphone 7 Apple Note:
When a record is deleted from a table with an AutoNumber field like this one, the AutoNumber value that had been associated with that record is gone forever. For example, imagine that the Columbia Records row was deleted from the table. The next new record would take on a Label_ID of 8. The Label_ID of 3 has already been used and will not be used again.
B. Adding a single record using an INSERT query
- Click the Create tab, then Query Design.
- Click Close to dismiss the Show Table dialog.
By default, queries in Access are of the Select type. However, you'll note that other query types are available including Append, Update, and Delete. We will work with the Append type in a moment and check out the Update and Delete types later. - Click on the Append button. You'll be prompted to specify which table you want to append to.
- Choose Artists from the drop-down list, and click OK. Note that an Append To row is added to the design grid.
- In the Field area of the design grid, enter "The Beatles" and tab out of that cell.
- Move your cursor to the Append To cell and select Artist_Name from the drop-down list.
- Move to the next column, and enter 1957 into the Field cell.
- Select Year_Begin as the Append To field for this column.
- Move to the next column, and enter 1970 into the Field cell.
- Select Year_End as the Append To field for this column. Your query design grid should look like this:
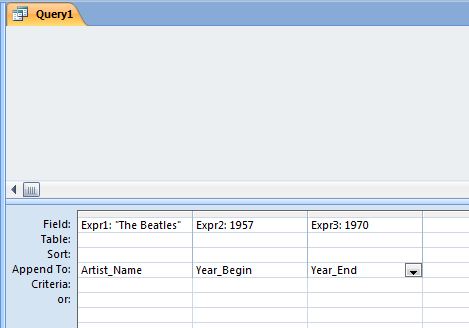 Figure 2.3: MS_Access query design grid GUI showing the layout that will result in appending one record to the database table. Note that an MS-Access Append query is actually translated into an SQL Insert query.
 - Click the Run button to execute this query. Answer Yes when asked whether you really want to append the record to the table.
- Open the Artists table, and confirm that a record for The Beatles exists.
At this point, you may be wondering why we used an Append query when I said we'd use an Insert query. - Go back to the design view window of your query, select View > SQL View, and note that what Access calls an Append query in its GUI is actually an INSERT query when translated to SQL:
INSERT INTO Artists ( Artist_Name, Year_Begin, Year_End )
SELECT "The Beatles" AS Expr1, 1957 AS Expr2, 1970 AS Expr3;
Check the Artists table to verify the addition of the new record. If your Artists table is still open, in the Home ribbon you can select Refresh then Refresh All.
If you're wondering why we bothered to write this query when we could have just entered the data directly into the table, you're right. That would be a waste of time. However, such statements are critical in scenarios in which records need to be added to tables programmatically. For example, if you've ever created a new account through some websites like amazon.com, it is likely that your form entries were committed to the site's database using an INSERT query like this one.
It is important to note that the syntax generated by the Access GUI does not follow standard SQL. Let's modify this SQL so that it follows the standard (and adds another artist to the table). - Change the query so that it reads as follows:
INSERT INTO Artists ( Artist_Name, Year_Begin, Year_End )
VALUES ( "The Kinks", 1964, 1996 );
- Click the Run button to execute the query.
- Finally, modify the query to add one more artist (and note the removal of the Year_End column and value, since The Who are considered an active band):
INSERT INTO Artists ( Artist_Name, Year_Begin )
VALUES ( "The Who", 1964 );
- Execute the query, then close it without saving.
C. Adding records from another table in bulk
The last method of adding records to a table is perhaps the most common one, the bulk insertion of records that are already in some other digital form. To enable you to see how this method works in Access, I've created a comma-delimited text file of albums released in the 1960s by the three artists above.
- Download the Albums.txt file and save it to your machine.
- In Access, go to External Data > Text File. (Note the other choices available, including Access and Excel.)
- Browse to the text file on your machine and select it.
Note the three options available to you: importing to a new table, appending to an existing table and linking to the external table. The second option would make sense in this situation if the column headings in the text file matched those in the target Access table. They do not, so we will import to a new table and build a query to perform the append. - Confirm that the Import option is selected, and click OK.
- The first panel of the Import Text Wizard prompts you to specify whether your text is Delimited or Fixed Width. Confirm that Delimited is selected, and click Next.
- The next panel should automatically have Comma selected as the delimiter and double quotes as the Text Qualifier (i.e., the character used to enclose text strings). Check the First Row Contains Field Names checkbox, and click Next.
- The next panel makes it possible to override the field names and types. The wizard has correctly identified the field types for all but the Label_ID field. Click on the Label_ID heading, and change its data type to Long Integer. Click Next.
- The next panel provides an opportunity to specify the table's primary key. Options include adding a new AutoNumber field, choosing the key from the existing fields, or assigning no primary key at all. Because this table will be of no use to us after appending its records to the Albums table created earlier, select No primary key, and click Next.
- Finally, the last panel prompts you for the name to give to the table. Enter Albums_temp, and click Finish to complete the import.
- This is a one-time import process, so simply click Close when asked if you want to save the import steps.
- Double-click on Albums_temp to open it in datasheet mode, and confirm that the data imported correctly. You're now ready to build a query that will append the records from Albums_temp to Albums.
Note:
The Albums.txt text file you just imported was written assuming that the records in the Labels table are stored with Label_ID values as specified in the figure in Part A and Artist_ID values of 1 for The Beatles, 2 for The Kinks and 3 for The Who. If your tables don't have these ID values (e.g., if you ran into a problem with one of the inserts into the Artists table and had to add that artist again), you should modify the ID values in the Albums_temp table so that they match up with the ID values in your Labels and Artists tables before building the Append query in the steps below.
- Click Create > Query Design to begin building the query.
- Add the Albums_temp table to the query GUI. Do not add the Albums table. Close the Show Table dialog.
- As before, click the Append button to change the query type. You may have to go back to the Design ribbon.
- Select Albums as the Append to table, and click OK.
- Double-click on each of the fields in the Albums_temp table so that they appear in the design grid. Note that the Artist_ID and Label_ID fields are automatically paired up with the fields having the same name in the Albums table. The title and release year fields have different names, so you will have to match those fields up manually.
- In the Append To cell, select Title under the Album_Title field and Release_Year under the Released field.
If we wanted to append a subset of records from Albums_temp, we could add a WHERE clause to the query. We want to append all the records, so our query is done. - Execute the query, and confirm that the Albums table is now populated with 10 records.
- Close the query without saving. You would consider saving it if you found yourself performing this sort of append frequently.
If you were wondering why we didn't just import the text file and use the table produced by the import, that's a good observation. In this particular scenario, that would have been less work. However, the process we just followed is a common workflow, particularly when you are looking to append new records to a table that is already populated with other records. In that scenario, this methodology would be more clearly appropriate.