The idea of the little software tool we are going to build is that sometimes you would like to be able to quickly create a feature class with points for certain places based on their names. Let’s say you want to produce a shapefile showing a few places in the city you are living in. What you could do is open a basemap in ArcGIS or some other GIS software and then digitize point features for these particular locations. Or you could look up the coordinates of the places in some external application such as Google Maps and then create new point features based on these coordinates manually or by exporting the coordinates in a format that can be imported by your GIS. Both these options are relatively time consuming and require several steps. We therefore want to exploit the fact that there exist many web services that allow for querying for geographic places based on name, type, and other properties, and getting back the coordinates. The two web services we are going to work with are the Nominatim query interface to OpenStreetMaps (OSM) and the place query interface of the online geographic gazetteer GeoNames. We will discuss these services in more detail below. Our tool should allow us to enter a query term such as a place name, pick a query service and set some additional query options, and then run the query to get a list of candidate places with coordinates. We can then look at the result list and pick one or more candidates from the list and either
- add them to a layer currently open in ArcGIS Pro (assuming that the software is run as a script tool inside ArcGIS),
- add them to a shapefile on disk, or
- add the result to a CSV text file (basically an alternative that still works even when arcpy is not available).
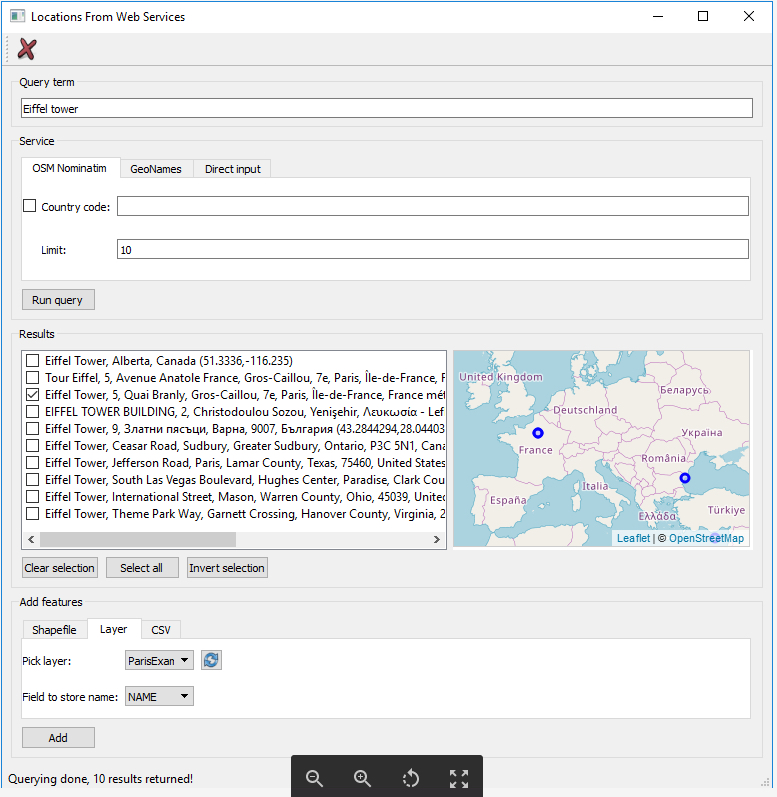
Figure 2.20 and the video below show the GUI of the software and further illustrate how the tool works. The use case in the shown example is that we use the tool to populate a layer open in ArcGIS Pro with some of the main sightseeing locations in Paris including the Eiffel Tower, the Louvre, etc.
Please watch the following video, Location from Web Service Tool Overview (5:25min):
Hello. In this video, I'm quickly going to show you, or demonstrate to you, the tool that we are going to build in this walkthrough, the tools for querying different surfaces on the map to create point features, and then add them either to an open layer in ArcGIS, to a shape file on disk, or just to a CSV text file.
And you can see the tool here on the right on the screen, I'm currently running it inside of ArcGIS Pro, and I've already used it to add a few places for different attractions in Paris. And, um, so the GUI is structured into four different parts.
We have the part at the top, where the user can enter a query to a name of a place. Then we have an area where he can choose between different web services to query. Then an area where he will see the results of this query. And then an area where he can add the features he wants to from some data source.
So let's demonstrate this by querying for Eiffel Tower. And I'm going to use the Nominatim query interface to OpenStreetMap. I'm not going to use any of the options for this first query-- just pick the Run Query button. And you see that then the result lists here is updated based on what you get back from this Nominatim web service.
And we have this nice little map, which appear on the right, that shows us the different results on the map, which can also be very handy. Obviously, we are interested in the one here that is located in Paris.
So we can actually click on that one, and then see, OK, this is the one called Eiffel Tower. So, basically the third one here from our list-- so what I can do is use the buttons below the results to clear the selection, and then to say, I just want this entry here. And, here at the bottom, you can see that I'm currently on the tab for adding the features to a layer in ArcGIS Pro. And I've selected the Paris example layer that I set up for this project, and the names of the features should be stored in the field called name of that layer.
So I would just click the Add button now to add this one feature for the Eiffel Tower to this data set. And actually, for having it show up on the map, I need to zoom in and out a bit so the map gets updated. And then you see here now that this new point has been added.
And, just to show you the rest of the interface-- we have another tab here for instead of Nominatim querying the geo name step service, with different options for that. And we have also the tab that allows us for directly entering features with name, latitude, and longitude. So let's say I have created this map for a friend, and now I also want to add my home as a place to that map. I could enter it here, my home, and then I would have to enter some coordinates. So let's hope that I'm going to find something that's at least somewhere in the area of Paris.
It's still-- the button has to run code run query, but in principle it just creates a single point feature from what I entered here, that is shown here on the list. Looks like I actually at least - it's somewhere in Paris. And I can now also add that one to the layer here.
So I'm not sure which one is in the place, I think it's the one up here-- that one here. So that's now-- I can click on it, yes, that's the place, my home. So you see now that the result has indeed been added to the layer.
And just to look at the last steps here-- so the shape file tab would allow us to, instead, add the features a shape file on disk. And there's also the option to create a new shape file for that purpose that opens a separate dialog box, for which you also will have to create the graphical user interface.
And the last one is the CSV tab, where it just can select a file to which the features will be added as, basically, name, latitude, longitude columns. And the buttons with the three dots on it are always for opening a file a dialogue for selecting a particular shape file or CSV file.
OK, so much for this overview, and now we will move on to actually create the graphical user interface for this tool.
The GUI is organized into four main parts:
- The text field for entering the query term. We are currently querying for "Eiffel tower".
- The section where you pick a web query service and set some additional options. The figure shows the interface for the Nominatim OSM service. In addition to Nominatim and GeoNames, we also have a “Direct Input” tab for adding places directly by providing a name and lat/lon coordinates.
- Since the query has already been run, the "Results" section shows different candidate toponyms returned by the Nominatim service for our query. The third one looks like the result we want, so we selected just that one. The selection can be changed with the help of the buttons below or by directly checking or unchecking the checkboxes. Next to the result list is a browser widget that is used to display a Leaflet based web map of the results.
- The final section is for adding the selected features to some dataset. The figure shows the tab for adding them to a currently open layer in ArcGIS Pro.
We can run as many queries as we wish with the tool and collect the results we want to keep in one of the possible output options. While we will only present a basic version of the tool in this walkthrough supporting two different query interfaces and direct input, the tool could easily be extended to provide access to other web portals so that it can be used for running queries to, for instance, get locations of all Starbucks located in a particular city or create locations from a list of addresses.
Before we continue with exploring the GUI and code of the application, let us talk about the two web services we are going to use:
Nominatim – Surely, you know about OpenStreetMaps (OSM) and how it collects geographic data from volunteers all over the world to create a detailed map of the world. OSM data is freely available and can be directly exported from the OSM web site. In addition, there exist quite a few web services built around the OSM data, some of them created with the purpose of allowing for querying the data to only obtain information about particular features in the data. One such example is the Nominatim web service provided by OSM themselves. The website for Nominatim Open Street Maps provides an easy to use interface to the Nominatim query engine. You can type in a search term at the top and then will get to see a list of results displayed on the left side of the page and an OSM based map on the right that shows the currently selected entity from the result list. Give it a try, for instance by running a query for “Eiffel tower, France”.
Note: With some recent changes, it seems Nominatim has become much more restrictive and will often only return a single result rather than multiple options. If you leave out the 'France' in the query, the only result returned will actually not be the Eiffel Tower in Paris. However, you will still get multiple results if you, for instance, enter 'Washington' as the query string. Due to these changes, the results you will get when using Nominatim in the Locations from Web Services Tool will partially deviate from what is shown in the figures and videos in this section (for instance, the list of options shown in Figure 2.25 when only querying for 'Eiffel tower' without country name.
Nominatim provides an HTTP based web API that can be used for running queries from your own code and getting the results back, for instance as JSON or XML data. The web API is explained on this wiki page here. Query terms and additional parameters are encoded in a URL that has the general format:
https://nominatim.openstreetmap.org/search
where parameters are specified as <parameter name>=<parameter value> pairs and multiple parameters have to be separated by an & symbol. The parameter name for the query string is simply 'q' (so q=...). To run the query, the client sends an HTTP GET request with this URL to the Nominatim server who processes the query and parameters, derives the result, and sends back the results to the client. The format parameter controls how the result is presented and encoded. Without specifying that parameter, you will get the kind of HTML page that you already saw above with the result list and map. When using format=json as we will do in the following, we get the result as a list of entities encoded as JSON. Here is an example query URL, querying for “Eiffel tower, France” again, that you can test out simply by clicking on the link to open the URL in your browser:
https://nominatim.openstreetmap.org/search?q=Eiffel%20tower%2c%20France&format=json
Have a look at the result shown in your browser. As we explained at the beginning of the lesson, JSON uses [...] to denote lists of entities
[ <entity1, entity2>, ... ]
where each entity is described by its properties like in a Python dictionary:
{<property1>: <value>, <property2>: <value>, ...}
Due to the changes, we mentioned above, the result will be a list with just a single entity, looking like this ...
[{
    "place_id":115316817,
    "licence":"Data © OpenStreetMap contributors, ODbL 1.0. http://osm.org/copyright",
    "osm_type":"way",
    "osm_id":5013364,
    "lat":"48.8582599",
    "lon":"2.2945006358633115",
    "class":"man_made",
    "type":"tower",
    "place_rank":30,
    "importance":0.5868325701744196,
    "addresstype":"man_made",
    "name":"Eiffel Tower",
    "display_name":"Eiffel Tower, 5, Avenue Anatole France, Quartier du Gros-Caillou, 7th Arrondissement, Paris, Ile-de-France, Metropolitan France, 75007, France",
    "boundingbox":["48.8574753","48.8590453","2.2933119","2.2956897"]
}]
We can see that the most important properties for us will be the ‘display_name’ property and the ‘lat’ and ‘lon’ properties (appearing in bold above) in order to create point features and add them to an existing data set with our tool. Feel free to compare this result to what you get when querying for 'Washington' where you will get a list of multiple results.
The following query uses a few more parameters to query for places called London in Canada (countrycodes=CA) and asking for only a single entity be returned (limit=1).
https://nominatim.openstreetmap.org/search?q=London&format=json&countrycodes=CA&limit=1
If you look at the result, you will see that it lists London in Ontario as the only result. Without using the ‘countrycodes’ parameter the result would have been London in the UK because Nominatim uses a ranking scheme to order entities by likelihood/prominence. Without the 'limit' parameter, we would get a list of multiple options in the JSON result. ‘format’, ‘countrycodes’ and ‘limit’ will be the only parameters we will be using in our tool but please have a look at the other parameters and examples given on the Nominatim wiki page to get an idea of what other kinds of queries could be implemented.
GeoNames – You have already seen the Nominatim examples, so we can keep the section about GeoNames a bit shorter, since the URLs for running queries are somewhat similar. GeoNames is essentially an online geographic gazetteer, so a directory of geographic place names with associated information including coordinates. The main page can be used to type in queries directly but we will be using their REST web API that is documented here. Instead of a parameter for specifying the output format, the API uses a special URL for running queries that are replied to using JSON, as in the following example:
http://api.geonames.org/searchJSON?name=Springfield&maxRows=10&username=demo
Please note that a parameter (name=) is used to specify the query term. In addition, GeoNames requires a user name to be provided with the ‘username’ parameter. In case you tried out the link above, you probably got the reply that the daily request limit for user ‘demo’ has been reached. So you will have to create your own account at http://www.geonames.org/login and then use that user name instead of ‘demo’ in the query. The JSON sent back by GeoNames as the result will start like this:
{
    "totalResultsCount": 3308,
    "geonames": [
        {
            "adminCode1": "IL",
            "lng": "-89.64371",
            "geonameId": 4250542,
            "toponymName": "Springfield",
            "countryId": "6252001",
            "fcl": "P",
            "population": 116565,
            "countryCode": "US",
            "name": "Springfield",
            "fclName": "city, village,...",
            "adminCodes1": {
                "ISO3166_2": "IL"
            },
            "countryName": "United States",
            "fcodeName": "seat of a first-order administrative division",
            "adminName1": "Illinois",
            "lat": "39.80172",
            "fcode": "PPLA"
        },
        {
            "adminCode1": "MO",
            "lng": "-93.29824",
            "geonameId": 4409896,
            "toponymName": "Springfield",
            "countryId": "6252001",
            "fcl": "P",
            "population": 166810,
            "countryCode": "US",
            "name": "Springfield",
            "fclName": "city, village,...",
            "adminCodes1": {
                "ISO3166_2": "MO"
            },
            "countryName": "United States",
            "fcodeName": "seat of a second-order administrative division",
            "adminName1": "Missouri",
            "lat": "37.21533",
            "fcode": "PPLA2"
        }
    ]
}
Here the list of entities is stored under the property called ‘geonames’. Each entity in the list has the properties ‘toponymName’ with the entity name, ‘lng’ with the longitude coordinate, and ‘lat’ with the latitude coordinate. Query parameters we will be using in addition to ‘name’ and ‘username’ are ‘maxRows’ to determine the number of results sent back, ‘country’ to restrict the search to a single country, and ‘featureClass’ to look only for features of a particular type (codes A,H,L,P,R,S,T,U,V of the GeoNames feature class codes defined here).