e-Portfolios
Since you'll be creating web-based maps, you'll need to have space on a web server to publish them. Some of you may have your own personal website set up already. If so, you can use that. We used to have webspace at Penn State (referred to as PASS, short for Penn State Access Account Storage Space) but this was retired in July 2023. As a replacement we're suggesting 000webhost.com which offers free accounts (1 free / user) and seems to have reliable uptime (which is also important and not always a given).
There's a number of alternative account options but it's the "Free Web Hosting" one that we're going to use.
There is one wrinkle - if you try to signup with your Penn State address you'll get an error message : "Please use an email address from a reputable email provider (like GMail or Outlook)." That's a slight inconvenience but we suspect everyone has their own alternative address.
Once you've created your account, create your new website (ignoring the annoying prompts to sign up for a premium account, you don't need one)
Name your website something like SURNAMEGeog863
Give it a password
It'll churn for a few seconds and you'll have a webpage.
If you're wondering what the URL is for your site it'll be the name you gave you site in all lower case (e.g. https://surnamegeog863.000webhostapp.com/)
There's some instructions at your URL (once it's created) telling you how to build a simple website (we'll ignore that) and how to upload your own (which we'll be doing in Lesson 3 when you create a HTML page)
Once you've got your webspace allocated, there are a few ways to connect to it. Here are two, with the first being the one I recommend most:
Connect using FileZilla
FileZilla is a free and open-source secure file transfer protocol (SFTP) application. If you already have another SFTP app that you prefer, you're welcome to use it instead.
- FileZilla can be downloaded at FileZilla. Installation should be straightforward.
- Along the top of the application window, you should see text boxes for making a connection to a remote server. Fill out the boxes as follows:
To find your FTP details, please log on to your members' area go to 'Settings' -> 'General Settings' -> 'FTP Details' section and you will be presented with your information.
If you don’t know your website password, please go to your members' area -> 'Manage Website' -> 'Settings' -> 'General' -> 'Password'
Host: files.000webhost.com
Username: your website name (e.g. surnamegeog863) all lowercase
Password: same as your website password
Port: 21
Then click Quickconnect. Tell FileZilla whether you want it to store your password. After a moment, you should see a connection to your webspace on the right side of the window.
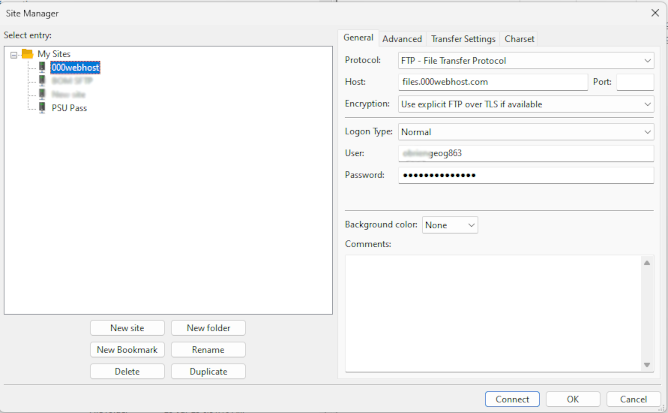
If you want to set it up using Site Manager then the connection parameters will look like:
- Double-click on the public_html folder to access the part of your webspace that's open to the world to see (where you'll want to post your projects).
- To transfer a file from your local system to your webspace, navigate to the file in the left-hand pane, right-click on the file and select Upload. (Or drag and drop from the local site to the remote site.)
- When finished transferring files, you can disconnect from the remote server by clicking on the button with the red X.
To avoid having to enter the same connection parameters every time, you can store them as follows:
- Open the Site Manager (1st button on toolbar).
- Click New Site.
- Give a name to your connection (e.g., PSU web space).
- Enter the Host and Port values as specified above.
- Set the Protocol to FTP - File Transfer Protocol.
- Set the Logon Type to Normal or Ask for password (depending on whether you allowed FileZilla to store your password or not).
- Set the User to your website name (again probably surnamegeog863).
- Click Connect and enter your password if prompted.
Going forward, you can connect to your webspace in FileZilla by going to the Site Manager dialog, selecting the connection you created above, and clicking Connect.
Note: The application is set up by default to show a directory tree and a file listing for both the local and remote sites. If you're like me and prefer to see the directory tree and files in a single pane, you can toggle the directory trees off by clicking on the 3rd and 4th buttons in the toolbar.
Connect using the 000webhost File Manager
- This is a web-based means of uploading files to your web space.
- If you check out the Dashboard (click "Manage") then you'll see a few icons - try File Manager and it'll show you your folders - public_html is where you'll be putting your html, js and css files later in the class. A bit like Windows Explorer or Finder on a Mac you can click on the folder names on the left and create new folders with the icons in the top right. I'd suggest a folder per lesson to keep everything neat and tidy.
- Going this route doesn't require installing any additional software and the interface is fairly self-explanatory. The downside is that the interface is a bit clunky and tedious.
You may encounter some web publishing tutorials that recommend you set up a blog. Blogs are preferable to a plain personal web page for most students because blogging software provides page authoring tools that simplify the publishing process. However, for this course, you should avoid setting up a blog. You will need to be able to write your own HTML from scratch and the blogging tools will only complicate matters.