This page is intended for Mac users. If you work on a PC, skip to the next page.
This short tutorial is meant to provide you with familiarity using a small number of unix commands to manipulate big text files of data. It is not meant to substitute for a complete understanding of unix, or programming in general, or even an exhaustive listing of useful commands but I hope that if you follow along, you'll learn enough simple file editing skills to save you some time.
Part 1: navigating your file structure from the terminal
Commands in Part 1: whoami, pwd, ls, cd, mkdir, man
The first thing we'll want to do is open a terminal window. Go to the Utilities folder inside your Applications folder and open Terminal. A window appears with some text that should be similar to the following.
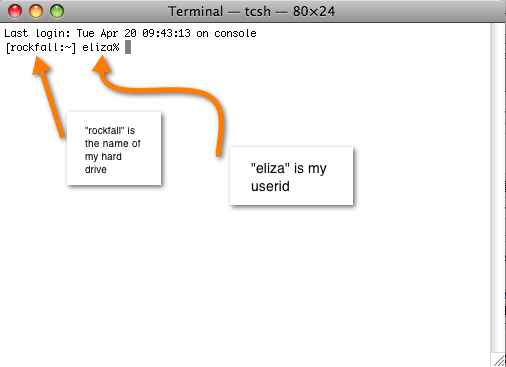
Last login: Tue Apr 20 09:43:13 on console
[rockfall:~] eliza%
The first line "Last login: Tue Apr 20 09:43:13 on console" provides the date, and time from the last time that you logged into the system. On the second line, the word rockfall refers to the machine that you are logged into. In this case, rockfall refers to my machine or hard drive. The text after the : refers to which directory I am in. The ~ means that I am currently in my home directory. So, [rockfall:~] means that I am logged into the home directory on my machine. Next, "eliza" refers to my userid and the % means that is the end of the prompt and is waiting for your input.
An image of the window with the text referenced above is below.
Here are three commands to try:
- Type whoami at the prompt. The response should be your username.
- Type pwd at the prompt. This stands for "present working directory" and it should tell you where you are in your computer's file structure.
- Type ls at the prompt (the first character in the ls command is a lowercase L, not the number one). This command should give you a listing of all the subfolders and files inside the folder where you are. Do you recognize the list? It probably looks slightly unfamiliar to you because it is just a plain text listing as opposed to a pretty list with little icons to tell you the type of folder or file each item is. Furthermore, alphabetizing in unix is case sensitive, so if some of your folders and files are capitalized and some aren't, you might find that your list is in a different order than you are used to seeing.
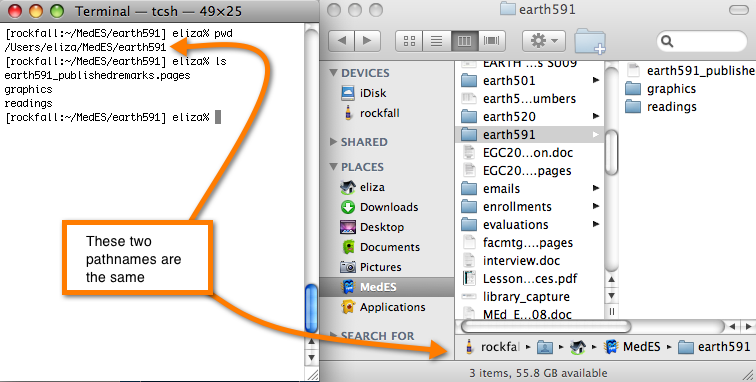
- Now we'll move around the file structure a little bit. In order to visualize better what you are doing, open your Finder to the same location as your terminal window. This way you'll be able to double check what you are doing. See my example below. I'm in the directory called "earth591" which is inside the directory called MedES. Note that when you are in the Finder, you can check where you are by looking down at the bottom margin. In the terminal, if you forget where you are you can always type pwd.
- Now, in your terminal window, go to one of the folders inside the folder where you are. To do so, type cd foldername at the prompt. For example, in my earth591 folder, there are two subfolders called "graphics" and "readings". If I want to go to "graphics" I type cd graphics at the prompt.
- To move one directory upwards, type cd .. at the prompt. That's cd, then a space, then two periods without spaces between them.
- You don't need to move along one directory at a time, either. When I first started up my terminal window I was in the folder called "Users/eliza." If I wanted to go directly to the graphics folder inside the earth591 folder I could have typed cd MedES/earth591/graphics at the prompt and I would have gone straight there with zero mouse clicks.
- If you type cd with no arguments after it, you will be returned to your original location (the default location where you started when you opened up Terminal).
- You can create new folders and files, too. Type mkdir junk at the prompt in your terminal window. You have just made a new folder called "junk". Notice in your finder window that this new folder appears right away. You can make more than one directory at a time with just one command. If you type mkdir junk1 junk2 junk3 at the prompt you will make three directories all at the same level with those names.
- The man command prints the manual page for any command to the terminal screen. Try it with the other commands in this section by typing man whoami, man ls, etc. at the prompt. The man page will give you more details than are in my little tutorial about any and all unix commands, including the various options that go with each command.
Part 2: simple text file manipulation
Commands in part 2: cp, mv, rm, more, head, tail, cat, >
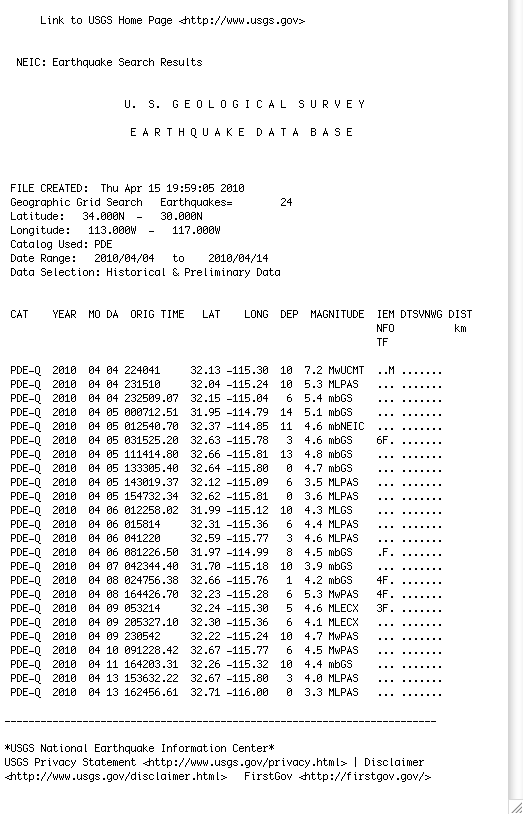
Now let's take a text file and mess around with it using unix commands in the terminal window. Here is a link to a plain text file of ten days of aftershocks following the 4 April 2010 Baja California earthquake. Put it in the new directory you called earth801/data1. Go to earth801/data1 and type ls to verify the file is there. Type more baja_neic.txt (in which baja_neic.txt is the actual name of the text file). The file should look like the screenshot below. If your terminal window is too small to show the whole file at once, you will get a black bar at the bottom that tells you what percentage of the file you are seeing. Hit the spacebar and you'll see another chunk of the file. Continue to hit the spacebar until you've seen the whole file and you are back at the terminal prompt. Alternatively, if you type cat baja_neic.txt the entire file will scroll by and leave you at the prompt when it's done.
The command head baja_neic.txt shows you exactly the first ten lines of the file. Try it. You can also modify the head command like this:
head -5 baja_neic.txt
The -5 tells head to show the first 5 lines. Showing ten lines is the default when head has no arguments, so the following two commands are equivalent:
head baja_neic.txt
head -10 baja_neic.txt
The command tail is similar to head but works on the end of the file instead of the beginning. The commands more, cat, head, and tail return their output to the screen by default but you can also have them create a new file and put their results in it instead. The way to do this is to redirect the output with the > symbol.
For example, do this:
head -5 baja_neic.txt > newfile
and you will create a new text file called "newfile" which contains exactly the first five lines of the original file baja_neic.txt. It is important to note here that performing this command has not changed the original file in any way. You can type ls to verify that you now have two files in your data1 directory. One of them is the original baja_neic.txt and the other one is called newfile and it is a copy of the first five lines of baja_neic.txt. Use the more command to look at your newfile file. Did you get what you were expecting? When the "head" command counts lines of a file, blank lines are counted just like lines that have text characters in them, so that's why newfile looks the way it does. At this point, if you have been following along, the following three commands should give you identical output:
head -5 baja_neic.txt
more newfile
cat newfile
Okay, on to the next command of interest. The cp command copies one file to another but instead of using > you just specify the other filename. So, these two commands are equivalent ways of copying the entire file baja_neic.txt to a new file called baja_neic_copy.txt:
cp baja_neic.txt baja_neic_copy.txt
cat baja_neic.txt > baja_neic_copy.txt
If you want to rename a file without changing its contents, use mv. Like cp, mv requires two filenames, the previous one and the new one.
mv newfile baja_neic_five.txt
The above command renames the file "newfile" to "baja_neic_five.txt". You can also use "mv" to change the location of a file. Try typing
mv baja_neic_copy.txt ../data2/baja.txt
This command takes the file "baja_neic_copy.txt" and moves it from the folder data1 to the folder data2 and renames it baja.txt. You can go to data2 (remember how?) and verify there is now a file in there called baja.txt and that it is a duplicate of baja_neic.txt.
Another cool use of the cat command is to stick two or more files together and make one file. So,
cat baja_neic.txt newfile > baja2.txt
will make a file called baja2.txt which is a copy of baja_neic.txt plus a copy of "newfile" stuck together.