Now let's try Esri's more open-ended option for creating apps.
- Re-open your Buildings map and click again on the Share button.
- Click Create a Web App and this time click on the Web AppBuilder tab rather than the Configurable Apps tab.
- Assign a Title of PSU Main Campus Buildings, add some tags that would aid in discovering the app (e.g., Penn State, buildings), optionally enter a summary, then click Get Started.
The Web AppBuilder will open with configuration options organized within tabs on the left side of the window and a preview of your new app on the right side. The app is dynamically linked to the configuration options so that changes made on the left will be reflected on the right immediately. The first of the configuration tabs is Theme, which provides access to settings that deal mainly with the app's appearance.
- Try out some or all of the available themes (Billboard, Box, Dart, etc.). The controls on the app preview are functional, so you can click on the Legend and Layer List controls to see how they would behave. Depending on the theme chosen, you will see different options under the Style and Layout headings.
- Click on the Map tab and note that it is possible to change the app's underlying Web Map and to override the map's initial extent and visible scale levels.
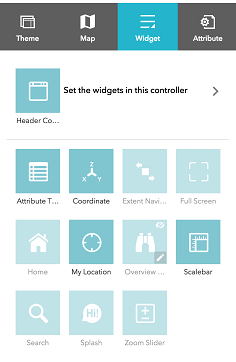
- Next, click on the Widget tab. This is where the real power of the Web AppBuilder becomes apparent.
The widgets available in Web AppBuilder can be categorized as off-panel or in-panel. Off-panel widgets are built into the app and can only be toggled on/off. Examples include the Scalebar and Coordinate widgets. In-panel widgets, on the other hand, can be added to or removed from the app. When adding an in-panel widget, the developer can position the widget within a container. If you experimented with the various themes, you saw that the shape and positioning of the widget container is something that differs across the themes. And for some themes, in-panel widgets can also be placed in numbered positions outside of the theme's container.
- Hover your mouse over some of the off-panel widgets and note the following:
- An eye icon appears in the widget's upper-right corner. The widget can be toggled on/off by clicking on this icon. Widgets that have been turned on are shaded dark blue, while those that are turned off are light blue.
- Widgets that are toggled on will have their position within the app highlighted in red.
- A pencil icon appears in the widget's lower-right corner. The widget can be configured by clicking on this icon. (For example, the Scalebar widget can be configured to show distance measured in English units, metric units, or both.)
- Turn on the following widgets: Attribute Table, Coordinate, My Location, Scalebar, Overview Map.

- Configure the widgets as follows:
- Attach the Overview Map to the top-right corner and initialize it in its expanded state.
- Modify the Attribute Table so that only the building name and abbreviation columns are visible. (Note that this can also be done for the web map itself, which is an important consideration if you're using the map as the basis for multiple apps serving multiple purposes/audiences.)

Now let's modify the widgets that are held within your theme's widget container (or controller).
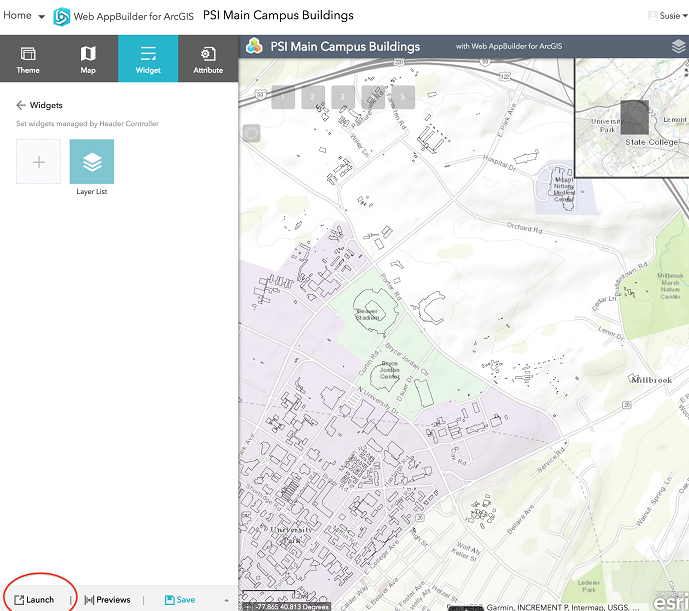
- Regardless of the theme you selected, you should see a Set the widgets in this controller link near the top of the tab. Click on this link. You should see the Legend and Layers List widgets by default.
For this simple map in which the title makes it clear what's being shown, a legend is unnecessary.
- Hover your mouse over the Legend widget and click on the X in the upper right to remove it from the app.
For the same reason, you could probably also remove the Layer List widget. However, this widget provides a context menu of options that could be of interest to users.
- Hover your mouse over the Layer List widget and click on the pencil icon to change its configuration.
- Uncheck the Show Legend box. The widget makes it possible to view a legend for each layer by clicking on a small arrow to the left of the layer name, but again, there's not much point in a legend here.
The widget also offers the ability to perform certain actions through the context menu. All of these items are turned on by default, but you can override that.
- Uncheck the Enable/Disable Pop-up box and the Move up/Move down box (with only one layer on the map, the Move options will be disabled anyway).
- Click OK to dismiss the Layer List dialog, then Save your app.
- Click the Launch button to open your app in a new tab and confirm that the various settings you've made have taken effect.

Now let's check out some of the other in-panel widgets that are available.
- Close the tab containing your running app and return to the Web AppBuilder tab.
- Under the Widgets heading, click on the + sign to add a new widget. In addition to the Layer List and Legend widgets that we've already seen, you should see many others including Basemap Gallery, Edit, and Geoprocessing, among others. Being able to switch basemaps is a nice feature to have, even in a very simple demo like this, so let's provide that capability.
- Click on the Basemap Gallery widget and click OK. You'll be taken immediately to a configuration panel, which for this widget provides the ability to use your organization's basemap gallery (which will be the same as Esri's if your organization hasn't defined one) or configure a custom gallery for this app.
- Choose the Configure custom basemaps option, then click the Import button.

The Import basemaps dialog allows you to pick and choose from the full set of basemaps found in Esri's or your organization's gallery. Esri's gallery is selected by default.
- Click on each of the basemaps one at a time to add them to this app's gallery, with the exception of Imagery with Labels (it differs little from Imagery in this area), Oceans (not applicable to this area) and Terrain with Labels (not intended for use at this scale). Click OK twice to finish configuration of the Basemap Gallery widget.
- Click again on the + sign, add the Draw widget, check the box to Add the drawing as an operational layer of the map and click OK. This will enable the user to add custom features and annotation as a separate layer.
Now let's say you want the widgets to appear in a different order.
- Click on one of the widgets and drag it to a new position. You should see a red vertical line indicating where the widget will end up when you release the mouse button.
Before leaving the Widgets tab, there are a few more points worth mentioning:
- The Analysis widget provides access to several analytical tools that may be useful depending on the app's purpose (e.g., Create Buffers, Create Viewshed, etc.). Keep in mind though that usage of these tools may consume service credits allocated to your ArcGIS Online organization.
- The Edit widget can be used to develop online editing apps.
- The Geoprocessing widget can be used to "wire up" your app to a geoprocessing task.
- Full documentation for all of Esri's widgets can be found at http://doc.arcgis.com/en/web-appbuilder/create-apps/widget-overview.htm.
- Click on the Attribute tab to move on to a set of options that help with branding your app.
- Enter a sensible Title, such as Penn State University Park Buildings.
- If you're not interested in advertising for Esri, clear the text in the Subtitle box or assign your own.
- Set the app's logo (using the same Nittany Lion shield from the previous page) by hovering over the Logo icon, clicking the Custom link and browsing to the image on your computer. Note that the logo is not displayed for all themes.
- Click on Add New Link, enter www.psu.edu in the first box (the text that you want to display) and the URL http://www.psu.edu in the second box. Again, note that links are not displayed for all themes.
- Finally, Save your app, then click Launch to see the app as an end user would.
With that, you've built a couple of apps that could be used in real-world scenarios. Best of all, you didn't have to write a line of code. One thing I hope you'll take away from this exercise is to remember that these no-coding tools exist and to look for opportunities to take advantage of them.
Move on to the next page of the lesson to solidify what you've learned here with an assignment that requires you to build another app using data and requirements of your own choosing.