The interactivity offered by this map is nice, but you may find yourself in situations where you need to go further. For example, maybe you want end users to be able to query the map's underlying data for features meeting certain criteria or to be able to edit the underlying data. Esri offers a couple of different non-programming options for those looking to build apps with greater functionality. The first of these is a set of templates that each meet a narrowly focused need (e.g., Edit, Query, Directions). As the app developer, you select the desired template and make a relatively small number of configurations to tailor the app to your needs. The second option is to use Web AppBuilder. This option is more open-ended, allowing you to build a less narrowly focused app by picking and choosing from a set of widgets.
We'll start with configurable app templates and to demonstrate their use we'll create an app for locating buildings on the Penn State Main Campus.
- In your Penn State ArcGIS Online organizational account, create a new map.
- Add the campus building data as a layer by going to Add > Add Layer from Web and pasting this ArcGIS Server map service:
http://maps.pasda.psu.edu/arcgis/rest/services/pasda/PSU_Campus/MapServer/1
- Zoom to the central part of campus and style the layer as desired.
- Save the map with the name PSU Buildings. Be sure to add some tags that would aid in discovering the map (e.g., Penn State, buildings) and optionally enter a summary.
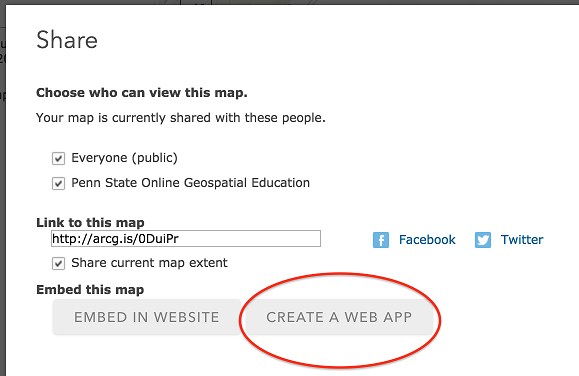
- Click Share, then check the Everyone box to ensure your map is viewable to the public.
- Click Create a Web App.
You'll be presented with a gallery of app templates on which you can base your own app. Browse the templates to get a sense of the variety of apps available. Note that how your map will look within a given template can be previewed by clicking on the desired template and selecting Preview.
We're going to create a Basic Viewer application and configure it so that users can search for buildings by name.
- Click on the Basic Viewer template and select CREATE WEB APP.
- Assign a title to the app (e.g., Penn State Main Campus Building Finder), add some tags that would aid in discovering the app (e.g., Penn State, buildings), optionally enter a summary, then click DONE. After a few moments, you'll be presented with a Configure page. The full set of configuration options for this template are organized under the tabs General, Theme, Options and Search. Let's start with the General tab, already shown by default.
- The app preview on the right initializes with a heading based on the underlying map name. Change this by setting the Application title to Penn State Main Campus Building Finder.
Other options under the General tab have to do with providing some background info to the user regarding the app's purpose and/or use. This can be done through a Details dialog or through a Splash Screen. Both options offer a WYSIWYG HTML editor for defining the content. The main difference is that the splash screen appears automatically when the app loads (but cannot be viewed after that), while the Details dialog can be opened whenever desired via a button. Some apps require no background info, while others are not as intuitive. You may choose to employ neither, just one, or both of these options, depending on the app.
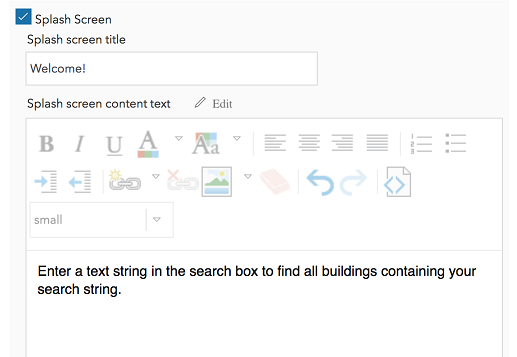
For this app, let's go with a Splash Screen, but no Details.
- Check the Splash Screen checkbox, then set the properties as follows:
Splash screen title: Welcome!
Splash screen content text: Enter a text string in the search box to find all buildings containing your search string.
Define custom button text: Close
- In the app preview area on the right side of the window, click Save to save your configurations so far. When the app preview reloads, you should see the changes you've made, including the splash screen.
- Now, move to the Theme tab and set the Title logo to
https://www.e-education.psu.edu/geog260/sites/www.e-education.psu.edu.geog260/files/image/webappimages/psu-facebook-avatar-180x180.jpgand the Logo link tohttp://www.psu.edu. Note that while the image is actually 180 pixels x 180 pixels, it will be dynamically resized to 48 pixels x 48 pixels. - Feel free to experiment with the layout options. (You'll need to click Save to refresh the preview after selecting a different layout.) I'm partial to the Default, but you're welcome to choose a different one.
At the top of the Theme tab, you have the ability to customize the colors of the header background, header text, button icons, panel background and panel text. It turns out that Penn State's blue and white colors are already a pretty good match for the app's default colors. However, we can adjust the header background color to match the Penn State blue a bit better.
- Open the Penn State shield used above in Firefox, then right-click on the image and choose Inspect Element.
- Under the Inspector tab, you should see an eyedropper icon. If you've worked in image editors like Photoshop, you should be familiar with how this tool works. Click on the tool to activate it, then click on the blue part of the shield. This will copy the hexadecimal value of that color to your clipboard. (The shield contains many shades of blue, so your color value is likely to be different from mine.)
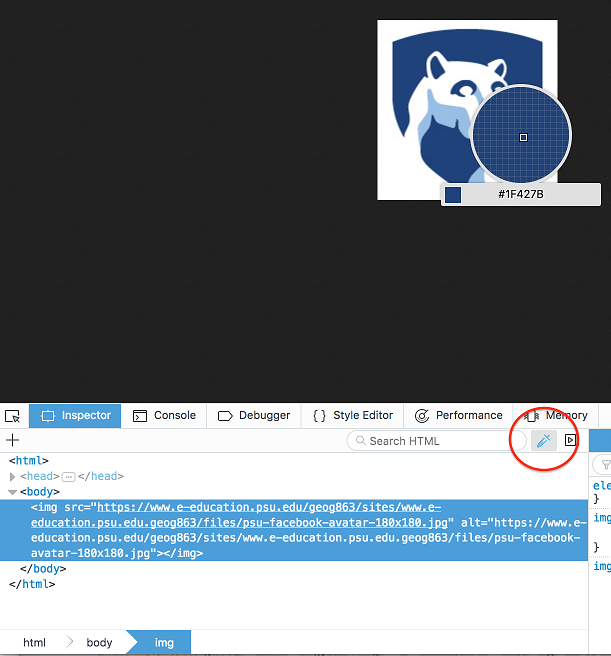
- Return to the app and Paste the copied color value in to set the Header color property.
- Move to the Options tab and spend a few minutes examining the many ways you can customize the app GUI. Here are the settings I would make for this app:
- Display scalebar on map
- Turn off Bookmarks. (I didn't see a tool associated with this option on the GUI anyway.)
- Turn off Map Details. We left this option empty under the General tab earlier, opting to show a splash screen only.
- Turn on the Measure tool. You should experiment with this; it can be used to measure lengths and areas.
- Uncheck Display layer list. There's not much point in letting the user toggle the buildings on/off in this app.
The Basic Viewer template provides a box for the user to enter search text, which by default is set to work against Esri's world geocoder. We'll now carry out the most important of our customizations by wiring up the search box to a column in the buildings layer that holds the building names.
- Click the Search tab, uncheck the Esri World Geocoder option and check the PSU Buildings option.
- Click the Edit button next to the PSU Buildings option.
- From the Search Fields list, select BLDG_NAME_.
- Set the Placeholder to Enter part of a building name.
- Check the Enable Suggestions box. This will find matches in the buildings layer and present them in a dropdown list as the user types.
With that, you've made all the necessary settings to tailor this template to your specific purpose.
- Click Save and Close once you're satisfied with the app's settings. You'll be taken to your app's "item details" page (also accessible from your "My Content" page).
- To see the app as an end user would see it, click the View Application button to open it in a new browser tab.
- Test your new app by entering the name 'walker' in the search box. You should see that the app finds two buildings that make up the Walker Clubhouse (associated with the PSU golf courses) and Walker Building (home of the Geography and Meteorology departments). Note how the settings you made when configuring are reflected in the app.
- Returning to the Details page, note the various pieces of metadata that can be edited (thumbnail, description, access use and constraints, etc.).
- Note also that you would come here and click the Configure App button if you wanted to make changes to the app.
- Finally, and importantly, if you want others to be able to use your app, you'll need to click the Share button. In the Share dialog, you can select whether you want the app to be visible to Everyone, your Penn State group, or some other group to which you belong. Select Everyone in this case.
- And just to test your app's visibility, scroll to the bottom of the app's Details page and find the URL in the bottom right. Click the Copy button to copy the URL to your clipboard, then paste that URL into a different browser where you are not signed in to ArcGIS Online. If the app works properly, then you can safely share that URL with your end users.
Remember that there are many configurable app templates available to you as an app developer. Often there are multiple templates that can serve as logical starting points, and depending on the widgets employed by the template, you'll see different customization options. For example, this building finder app could have been built using the Public Information template. If you have extra time after completing this lesson, you might want to experiment with building an app from that template.