
Transmission Line Siting Exercise
Additional Instructions for Penn State Computer Labs
**If you are using your own computer for this exercise, you don’t need to use these additional instructions.**
The manual for the Transmission Line Siting Exercise repeatedly warns of using the directory 'C:\temp' for your exercise. This works well if you have your own computer and are thus allowed to create directories. If you do not have your own computer and must use a Penn State computer lab, accessing the C drive is not possible. The good news is that with a few minor tweaks you can do the exercise in a Penn State lab (henceforth referred to as 'lab'). I will document the changes below.
On page 2, you are instructed to unzip the file 'SAMPLE_ROUTING_PROJECT_WO_DOCS.zip' and place the directory 'SAMPLE_ROUTING_PROJECT' into 'C:\temp'. You won’t be able to do that in the lab and you have two options to get around this limitation. The first method is to use a thumb drive or portable hard drive, the other is to use a temporary drive that appears after you log into a lab machine. The first option is simple, take your portable drive and connect it to the lab machine. It will soon appear in Windows file manager. I can't say for sure what the driver letter will be, it's best to open the file manager (hit the windows key and the letter E at the same time) and then connect the drive, that way you'll see the new drive appear and readily ascertain it's letter. For the remainder of these instructions, let’s assume the driver letter is 'M.'
The second method uses a temporary drive established during login to the lab machine. This will be the designated by the letter T, you can't change it. You can use this just as you would the portable driver except for one major difference. When you log out THE DRIVE GOES AWAY, DELETING ALL YOUR FILES! Sorry for yelling, but you really need to understand that last part, this drive T only exists while you are logged in and then disappears taking your files along with it. That's not a major catastrophe, you can copy the whole SAMPLE_ROUTING_PROJECT directory and to your PASS space. But if you forget, POOF!!! (You might be wondering why we don't just set you up to use your PASS space. We've tested that and the exercise doesn't work. Some of the operations you'll run in ArcGIS don't seem to work over the network, which is where your PASS space is.) Now that I've given you the warning about using the temporary T drive, let's continue. I'll use M as the drive from here on but if you use another drive letter, just substitute it every time.
Once you've copied the SAMPLE_ROUTING_PROJECT directory to your drive it should be like this:
M:\SAMPLE_ROUTING_PROJECT
Let's refer to your manual again. See that on page 5 you're instructed to open the file 'Base Map.mxd'. For you that is now in M:\, so find it here:
M:\SAMPLE_ROUTING_PROJECT\Base Map.mxd
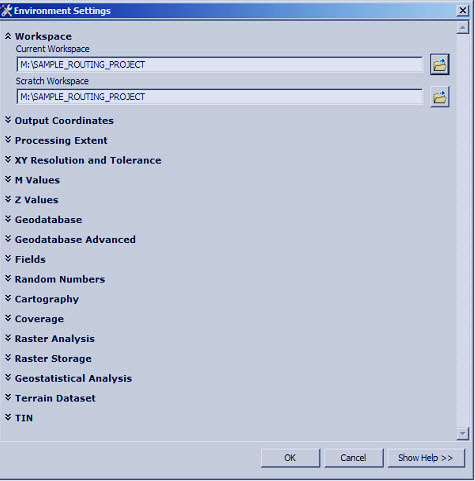
Open this file in ArcGIS as instructed. After opening the file you have one more important step. You need to tell ArcGIS where your files are. Go to the 'Geoprocessing' menu and choose 'Environment Settings.' You will see a dialog box (pictured below) with a list of words accompanied by up and down arrows. Click the first word, 'Workspace.' You'll see two boxes labeled 'Current Workspace' and 'Scratch Workspace.' In both of these boxes put the directory where you have your files. In these instructions it's 'M:\SAMPLE_ROUTING_PROJECT'. (REMEMBER TO SUBSITITUTE YOUR DRIVE LETTER.) Click the OK button. This small step makes it possible to run your exercise outside the 'C:\temp' directory. From this point on, remember that every time the instructions point to c:\temp\SAMPLE_ROUTING_PROJECT you'll be looking in your own directory.
You'll notice these changes have had an effect when you get to on page 9. As you attempt to add the 'SampleProject_Toolbox' toolbox, you should see 'Home - SAMPLE_ROUTING_PROJECT' in the dialog box. Go in there find SampleProject_Toolbox.tbx just as the directions describe. Continue to follow along but when you get to page (Step 4.2) instead of seeing your directories starting with 'c:\temp\SAMPLE_ROUTING_PROJECT' your directory will start with 'M:\SAMPLE_ROUTING_PROJECT'. (But really your own, not necessarily M, remember?) After checking this, hit OK just as the instructions say and let the model run. Do the next five models, following the instructions but always checking to see that your 'different' directory is being used.
After you have run all the models you'll find yourself on page 24. As you follow the directions for the rest of the exercise just remember to substitute your path for c:\temp and you won’t have any problems.
One more thing, if you decided to use the temporary drive T on the Penn State lab machines, remember to copy the whole ‘SAMPLE_ROUTING_PROJECT’ to you PASS space for safe keeping. Even if you do this exercise from a portable hard drive, it’s a good idea to have a backup in your PASS space (drive X on the lab machines.)