Before getting into the details of how to read and modify these attributes, it's helpful to review how geographic datasets are stored in ArcGIS. You need to know this so you can open datasets in your scripts, and on occasion, create new datasets.
Geodatabases
Over the years, Esri has developed various ways of storing spatial data. They encourage you to put your data in geodatabases, which are organizational structures for storing datasets and defining relationships between those datasets. Different flavors of geodatabase are offered for storing different magnitudes of data.
- File geodatabases are a way of storing data on the local file system in a proprietary format developed by Esri. They offer more functionality than shapefiles and are best suited for personal use or small organizations.
- ArcSDE geodatabases or "enterprise geodatabases" store data on a central server in a relational database management system (RDBMS) such as SQL Server, Oracle, or PostgreSQL. These are large databases designed for serving data not just to one computer, but to an entire enterprise. Since working with an RDBMS can be a job in itself, Esri has develped ArcSDE as "middleware" that allows you to configure and read your datasets in ArcGIS Pro and other Esri products without touching the RDBMS software.
ArcGIS Pro also provides the ability to pull data directly out of an RDBMS using SQL queries, with no ArcSDE involved, through query layers.
A single vector dataset within a geodatabase is called a feature class. Feature classes can be optionally organized in feature datasets. Raster datasets can also be stored in geodatabases.
Standalone datasets
Although geodatabases are essential for long-term data storage and organization, it's sometimes convenient to access datasets in a "standalone" format on the local file system. Esri's shapefile is probably the most ubiquitous standalone vector data format (it even has its own Wikipedia article). A shapefile actually consists of several files that work together to store vector geometries and attributes. The files all have the same root name, but use different extensions. You can zip the participating files together and easily email them or post them in a folder for download. In the Esri file browsers in ArcGIS Pro, the shapefiles just appear as one file.
Note:
You may see that in Esri's documentation, shapefiles are also referred to as "feature classes." When you see the term "feature class," consider it to mean a vector dataset that can be used in ArcGIS.Another type of standalone dataset dating back to the early days of ArcGIS is the ArcInfo coverage. Like the shapefile, the coverage consists of several files that work together. Coverages are definitely an endangered species, but you might encounter them if your organization used ArcInfo Workstation in the past.
Raster datasets are also often stored in standalone format instead of being loaded into a geodatabase. A raster dataset can be a single file, such as a JPEG or a TIFF, or, like a shapefile, it can consist of multiple files that work together.
Providing paths in Python scripts
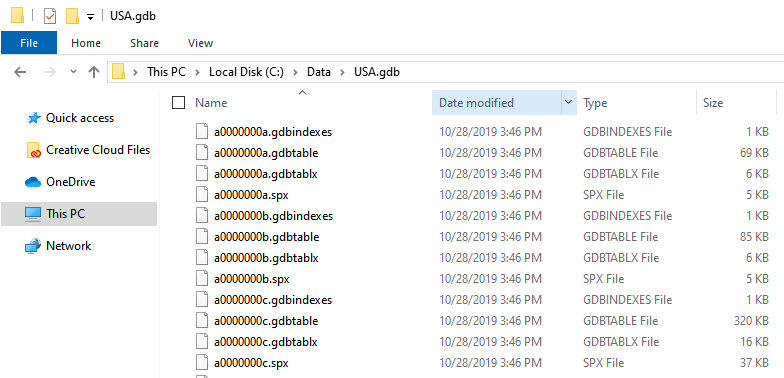
Often in a script, you'll need to provide the path to a dataset. Knowing the syntax for specifying the path is sometimes a challenge because of the many different ways of storing data listed above. For example, below is an example of what a file geodatabase looks like if you just browse the file system of Windows Explorer. How do you specify the path to the dataset you need? This same challenge could occur with a shapefile, which, although more intuitively named, actually has three or more participating files.
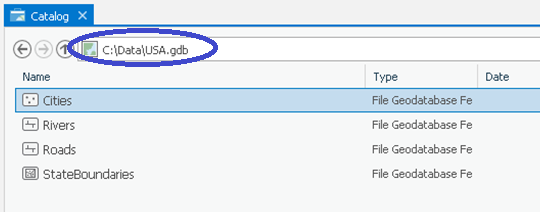
The safest way to get the paths you need is to open Pro's Catalog View (which displays in the middle of the application window, unlike the Catalog Pane, which displays on the right side of the application window) and browse to the dataset. The location box along the top indicates the folder or geodatabase whose contents are being viewed. Clicking on the dropdown arrow within that box displays the location as a network path. That's the path you want. Here's what the same file geodatabase would look like in Pro's Catalog view. The circled path shows how you would refer to a feature class's geodatabase then add the feature class name. (Alternatively, you could right-click any feature class from either the Catalog View or Catalog Pane, go to Properties, then click the Source tab to access its path.)
Below is an example of how you could access the feature class in a Python script using this path. This is similar to one of the examples in Lesson 1.
import arcpy
featureClass = "C:\\Data\\USA\\USA.gdb\\Cities"
desc = arcpy.Describe(featureClass)
spatialRef = desc.SpatialReference
print (spatialRef.Name)
Remember that the backslash (\) is a reserved character in Python, so you'll need to use either the double backslash (\\) or forward slash (/) in the path. Another technique you can use for paths is the raw string, which allows you to put backslashes and other reserved characters in your string as long as you put "r" before your quotation marks.
featureClass = r"C:\Data\USA\USA.gdb\Cities"
. . .
Workspaces
The Esri geoprocessing framework often uses the notion of a workspace to denote the folder or geodatabase where you're currently working. When you specify a workspace in your script, you don't have to list the full path to every dataset. When you run a tool, the geoprocessor sees the feature class name and assumes that it resides in the workspace you specified.
Workspaces are especially useful for batch processing, when you perform the same action on many datasets in the workspace. For example, you may want to clip all the feature classes in a folder to the boundary of your county. The workflow for this is:
- Define a workspace.
- Create a list of feature classes in the workspace.
- Define a clip feature.
- Configure a loop to run on each feature class in the list.
- Inside the loop, run the Clip tool.
Here's some code that clips each feature class in a file geodatabase to the Alabama state boundary, then places the output in a different file geodatabase. Note how the five lines of code after import arcpy correspond to the five steps listed above.
import arcpy

arcpy.env.workspace = "C:\\Data\\USA\\USA.gdb"
featureClassList = arcpy.ListFeatureClasses()
clipFeature = "C:\\Data\\Alabama\\Alabama.gdb\\StateBoundary"

for featureClass in featureClassList:
    arcpy.Clip_analysis(featureClass, clipFeature, "C:\\Data\\Alabama\\Alabama.gdb\\" + featureClass)
In the above example, the method arcpy.ListFeatureClasses() was the key to making the list. This method looks through a workspace and makes a Python list of each feature class in that workspace. Once you have this list, you can easily configure a for loop to act on each item.
Notice that you designated the path to the workspace using the location of the file geodatabase "C:\\Data\\USA\\USA.gdb". If you were working with shapefiles, you would just use the path to the containing folder as the workspace. You can download the USA.gdb here and the Alabama.gdb here.
If you were working with ArcSDE, you would use the path to the .sde connection file when creating your workspace. This is a file that is created when you connect to ArcSDE in Catalog View, and is placed in your local profile directory. We won't be accessing ArcSDE data in this course, but if you do this at work, remember that you can use the location box as outlined above to help you understand the paths to datasets in ArcSDE.