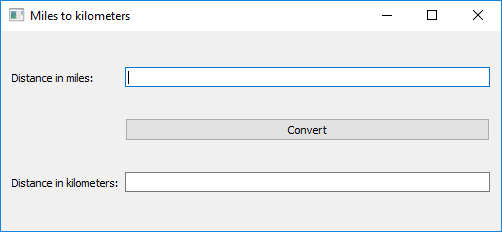
Here is how the code for our miles-to-kilometers conversion tool looks when using PyQt5 instead of tkinter. You will see that there are some differences but a lot also looks very similar. We kept the names of the variables the same even though the widgets are named a little differently now. Since you now have PyQt5 installed, you can immediately run the code yourself and check out the resulting GUI. The result should look like the figure below.
Important note: When you run PyQt5 code in Spyder directly (here or in later sections), you may run into the situation that the program won't run anymore when you start it a second time and instead you get the error message "Kernel died, restarting" in the Spyder Python window. This can be resolved by going into the Spyder Preferences and under "Run" select the option "Remove all variables before execution" to make sure that everything from the previous run is completely cleaned up before the script code is executed again.
Source code:
from PyQt5.QtWidgets import QApplication, QWidget, QLabel, QGridLayout, QLineEdit, QPushButton

def convert():
    """Takes miles entered, converts them to km, and displays the result"""
    miles = float(entryMiles.text())
    entryKm.setText(str(miles * 1.60934))

app = QApplication([])

rootWindow = QWidget()
rootWindow.setWindowTitle("Miles to kilometers")
rootWindow.resize(500, 200)

gridLayout = QGridLayout(rootWindow)

labelMiles = QLabel('Distance in miles:')
gridLayout.addWidget(labelMiles, 0, 0)

labelKm = QLabel('Distance in kilometers:')
gridLayout.addWidget(labelKm, 2, 0)

entryMiles = QLineEdit()
gridLayout.addWidget(entryMiles, 0, 1)

entryKm = QLineEdit()
gridLayout.addWidget(entryKm, 2, 1)

convertButton = QPushButton('Convert')
gridLayout.addWidget(convertButton, 1, 1)

convertButton.clicked.connect(convert)

rootWindow.show()

app.exec_()
Let’s look at the main differences between this code and the tkinter based code from Section 2.5.1.
Obviously, we are now importing classes from the module PyQt5.QtWidgets and the widgets are named differently (all starting with ‘Q’).
While with tkinter, we only created one object for the application and root window together and then called its mainloop() method to start the execution of the event processing loop, the application and its main window are two different things in QT. In line 8, we create the application object and then at the very end we call its exec_() method to start the event processing loop. The window is created separately in line 10, and before we call exec_(), we invoke its show() method to make sure it is visible on the screen.
The creation of the widgets looks very similar in both versions. However, with tkinter, we didn’t have to create a grid layout explicitly; it was already available after the main window had been created. With PyQt5, we create the grid layout for the root window explicitly in line 14. To add widgets to the grid layout, we call the addWidget(…) method of the layout providing numbers for the row and column as paramters.
In the tkinter version, we had to set up a special variable to change the content of the entryKm line input field. This is not required with PyQt5. We can simply change the text displayed by the corresponding QLineEdit widget by calling its setText(…) method from the convert() function in line 6.
Finally, connecting the “clicked” event of the button with our convert() event handler function happens as a separate command in line 31 rather than via a parameter when creating the button object. By writing "convertButton.clicked.connect(convert)" we are saying, in QT terminology, that the “clicked” signal of convertButton should be connected to our convert() function.
It seems fair to say that from the perspective of the code, the differences between tkinter and PyQt5 are rather minor with, in some cases, one of them needing a bit more code, and in other cases, the other. However, this is partially due to this example being very simple and not involving more advanced and complex widgets and layouts.
When you tried out both versions of our little tool or just closely compared the two figures above with screenshots of the produced GUIs, you may also have noticed that, in addition to the differences in the code, there are some differences in the produced layout and behavior. We didn’t make use of all available options to make the two versions appear very similarly and it is certainly possible to do so, but our personal impression is that just based on the default look and behavior, the layout produced by PyQt5 is a bit more visually appealing. However, the main reason why we are going to continue with QT5/PyQt5 for the remainder of this lesson are the following:
- QT5 is a modern and widely used cross-platform and cross-language library; knowledge and skills acquired with QT can be applied in languages other than Python.
- QT5 is efficient and smooth because of the compiled core library written in C++.
- QT5 and PyQt5 provide a large collection of available widgets and can be expected to be under active development for the foreseeable future.
- There exists very good tool support for the combination of QT5 and PyQt5
- Finally and very importantly: In lesson 4 we will continue with the GUI development started in this lesson in the context of QGIS 3. QGIS and its interface for plugins have been developed for PyQt5.
As a final note, if you want to run the converter tool code with PySide, you have to replace the import line with the following line:
from PySide2.QtWidgets import QApplication, QWidget, QLabel, QGridLayout, QLineEdit, QPushButton
Of course, you will first have to install the PySide2 package in the ArcGIS Pro package manager to be able to run the code.