In this final homework assignment, the task is to create a qgis based program, simpler than the Bus Track Analyzer from the lesson walkthrough but also involving the definition of a class hierarchy and static class functions to identify instances of the classes in the input data. While it is an option to submit a QGIS plugin rather than a standalone tool for over&above points, this is not a requirement and, therefore, it is not needed that you have worked through Section 4.11 and 4.12 in detail. The main code for the tool you are going to implement will include a class hierarchy with classes for different types of waterbodies (streams, rivers, lakes, ponds, etc.) and the tool's purpose will be to create two new vector data sets from a JSON data export from OpenStreetMap (OSM).
The situation is the following: you are working on a hydrology related project. As part of the project you frequently need detailed and up-to-date vector data of the waterbodies in different areas and one source you have been using to obtain this data is OpenStreetMap. To get the data you are using the Overpass API running queries like the following
https://www.overpass-api.de/api/interpreter?data=[out:json];(way["natural"="water"](40.038844,-79.006452,41.497860,-76.291359);way["waterway"]
(40.038844,-79.006452,41.497860,-76.291359););(._;>;);out%20body;
to obtain all OSM “way” elements (more on ways and the OSM data model in a moment) with certain water related tags.
An overpass query like this will return a JSON document listing all the way entities with the required tags and their nodes with coordinates. Nodes are point features with lat / lon coordinates and ways are polyline or polygon features whose geometry is defined via lists of nodes. If you are not familiar with the OSM concepts of nodes, ways, and relations, please take a moment to read The OpenStreetMap data model.
The only data you will need for this project is the JSON input file we will be using. Download it and extract it to a new folder, then open it in a text editor. You will see that the JSON code in the file starts with some meta information about the file and then has an attribute called “elements” that contains a list of all OSM node elements followed by all OSM way elements (you have to scroll down to the end to see the way elements because there are many more nodes than ways in the query result).
All node definitions in the “elements” list have the following structure:
{
  "type": "node",
  "id": 25446505,
  "lat": 40.2585099,
  "lon": -77.0521733
},
The “type” attribute makes it clear that this JSON element describes an OSM node. The “id” attribute is a unique identifier for the node and the other two attributes are the latitude and longitude coordinates.
All way definitions in the “elements” list have the following structure:
{
  "type": "way",
  "id": 550714146,
  "nodes": [
    5318993708,
    5318993707,
    5318993706,
    ...
    5318993708
  ],
  "tags": {
    "name": "Wilmore Lake",
    "natural": "water",
    "water": "reservoir"
  }
},
The attribute “type” signals that this JSON element describes an OSM way feature. The “id” attribute contains a unique ID for this way and the “nodes” attribute contains a list of node IDs. If the IDs of the first and last nodes in this list are identical (like in this case), this means that this is a closed way describing an areal polygon geometry, rather than a linear polyline geometry. To later create QGIS geometries for the different waterbodies, you will have to take the node list of a way, look up the corresponding nodes based on their IDs, and take their coordinates to create the polygon or polyline feature from.
In addition, the JSON elements for ways typically (but not always!) contain a “tags” attribute that stores the OSM tags for this way. Often (but not always!), ways will have a “name” tag (like in this case) that you will have to use to get the name of the feature. In this example, the way also has the two tags “natural” with the value “water” assigned and “water” with the value “pond” assigned. The way in which waterbodies are tagged in OSM has been criticized occasionally and suggestions for improvements have been made. Right now, waterbodies typically either have been tagged with the key “waterway” with the assigned value being a particular type like “stream” or “river”, or with the combination of the key “natural” being assigned the value “water” and the key “water” being assigned a specialized type like “lake” or “pond”. Luckily, you don’t have to worry too much about the inconsistencies and disadvantages of the OSM tagging for waterbodies because you will below be given concrete rules on how to identify the different types of waterbodies we are interested in.
In lesson 2, we already talked about JSON code and that it can be turned into a nested Python data structure that consists of lists and dictionaries. In lesson 2, we got the JSON from web requests and we therefore used the requests module for working with the JSON code. In the context of this assignment, it makes more sense to use the json module from the standard library to work with the provided JSON file. You can simply load the JSON file and create a Python data structure from the content using the following code assuming that the name and path to the input file are stored in variable filename:
import json

with open(filename, encoding = "utf8") as file:
	data = json.load(file)
After this, you can, for instance, use the expression data["elements"] to get a list with the content that is stored in the top-level “elements” attribute. To get the first element from that list which will be the description of an OSM node, you'd use data["elements"][0] and data["elements"][0]["id"] refers to the ID of that node, while data["elements"][0]["type"]will return the string 'node' providing a way to check what kind of OSM element you are dealing with. The page How-to-parse-json-string-in-python contains an example of how to access elements at different levels in the JSON structure that might be helpful here. If you have any questions about handling JSON code while working on this assignment, please ask them on the forums.
In order to later create polyline or polygon geometries from the OSM way elements in the input file, we will have to look up node elements based on the node IDs that we find in the "nodes" lists of the way elements to get to the latitude and longitude coordinates of these nodes. A good first step, therefore, is to create seperate dictionaries for the node and way elements using the IDs as key such that we can use the IDs to get to the entire node or way description as a Python dictionary. The following code creates these dictionaries from the content of variable data:
nodesDict = {}  # create empty dictionary for the node elements
waysDict = {}   # create empty dictionary for the way elements

for element in data['elements']:            # go through all elements in input data
    if element['type'] == 'node':           # check if element is an OSM node
        nodesDict[element['id']] = element  # place element in nodes dictionary using its ID as the key
    elif element['type'] == 'way':          # check if element is an OSM way
        waysDict[element['id']] = element   # place element in ways dictionary using its ID as the key
Now that this is done we can loop through all way elements using the following code:
for wayID in waysDict:       # go through all keys (= way IDs)
    way = waysDict[wayID]    # get the way element for the given ID
    print(way)
    ... # do something else with way, e.g. access its node list with way['nodes']
Since each node or way element is again represented by a Python dictionary, the output we get from the print statement will look as below and we can, for instance, use way['nodes'] or way['tags'] to refer to the different properties of the way element.
{'type': 'way', 'id': 4251261, 'nodes': [25446505, 618262874, 25446506, 618262877, 618262880, 5421855904, 25446508, 4568980789, 4568980790, 4568980791, 4568980792, 618264570, 4568980793, 4568980794, 4568980795, 618264571, 25446510, 4568980796, 4568980797, 618264572, 4568980798, 4568980799, 618264573, 4568980800, 25446511, 618264574, 25446512, 618264575, 25446513, 618264576, 618264577, 25446514, 618264578, 25446516, 5417811540, 618264580, 25446560, 25446517], 'tags': {'name': 'Conodoguinet Creek', 'waterway': 'river'}}
Furthermore, whenever we have a node ID and need to get the information for that node, we can look it up in the nodes dictionary:
nodeID = 5318993708    # some exemplary node ID

node = nodesDict[nodeID]   # get the node element we have stored under that ID
print(node)
Again, keep in mind that a node is represented by a Python dictionary. Hence, the output from the print statement will look as below and we can, for instance, use node['lat'] and node['lon'] to refer to the latitude and longitude coordinates of that node.
{'type': 'node', 'id': 5318993708, 'lat': 40.4087294, 'lon': -78.6877245}
Before you read on, we recommend that you make sure you have a good understanding of what the code above does and how to work with the nested dictionary structures containing the way and node information. Play around with the code a bit. For instance, try to modify the loop that goes through the way elements such that it checks whether or not the given way elements contain a 'tags' property and if so, whether or not the tags dictionary contains an 'name' entry. If so, print out the name stored there. E.g. for the first way element shown above, the produced output should be just Conodoguinet Creek.
Your task
Your task now is to implement a tool based on the qgis Python package with at least a basic GUI that allows the user to select an input .json file on disk. When the user presses a button, the tool reads in all the node and way information from the json file into two dictionaries that allow for accessing the different node and way entities by their ID as we showed above.
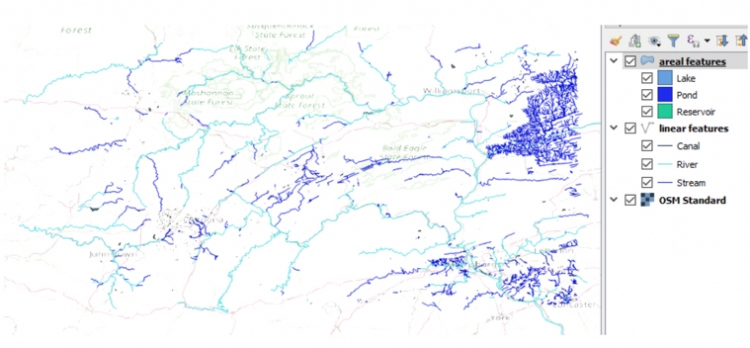
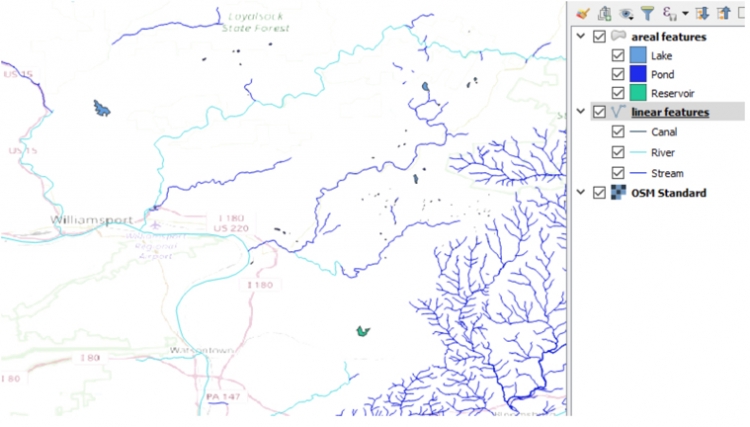
Next, the program should loop through all the way entities and create objects of the six different waterbody classes Stream, River, Canal, Lake, Pond, and Reservoir depending on how the ways are tagged. The first three of these classes are for linear features that will be represented by polylines later on. The other three are for areal features that will be represented by polygons. Your tool should produce two new vector data sets in the GeoPackage format, one with all linear features and one with all areal features that look as shown in the image below when added to QGIS.
Details
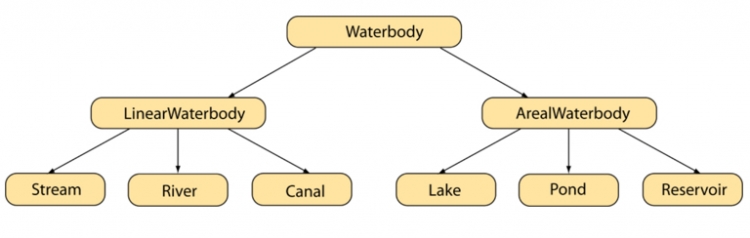
Waterbody class hierarchy:
The classes for the different waterbody types should be arranged in a class hierarchy that looks as in the image below (similar to the bus event hierarchy from the lesson walkthroughs, see also Section 4.7 again). In the end, there should be definitions for all these 9 classes and the different instance variables, methods, and static class functions should be defined at the most suitable locations within the hierarchy. A template file for this class hierarchy that already contains (partial) definitions of some of the classes will be provided below as a starting point.
Here are a few requirements for the class hierarchy:
- The entire class hierarchy should be defined in its own file, similar to the bus_events.py file in the lesson walkthroughs.
- Each waterbody object should have an instance variable called name for storing the name of this waterbody, e.g., 'Wilmore Lake'. If there is no “name” tag in the JSON code, the name should be set to “unknown”.
- Each waterbody object should have an instance variable called geometry for storing the geometry of the waterbody as a qgis QgsGeometry object. You will have to create this geometry from the node lists of a way using either the fromPolylineXY(…) or fromPolygonXY(…) functions defined in the QgsGeometry class depending on whether we are dealing with a linear or areal waterbody (see examples from the lesson content, e.g. Section 4.10.2.4). Both functions take QgsPointXY objects as input but in the case of fromPolylineXY(…) it's a single list of QgsPointXY objects, while for fromPolygonXY(...) it's a list of lists of QgsPointXY objects because the polygons can in principle contain polygonal holes.
- Each object of a linear waterbody class should have an instance variable called length for storing its length in meters, while each object of an areal waterbody class should have an instance variable called area for storing its area in square meters. The values for these instance variables can be computed using the approach shown under “Hint 2” below once the geometry object has been created from the nodes. This is already implemented in template class hierarchy file provided below.
- There should be a static class function (see Section 4.8) fromOSMWay(way, allNodes) for all waterbody classes that takes the Python data structure for a single OSM way element and the dictionary containing all OSM node elements read from the input file as parameters. The function then checks the tags of the given way element to see whether or not this element describes a waterbody of the given class and if so creates and returns a corresponding object of that class. For example: If fromOSMWay(way, allNodes) is called for class Stream, the implementation of this function in class Stream needs to check whether or not the tags match the rules for the Stream class (see tag rule list given below). If yes, it will then create a polyline geometry from the node ID list included in the way element by looking up the coordinates for each node in the allNodes dictionary. Then it will create an object of class Stream with the created geometry and, if available, name extracted from the “name” tag of the way. If the tags do not match the rule for Stream, the function simply returns None, signaling that no object was created. Overall this function should work and be used similarly to the detect(…) class functions of the bus event classes from the lesson walkthroughs. The following code provides a basic example of how the function could be used and tested:
import waterbodies                               # import the file with the waterbodies class hierarchy
classes = [ waterbodies.Stream ]                 # list of bottom level classes from the waterbodies.py file; we just use the Stream class in this example but the list can later be extended
way1 = waysDict[5004497]                         # we just work with two particular way elements from our waysDict dictionary in this example; this one is actually a stream ...
way2 = waysDict[4251261]                         # ... while this one is not a stream

for cl in classes:                               # go through the classes in the class list
     print('way1:')
     result = cl.fromOSMWay(way1, nodesDict)     # call the fromOSMWay(...) static class function of the given class providing a way element and our nodes dictionary as parameters;
                                                 # the task of the function is to check whether the way element in the first parameter satisfies the tag rules for the class (e.g. for Stream) and,
                                                 # if yes, create a new object of that class (e.g. an object of class Stream) and return it. To create the object, the function has to create a QgsGeometry
                                                 # object from the list of node IDs listed in the way element first which involves looking up the coordinates of the nodes in the nodes dictionary provided
                                                 # in the second parameter

     if result:                                  # test whether the result is not None meaning that the tag rules for the class were satisfied and an object has been created and returned
         print('object created: ' + str(result)) # since way1 is indeed a Stream this will print out some information about the created object
     else:
         print('return value is None -> no object of class ' + str(cl) + ' has been created')

     print('way2:')
     result = cl.fromOSMWay(way2, nodesDict)     # now we do the same for way2 which is NOT a stream
     if result:                                  # test whether the result is not None meaning that the tag rules for the class were satisfied and an object has been created and returned
         print('object created: ' + str(result))
     else:
         print('return value is None -> no object of class ' + str(cl) + ' has been created') # since way2 is not a stream, this line will be executed
Of course, you will only be able to test run this piece of code once you have implemented the fromOSMWay(...) static class function for the Stream class in the waterbodies class hiearchy file. But here is what the output will look like:way1: object created: <waterbodies.Stream object at 0x000000F198A2C4E0> way2: return value is None -> no object of class <class 'waterbodies.Stream'> has been created
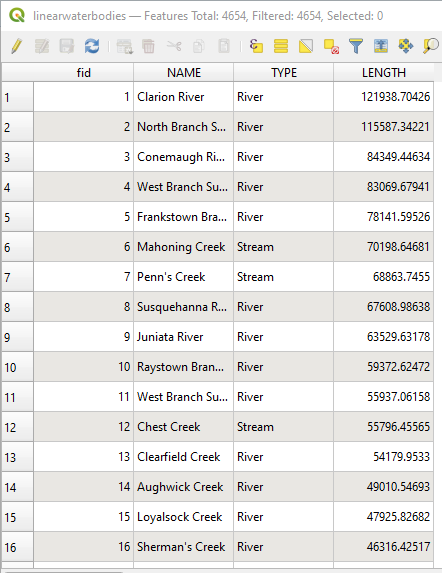
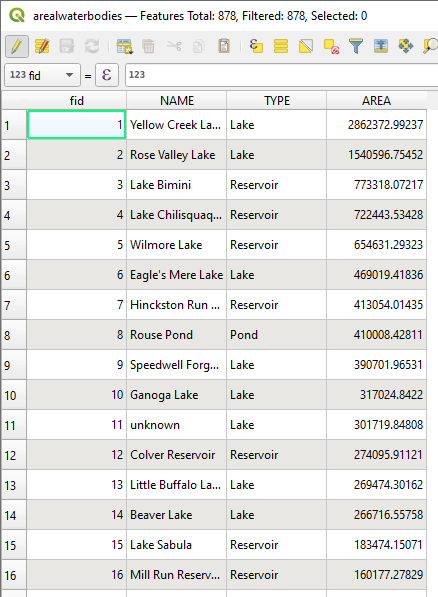
Also, the idea of course is that later fromOSMWay(...) will be called for all way elements in the waysDict dictionary, not for particular elements like we are doing in this example. - There should be a method toQgsFeature(self) that can be invoked for all waterbody objects. This method is supposd to create and return a QgsFeature object for the waterbody object it is invoked on. The returned QgsFeature object can then be added to one of the output GeoPackage files. When called for an object of a linear waterbody class, the created feature should have the polyline geometry of that object and at least the attributes NAME, TYPE, and LENGTH as shown in the image of the linear attribute table above. When called for an areal waterbody class, the created feature should have the polygon geometry of that object and at least the attributes NAME, TYPE, and AREA (see the image with the areal attribute table above). Using this method to create a QgsGeometry object can be integrated into the for-loop of the example code from the previous point:
    if result:                          # test whether the result is not None meaning the tag rules for class where satisfied an object has been created and returned
        feature = result.toQgsFeature() # call toQgsFeature() to create a QgsFeature object from the waterbody object
        print(feature)                  # print string representation of feature
        print(feature.attributes())     # print attribute values as a list
        # do something else with feature like storing it somewhere for later use
Assuming this code is executed for way1, running the code after the toQgsFeature() method has been implement should produce the following output:<qgis._core.QgsFeature object at 0x000000AB6E36F8B8> ['Rapid Run', 'Stream', 372.01922201444535]
The attributes listed are the name, the type, and the length of the stream. - Add a definition of the __str__(self) method to each class at the bottom level of the hierarchy with the goal of producing a nicer description of the object than simply something like <waterbodies.Stream object at 0x000000F198A2C4E0>. The description should include the type, name, and length/area of the object, so for example it could look like this:
Stream Rapid Run (length: 372.01922201444535m)
While this method will not play an important role in the final version of the code for this assignment, it can be very useful to provide some helpful output for debugging. Keep in mind that, once you have defined this method, using print(result) or str(result) in the code examples for fromOSMWay(...) will produce this more readable and more informative description instead of just <waterbodies.Stream object at 0x000000F198A2C4E0>.
Tag rules for different waterbodies
We already mentioned that we are providing the tag rules for the six bottom-level classes in the hierarchy that should be used for checking whether or not a given OSM way describes an instance of that class. You simply will have to turn these into Python code in the different versions of the fromOSMWay(way, allNodes) static class function in your class hierarchy. Here are the rules:
Stream: the way has the “tags” attribute and among the tags is the key “waterway” with the value “stream” assigned.
River: the way has the “tags” attribute and among the tags is the key “waterway” with the value “river” assigned.
Canal: the way has the “tags” attribute and among the tags is the key “waterway” with the value “canal” assigned.
Lake: the way has the “tags” attribute and among the tags there is both, the key “natural” with the value “water” assigned and the key “water” with the value “lake” assigned.
Pond: the way has the “tags” attribute and among the tags there is both, the key “natural” with the value “water” assigned and the key “water” with the value “pond” assigned.
Reservoir: the way has the “tags” attribute and among the tags there is both, the key “natural” with the value “water” assigned and the key “water” with the value “reservoir” assigned.
Right now, the rules for all three linear classes are the same except for the specific value that needs to be assigned to the “waterway” key. Similarly, the rules for all three areal classes are the same except for the specific value that needs to be assigned to the “water” key. However, since these rules may change, the logic for checking the respective conditions should be implemented in the fromOSMWay(way, allNodes) class function for each of these six classes.
Creation of output GeoPackage files:
You saw examples of how to create new layers and write them to GeoPackage files with qgis in Section 4.5.3 and the lesson walkthrough code from Section 4.10 (main.py and bus_track_analyzer.py). So once you have gone through the list of way elements in the input data and created waterbody objects of the different classes via the fromOSMWay(...) static class functions, creating the features by calling the toQgsFeature() method of each waterbody object and producing the output files should be relatively easy and just require a couple lines of code. You will have to make sure to use the right geometry type and CRS when creating the layers with qgis.core.QgsVectorLayer(...) though.
GUI:
As in the Lesson 2 assignment, you are again free to design the GUI for your tool yourself. The GUI will be relatively simple but you can extend it based on what you learned in this lesson for over&above points. The GUI should look professional and we are providing a minimal list of elements that need to be included:
- A combination of a line edit widget and tool button that opens a file dialog for allowing the user to select the input JSON file.
- Similar combinations of widgets for choosing the names under which the two new output GeoPackage files should be saved with a "save file" dialog.
- A button that starts the process of reading the data, going through the way elements and creating the waterbody objects, creating the two new GeoPackage output files and populating them with the QgsFeature objects created from the waterbody objects.
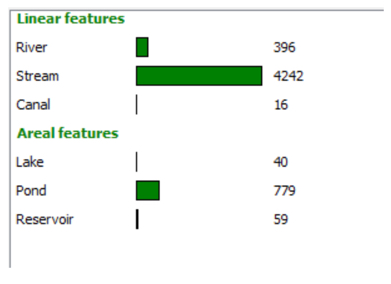
- Optional for over&above points: A QWidget for displaying information about how many features of the six different classes have been created as shown in the image below using drawing operations as explained in Section 4.9.1 and used in the lesson walkthrough. A basic version of this widget would just display the names and numbers here. Showing bars whose width indicates the relative percentages of the different waterbody types is an option for more over&above points. The class for this widget should be defined in its own file, similar to the class BusTrackerWidget in the lesson walkthrough.
Class hierarchy template file:
If you think you have a good grasp on the fundamentals of object-oriented programming in Python, we recommend that you challenge yourself and try to develop your own solution for this assignment from scratch. However, for the case that you feel a bit overwhelmed by the task of having to implement the class hierarchy yourself, we are here providing a draft file for the waterbody class hierarchy that you can use as a starting point. The file contains templates for the definitions of the classes from the leftmost branch of the hierarchy, so the classes Waterbody, LinearWaterbody and Stream, as well as the ArealWaterbody class. Your first task will then be to understand the definitions and detailed comments, and then add the missing parts needed to complete the definition of the Stream class such as the code for testing whether or not the tag rules for Streams are satisfied, for producing the polyline geometry, and for creating a QgsFeature. The class definition of Stream in particular contains detailed comments on what steps need to be implemented for fromOSMWay(...) and toQgsFeature().
You can then test your implementation by adapting the code examples given above to put together a main program that reads in the data from the JSON input file, calls the fromOSMWay(...) function of the Stream class for each way element, and collects the Stream objects produced from this. You can then either print out the information (name, length) from the instance variables of the Stream objects directly to see whether or not the output makes sense or you next implement the __str__(self) method for Stream to produce the same kind of output with print(result). Then go one step further and write the code for producing a GeoPackage file with the QgsFeature objects produced from calling the toQgsFeature() method for each Stream object that has been created.
Once you have this working for the Stream class, you can start to add the other classes from the hierarchy. You will see that these need to be defined very similarly to the Stream class, so you will only have to make smaller modifications and extensions. Once the full hierarchy is working and you are able to produce the correct GeoPackage files, the final part will be to design and incorporate the GUI.
As a last comment, if you want to make changes to the existing code in the template file, that is absolutely ok; please don't treat it as something that you have to use in exactly this way. There are many possible ways in which this assignment can be solved and this draft follows one particular approach. However, the fromOSMWay(way, allNodes) static class function and toQgsFeature(self) method need to appear in the class definitions with exactly the given paramters, so this is something you are not allowed to change.
Overall, the main.py file and the general file organization of the walkthrough code in Section 4.10 provide a good template for this assignment but no worries, this assignment is significantly simpler and requires much less code. Below you can find two more hints on some of the steps involved.
Hint 1
In the lesson walkthrough, we had a list with the names of all bus event classes that we were looking for in the data. We then used a for-loop to go through that list and call the detect(…) class function for each class in the list. In this assignment, it may make more sense to have two separate lists: one for the class names of the linear waterbody classes and one for the names of the areal waterbody classes. That is because you probably would want to store the objects of both groups in separate lists since they need to be added to two different output files.
Hint 2
If you are using the template class hierarchy file, you won't have to write this code yourself but the following will help you understand what is going on with the length and area computation code: when we have a QgsGeometry object in variable geometry, we can calculate its length/area with the help of an object of the qgis QgsDistanceArea class. We first set up a QgsDistanceArea object suitable for WGS84 coordinates:
qda = qgis.core.QgsDistanceArea()

qda.setEllipsoid('WGS84')
Then we calculate the length or area (depending on whether the geometry is a polyline or polygon) with:
length = qda.measureLength(geometry)
or
area = qda.measureArea(geometry)
Finally, we convert the area or length number into the measurement unit we want, e.g. with
lengthMeters = qda.convertLengthMeasurement(length, qgis.core.QgsUnitTypes.DistanceMeters)
or
areaSquareMeters = qda.convertAreaMeasurement(area, qgis.core.QgsUnitTypes.AreaSquareMeters)
Grading Criteria
The criteria your code submission will be graded on will include how elegant your code is and how well you designed the class hierarchy as well as how well-designed the GUI of your tool is. Successful completion of the above requirements and the write-up discussed below is sufficient to earn 90% of the credit on this project. The remaining 10% is reserved for "over and above" efforts which could include, but are not limited to, the following (the last two options are significantly more difficult and require more work than the first two, so more o&a points will be awarded for these):
- Look through the JSON for some other types of waterbodies (linear or areal ones) that appear there. Pick one and add it to your tool by adding a corresponding class to the waterbody class hierarchy and changing the code so that ways of that class are detected as well.
- Add some code to your tool that first sorts all linear waterbody objects by decreasing length and all areal waterbody objects by decreasing area before adding the objects to the data set. As a result, the order should be as shown in the attribute table images above without first having to sort the rows in QGIS. For this, you should override the < operator by defining the __lt__(self, otherObject) method (for “less than”) for these classes so that it compares the lengths/areas of the two involved objects. You can then simply use the list method sort(…) for a list with all linear/areal objects to do the sorting.
- Add the information display widget showing numbers of objects created for the different classes using QPainter methods to the GUI of your program as described above. The advanced version with bar chart as shown in the image above is sufficient to earn full o&a points if done well.
- Turn the standalone tool into a QGIS plugin that adds the produced data sets as new layers to the project currently open in QGIS using a dock widget as in Section 4.12 (this option alone will give full o&a points if done well).
Write-up
Produce a 400-word write-up on how the assignment went for you; reflect on and briefly discuss the issues and challenges you encountered and what you learned from the assignment. Please also briefly mention what you did for "over and above" points in the write-up.
Deliverable
Submit a single .zip file to the corresponding drop box on Canvas; the zip file should contain:
- The folder with the entire code for your tool
- Your 400-word write-up