The Lesson 9 assignment has two parts: reporting on a web map that uses OpenStreetMap (OSM), and actually editing OSM yourself. You will produce a single document describing these efforts.
Reporting on a web map that uses OSM
Find an Internet map that uses some element of OSM. Produce a write up of several paragraphs describing the following:
-
What is the purpose and URL of the site, and who built it?
-
How is OSM being used? (i.e., Is the site simply pulling the OSM tiles, or is the source data used for creating thematic layers, etc.?)
-
Include at least one screenshot showing the OSM data.
-
-
What advantages and disadvantages are introduced into this map by using OSM data?
-
Do you see any other appropriate ways that OSM data could be used in this site?
Editing OSM yourself
In this part of the assignment, you'll get some practice with adding data to OSM in your town or some other place that you know well. You'll take some "before" and "after" screenshots to demonstrate the things you added to the map.
The easiest way to get started with editing OSM is using the in-browser editor at OpenStreetMap.org, which is called iD.
- Visit OpenStreetMap.org and register for an account. This requires creating a name and password and supplying your e-mail address (so you can prove you're a person and not a robot).
- After you've created the account, return to OpenStreetMap.org and log in. Do not use Internet Explorer for this part of the exercise, because it cannot display the iD editor.
- Navigate to your hometown or another place you want to edit and click the Edit dropdown button. If asked which editor you want to use, choose iD.
- Click Start the Walkthrough and carefully follow all instructions to complete the iD training.
ID includes a walkthrough for beginners that gives you some hands-on practice with tracing and tagging features. Thus, full editing instructions for using iD are not included in this lesson. Follow the walkthrough, and you should have the basics down. - After completing the walkthrough, scan the features available in your hometown and identify some things you want to add. The easiest way to start is probably by tracing a building. Choose to create an Area and trace around a building that you see in the imagery.
The first thing to do is tag it with building=yes. Also, if the building has a name, supply the name tag.
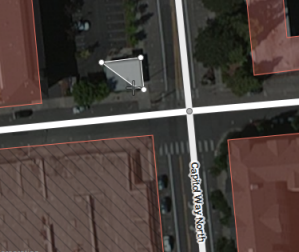 Figure 9.15Now you can provide other tags further specifying the purpose of the building, if these are known. An appropriate tag to add in the above image might be amenity=restaurant.
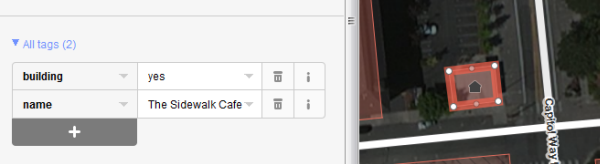 Figure 9.16
You can optionally supply addresses for features, but this involves several OSM tags. The easiest way to do it in iD is to fill in the Address form. This ensures all the address parts get the correct tags.Adding addresses is not required for this assignment.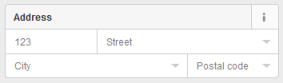 Figure 9.17
 - Continue with your assignment by adding (or modifying) a total of at least 7 features, making sure the following criteria are satisfied:
- Five different types of features must be represented. In other words, don't just trace 7 building footprints. Use the OpenStreetMap wiki to learn the correct way to tag different types of features. You can also use the left-hand Search menu in iD to get hints about tags, but, during this assignment, you should verify that the tags placed by iD match what you intended to map as described in the OpenStreetMap wiki documentation.
- Point, Line, and Area features must be represented. You can satisfy this requirement by adding new lines or adjusting existing lines. For example, sometimes roads need more detail to produce smooth curves, line up with the imagery, etc.
- Before you add the features, go to the main OSM page at OpenStreetMap.org and take some screen captures.
If you have trouble thinking of what to add, consider mapping parks, schools, churches, restaurants, civic buildings, clinics, ponds, wetlands, etc. New subdivisions are also a great opportunity for mapping roads. You can get more ideas by looking around OSM in a city that's been mapped in detail, such as Seattle or State College. Another way to get good ideas is by walking or biking around your town.
- Produce a list of the features you edited and add it to your report that you created in the first part of the project. Include a list of all tags that you placed or edited on each feature. These tags must comply with the community-approved documentation on the OpenStreetMap wiki. Link for your reference here: https://wiki.openstreetmap.org/wiki/Map_features
- Wait for about 10-15 minutes after your edit session and then go to OpenStreetMap.org and take some screen captures of the new features. Note that OSM updates their tile levels at different times, so your feature may only be visible at certain tile levels. Choose any tile level that works for the screenshot. You don't have to supply 7 screenshots; just provide enough to show some of the "before" and "after" effects of your edits.
- Paste the screenshots in your report.