Now that you have received an introduction to web mapping APIs and their basic elements, you need to start experimenting with one in order to make any more significant progress. The way you will learn Leaflet, and any other API, is by taking a look at its developer code samples, trying to run them, and experimenting with adjustments or tweaks to suit your fancy. Indeed, a strategy for building any web application is to find the combination of samples that best approximates what you want to do and then start experimenting with merging those samples, testing the functionality one piece at a time until you've met all your requirements.
In this spirit of exploration and experimentation, we are going to take some time to look through some of the Leaflet developer samples and other online supplementary materials such as developer forum posts. These are the kinds of resources that you'll be working with as you complete your final project and continue Leaflet development beyond this course. I want to make sure you can use and interpret them effectively.
In the next section of the lessons, you'll complete a walkthrough where you put your PhillyBasemap tiles that you made with QGIS into the map, and then place a WMS on top of them. The user should be able to click a feature in the WMS and see a popup with basic information about that feature. The completed walkthrough will look something like this:
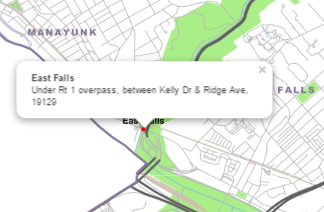
A good strategy when you approach a coding problem like this is to make a basic list of the things you'll need to figure out how to do. Then you can hunt for examples that show how to accomplish those tasks. In the above scenario, I can think of four key things you need to know how to do in order to get this to work.
- Add a tiled basemap to the map
- Add a WMS layer on top of the basemap
- Query a WMS layer on a mouse click
- Display the result in a popup
Now take a look through some of the following Leaflet examples and developer forum posts that could help you achieve this goal. Don't worry about writing the code yet; that will be covered in the walkthrough. For now, just get familiar with the code structure and patterns. Then the material will be somewhat familiar when it's time to complete the walkthrough.
Add a tiled basemap to the map
This is such a common task that you could go to the Leaflet Quick Start Guide example. Indeed, this shows how to add a tiled basemap from Mapbox, using the L.tileLayer class:
L.tileLayer('https://api.tiles.mapbox.com/v4/{id}/{z}/{x}/{y}.png?access_token={accessToken}', ...)This is even more complex than you need, though, because the sample requires you to have a Mapbox access token and project ID. If you're just adding tiles hosted from your own server, you could adapt the simple code snippet from the L.tileLayer API reference:
L.tileLayer('http://{s}.somedomain.com/{foo}/{z}/{x}/{y}.png', {foo: 'bar'});In this situation, foo just represents additional options you can apply to the tile layer. The important part is that you pass in a URL to your tiles with {x}, {y}, and {z} representing the column, row, and zoom level, respectively.
If you Google OpenStreetMap in Leaflet example, you'll find helpful sample code on the Getting Started with Leaflet page that adds OpenStreetMap as a tiled basemap.
// set up the map
map = new L.Map('map');

// create the tile layer with correct attribution
var osmUrl='http://{s}.tile.openstreetmap.org/{z}/{x}/{y}.png';
var osmAttrib='Map data © <a href="http://openstreetmap.org">OpenStreetMap</a> contributors';
var osm = new L.TileLayer(osmUrl, {minZoom: 8, maxZoom: 12, attribution: osmAttrib});

// start the map in South-East England
map.setView(new L.LatLng(51.3, 0.7),9);
map.addLayer(osm);
Add a WMS layer on top of the basemap
The Leaflet examples contain a page about working with WMS in Leaflet. From the Leaflet WMS and TMS tutorial:
var wmsLayer = L.tileLayer.wms('https://demo.boundlessgeo.com/geoserver/ows?', { layers: 'nasa:bluemarble' }).addTo(map);The above example shows how the L.tileLayer.wms class can be used together with a URL and a list of layer names to add a WMS to the Leaflet map.
Query a WMS layer on a mouse click
This one is a little harder. A WMS query is based on a GetFeatureInfo request, and Leaflet doesn't provide any kind of method for doing that. In contrast, Leaflet is more focused on working with vector data drawn by the browser from sources like GeoJSON. Its support for WMS layers is limited to display only.
So how do you query a WMS using Leaflet? It's time to head over to Google and try WMS GetFeatureInfo Leaflet. A couple of resources in the results are useful. First, a GitHub page by Ryan Clark shares some JavaScript functions he wrote for doing the GetFeatureInfo request directly through the web via jQuery and AJAX. I'll describe this more thoroughly in the walkthrough, but basically, he constructs a JavaScript string variable of the URL he needs in order to do the request, then he sends the request to the web using a method from the jQuery open source JavaScript helper library. Paul Crickard III wrote a simplified implementation of Clark's technique on his blog that forms the basis for the code in the walkthrough.
Both examples listen for a mouse click event on the map to trigger the query, although this is coded in slightly different ways. Crickard's pattern is sufficient for our purposes, with onMapClick being a function that runs after the map detects a click event:
map.addEventListener('click', onMapClick);
function onMapClick(e){
  . . .
}
Please take a few minutes to review both these resources and do your best to see what's going on. You likely won't understand all the code, but pay attention to the general patterns of setting up a URL, making a request, and working with the result.
Display the result in a popup
Both Clark's and Crickard's GetFeatureInfo examples above display elements of the query response inside a popup. Both use the L.Popup class for this, but Crickard's example is a bit easier to follow for beginners. He does:
popup = new L.Popup({maxWidth: 400});
Then later he sets an anchor point for the popup and the content that should appear inside.
popup.setLatLng(e.latlng);
popup.setContent("<iframe src='"+URL+"' width='300' height='100' frameborder='0'></iframe>");
map.openPopup(popup);
Notice that HTML can be used for the content. You can parse the WMS GetFeatureInfo response and pull out the elements you need and format them into an HTML string to act as the content.
Finding and adapting examples to fit your goal
It's natural to ask, "How do you expect me to write a bunch of code like this from scratch when I'm just barely getting familiar with JavaScript?!" The answer is that you don't have to write code like this from scratch. You only need to know enough to interpret and adapt a working example. Using the documentation and examining the code line by line, you should be able to get at least a basic idea of what is happening. If there's a parameter you don't understand, you can zero in on it. But don't worry about grasping everything.
Experienced developers sometimes say that the way to learn an API is to "play with it." This can drive beginners insane. Play with what? How do I even know what to do? In this lesson, you have hopefully learned to pick out simple code examples that are most relevant to what you want to do, then examine them line by line and see if you can tell what each line of the code is doing. Then make minor adjustments to the code to fit it to your own data and scenario. (This is the "playing with it" part.) Let's go to the walkthrough to see how the above examples could be adapted to some of your own web map services.