3.1 HTML
HTML Basics
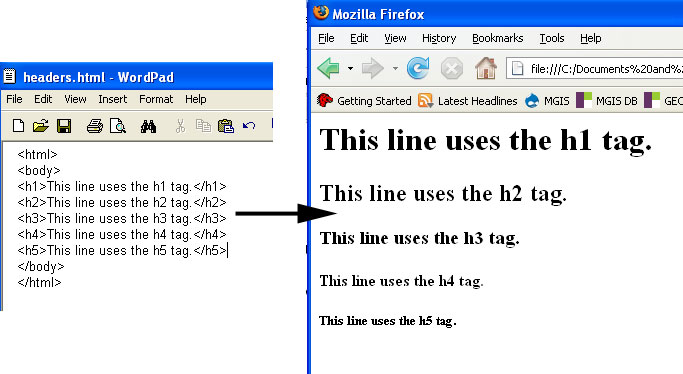
HyperText Markup Language (HTML) is the core language involved in the authoring of pages published on the World Wide Web. HTML is simply plain text in which the text is "marked up" to define various types of content, such as headings, paragraphs, links, images, lists, and tables. The markup occurs in the form of tags, special character strings that signal the beginning and end of a content element. For example, the <h1>...<h6> tags are used to define heading elements:
- The characters that denote an HTML tag (< and >) are referred to as angle brackets.
- Tags usually come in pairs (e.g., <body> and </body>, where <body> is the start tag and </body> is the end tag).
- HTML is not case sensitive (i.e., <title> is the same as <TITLE>), though lowercase is the recommended standard.
- Tags and their associated text form HTML elements.

A simple HTML document
All HTML documents should be enclosed within <html></html> tags and should contain a head section and a body section. The head section contains metadata about the document and is defined using the <head> tag. The <title> tag is used frequently in the head section to define the title of the document. The body section contains the information you want to appear on the page itself and is defined using the <body> tag. Below is an example of a very basic HTML document:

Commonly used tags
As we saw earlier, the <h1>...<h6> tags are used to define headings. Other tags that are often used to define elements in the body of a document include:
- <p></p> to define paragraphs of text
- <em></em> to give text emphasis (displayed in italics by default)
- <strong></strong> to give text strong emphasis (displayed in bold by default)
- <br> to insert a line break
- <hr> to insert a horizontal rule (line)
Note that a couple of these tags refer to the default presentation of their associated text. Later in the lesson, we'll see how stylesheets can be used to override these defaults.
Displaying lists
HTML allows authors to define two types of lists -- ordered and unordered. Ordered lists are most appropriate when listing a set of steps or items that can be ranked in some way. The <ol> tag is used to begin an ordered list and the </ol> tag is used to end it. Within those tags, each item should be enclosed within <li> and </li> tags. By default, web browsers number the items automatically beginning with 1.
| Code | Display |
|---|---|
<html>
<body>
<h4>Ordered List</h4>
<ol>
    <li>Citizen Kane</li>
    <li>Casablanca</li>
    <li>The Godfather</li>
</ol>
</body>
</html>
|
 |
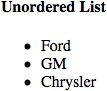
Unordered lists are most appropriate when listing items that cannot be ranked meaningfully. List items are defined the same way with <li></li>, but the items are enclosed by <ul></ul> rather than <ol></ol>. By default, web browsers mark the items with bullets.
| Code | Display |
|---|---|
<html>
<body>
<h4>Unordered List</h4>
<ul>
    <li>Ford</li>
    <li>GM</li>
    <li>Chrysler</li>
</ul>
</body>
</html>
|
 |
Note: The indentation of the list items in the examples above is done merely to improve the readability of the HTML code and is not responsible for the indentation of the items in the output. Writing the code such that the li elements appear flush with the left margin would result in the same output.
Displaying images
Images are added to a web page using the <img> tag. For example:
<img src="brown_MarkerA.png">
Some important points to note about this example:
- img elements don't have an end tag.
- src is an example of an element attribute.
- Attribute values should be specified in quotes, preferably double quotes.
- The web browser will look for brown_MarkerA.png in the same folder that the HTML document is in.
- It is also possible to load images using a full web address (URL):
<img src="http:/detwilergeog863.webhostapp.com/icons/brown_MarkerA.png">
Adding links
Links are added to a web page using the anchor tag (<a>) and its href attribute:
<a href="http://www.psu.edu/">Penn State</a>
Note that the text that you want to display as a link should be placed between the <a> and </a> tags. The URL that you want to load should be used to specify the href attribute value.
You've probably encountered pages with links that jump to a specific location in the page (e.g., a "Back to top" link). This is called a bookmark link and creating one is a two-step process:
- Create an anchor somewhere in the document: <a id="top"></a>
- Link to that anchor: <a href="#top">Back to top</a>
Note that the value assigned to the id attribute ("top" in this case) is entirely up to you. The key is to plug the same value into the href attribute and precede that value with a pound sign to specify that you're linking to an anchor in the same document.
This will also work to link to a specific location in another page a bookmark link will also work to link to another page such as Lesson 3 Deliverables using:
<a href="www.e-education.psu.edu/geog863/node/1886#L2deliverables">Lesson 3 Deliverables</a>
HTML entities
Some of the characters you might want to display on your page require special coding because they have special meanings in HTML. For example, if you wanted to display an algebraic expression like x > 5, you'd need to use the code > since angle brackets are used to produce start and end tags.
Another aspect of HTML that can prompt the use of one of these entities is the fact that consecutive spaces in your HTML source code are treated as one. You can get around this by inserting one or more non-breaking spaces with the entity .
Some other commonly used entities include:
| Output char | HTML code |
|---|---|
| & | & |
| " | " |
| © | © |
| ÷ | ÷ |
| × | × |
HTML tables
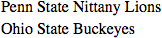
Tables are commonly used in mapping applications to display information associated with features on the map. A table is defined using the <table> and </table> tags. A row can be added to the table using the <tr> and </tr> tags. Individual cells of data can be added to a row using the <td> and </td> tags. Here is a very simple example:
| Code | Display |
|---|---|
<table> <tr> <td>Penn State</td> <td>Nittany Lions</td> </tr> <tr> <td>Ohio State</td> <td>Buckeyes</td> </tr> </table> |
 |
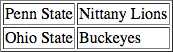
To add a border to a table, you set its border attribute to some whole number (of pixels):
| Code | Display |
|---|---|
<table border="1"> <tr> <td>Penn State</td> <td>Nittany Lions</td> </tr> <tr> <td>Ohio State</td> <td>Buckeyes</td> </tr> </table> |
 |
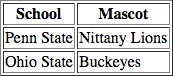
To include column headings, add a row containing <th> elements instead of <td> elements. By default, web browsers will display the <th> elements in bold:
| Code | Display |
|---|---|
<table border="1"> <tr> <th>School</th> <th>Mascot</th> </tr> <tr> <td>Penn State</td> <td>Nittany Lions</td> </tr> <tr> <td>Ohio State</td> <td>Buckeyes</td> </tr> </table> |
 |
<td> and <th> elements have an attribute called colspan that can be used to spread the element's text across multiple columns:
| Code | Display |
|---|---|
<table border="1"> <tr> <th colspan="2">2000</th> <th colspan="2">2006</th> </tr> <tr> <th>Males</th> <th>Females</th> <th>Males</th> <th>Females</th> </tr> <tr> <td>5,929,663</td> <td>6,351,391</td> <td>6,043,132</td> <td>6,397,489</td> </tr> </table> |
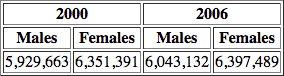 |
Likewise, <td> and <th> elements also have a rowspan attribute for spreading text across multiple rows.
Miscellaneous notes
Comments (text that you want to be visible when viewing the source code, but not in the rendered page) can be inserted into an HTML document using the following syntax:
<!-- This is a comment. -->
Also, as mentioned above, consecutive spaces are ignored by web browsers. This means that you should feel free to indent your HTML code (as shown in the table examples) and use line spacing to make it easier to read and follow.
Online tutorials/cheatsheets
This section of the lesson is just an introduction to the basics of HTML. There are many other helpful online HTML tutorials that can help you learn the language, along with cheatsheets that can be used for quick reference once you've gained some coding experience. Here is a list of sites that I've found to be helpful: