PHP's database support
PHP is a popular open-source language for building web pages that draw dynamic content from a database. It has functions for extracting data from all of the major RDBMS packages. This part of the lesson focuses on using PHP with MySQL. If you're considering retrieving data from a package other than MySQL, you should visit PHP's Database Extensions page.
The University server we're using in this course is actually equipped with the MySQL Improved Extension (MySQLi) rather than the older MySQL Extension. The old extension enables interaction with a database through a set of functions whose names begin with mysql_. Generally speaking, the improved extension has all of the same functions, just with names beginning instead with mysqli_. One of the improvements the MySQLi extension offers developers is the ability to write code in an object-oriented or a procedural style. My experience has been with the original MySQL Extension, which is strictly procedural, and I have not yet had a chance to experiment with the object-oriented style. Therefore, my examples are written in the procedural style. You are welcome to write object-oriented code if you'd prefer.
In looking at the reference documentation on the php.net site, it appears that it is geared toward those using the object-oriented style. Because this could make it harder for you to follow my examples, I'm going to refer you instead to another site that appears to be hosting an older version of the reference documentation that I've found easier to follow. For example, the first function we'll use is called mysqli_connect(). You can find a description of this function at this site: PHP Manual:mysqli-connect. You can also jump to descriptions of any of the other mysqli_ functions used in the lesson by clicking on their links. Unfortunately, finding this same function in the php.net version of the documentation is much more difficult because it's listed under the heading of mysqli::__construct (the object-oriented version of the function). This is just one example of why I'm directing you away from the current documentation at php.net.
Connecting to MySQL with PHP
Using the MySQLi Extension, connections are made to MySQL databases using the mysqli_connect() function (reference documentation cited above). This function accepts 6 optional arguments, the first 4 of which we'll need in this class: the name of the server hosting the database, the user's name, the user's password and the name of the database. It returns a link to the database that is needed by other mysqli functions (e.g., the one needed to execute SQL queries). I would make a connection to my database and store the returned link in a variable like this:
<?php
$link = mysqli_connect("instructdb3.ait.psu.edu","inst_4","password","jed124");
?>
When connecting to your database, you should replace my database name (access account ID) with yours and replace my user name and password with the values supplied to you in the dbinfo file that was put in your personal web space.
Writing SQL to retrieve the desired data
This stage of the mashup building process is another of the reasons I recommend using Access as a front-end to your MySQL database. Its query building GUI can be an effective tool for generating the SQL needed by a mashup, particularly if the query requires joins or group by operations. For example, if my PHP script needed a career home run list from a MySQL version of the baseball stats database, I'd use Access to build the query much like you did during the SQL tutorial. I'd then switch to SQL View and copy and paste the SQL code into my PHP script, storing the SQL string in a variable for use later.
There's just one problem with this methodology: the version of SQL employed by Access is of a slightly different dialect than that of MySQL. Some of these differences can be seen by comparing the same query in the two different dialects next to one another:
Access:
SELECT [players]![first_name] & ' ' & [players]![last_name] AS player, Sum(stats.hr) AS career_hr
FROM players INNER JOIN stats ON players.player_id = stats.player_id
GROUP BY [players]![first_name] & ' ' & [players]![last_name]
ORDER BY Sum(stats.hr) DESC;
MySQL:
SELECT CONCAT(players.first_name, ' ', players.last_name) AS player, Sum(stats.hr) AS career_hr
FROM players INNER JOIN stats ON players.player_id = stats.player_id
GROUP BY CONCAT(players.first_name, ' ', players.last_name)
ORDER BY Sum(stats.hr) DESC;
The difference that is likely to make the most impact on your query writing is the way that Access places table/field names inside brackets and the way that it signals a parent-child relationship between a table and field using an exclamation point. In the standard SQL used by MySQL, there are no brackets around table/field names and a parent table is connected to its child field using a period.
The other difference that can be seen in this example is that concatenation is done in MySQL using the CONCAT() function, whereas strings are concatenated in Access using an ampersand (&) or a plus sign (+).
More of the differences between Access SQL and MySQL SQL can be found at SQLzoo.net. Despite the differences, I still find modifying the code generated by the Access query GUI easier than producing the code wholly from scratch, but your mileage may vary.
Plugging the MySQL-friendly version of the SQL into the PHP script looks like this:
<?php
$link = mysqli_connect("instructdb3.ait.psu.edu","inst_4","password","jed124");

$sql = "SELECT CONCAT(players.first_name, ' ', players.last_name) AS player,
   Sum(stats.hr) AS career_hr
   FROM players INNER JOIN stats ON players.player_id = stats.player_id
   GROUP BY CONCAT(players.first_name, ' ', players.last_name)
   ORDER BY Sum(stats.hr) DESC;";
?>
Executing the SQL
The next step is to execute the query held in the $sql variable using the mysqli_query() function. mysqli_query() requires a database link for its first argument and a query string for its second argument. When executing a SELECT query as we're doing here, mysqli_query() returns a result object, which like the database link, should be stored so that it can be used later by other mysqli functions:
$result = mysqli_query($link, $sql);
Note
If there is an error in your query syntax, mysqli_query() will return a value of FALSE instead of a result object. Also keep in mind that your query may have perfectly valid syntax, but yield no records because of either flawed logic in the query's design or a simple lack of data meeting the criteria at that time. An example of flawed logic would be a query that attempts to select records having an hr value less than 0 (which is impossible). An example of the second situation would be a query that attempts to select records where the last_name is 'Rodriguez'. There are no records presently in the database meeting that criterion (though if I were to re-populate the database with the current top 10 home run hitters, there would be). In both cases, the query will return a result object because of its valid syntax, but it will contain 0 rows. (See the usage of the mysqli_num_rows() function below.)
Obtaining the query results
The mysqli_fetch_array() function can be used to obtain one row of data from your query result. The values in that row are returned as an array, which is typically stored in a variable. An individual value can then be obtained from the array variable by supplying the name of a column in brackets. For example:
$row = mysqli_fetch_array($result);
$player = $row['player'];
// OR
// $player = $row[0]; // assuming "PLAYER" is 1st field
There are two main ways to process all of the records returned by a query. The first involves determining how many records were returned using the mysqli_num_rows() function, then setting up a for loop to carry out the necessary processing that many times. The other method involves taking advantage of the fact that mysqli_fetch_array() returns 0 if the last row has already been fetched. With this method, a while loop can be used to continue processing until mysqli_fetch_array() returns 0. Both methods are demonstrated below, with the while loop commented out:
$num_results = mysqli_num_rows($result);
for ($i=0;$i<$num_results;$i++) {
   $row = mysqli_fetch_array($result);
   $player = $row['player'];
   $hr = $row['career_hr'];
   echo $player .', '. $hr .'<br />';
}

// OR
//while ($row = mysqli_fetch_array($result)) {
// $player = $row['player'];
// $hr = $row['career_hr'];
// echo $player .', '. $hr .'<br />';
//}
The second method is a bit more slick, though if you find it harder to follow, you're welcome to utilize the first method, which is a bit more straightforward.
The complete career home run script is below (http://phpdb.aset.psu.edu/phpjed124/career_hr.php) Note that the script includes a check of the $result variable to make sure the query returned a result. Note also the last line of the script which closes the connection to the database.
$link = mysqli_connect("instructdb3.ait.psu.edu","inst_4","password","jed124");

$sql = "SELECT CONCAT(players.first_name, ' ', players.last_name) AS player,
   Sum(stats.hr) AS career_hr
   FROM players INNER JOIN stats ON players.player_id = stats.player_id
   GROUP BY CONCAT(players.first_name, ' ', players.last_name)
   ORDER BY Sum(stats.hr) DESC;";
$result = mysqli_query($link,$sql);
if ($result != 0) {
   $num_results = mysqli_num_rows($result);
   for ($i=0;$i<$num_results;$i++) {
      $row = mysqli_fetch_array($result);
      $player = $row['player'];
      $hr = $row['career_hr'];
      echo $player .', '. $hr .'<br />';
   }
} else {
   echo 'Problem with query!';
}

mysqli_close($link);
Note
When running a PHP script that reads from your MySQL database, be sure to use the phpdb.aset.psu.edu server as shown in the URL above. It is specially configured to read data from our MySQL databases, whereas php.scripts.psu.edu is not.
Incorporating data from a database into a mashup
To convert a mashup based on a local XML file (like what was demonstrated earlier in the lesson) to one based on data coming from a database, there are really only two main steps:
- Write a PHP script using the methodology described above and output the data values in XML format.
- Change the ajax() statement so that it reads the XML produced by the PHP script instead of from the XML file.
Here is the source code for a PHP script that reads the candidate cities data from my MySQL database and outputs the values as XML (http://phpdb.aset.psu.edu/phpjed124/get_cities.php):
<?php
$link = mysqli_connect("instructdb3.ait.psu.edu","inst_4","password","jed124");

$sql = "SELECT name, population, x, y FROM candidate_cities ORDER BY name;";

$result = mysqli_query($link,$sql);
if ($result != 0) {
   header("Content-type: text/xml");
   echo '<shapes>';

   $num_results = mysqli_num_rows($result);
   for ($i=0;$i<$num_results;$i++) {
      $row = mysqli_fetch_array($result);
      $name = $row['name'];
      $pop = $row['population'];
      $x = $row['x'];
      $y = $row['y'];

      echo '<pt name="' .$name. '" population="' .$pop. '" x="' .$x. '" y="' .$y. '" />';
   }

   echo '</shapes>';
} else {
   echo 'Problem with query!';
}

mysqli_close($link);

?>
The statements to pay particular attention to are in bold. First, a header statement is added so that browsers receiving the output from this script will know that it is in XML format. Next, the start tag for the root element of the XML data is echoed to signal the beginning of the XML packet. Then inside the loop the current city's attributes are echoed in XML form.
This line can be tricky as it involves the use of both single and double quotes and a lot of concatenation. The literal text being echoed is in single quotes, but part of that literal text is a number of double quotes (because the values that are being retrieved from the variables represent element attribute values in the XML output and such values must be enclosed in quotes) . Perhaps the best way to produce a statement like this is to forget about quoting the attribute values at first, then add those quotes in later. Here is the statement without the attribute value quotes (i.e., no double quotes):
echo '<pt name=' .$name. ' population=' .$pop. ' x=' .$x. ' y=' .$y. ' />';
And here is the statement with caret symbols in place of where the double quotes ought to be (since it may be hard for you to differentiate between single and double quotes when they're right next to each other):
echo '<pt name=^' .$name. '^ population=^' .$pop. '^ x=^' .$x. '^ y=^' .$y. '^ />';
With the PHP script written, the next step is to modify the JavaScript you used earlier in the lesson so that it reads the output from the PHP script instead of an actual XML file:
$.ajax({ url: "get_cities.php", dataType: "xml", success: function(xmlDoc){
Because of the restriction that JavaScript can only read files in the same directory, you'll need to store your html page in the same folder as the PHP script. This means you may also need to copy your custom marker icons to the special PHP folder as well, or specify absolute paths to them in your code.
Polygon data example
Earlier in this lesson, I guided you through loading polygon attributes and geometries into MySQL. Now let's see how to retrieve polygons from MySQL and display them on a map.
The example page we're going to examine displays two maps of political party registration in Pennsylvania's 67 counties: one depicting numbers from December 2007 and the other from April 2008, just before the state's presidential primaries.
First, have a look at the three tables involved in this mashup:
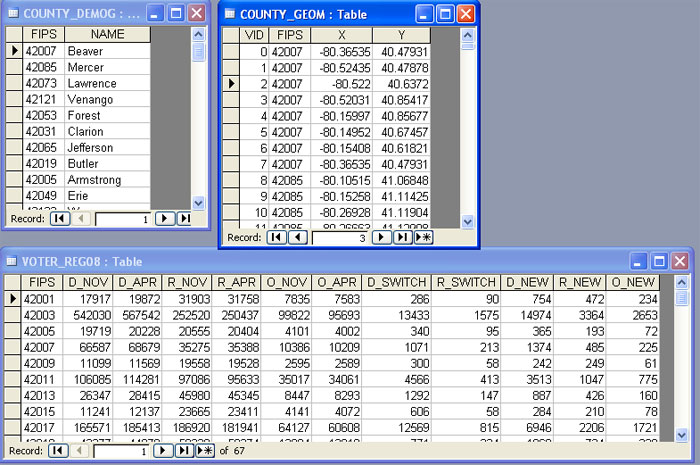
Note that each table contains a FIPS field, which is used to conduct joins between the tables. Now, let's look at the PHP script that's used to retrieve the required data (http://phpdb.aset.psu.edu/phpjed124/voter_reg.php):
<?php
$link = mysqli_connect("instructdb3.ait.psu.edu","inst_4","password","jed124");

$sql = "SELECT COUNTY_DEMOG.FIPS, COUNTY_DEMOG.NAME, VOTER_REG08.D_NOV,
    VOTER_REG08.D_APR, VOTER_REG08.R_NOV,
    VOTER_REG08.R_APR, VOTER_REG08.O_NOV, VOTER_REG08.O_APR,
    VOTER_REG08.D_SWITCH, VOTER_REG08.R_SWITCH,
    VOTER_REG08.D_NEW, VOTER_REG08.R_NEW, VOTER_REG08.O_NEW
    FROM COUNTY_DEMOG
    INNER JOIN VOTER_REG08 ON COUNTY_DEMOG.FIPS = VOTER_REG08.FIPS;";

$result = mysqli_query($link,$sql);
if ($result != 0) {
    header("Content-type: text/xml");
    echo '<shapes>';

    $num_results = mysqli_num_rows($result);
    for ($i=0;$i<$num_results;$i++) {
        $row = mysqli_fetch_array($result);
        $fips = $row['FIPS'];
        $name = $row['NAME'];
        $d_nov = $row['D_NOV'];    $d_apr = $row['D_APR'];
        $r_nov = $row['R_NOV'];    $r_apr = $row['R_APR'];
        $o_nov = $row['O_NOV'];    $o_apr = $row['O_APR'];

        echo '<poly name="' .$name. '" d_nov="' .$d_nov. '" d_apr="' .$d_apr. '"
          r_nov="' .$r_nov. '" r_apr="' .$r_apr. '"
          o_nov="' .$o_nov. '" o_apr="' .$o_apr. '">';

        $sql = "SELECT X, Y FROM COUNTY_GEOM WHERE FIPS='" .$fips. "' ORDER BY VID;";

        $coords = mysqli_query($link, $sql);
        if ($coords != 0) {
            $num_coords = mysqli_num_rows($coords);
              for ($j=0;$j<$num_coords;$j++) {
              $rec = mysqli_fetch_array($coords);
              $x = $rec['X'];
              $y = $rec['Y'];
              echo '<v x="' .$x. '" y="' .$y. '" />';
            }
        }

        echo '</poly>';
    }

    echo '</shapes>';
}
The basic idea behind this program is to query the voter_reg_08 table to get a list of all the counties along with their voter registration information. A for loop is used to step through this list one county at a time. Within the loop, the county's name and registration figures are echoed as an XML element called poly.
Also within that loop, another bit of SQL is used to query the county_geom table for the coordinates of the vertices that form the geometry of the county being processed by the loop. A second loop is then embedded within the first to cycle through the records in the coordinate list. These coordinates are then echoed as an XML element called v (short for vertex) which is a child element of the parent poly element.
After the internal loop is complete, the poly element is closed with its end tag. Likewise, after the external loop is complete, the root element (shapes) is closed with its end tag.
As for the JavaScript code used for the page, I recommend that you view its source to follow along with this discussion. Just as the PHP script used two loops to produce the XML output, the function embedded in the ajax() statement uses two each() to read the XML. The first loop works through all of the elements in the XML packet with the tag name poly. Within the loop, the raw voter counts are obtained for the current county and converted to percentages. From those percentages, the margin separating the two major parties is computed and passed to a function called get_color(), which returns a hexadecimal color value that varies depending on the margin (dark blue for heavily Democratic counties, dark red for heavily Republican counties, etc.).
Note
I used ColorBrewer to obtain the color values.
After a bit of code concerned with constructing the tables below the maps, the coordinates for the current county are obtained by getting all of the child elements of the parent poly element (referenced by the rec variable) with the tag name v. Recall that a Polygon is constructed from an array of LatLng objects, so a new empty array variable called pts is created. This array variable is then populated by a second loop that steps through all of the v elements. For each vertex, the x and y values are obtained and used to create a new LatLng object. That LatLng object is then added to the pts array.
After the vertex loop, a new Polygon is created from the pts array, assigned the appropriate color for that county and added to the map. A function named handle_clicks() is also called to pop up an info window for the polygon when it is clicked. This function is complicated a bit by the fact that the page contains two maps, something you won't have to worry about unless you create a similar two-map page.
That concludes this part of the lesson on the topic of reading data from a relational database and incorporating it into a mashup. Earlier in the course we saw how form elements can be used to further develop your map's user interface. Now that we've covered the use of relational databases, let's revisit the use of form elements, this time in a relational database context.