Setting up the City Builder from Scratch
To give you an idea of how such a scene can be set up, we will go through a series of steps to recreate the City Builder scene. All the resources you need are already inside the “City Builder” folder.
- Create a new scene in the City Builder folder, and name it “My City Builder”
- Navigate to the “Prefabs” sub-folder and drag the “Plane” prefab into the scene. Reset its position to (64,-0.2,0) and change its scale to (50,1,50). Notice that the plane object already has a Box Collider attached to it.
- Select the Main Camera GameObject and set its position to (65,85,-85) and orientation to (74,0,0)
- Drag the “Roads” prefab onto the scene and set its position to (42,1.1,-17). This is a rather detailed object, with many child objects under it. If you expand this GameObject and examine its children, you will notice that some of them have the tag “Street”, and some of them do not. We use these tags later when we want to decide whether the building, we want to add to the city is being placed on the street or not. More precisely, if the building object that is following our mouse pointer collides with another object with either the tag “Street” or “Building” it is considered an illegal location.
 Credit: ChoroPhronesis
 - Drag the “Car” Prefab onto the scene and set its position to (59.5,0,-1.2). If you look at the inspector panel of the car GameObject you have just added to your scene, you will notice that it has a script attached to it called “Car AI”. This script utilizes the AI engine of Unity which implements a path finding algorithm, so the car moves through several “Patrol points”. These points are not assigned yet, but we will do them shortly. Apart from this script, the Car object also has a component called “Nav Mesh Agent”. This is a native unity component as part of its AI engine that marks a GameObject as a navigatable agent. Since we want the car to act as such an agent, we need to have this component added it. There are many parameters that you can set for the Nav Mesh Agent including the movement and turn speed, acceleration, obstacle avoidance, etc. for more information watch NavMesh Agent - Unity Official Tutorials.
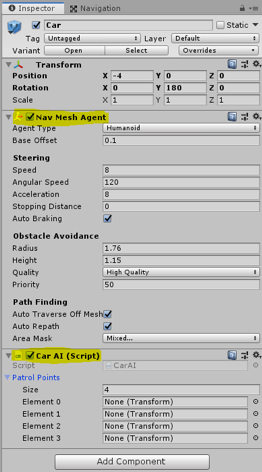 Credit: ChoroPhronesis
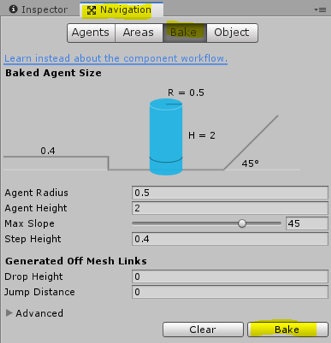
 - Before adding the patrol Points to the Car AI script, we must tell unity which parts of our scene are “walkable” by the Nav Mesh Agent. To do this, go to the “Window” menu on top of the Unity editor, Select AI -> Navigation.
-
A new panel called Navigation will be opened on the right side of the editor. Select the “Bake” tab on this panel and click on the Bake button.
 Credit: ChoroPhronesis
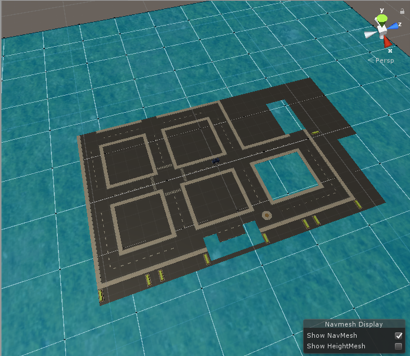
After a few seconds your scene should look like this:
 Credit: ChoroPhronesis
 -
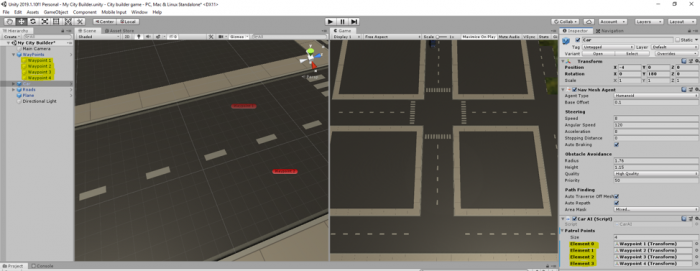
Navigate to the Prefabs folder again and drag the “Waypoints” prefab onto the scene, and set its position to (62.5,0,-70.2). This GameObject has four children, where each act as a patrol point for our Car AI script. You can inspect the position of each these points in the scene. Now, if we select our Car GameObject again, and look at its properties in the inspector menu, we can add patrol points to the Car AI script. Simply drag each waypoint (children of the WayPoint object named Waypoint 1 to 4) to each element (0 to 3) place in the Car AI script.
 Credit: ChoroPhronesis
 - Hit play, and you should have your car move from one Patrol Point to the next over a loop. As an exercise (not evaluated), change the placement of the Waypoints in the scene so the car goes around a block.
-
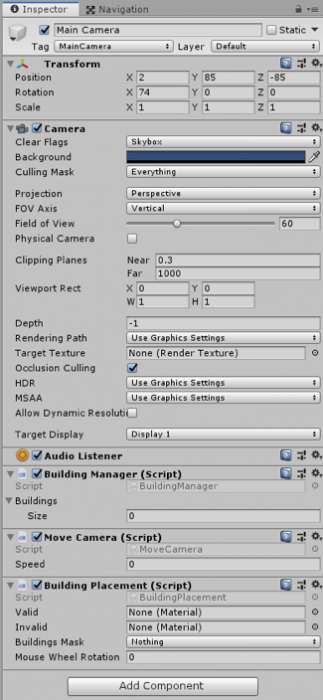
Inside the City Builder folder, navigate to the “Scripts” subfolder. Drag the “BuildingManager”, “BuildingPlacement”, and “MoveCamera” scripts onto the Main Camera GameObject in your scene.
 Credit: ChoroPhronesis
 -
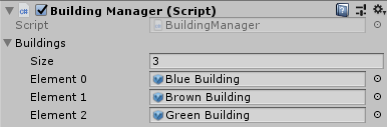
Most of our functionalities are covered by these three scripts, so we will briefly go over them. The “Building Manager” script takes care of generating the menu on the left side of the screen and adding buttons to it to the number of buildings we want to have in our menu. You can see that this script has a property called “Buildings” in the editor. If you expand this option, you will see a placeholder for “Size”. Change this value to 3. This means that we want our menu to hold three buttons each representing a different building, so we can select them and place them in the city. When you change the value to 3, you will notice that three new empty placeholders are shown. Go to the Prefabs subfolder again, and drag the Blue, Brown, and Green building prefabs to each of those placeholders.
 Credit: ChoroPhronesis
Now to the number of buildings we have added to this list, we will have buttons with the same name as the building prefabs generated for us. Clicking on each button will inform the “Building Placement” Script, which building to generate and attach to the mouse pointer. For more detail, please examine the fully commented script of “Building Manager”.
-
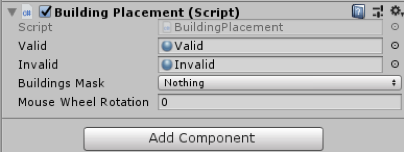
Next, we will examine the “Building Placement” script. There are three properties for this script in the editor that we need to change. First, we need to add different materials for the “base” of the buildings to indicate illegal and legal positions of the building by means of color. Navigate to the “Materials” subfolder and drag the “Valid” material to its corresponding placeholder in the inspector panel. Do the same for the “Invalid”. Once the “Building Manager” script informs the “Building Placement” script which building is requested to be generated, the “Building Placement” script will instantiate (create a copy on the fly) that building and will attach it to the position of the mouse pointer. Furthermore, it will use the valid and invalid materials we’ve just added to the component, so it can change the color of the base of the buildings to red when they collide with buildings and streets (i.e. invalid), or otherwise blue (i.e. valid).
 Credit: ChoroPhronesis
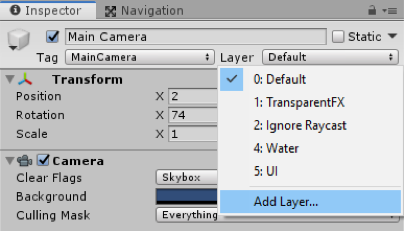
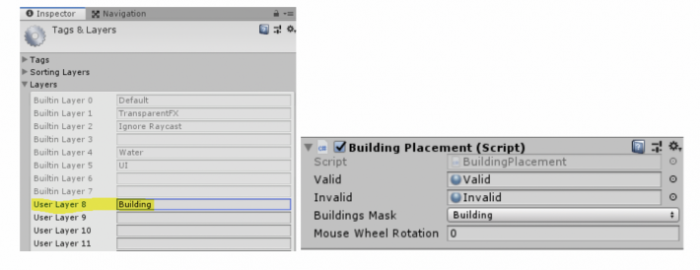
The “Building Placement” script is also monitoring the clicking of the mouse by the user. If there is a building attached to the mouse pointer and the position is legal and the user clicks on the mouse, it will place the building on that exact location and will disable its base (so it looks realistic when placed in the city). Notwithstanding, we also want the user to be able to click on a building that is already placed in the city so they can remove it. This means that our “Building Placement” implements a second check condition to see if no building is attached to the mouse pointer at the moment when the user clicks on the left mouse button. If that is the case, it also checks whether what the user has clicked on is actually a building or not. For this check, our script uses the “Building Mask” property, as shown in the editor. All the building prefabs we have added to the “Building Manager” script already belong to the “Building” layer. All we need to do is tell unity which layer to look for when the user clicks on objects in the city. As such, we need to create a new layer and set that as our Buildings Mask. For this, click on the “Layer” dropdown menu on top of this panel, and select “Add Layer”.
 Credit: ChoroPhronesis
Create a new layer called “Building” and set the Building Mask to that layer (this layer should already exist in your layer list, if not, create it).
 Credit: ChoroPhronesis
 -
The last property we need to set in the unity editor is related to the “Move Camera” script. We need to indicate a speed value for the movement of the camera, so we can move it using the arrow keys. Set this value to 15.
 Credit: ChoroPhronesis
 -
That is all you needed to do in order to set up a fully working City Builder scene with the assets that were provided to you. Press play and enjoy your creation. You should be able to move the camera around, place buildings in designated areas of the city and remove them. You may notice that we have not covered which script handles the color changing of the base of buildings when they are selected, as well as the function for deleting them. This is because, each of the building prefabs we added to the “Building Management” script has a script called “PlacableBuilding” that takes care of these functions, and we do not need to set anything up for them to work. However, in short, once a building that is already placed in the city is clicked on, the “Building Placement” script detects which exact building was clicked and triggers the “PlacableBuilding” script attached to it. This script will then change the base color of that building to purple, and if the user presses the “D” key, it will remove that building from the scene.
You can also watch this complete video tutorial on how to assemble this scene.
Video: CityBuilder Instructions (6:39) This video is not narrated.
Note: Although we did not directly go over the scripts line by line, I strongly recommend that you look at the scripts inside the “Scripts” subfolder to have a better understanding of how some of these functions are implemented in C#. All the scripts are fully commented for your convenience.