Syntax introduced: mouseX mouseY pmouseX pmouseY mouseClicked() keyPressed boolean else
Another fun thing to do is write programs that involve interactivity via the keyboard and the mouse. Processing stores the position of the cursor as long as the cursor is inside the display window. It stores that position inside the variables mouseX and mouseY. It also stores the most recent previous position of the cursor in the variables pmouseX and pmouseY. You can take advantage of this by telling your program to do various things depending on where the cursor is.
Example 4.0: Interactivity via the mouse
This program draws a square and circle to the screen. The circle follows the cursor around the display window. Both the circle and square change color depending on the cursor's position.
color bg = color(220, 220, 200);

void setup() {
background(bg);
size(200, 200);
}

void draw() {
strokeWeight(1);

fill(48, 107, 198, 100);
if (mouseX >= 100 && mouseY < 100) {
fill(242, 99, 42, 100);
}
if (mouseX < 100 && mouseY >= 100) {
fill(146, 21, 175, 100);
}
rect(40, 40, 40, 40);
ellipse(mouseX, mouseY, 50, 50);
}
 Below is a screencast of what this code does. The default fill color is blue, but if the cursor is in the upper right, the fill color is orange. If the cursor is in the lower left, the fill color is purple. Note that the position of the ellipse is assigned with mouseX and mouseY as its coordinates. Above is a snapshot of the display window. Since I have background() inside setup(), you can see the trail left behind by the circle (1:21).
Click here for a transcript of the video of Example 4.0.
Here's what this program does line by line. Up here, we're setting a color variable with these values. Here's the set-up block. First thing we do is tell it to make the background the color that we set up here. And we're telling it what size to make the display window. Here in the draw block, we're setting a default fill color. And then we have two if statements, one after another. The first one says that, if the cursor is greater than 100 and x and less than 100 and y, to make the fill this color. So this logical and here means that both of these have to be satisfied in order to execute this command. All right. Same down here, but we're just giving it different places to look for and then different fill color in case this is true. When you write if statements that aren't nested, that are separate from each other, you have to make sure that the test couldn't be satisfied by both of them at the same time because that will give you strange results that you're not expecting. Even if both of these turned out not to be true, we're going to draw this rectangle every time, and the ellipse is going to follow the mouse around. So let's see what it looks like when it's running. All right. So there's our rectangle. It doesn't move but it does change color depending on where the cursor is. The circle follows the mouse around and it changes color, just like we specified.
Example 4.1: More things you can do with the mouse
Below is another example program that uses mouseClicked(). mouseClicked() is a separate function written in its own block after draw(). In this program, clicking inside one of the squares will make the other square change color.
// Click within a square to change
// the color of the other square.

color value  = color(255, 0, 0);
color value2 = color(0, 255, 0);

void setup() {
   size(200,200);
   background(255);
}

void draw() {
  fill(value);
  rect(25, 25, 50, 50);
  fill(value2);
  rect(75, 75, 50, 50);
}

// The mouseClicked function is called after a mouse button is pressed
// and then released.
void mouseClicked() {
   //if the cursor is inside the top square and the color of the bottom
   //square is green . . .
   if(mouseX < 75 && mouseY < 75 && mouseX >25 && mouseY > 25
       && value2 == color(0,255,0)) {
      value2 = color(0, 255, 255);
   }

   // If the cursor is inside the top square and the color of the bottom
   // square is aqua . . .
    else if (mouseX < 75 && mouseY < 75 && mouseX > 25 && mouseY > 25
      && value2 == color(0, 255, 255)) {
      value2 = color(0,255,0);
    }

   //if the cursor is inside the bottom square and the color of the top
   //square is red . . .
   else if (mouseX < 125 && mouseY < 125 && mouseX > 75 && mouseY > 75
      && value == color(255, 0, 0)) {
      value = color(255, 0, 255);
   }

   //if the cursor is inside the bottom square and the color of the top
   //square is pink . . .
   else if (mouseX < 125 && mouseY < 125 && mouseX > 75 && mouseY > 75
      && value == color(255, 0, 255)){
      value = color(255, 0, 0);
   }

   //tell me if I haven't satisfied any of the above possibilities
   else {
      println("You have to click inside a square for something to happen!");
   }
}
Review of if - else if - else
You already saw an example of the if-else structure back in Lesson 3, but I'm going to repeat the explanation here anyway. Bare bones it looks like:
if
else if
else if
else if
else
inside the mouseClicked() function.
The way it works is like this:
if (test is true) {
   do something;
}

else if (first test was false, then test if this test is true and if it is) {
   do some other thing;
}
else if (first two tests were false, test this one) {
  do some other thing;
}

else if (first three tests were falst, test this one) {
  do some other thing;
}

else {
   none of the above possibilities were true, so do this by default;
}
You can write as many else ifs as you want to in between the first if and the final else. The final else does not include a parenthetical test because it is there to mop up. It will execute its commands by default when none of the tests above it have been satisfied.
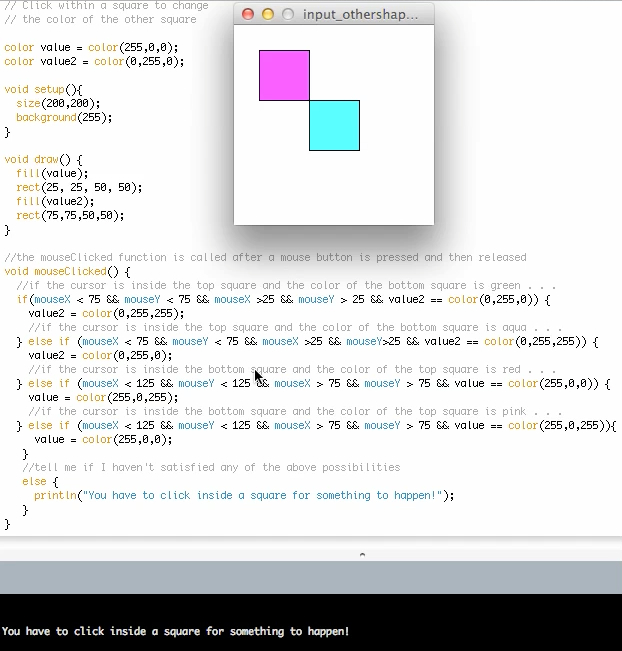
Screenshot of the text of the program and a still from the program running in which clicking the mouse in certain regions changes the fill color of the squares.
Below is a screencast of me walking you through the above program. I also explain the if, else if, else structure (2:18).Click here for a transcript of the Screencast.
So up here, at the top of the program, we are going to set two color variables and call them value and value 2. In the set-up block we set the size of the display window and we set the background to white. Inside the draw block, all we do is set the first fill value that we already specified up here and draw a square, and then we set another fill value that we specified up here and draw another square. That's all this will do. But in case we click the mouse inside the display window, that triggers this function to run. And this function has a kind of a complicated if statement series nestled inside it. So let's just run the program, and I can go through what this does. So the default is to plot these two squares with these colors. Now, if I click the mouse inside the display window, this first if statement tests to see whether the cursor is inside the top square. And if it is, it changes the color of the bottom square. That's actually what both of these two if statements take care of. So if I click in here, I'm toggling the color of the bottom square. The next two statements test whether the cursor has been clicked inside the bottom square. And if it has, then it changes the color of the top square. So clicking in here toggles the color of the top square. But what if I click the mouse some other place in the display window? It's not in either of these two squares. If I click it out here, then the string that I wrote tells me that I did something unexpected. So what these series of statements do is, this tests to see whether this is true, and if it is, it does this command and ignores everything else. But if it's not true, it sees this else if statement and it looks to see if this one is true. And if it is, it executes this command and ignores everything else. And that keeps going along. If it turns out that none of these are true, by default, it executes this command. So writing an else statement at the bottom of a series of ifs and else ifs is kind of a good fail-safe procedure because it can alert you that something has happened inside your function that you didn't cover with all your other possibilities.
Your turn to play around with mouse inputs:
Exercises
4.1 Draw a series of points in a trail following the mouse position.
4.2 Draw a shape that follows the mouse but does not leave a trail.
4.3 Draw a shape that follows the mouse but in reverse (reverse x and y or reverse the response to changes in directions of x and y)
4.4 Draw a shape that changes size depending on the mouse position.
4.5 Draw three different shapes of three different colors to the screen and have them move in an interesting relationship to the mouse when the mouse is moved, and have them change color when the mouse is clicked.