Important note: As the previous section, this section is provided for interest only. We recommend that you just read through it or skip over it completely and you can then loop back to it at the end of the lesson if you have free time or after the end of the class. If you decide to go through the steps yourself and find yourself stuck with some errors, please feel free to ask about them on the course forums but don't let such issues keep you from reading through the rest of the section and finishing the lesson.
Now that we know conda is installed and working, we will proceed to building your first conda package. Before we begin create a copy of your pip folder and rename it to conda. Delete the "dist" and "locationsfromwebservices.egg-info" folders. Creating a conda package will involve the following steps:
- Creating a meta.yaml file
- Creating a LICENSE file
- Creating a build.sh and bld.bat files
- Creating a setup.py file (we already created it while building the pip package)
- Building the project using conda-build
- Creating an account on Anaconda Cloud
- Uploading the project to Anaconda Cloud
We will walk through all these steps and create the necessary files and folders, just as we did for pip. For reference, as you are reading on, your final package folder and file structure should look like this for conda:
<yourinitialsdate>locationsfromwebservices
  ├── bld.bat
  ├── build.sh
  ├── LICENSE
  ├── meta.yaml
  ├── setup.py
  └── <yourinitialsdate>locationsfromwebservices
     ├── __init__.py
     ├── core_function.py
     ├── gui_main.py
     ├── gui_main.ui
     ├── gui_newshapefile.py
     ├── gui_newshapefile.ui
     └── main.py
The next step is to create a file named meta.yaml in the original (outer) <yourinitialsdate>locationsfromwebservices folder. You can create the file in any text editor. Make sure the name and extension match exactly. Type in the following into the file. Some of the elements will be left empty, but it is a good idea to use this template, to make sure all the elements you need are there:
package:
  name: <yourinitialsdate>locationsfromwebservicescomplete
  version: "1.0"

source:
  path: ./

requirements:
  build:
    - python
    - setuptools

  run:
    - python
    - pyqt

about:
  home: https://www.e-education.psu.edu/geog489/node/1867/
  license: BSD
  license_file: LICENSE
The package section of the file simply contains the package name and the version. The name can only contain lowercase letters and dashes.
The source sections point to the source of the data. In this case, we are pointing to the source on the local drive, but the source could be git or a compressed (.zip or .tar file), along with a few other options.
The requirements specify what tools are necessary to build the package, and the run section specifies what packages are necessary for running the package. Since we made the arcpy an optional part of the project we will not include it under the requirements. Setuptools is a package that helps with building Python projects. Please note that in conda the pyqt5 package is just called pyqt.
The about section provides more information about the package, such as the website it may be found on and license specification.
We set the license to BSD, which is a very permissive license type. Other licenses you may want to consider are GPL (General Public License) and LGPL (Lesser General Public License). A summary of these open source license types and a few others can be found at: choosealicense.com. It is a good idea to include a license with your package distribution. The name of the license file is specified in the about – license_file section, and it is typically named just license. You can download a sample license file here to be included with your distribution, or you can use the Binpress license generator and specify your own terms. Place the LICENSE file in the outer <yourinitialsdate>locationsfromwebservices folder where the meta.yaml file is located.
The version of the meta.yaml file we created is rather simple. There are other options you can set if necessary. Find the complete guide here.
Now we also need to create two build script files – build.sh and bld.bat. The .bat file works in the Windows environment, but, if the project is built on a Linux or a macOS environment (unlikely for arcpy type projects), we need the build.sh file as well.
Type in the following content into the bld.bat file:
"%PYTHON%" setup.py install
if errorlevel 1 exit 1
Here is the content for the build.sh file:
$PYTHON setup.py install
As you may have gathered from the batch files we created, the setup.py file is required by conda. Since we created it in setting up the pip package we do not need to recreate it here – just copy it from its location in your pip folder to the <yourinitialsdate>locationsfromwebservices folder within your conda folder.
Copy the LICENSE file into the <yourinitialsdate>locationsfromwebservices folder as well.
Now that we have the package set up, we will use the Python Command Prompt to build the package. Make sure you are in the folder that contains the outer <yourinitialsdate>locationsfromwebservices and run the following command:
conda-build <yourinitialsdate>locationsfromwebservices
After a long process and verbose output, towards the end you should see a line that gives you the command to upload your package to anaconda. More on this later. For now, just look at this output and note where the compressed tar.bz2 archive with your package has been created:
# If you want to upload package(s) to anaconda.org later, type:

anaconda upload c:\Users\<user name>\AppData\Local\ESRI\conda\envs\arcgispro-py3-clone\conda-bld\win-64\<yourinitialsdate>locationsfromwebservicescomplete-1.0-py35hc17e43c_0.tar.bz2
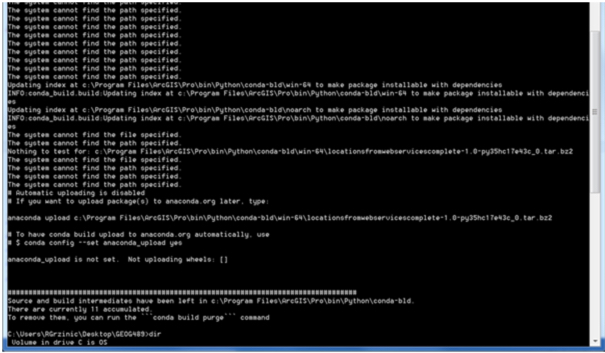
If you were watching the conda-build output very closely you might have seen a couple of errors displaying "The system cannot find the path specified" for some Visual Studio tools – that is okay and you do not need to be concerned by those.
That brings us to the next section of the lesson where we discuss Anaconda. Leave the Python Command Prompt window open, as we will be using it shortly to upload the package to the Anaconda Cloud.