1.2.2 Configuring an App Based on a Template (Instant Apps)
Now let's see how a similar app can be built using one of the newer Instant Apps templates. (You can skip steps 1-5 if you already created and saved a PSU Buildings web map in the previous section.)
- In your Penn State AGOL organizational account, open a new Map, sticking with the current Map Viewer.
- Add the campus building data as a layer by clicking Add > Web service and pasting this ArcGIS Server map service:
https://mapservices.pasda.psu.edu/server/rest/services/pasda/PSU_Campus/... - Zoom to the central part of campus and style the layer as desired.
- Save the map with the name PSU Buildings. Be sure to add some tags that would aid in discovering the map (e.g., Penn State, buildings) and optionally enter a summary.
- Click Share map, then check the Everyone box to ensure your map is viewable to the public.
- Click Create app. (It's the button below Share map.)
You'll be presented with a gallery of app templates on which you can base your own app. Browse the templates to get a sense of the variety of apps available. Note that how your map will look within a given template can be previewed by clicking on the desired template and selecting Preview.
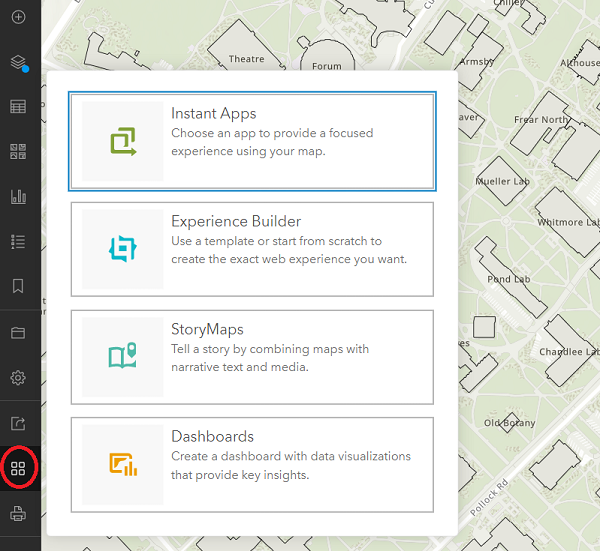 Figure 1.14 Creating an Instant App
We're going to create a Sidebar application and configure it so that users can search for buildings by name. The Basic template would be appropriate too, though it doesn't appear to offer a way of displaying the usage instructions that we showed through a splash screen in the previous app. - Locate the Sidebar template and click Choose.
- Assign a title to the app (e.g., Penn State Main Campus Building Finder Instant App), add some tags that would aid in discovering the app (e.g., Penn State, buildings), optionally enter a summary, then click Create App. After a few moments, you'll be presented with a page for Configuring the app. The app configuration process defaults to an Express mode, which presents a set of essential settings to consider in five categories.
If it's your first time with Instant Apps, you'll be presented with a dialog of tips before you can begin configuring. - Read over the tips, clicking Next to move from one to the next, then Done when you've read the last tip.
- Go to the Step 1 settings and note that the Map is already selected. This makes sense as you just chose to create an app from the Map Viewer, but you'd have the ability here to select a different map if you wanted.
- Click Step 2. About to move on to Step 2, which involves providing info that will help the user understand the purpose behind your app.
- Confirm the Header is toggled on and set the App title to Penn State Main Campus Building Finder.
The Step 2 settings offer one way to provide user instructions through an Introduction window. This adds an I icon to the map that the user can click on to get info on the map's purpose and/or instructions. Unfortunately, it can't be set to open when the app loads. There is another option that I like a bit better, so leave the Introduction panel toggled off. - Click Next to move on to Step 3.
- A legend is probably not necessary in this scenario, so toggle the Legend option off.
- Displaying info on selected buildings in a side panel is a nice feature, so leave the Pop-up panel toggled on.
- The Details panel should be enabled by default. It is the other way to provide user instructions. Edit its content to appear as follows:
Welcome! Enter a text string in the search box to find all buildings containing your search string.
Specify that it should also be open by setting the Select which panel to open at start option (top of the Step 3 settings) to Details. - Click Next again to move on to Step 4, which presents a number of interactivity settings. Take a moment to look over the available options, clicking on their info buttons if you're unsure what they mean.
The goal of this app is to provide the user with the ability to find a building by name, so we want the Search widget to be enabled. (It is by default.) However, its default behavior is to pass the entered text to the ArcGIS World Geocoding Service, which is not what we're looking for. Let's configure the app to use the buildings layer from the map as a Search source. - Under the ArcGIS World Geocoding Service source, click Add a source. You should be presented with options for specifying a layer source from a URL or from the map.
- Choose Map. In this case, the map contains just a single layer, which you should see listed.
- Click on that buildings layer to select it.
- Set the Layer Name to PSU Campus Buildings.
- We could set the Placeholder text to something more context-specific, but it would only appear if we were going to allow the user to select from multiple search sources (which we won't be doing). So leave this setting unchanged.
- From the Search field dropdown list, select BLDG_NAME_ . Note that you could add other fields to search as well, if desired.
- Click Done to complete the addition of the new source for the Search widget. You should now see both the geocoding service and the buildings listed as sources.
- As we don't really need to support geocoding, click on the three dots next to the Geocoding Service source, then click Delete.
- Finally, confirm that the Search open at start option is toggled on.
- Click Next to move on to the last group of settings, which control the theme and layout of the app's widgets. We'll leave these settings on their defaults, but note that we could choose a Light or Dark theme and move the widgets (a Home button, Zoom controls, the Search widget, and a Scalebar widget) to different positions.
- Click Publish and then Confirm to complete the configuration of the app.
After a few moments, you should be presented with a dialog containing some sharing options. Note that the app is not shared with the public by default. You have the ability to change that here if you wish. You'll also see buttons for sharing through social media and code that you could copy if you wanted to embed the app in a webpage like we embedded a web map earlier in the lesson.
- Click Launch to have a look at your app as an end user would see it.
The Details panel should be open on load, showing the user instructions.
- Try testing the search box (e.g., for Pattee Library) to confirm that it's working properly.
Now that you've seen how to quickly put together an app using a couple of different configurable templates, let's have a look at an option that provides a bit more flexibility.