2.1 Understanding 3D Features
- Open UniversityParkCampus_Lesson6 Project in ArcGIS Pro.
-
Click the Project tab. Select Save As.
 Credit: 2016 ArcGIS
 - In the Projects Folder (C:\Users\YOURUSER\Documents\ArcGIS\Projects\ UniversityParkCampus), Save Project as UniversityParkCampus_Lesson6_Shadow.
- Go back to the Map view.
-
Make sure the following layers are checked in the 3D Layers Content Pane: Up_Roof_Segments, Building_Footprints., and Topography.
Note: What you have created in Lesson 5 as a 3D building, is an extrusion from attribute. It means that you extruded a 2D polygon based on a ‘Z’ attribute you extracted from LiDAR Data or DSM or any other sources. Having an extruded building, does not make your features with 3D geometry. It is just a 3D visualization of your 2D data. For many 3D spatial Analysis, you need 3D features or Multipatch features.
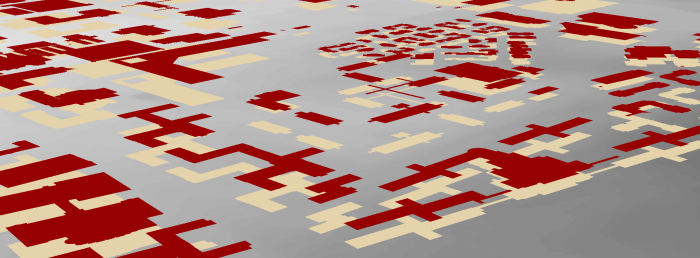
3D features are features with 3D geometry. 3D features can be displayed without the need to draping them over a surface like DEM. They already have Z information in their geometry. In the image below you can see how 2D features (Crème color) are dependent on a surface for display in a 3D scene, whereas 3D features (Red color) have z information and are located in the elevation they belong to without extrusion.
 Credit: ChoroPhronesis Lab
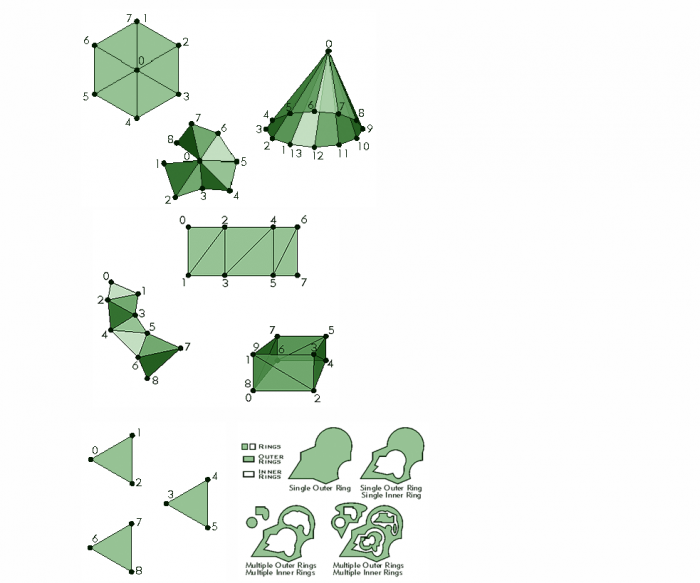
Multipatch features are 3D objects that represent a collection of patches to present boundary (or outer surface) of a 3D feature. Multipatches can be 3D surfaces or 3D solids (volumes).
Also, the icon next to a multipatch feature is a 3D feature. The image below shows the multipatch icon. For now the only supported type of features for multipatch layers are polygons. Points and lines can be converted to 3D features but not multipatch features.
 Credit: 2016 ArcGIS
 - For ‘Sun Shadow Analysis’ you need multipatch features. Multipatch features for buildings are provided in Lesson6.gdb.
-
On the top ribbon, click Map and select Add Data. Locate Lesson6.gdb and select ‘Building_MP_Campus’.
Note: The reason that you will work on the smaller part of campus for this 3D spatial analysis is that your computer might not be able to handle bigger data. The multipatch layer for bigger areas of campus are also provided, in case you would like to carry on more analysis in your free time (Buildings_MP).
-
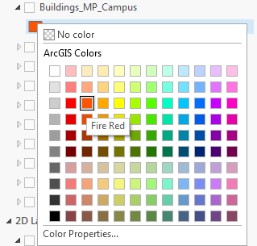
Right click on the symbol under layers to modify the color. Change the ‘Building_MP _Campus’ to Fire Red.
 Credit: 2016 ArcGIS
 -
Right-click on Building_MP_Campus and select Properties. Select Elevation from the menu. Set the features are, Relative to the ground. Click Ok.
 Credit: 2019 ArcGIS
 -
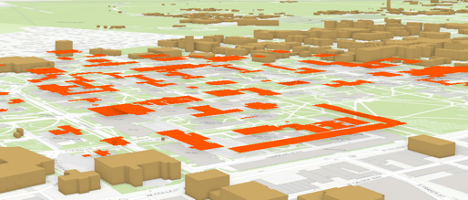
Uncheck UP_Roof_Segments. Now you can see what the multipatch surfaces look like. Navigate by holding down the scroll wheel or the V key and drag the pointer to tilt and rotate the scene.
 Credit: ChoroPhronesis Lab
Test Your Knowledge
- Uncheck this layer and check back the UP_Roof_Segments.